


 Today I'm having all kinds of fun playing with DAZ 3D's cycloramas ... these are actually supplied free when you download the core program -- but I honestly never got around to working with them, so although I've had them for eons, I just never loaded them up and played with them! Suffice to say ... they're loads of fun. and a hulluva lot easier on the computer than working with a full-on environment.
Just reiterating here what I wrote t'other day about the difference between environments and cycloramas, for benefit of folks who're touching down on this post and not the other one: The difference between a cyclorama and a proper 3D environment is the difference between a stage and the real world. On a stage you have a front-projection screen on which things can be (!) projected, and you stand set dressing in front of it. The effect can be fantastic, and extremely believable. The real world is ... 3D everything. Phone poles, trashcans, litter, broken-down garden fences ... the lot. Nothing projected, no two dimensional set dressing that the stagehands roll around!
So, to get this shot you're working with a number of models and lights:
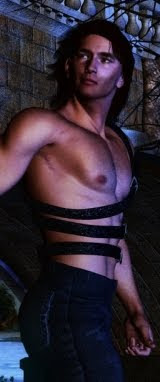
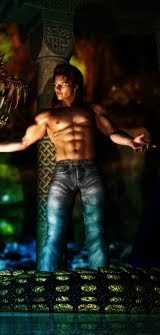
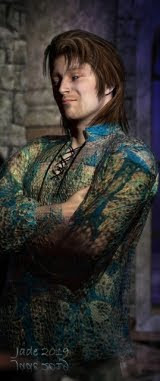
Michael 4
Millennium Horse
High-rez skin map on Michael 4
Pinto texture map on the horse
Kirtle on Michael 4, set to red
Leg wraps on Michael 4
Mario's hair on Michael 4, set to dak brown
The DAZ Environmnents Cyclorama: Wilds
Two grass-like props for the foreground
Four spotlights to simulate twilight
Stock pose "head down" for the horse
Stock pose "duellist: defeated" for Mike
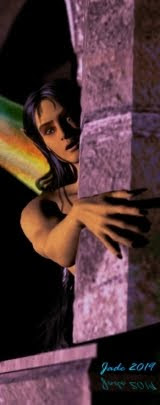
...and then the fun begins, because NOTHING that you import as a "stock" anything will do, to get this shot! Trust me, you'll get something that looks about as 2D and plasticky-fake as anything you ever saw in 3D:

Like I said, having imported all the odds and ends, then the fun begins! And it's real fun, if you have even half an idea of what you're doing ... bear with me!
The first thing to look at is the relative position of the models. Right now, if it looks like Mike is levitating about three feet off the ground ... he is! What you do is use your VIEWS -- left, right, front, back. This shows you where his spine is, and where the horse's hooves are, and where the ground plane is.
Get the whole lot leveled up, then move Mike around on the y-rotation tool, till you get a nice angle on the prone sprawl of his beautiful young limbs. So far, so good. Render one -- to make sure none of his body parts (like his heels, or the back of his head!) have sunk into the ground plane. Looking good? Horse in the right place?
You can pose and re-re-repose the characters to get a fantastic effect. Don't forget that the Millennium Horse has just as many pose "nodes" and controls as Michael 4. Or is it more? Whatever you do, don't opt for the stock pose. It might as well be a rocking horse ... wooden is the word that leaps to mind.
Stock poses are to get you into the ballpark -- saves you a whale of a lot of fiddling about. The trick is to start with them, not finish with them! Incidentally, you can buy packs of poses from DAZ, which will get you into a whole lot more ballparks! Like so:

With the figures posed and everything positioned just right ... now it's time to think about the lights. You can also buy packages of stock lights! DAZ also supplies some lighting sets, which will get you off to a start ... but there's downsides.
The lights that are packaged along with the Cyclorama Wilds goodies are dim. I mean, we're talking seriously dark. Your "raw" render will come out looking something like this:

This render as a look of first-light or last-light -- which is perfect, if this is what you want. But if you needed (or wanted) a full-daylight look, you have a problem. By far the easiest fix is to finish the artwork with the lights just as they are, and then tweak it in your imaging program (more about that in a second).
The one factor that will throw you a few times in the early days is that you can't seem to get shadows, no matter what you do. Mike just levitates there. Then it dawns on you that all lights have a default value of not casting shadows ... you have to turn this ON before you'll get shadows. They do this because adding "Deep Shadow Maps" makes rendering take a lot longer. Every light which has its shadow characteristics turned on, takes an extra "pass" through the rendering software. Even on a fast system, the finished art, today, took about 45 seconds. Slower systems could easily take five minutes.
So leave the shadows turned OFF till you're happy with the props and poses and colors and angle ... the whole shebang. Then turn ON the shadows and render one.

You're still going to get a dark picture (and you can fix this in DAZ without doing anything clever with the tricks of an imaging program -- but I ain't going there in this post ... another time!) so the first thing you'll want to do is make some adjustments.
My favorite program for this work is Irfanview. It's free, powerful, and easy ... nothing to pay and virtually nothing to learn! This is the one I use all the time.
You want to gamma the picture way up ... then turn up the contrast and turn down the color saturation. Jiggle these values till you see what you want, and save it!
Then I copied the work into Serif X3 to add the border and signature, and I was, uh, done! And it's a lovely picture. Makes you think of, "Brego, get me the hell out of here!"
Jade, 2 January