Saturday, August 10, 2024

Watching old artwork "pop!" in Photoshop. Nice!


The Barbarian was rendered original in Lux (which doesn't even exist anymore); the drowned city, the house by the sea, and the spacecraft were done in Bryce 7 Pro (!); Mr. Lace Shirt and the grieving warrior are raytraces. I've just spent a fascinating hour or so, running them through Photoshop. Nice! It's amazing to see the old work "pop" when it's given the proper treatment, which is why I keep posting selections of the old stuff. Second Life. The truth is, 12 and 14 years ago, I didn't do justice to the old renders. Many of them -- ten years old and more now -- are still delicious images even today. 


Having said all that, my fingers are itching to start Studio again, and get back into rendering. I haven't done this in waaaay over two years, and I'm trusting to "muscle memory" to get me going again, because I'm racking my brains for the details, and, um, it's been so long, I'm hazy, lol.


I did need to generate some book covers a few weeks ago, and I had intended to do a lot of the work in DAZ and Iray, but the way things worked out, time-wise, I ended up doing the whole thing in Photoshop. The author was delighted with the result, and now it's over to the publisher to decide which of these (if any) will jacket the book when it's published in a year or two...


See? I can still do this, lol, I haven't forgotten how! I just have gone somewhat hazy on the finer points of working with Iray, and figuring out how to get Studio to raytrace ... because I really, really, want to PAINT. Here's the thing of it: start out with a raytrace, and you can paint to your heart's content and end up with something beautiful. Start with an Iray render, and you really can't: it's like painting over a photo, and when you add digital painting to a photo, it looks soooo fake. You don't get "hybrid art," you get a bit of a mess, actually. So ... I want to paint, which means I need to be raytracing.


Luckily, the raytrace texture sets have been supplied for the props I've bought in the last six or so years, with the exception of the Iray shaders, which are (duh) Iray specific. But the thing is, I used to make my own texture sets (call them shaders) for the raytrace engine, and it was a lot of fun. So -- yes. It's just a question of getting the time away from a blizzard of work. I'm working on it.

More soon. I have some news, which I'm not yet at liberty to share, but it should be fine to share it next week. Hope to be back here sooner than that, because I'm aching to get back to art.

Friday, August 9, 2024

Life meets art in Photoshop ... a little PS magic


It was "Happy New Camera" time a short while ago. I blogged about it  here, (on my personal blog), but I haven't had the chance to post arty photos to this blog since I took the Canon EOS out of the box. I've been busy. Very, very busy. Am grabbing an opportunity to post a few arty pictures here -- I have about fifteen minutes going spare, so let's make the most of them!

Each of these shots is about 80% photograph and 20% Photoshop. Even with the Canon, the magic doesn't happen until it's been through the process to make it "pop." And of course, that process also works for images captured by the Lumix superzoom "bridge" camera that's been my workhorse for a long time now...


...it's just waaay harder trying to squeeze the quality out of the overall-soft images from a 1200mm zoom lens. Half of the Canon magic is that the landscapes are captured with an 18-45mm lens, and they're consequently that much crisper. Add Photoshop jiggery-pokery, and here we are!


Back soon with more ... and with some news! Got a smile on my face today, because -- 😀


Thursday, August 8, 2024

Touching base ... with apologies to J.R.R. ...


Just a ditty to keep contact with this blog while there isn't much to talk about. Yeees, the art started its life in Bing, but I promptly cut it up, rearranged it, repainted it, did a lot of things to it. And yes, I would have painted from scratch, if I had the whole day to spend on this (I don't). And yes, I would have rendered it in CG, if I had a spare hundred bucks to spend on the props (I don't). So we'll embrace the concept of compromise: AI + digital painting.  In this instance, AI is saving me a lot of time and money, and it is being used as a tool, with reason. Argh.


Life has been interesting in the last month. I had intended to invest a tonne of time in art and writing ... nope. Not going to happen. I have done a whale of a lot of editing, yes. (I'm working with the well-known Sherlock Holmes novelist, Mike Adamson). And my romance with my new camera continues unabated. I've entered the wonderful world of Canon EOS technology, and it's amazing. Loving it. I've actually written (yes, written. Don't faint) an invitation guest post for the ANALOG blog (because Firegrounds is in the latest issue, which is out about now). But aside from this, Real Life has been biting so hard, so deep, that any creative juices that might have been flowing in June were quite literally turned off at the taps. Okay ... let's start yet again, right? Right. Never say die, and all that.


So, let's see if I can't get the reins back between my hands -- and possibly the bit between my teeth, while we're dabbling in metaphors. 


And now the aforesaid ditty --


With Apologies to J.R.R. ...


I sit beside the fire and knit
And all the sweaters that don't fit --
All the scarves that fall in mud --
Are made right here, although I could
Be off and roaming 'round the Shire!
But I'm afraid that something dire
Will happen if I leave this hill,
So here I am, and I'll be still:
Comfy by my hearth I'll sit...
And dream adventures. While I knit.

Wednesday, June 19, 2024

Merrie Yuletide!


A Yuletide Blessing

Long is the night and the stars are bright;
Cold is the wind, and sighing.
Bare are the trees -- there's snow in the breeze;
Silent, the land... but not dying:
Sleep is the cure when one must endure --
Lord, knight, lady and fool:
Here is the night when back comes the light:
Blessed be all, upon Yule.


ooOOooOOooOOooOOooOOoo


Merrie Yuletide to all!


This is such a bittersweet festival to me, because the Winter Solstice also marks the anniversary of Mom's passing. And this year, it's more significant than ever. I can't believe that it's been seven years since she passed over. Seven years. She was born just short of the Winter Solstice in the northern hemisphere, and she passed on the very eve of Yule, in the south. I told her story here, so in this post I'll just say that I miss her, and always will. Wherever you are, Mom, I hope you're happy.


This year, we decided to celebrate the festival properly, with a small tree and some little gifts, and a midwinter feast. Nothing vastly elaborate, but something to break up the winter, which is turning out to be very cold indeed. Most of the continent is in the grip of an acutely chilly snap -- temperatures well below zero in the early morning, as far north as Queensland --


Not my photo!!! Borrowed from ABC News, to make my point, because (duh) I don't live in Qld. 


 --a nd there's really no answer to that, is there? Well, actually, there are several answers, but most of them involve jokes and the practise of banana bending, and there's not especially appropriate. So.


It's been a very long time indeed since I posted regularly to any blog. Life has been a bit rough, but I'll set down enough here to at least patch the gap a little. March and April saw me insanely busy. I did a stupendous amount of work on a new website, and as a consequence neglected others. It still isn't 100% complete, so I'm not (yet) going to link to it. Then in May, Dave and I got Covid a second time ... and everything sort of...ran off the rails. Long Covid is no joke, and there is no other explanation for what's going on with my health. I'm just exhausted, achy and confoozelated, a lot of the time. What can you say? I have eight tonnes of projects waiting to be tackled, and I don't have the energy, inspiration or creative zeal to sink my teeth into anything. No gumption. I hope this will change soon, but right now I'd have to say that the last four months or so have zipped past in a blur. It's not just this blog I've neglected ... I haven't posted a line to Facebook in almost as long!


In fact, Facebook is rather a sore spot for me at the moment. The AI driving it rubbed me the wrong way just once too often. I was getting time bans (which I believe they call Facebook Jail) for NOTHING I had done, including a lifetime ban from something they call the "FB Marketplace," for "contravening their community standards" -- which was a bloody good trick, because I have never in my life even seen this FB Marketplace thing, much less clicked a mouse on/in it. Huh. The last time, FB banned me for a day for something I did "yesterday," when I hadn't even looked at a ruddy computer for a week!!! I saw that cheerful little message when I turned on my phone to get the time at 7:05am, one morning in March ... and I walked away from Facebook. Should I go back? Maybe. Will I? Possibly. If I have a good enough reason.


Actually, the good enough reason is probably sitting under the Yuletree right now, in wrapping paper. A new camera. Canon. Mirrorless, pro-level, with two lenses -- a digital revamp of the old SLR tech of yesteryear. This time, as a new chapter in my patchwork career as a photographer opens up, I intend to go out there as a landscape photographer, because I'll be able to capture wide shots in the equivalent of 4K resolution. The Lumix superzoom bridge cameras I've been using for the last five or six years are dandy for what they are -- I wanted to go birding at the time, and did -- but they have their limitations. I actually quit photographing landscapes, because the 1200mm zoom generally yields wide shots of such low resolution, in poor-light conditions, the work looks more like finger-painting than photography!


So ... if this pans out (and I'll soon know), I shall be able to go back to signing off and watermarking as "Jen Downes Photography," which is a luxury/arrogance I haven't permitted myself in years now. We'll see. But one thing is for sure: this is going to be fun.


So ... Merrie Yuletide to all!


And for myself, I should be making resolutions for the new year that begins as we pass the midwinter solstice. Get past the Covid blues ... be more creative ... write my own stories, as well as "just" editing for Mike (which is also tremendously gratifying, and a lot of fun) ... try and find some genuine optimism for the future ... get out there with the new Canon mirrorless camera, and capture this state in Ultra HD. 


There. Goals to strive for as we go forward.  

Saturday, May 11, 2024

Second Life (again) ... more Photoshop magic


Photoshop brushes...


...and lighting effects

Dinokonda and reflections

Bryce sky, Photoshop birds and moon

Photoshop lens flare and lighting

Working through the old archives -- weeding out dead links from 2010 and 2011, deleting stubs that go nowhere, replacing artwork that has vanished -- I find myself wondering, where in the world did I get all that inspiration and energy, fourteen years ago? Twelve years ago?! It's true that sooo much has happened in the ensuing years, and I've pretty much had the enthusiasm knocked out of me, like everybody else in this world. But dang, looking back on the volume of the work I did, and the vision that drove it -- how did I manage all that?!

Jarrat and Stone, commanding NARC-Athena


Mike 4 struts his stuff

Even by by 2011, the images had enough substance that in 2024 Photoshop can process them through in about a minute each and give them a quality that's quite acceptable, and attractive, even today. I still have a lot of work to do in the early years ... I thought I was done, and then stumbled over a recurring issue that's taking some considerable tracking down and mending. But I'm getting there. Meanwhile...

Vickie 4 still looks good

What's next? Well, I'm editing at the moment. Turns out, this is a job I rather enjoy, especially working in cahoots with a writer of the calibre of Doctor Mike Adamson -- the well-known Sherlock Holmes novelist. A new chapter of life and/or career might be juiuuuust about to begin, and I have to say, I'm looking forward to what might happen here! So...

Bryce creation, for NARC Aphelion

...it's way past time to start up Studio and se if I can find my muse again. But not today. Tomorrow, perhaps. Or at the latest, next week -- thus spake the imperatrix of all procrastinators. Nudge, wink.

Friday, April 26, 2024

Okay -- I'll weigh in on this discssion with my ten cents' worth!

It rages on and on and on: AI, and what to do about it? Can it be stopped? Can artists even survive, in the teeth of AI? And it's not just art: Neil DeGrasse Tyson spoke somewhere, recently, with his opinion that AI is going to kill the whole Internet because fake content (news, celebrity videos, politics, obituaries, whatever) are flooding the whole webosphere to the point where, even now, no one knows what to believe. Fast forward a few years, and nobody will believe anything at all ... and that's kaput to the www. So ... what about AI as it appertains to ART, which is where I live and breathe? Here goes. This is my position, for what it's worth.

A LOOK AT PURE AI PICTURES
uploaded at A4/Letter size: please see

Have I used it? Yes. Why? To find out what it was about -- if it had any merit, and if I hated AI, at least I know what I hate, and why I hate it, right? Right. So, what did I learn?

The argument is that AI steals images and just collages them together ... to a large extent, rather true. Or at least, absolutely true of many (most?) of the current engines. So, AI "stealing" images off the internet is real, and rife ... and I hate this, but I also believe it's way too late to stop it now: I'm pretty sure the damage is done, no matter how angry professional artists get --

I read a looooong analysis article about this, late in 2023 (don't have a link, sorry -- just my memory), and there was this one artist going utterly ape about how the work of artists like Boris, Frazetta, Foss and so forth is being (their word) bastardized ... and they showed examples, AND you could see exactly how works from 1950 or 1980 had been subsumed and adapted. No, this shouldn't be allowed to happen, and I'm sure that -- eventually -- some government body somewhere is going to issue a law that stops it, within their sphere of influence. But remember, a US law ain't worth the proverbial hill o' beans in Russia, Thailand, Philippians, Malaysia, Pakistan, whatever. AI engines only have to move offshore, and the only thing the lawmakers could do would be to block US users from getting onto those servers. That legislation would take another five years, by which time, there'll be a workaround to fool the system. In the end ... no, I don't see legislation based on or around copyright having much effect. So, what's next?
 
Well, how about we try getting real about this. People have been using tracing paper and cameras to copy and manipulate photos and other paintings since it first dawned on someone to do this. AI collage work is not very much different from what we've all done for more years than one cares to remember. So,  for myself ... I don't see much real harm in AI art, so long as it's used as a hobby. But I have to believe it's only a matter of time before legions of artists who wouldn't know one end of a paintbrush from the other start to sell their pictures to unscrupulous (or simply ignorant!) publishers. In fact, what's already happening is that indie publishers are no longer commissioning cover art: they're going DIY, doing it themselves, with the result that people like self  -- who used to earn a few bucks at the boot end of the industry -- don't earn the proverbial brass farthing anymore.

(Yes, I used to be a cover artist, circa 2012 -- paid US$80 per cover, ooooh, aaaah, LOL. The indie publisher I worked for is closed now ... she died. There's no answer to that.)

So, in fact I have two "beefs" with AI art:

1) small-time artists like self are losing the tiny bit of cash flow we used to have -- which means a lot when you're disabled, and the creation of intellectual property if pretty much all you have to work with. And --

2) ...I'm a wee bit miffed, because I worked hundreds of hours to learn digital painting. Each "doodle" in the learning process took ten or twelve hours of work, and left me with pain in the hand, neck and spine ... the learning process was months long, also tortuously slow. Along comes AI, and blows away anything I could hope to do even after 500 hours of learning and practise. So, yeah, I could be pretty miffed if I took myself too seriously. Since it's so damned hard to learn digital painting, and the results tend to be so iffy for so long ... why would anybody ever bother to learn? Why wouldn't they just say, "Stuff it, I'm using AI." So, AI is just becoming another way via which creativity, and raw talent, are being buried. 


Now, having said all that ... I looked at numerous engines just for curiosity. Lexica, Night Cafe, Playground, Wombo, Dreamlike, Leonardo, a whole bunch more. By and large, the results I got on the FREE versions were far too poor to lure me in, and to get anything better -- they want big bucks in subscription fees. Noooo can do. You know what this means: small time artists are screwed on one side, and on the other, the owners of the AI engines are making megabucks. It could be said that they're getting rich off the backs of artists who're out of work now.

Bottom line: AI art is a great hobby, but it has a whole bunch of downsides. And that's my take on all this. If you have a different opinion -- that's fine and dandy. But I know how AI has already affected me, and my artistic future looks a little bit iffy, unless I turn this whole thing into a hobby. Which, I'll be totally honest, is all it is, anyway. Wasn't intended to be, just turned out that way, nudge, wink. So, what's all this digital painting about? Well, this:


...that's all me and my trusty Huion pen tablet. It's fun ... it's original,  creative ... and I'll be damned if I can figure out how to earn a buck with art, LOL. 


Friday, April 12, 2024

Story time: An Eagle's Flight

Yeeeees, there's a story burbling around in my feverish brain. I'm giving it the working title you see right here, An Eagle's Flight, but it could wind up called An Eagle Flies, or Where Eagles Fly, something along those lines. Don't hold me to the title you see here. But --


-- view this one full sized, and you'll see that this is the same character as the warrior on the cover. Call him Orel (at this point; the name might change later, along with the story title, though I doubt it for reasons that will shortly become clear). This is where the story begins: the reluctant hero, a man trying to outrun his own reputation ... thrice decorated by the Queen of Zarabia after extraordinary feats in battle. But those feats came at a dreadful price. Orel doesn't sleep, he dreams ... he feels possessed by the spirits of the warriors he's killed in the service of the Queen. She's old, and she dotes on him; she's like his grandmother, which is saying a lot. Orel is not native to this country. He's from the east, and arrived as an orphan boy just old enough to walk. He knew only his name. In the common tongue of  Vennia, Orel means eagle. Queen Isabeau gives him his ticket of leave from the regiment and a heavy purse, so  Orel can take his cats and his horses, take to the backroads in a Vardo like those belonging to his own people ... and find himself, get his heart and mind back into synch. But --


-- yep, it was always on the cards. He hasn't been on the road more than five or six months -- just long enough to watch springtime turn to autumn, and start to feel like a human being again (not because he's sleeping better or not dreaming, but because he and his ghosts have made their peace) -- when he runs into a couple of old comrades from the regiment. Gianna and Lynos have just left the service, and have taken soldiering work in the pay of a local thane, who advertised that he wanted border scouts. This was what they signed up for, but Count Radriq double-talked them with a binding contract ... they didn't read the fine print. Now, rather than just scouting up the source of trouble on the borderlands between Zarabia and neighbouring Kedd, Orel's old army mates are expected to root out the trouble. Since it's big trouble and they're massively outnumbered, they're up against a rather nasty wall. If they renege on the contract, they'll never get this work again, and it's all they're trained for. They're stuck, like flies in amber. So, when they meet Orel by chance, obviously they're recruiting. Or at the very least begging for help. The problem is this dude:


His name is Jevenni and he's baaaad. This Keddish warlord is building himself a rogue empire, and the bricks of its foundations are piracy, highway robbery, pillage, people-trafficking, whatever it takes. He has no scruples, and in this last twelve months has become the bane of the local thane's life. Count Radriq wants the Keddish land pirates gone, and he's holding Gianna and Lynos to the letter of a contract they signed too fast, in ignorance. Enter Orel. Help! So...


...they talk him into it, naturally enough. He's not the type to abandon friends in need. There's a couple of things he suggests: they must hire a good lawyer from Queen Isabeau's own staff, get him here, and have him reduce Count Radriq and his documentation to legal confetti. A lawyer from the capital will cost a great deal of money, but Gianna and Lynos know just where to get it. Jevenni has stolen wagonloads of valuables from the nobles of Count Radriq's fiefdom, and generous rewards have been posted. If they can recover even a tenth of what the warlord has taken, a lawyer from the city of Enashla will settle Radriq. Now...


 ...we launch into several episodic misadventures which are the meat-and-potatoes of true quest-fic, and it all leads eventually, inevitably, to this place: the land pirates' stronghold, in the ancient, ruined city of Ul-kedd-innu. To the horizon, the dead city lies smashed as a result of war, earthquake and plague more than a century in the past. Now, it is bleached bones and granite slabs. Jevenni has carved out his citadel in what used to be the palace and fortress, on the highest point, overlooking the fields of rubble-strewn desolation. According to everything his men divulge -- when captured and made drunk as lords -- he's so complacent, he doesn't post guards. In fact, it's a point of honour that he refuses to post guards: sentries and troops would only acknowledge that he is vulnerable in the heart of his own domain -- Jevenni would deny this to the death. With this information, Orel, the much-decorated veteran, favourite of the Her Serene Majesty, browbeats Count Radriq into providing a detachment from his household cavalry. But the force will hold back in the forest, waiting for a signal and letting the three specialists go in by stealth ... on the understanding that one man can pass where an army couldn't, and a specialist in creating havoc might bring the whole edifice tumbling down before the enemy knew it was happening. Under cover of darkness, in we go --


...long story short: subterfuge, stealth, swordfights and a liberal dash of strange sorcery, and by morning, the land pirates have scattered like roaches. Jevenni is extremely dead, and dawn finds Orel on the crenelated roof of the old fortress, right above the warlord's lair. Under the free, open sky, he is once again making peace with his ghosts and his father's old gods. The eagle -- for this is his name -- is trying very hard indeed to fly high and free, but will his flight carry him away from trouble, or right to the next battlefield? No one knows. Both Gianna and Lynos are injured, though not badly. They sent up the signal flare; the count's cavalry came in fast to scour the ruins for prisoners, and now Gianna and Lynos are only looking for the warlord's cache. They find it -- but in any case, they have actually fulfilled the contract. They no longer need a lawyer from Enashla. They take a portion of the spoils for themselves, as is only fair, and for himself, Orel takes enough to buy him the time, peace and quiet to begin again...


...and the story ends with a full-circle moment, right back where it began. At dawn, Orel hitches up his horses, stocks the Vardo, and is on the road again, headed away from anything remotely like a battlefield. In his ears, the ghosts' thin voices continue to whisper, but he has made his peace with some of them, and believes the others can be persuaded in time. The new sun is warm on his face, the open sky and moors lie ahead in the west, with snow-crowned mountains ringing a horizon so vast, it looks like the whole world. Now, perhaps the eagle can fly free after all. 


So ends this basic plot. In the writing, the details will change; names will change; a map will be sorted out, and the episodic parts will be tied down into a tight-knit structure. But this is more than enough to get my muse quite excited, and I think I'll enjoy writing this one. The art is not new. These are all 2019-2021 renders, featuring G8 Dae as Orel, G8 Rex as Lynos ... and I can't remember the G8 Female character who appears as Gianna, but she's in the DAZ library somewhere. That's the good old Millennium Horse, plus the DAZ Cat, many, many foliage and furniture props, and the old Gypsy Wagon from Renderosity. Everything here was rendered in Iray; a couple were painted comprehensively in Photoshop afterward. I was messing about with images and ended up, by chance, with these open in Irfanvew, in sequence ... the story just popped out at me! 


Sunday, April 7, 2024

Shaking hands with some old friends: remastering old, old images. Nice!

Michael 4 in Lux Render

Michael 4 in Lux Render -- done in 2012

2x M4, painted raytrace -- done in 2012

2x M4 ... Raytraced and Photoshopped

Still sorting through told old archives ... still playing with the ancient images in Photoshop because -- well, I don't have the energy at the moment to do much more. Right on cue, my health fell to pieces again. I'm trying to pick up the pieces, but I have to be honest and say that every time this happens, it gets harder to drag myself back up and start again. (Fair to say, also, that I ain't getting any younger. Sigh.) Having said that -- playing in Photoshop is a lot of fun, in lieu of doing fresh images.

The blog is starting to really come into shape now. There's just a little work left to do on the very, very early posts: dead links, Flash Player slideshows that haven't been supported in almost a decade, images that have vanished for one reason and another. The last thing I'll do on this job is (!) go through the retag everything. Honestly ... if you've tried to find something, anything, on this blog -- well, good luck with that! I can't find a dang thing myself! But the retagging is the last job of all, after which -- this whole blog is in very good shape indeed. 


Have been collaborating in a writing partnership lately -- which also has been keeping me busy and hence eating up what small amount of energy I have/had. But yes, I seem to have broken the drought, defeated the worst case of Writer's Block imaginable. I've collaborated on two stories and written another solo, for which I did this little piece, which appeared on my writing blog:


That's an amalgam of "odds and sods," pasted together, dropped into monochrome, colourized, and then painted with a tonne of snow. No it's not representational of an actual place in London. It's only supposed to be evocative of a time and a place: ice age hits Europe, and this is how London copes. Eep.

Last thing for today: I'm actually going to stand up here and defend the Generation 4 figures. I read something the other day where this one guy was utterly rubbishing Michael 4 and Victoria 4, as if nothing was good before about Genesis 5 or whatever. I'm going to stamp by foot and say that is utterly untrue. In fact, it's balderdash! Example:


That, there, is not Genesis anything. That is Victoria 4.2 in Iray, with a tiny bit of Photoshop enhancement after the fact. Actually LOOK at this --


Now, I designed that face and boy myself, using the Morphs++. The skinmap is Angel, with it's tattoos turned on. Shaders on the fingernails. Here is where it gets clever: that is a Genesis  Male hair prop she is wearing. Yep -- V4 can wear a G8M hairdo! The rest of it, though? If you're thinking it has to be Genesis -- nope. The great thing about M4 and V4 is that they are low-poly enough that older systems don't herniate, trying to render them.

Okay, off the soapbox. But I did want to say that. Done. More soon ... I do have many images in mind that I want to produce, and if/when I can find the energy and the time, I can't think of a better way to blow off a winter's evening. And winter is arriving rapidly in our neck of the woods. After the lingering heat of March, it's most welcome!

Tuesday, March 26, 2024

By request -- Tutorial: the easiest possible Photoshop landscape painting


All illustrations are uploaded
at full size -- you'll
need to view them at 1:1
to see them properly!

If you have a pen tablet and the skill to draw from scratch, any picture will start with a sketch. It’s the “proper” way to create a picture … but not too many people can actually draw! Even artists who can draw invariably start with photo references. The finished picture will, in almost every instance, be an amalgam of two or several photographs, where you have traced and combined desired elements from each and discarded the unwanted features.

Now, if you can draw, Step One is to start the project with at least a sharp idea in mind of what you’re trying to create. Once you have the image firm in the mind’s eye, Step Two is to gather the reference photos, get into your paint program (Photoshop is great for this … so is Krita), and start tracing off the individual elements that will go together to make your unique image.

But this little tutorial is going to assume you can’t draw –- or that you don’t have a pen tablet, and no immediate plans to buy one. There’s a hundred reasons for not having one, and not planning to buy one. This doesn’t mean you can’t create lovely images, using tools that are at your disposal, if you have any paint program, or Photoshop (yes, even Elements).

So, assuming you can’t draw from scratch, any image you create is always going to start with one or more photos … but rather than tracing off elements from them and combining them into a fresh sketch, here. we’re going to start simple. In this tutorial, we’ll take the simpler (faster) route, and create a painting that takes no drawing at all. None. I promise.

It all starts with at least one photograph! In a perfect world, it would be your own snapshot, but if you live in a desert and want to paint the ocean, or on the plains, and you want to paint mountains, you’ll have to find your base photograph(s) elsewhere. Ideally, these need to be free images. You don’t want to actually steal photos from photographers ― luckily, you don’t have to.

The Internet is teeming with freebie sites. There’s everything from the free wallpaper sites, which supply high quality images, to user-driven sites like pixabay.com … millions of free images that are posted by users via another form of visual social media. They’ve been made available for visitors. There is also Wikimedia, brim-full of non-copyright images. As a last resort, consider the actual gist of copyright law: a new work (literary or artistic) must be 15% different from the original that was its source. Well, even supposing you stole a photo from a photographer, the image you’ll be creating will be about 75% different, so if push came to shove … well, I leave the ethics of the art to you! I’m not here to talk ethics, rights and royalties!

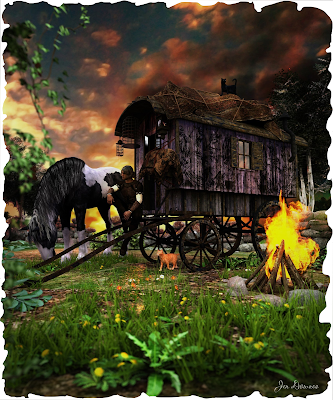
Found on Pixabay (free) ... it'll do for the base image!

So, this will be my picture. I’ve sized it to 1600 to 1067. Why? Two reasons. One: this is one of the standard aspect ratios for images. Two: it’s not very big, because it doesn’t have to be very big … because I’m not painting by hand on this one. If I were going to paint with the pen tablet, using Photoshop or Krita, I would set the size to at least 2500 pixels wide. You need the wiggle room to paint ― but there is a major downside to working with colossal images. Unless you have a supercomputer, the processor can struggle when the images get so big. Any hesitation, lag or delay between what your virtual brush is doing and what appears on-screen can be fatal when you’re painting. Rather paint on a smaller canvas and avoid strife. You’ll know the limitations or otherwise of your processor, so sizing the image at this stage is up to you.

Next, you’ll notice that the picture I’ve chosen is extremely flat. This means it has low contrast, no vivid colors, no real white or black zones, and a lot of chromatic grays. This is what you want, to start with. A flat picture will accept the abuse you’re going to heap onto it, when you come to apply all the filters, all that dodging and burning, the merging of layers with blend modes, the over-burning of the lens flare you’ll be adding. If you start out with a high-contrast image, it’ll be stark before you know it, mostly black and white. So, if your image is not soft and flat to begin with ― go into Photoshop (or whatever), and deliberately make it flat and soft.

(This tutorial assumes that you know how to do this, in whatever paint or photo program you’re using. In Photoshop, for instance, you want to go Enhance > Adjust Lighting > Levels … and just play around till you see what you want. If you don’t know how to do this, just play. Make a mess, have fun … it’s the best way to learn!)

So, now we have our base picture. We’ll put it into Layer One, and rename the layer ORIGINAL PHOTO. Notice all those other layers above it, which I’ve turned off in order to show the base picture. Those layers are where the magic happens, and you’ll be in charge of every filter, blend and merge. Starting with the same image, ten artists will come up with ten different pictures, barely alike. It’s your work … you choose what’s happening on the canvas.

TIP: when you do anything in a project ― apply a filter, adjust the lighting or sharpness, always, always DUPLICATE LAYER before you move on and do one more thing. Work on the clone layer, the copy, not the original layer. If you do further work on a clone, and you make a mess (it’s inevitable; it will happen; no one is immune to this rule!), you can throw the mess in the bin and go back to the original layer. Clone it again before doing things to it. This will save your sanity, if not your life!


If you were going to actually draw now, using the base image as your source, you would start your pen tablet (Wacom or Huion, or whatever; I have used both, and currently use the Huion while the Wacom Bamboo is put away). You would create a new layer op top of the photo … you would select a brush to draw/paint with … pick a color from the photo to paint in … and, in the new layer, you’d start to trace over the shapes and forms of the trees, plants, water and ground. You’d change and adapt what you wanted to change ― say, take out a fencepost, or get rid of a parked car, or omit the trash somebody dumped!

Since you’re not drawing here, instead, we’re going to use a shortcut. Photoshop has a wide variety of filters that can sometimes give a photo some of the characteristics of art. The filters are not fool proof. They often do not work well. Even when they do work, if you just slap a filter onto a photo and call it “done,” all you have is a Photoshop filter slapped onto a photograph … it doesn’t look very good. It certainly isn’t an enchanting painting.

But the process of adding a filter to the photo is the first step in getting to the painting. This is the trick that saves you having to draw, if you can’t draw, don’t have a tablet, or don’t have the time. There are all kinds of filters, some quite good, some really bad, some utterly pointless. A handful can work well some of the time, but don’t expect them to work every time ― it can be a bit of a crapshoot!

It’s up to you to choose the filter you like the best. No one can choose this for you … you are the artist, and this is your project. The photo is going to turn into a painting in your way. No one else’s!

You’ll find the filters here: Filters > Filter Galley … and you’ll need to sort the wheat from the chaff. It’s mostly chaff. Very few of these filters will do anything at all for you. If you apply just one, the result will probably be boring, lifeless, flat ― nothing enchanting about it. This is just the first step.

So, here is Step Three: apply the first filter, whatever you choose. In my picture, I applied Dry Brush, with a brush size of 0, brush detail of 10, and texture of 3. You could use anything you like … but remember that what you choose must be matched to what the picture needs, or it won’t work out very well. This is why “Zen Photoshop” really is art, not just a mechanical process.

Experiment with all the filters. Apply them all, configure them all, delete what you don’t like till you get to something you do like. Save the file. Now that you have Step Three to your liking, immediately duplicate the layer … you’re going to be working on the clone, not the original!


Okay, now we’ve got some lines into the picture, which simulates the work we’d have done by sketching or tracing, the next thing to think about is the color scheme, or pallet. If I’d sketched the whole thing by hand, color would still have been the next thing to tackle; at this point, the process is fairly similar. Now, if I were painting by hand with the pen tablet, this is the moment where I’d take a large, soft brush and start to put in swathes of color, which set the tone, and would also decide which will be the light and dark areas in the finished piece…

Using the shortcut method, it’s not so different. To a certain extent, the colors are already in the picture, because it started as a photo ― but the colors are all wrong. I had an idea in mind when I started, and this picture is not even close. I wanted “early morning in an enchanted forest,” but the photo I started with is just a kind of misty, murky twilight. All it gives me are the shapes of the trees. That’s only the starting point. I need to get the colors I want, or it’s never going to look like an enchanted woodland.

There’s two ways to go. You might get lucky with Photoshop’s “colorize image” function ― I haven’t had much luck with it, and seldom use it, but it’s worth trying. To do this, convert your cloned layer to monochrome, and then … colorize it. See what happens. Don’t be surprised if it’s not very good; it seldom is!

So, I always go the other way, and deliberately set the specific color pallet I want. Okay, so how do you do this? It’s actually not that difficult. In your mind’s eye, see the colors you want. Now, open the color picker pallet. Choose two colors that represent the most opposite colors in your imagined painting ― it could be the sky and the ground, or the light and the shadow areas. Set those two colors as the active swatches ― ie., they will be the ones your brushes are painting with, and which are used by the bucket fill tool … and when you option the gradient tool, you’ll get both.

This is what you’ll be doing. With the colors picked according to the image in your mind’s eye, select gradient fill. Create a new layer ― and fill it with a gradient. It’s hit and miss in Photoshop, so keep stroking the input path across the screen till you see what you want. Got it?

So far so good. Now, put a blend mode onto the layer to bake those colors into the layer below, which has the photo converted to lines. Aha! The magic begins as the picture assumes the colors you want! For my picture, the blend mode I used was Overlay, at 100% opacity. You could choose from half a dozen blend modes, and adjust the opacity from 10% to 100%. Only you know what you want your picture to look like. Get in there and play with the blend modes and opacity till you see exactly what you want.

Got it? Then, merge the bucket fill layer into the layer with your chosen line filter. And duplicate the resulting single, fused/merged layer immediately, so that you can go on to the next step.


With the colors set, it’s time to breathe life into this project. The magic happens when you begin to paint with light ― literally.

Look long and hard at the picture. See, in your mind’s eye, where the light is coming from. Can you see it? If you can see it, you can paint it, even with a mouse. The tools you’ll be painting with are dodge and burn. Dodge make areas of the painting brighter. Burn crushes the shadows or mid-tones, making them darker. You’re the artist: it’s up to you to paint with light and shadow, and create the picture. You have the outlines; you have the colors. Now ― paint. You don’t need a pen tablet for this; the work is not fine or detailed. Dodge and burn are more like “area weapons” than fine-scale tools. They’re best applied over significant portions of the image ―

Tip: go carefully, applying about 10% or 20% of dodge, and maybe 5% or 10% of burn on any one click. Build up the effect, little by little, and let the image take shape slowly rather than trying to do it all in one mouse click.

You’re the artist here. You’ll need to use your artist’s eye, your judgement, and create the image you saw in your mind’s eye. Photoshop can’t do this for you … this is where the art comes into its own. Experiment; find out what works; throw the failures into the bin and re-clone the previous layer for another attempt until you see just what you want. Note that dodge and burn can both be applied to highlights, midtones and shadows, but you really can’t dodge crushed shadows, and you also can’t actually burn featureless highlight areas to any great effect. Remember, zones close to 1 and 255 have no information in them, and it’s impossible to add information that isn’t there. So be careful how far you go with dodge and burn, because when the information is gone ― when you’ve brightened or darkened too far ― you won’t be able to add it back in. Go gradually, slowly, and build up. (If you do go too far and erase too much information, there’s a trick for getting it back … you can always paste the dead areas over from a previous layer, merge them into the new dodged, burned layer, and dodge/burn them juuust enough to fill in those dead zones. It’s tricky, but it does work.)


At this point, you might decide that you’re finished. If the painting looks done to you, that’s it. If it meets your original vision, you’re done. That’s art, and the call is yours to make.

For myself … I decided I wanted more texture in it. If I were painting by hand with the pen tablet, this is the time when I would start to doodle in color(s) and put in all the fiddly bits, the detail, or pseudo-detail that seduces the eye into thinking you’re looking at foliage when, in fact, you’re not. But we’re taking shortcuts here ― allowing for the fact that you might not have a pen tablet, or else you just don’t have an hour to two to spend faffing around, doodling. For whatever reason, you can take the shortcut.

You can apply another filter, and pour on more texture, save yourself the time and work. This is nothing that you can’t do by hand ― and it’s a lot of fun killing a whole afternoon or evening with this kind of detail doodling. But if you only have ten minutes … Photoshop to the rescue again.

The filter I chose was Poster Edges, with the settings dialed way down, so the filter didn’t ruin the picture….

And last of all, I added lens flare. Go to the very brightest area of the image ― where the sun would be, striking through the morning mist. Go to Filter > Render > Lens flare, and pick one of three types of lens flare. Position the hotspot. Dial the intensity up or down till it looks right to you. This was the point where I decided the picture was just what I wanted. I did try saturating the colors, but decided this “overcooked” it, and undid the effect. I could have gone on messing about … adding birds and bokeh and dust motes with ABR brushes, but you really can overcook a picture. One of the key things about art is knowing when to stop … when to sign off on the picture, and call it good!


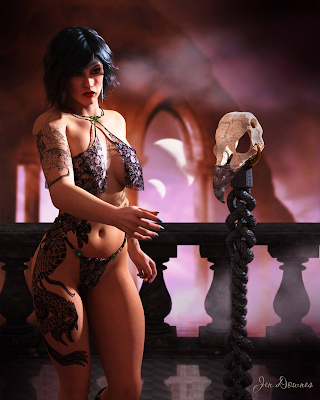
And the result, in closeup, so you can actually see it on the screen here? Worth a quick look before I call this post done:


...and that's the point where I signed off on it and called it done!