Friday, April 30, 2010

3D Fantasy: petitioning the gods of the storm


3D fantasy ... the barbarian babe and hunk, in DAZ Studio 3, ably assisted by Bryce 5.5. And I have to say, I am absolutely at the extreme limit of what can be done with this video card! Only two renders today, guys, because it took about three hours to get through this work. Luckily, I was able to multi-task, do other things at the same time, because it really, seriously took this system three hours to get to this point ... and it had to be fudged from the word "Go!"

Here's what I did: first, go back into the Stormlight project, reset it to landscape format and render a background...

Then, reopen the female character project and strip out everything except the model, so all you have left there is Victoria 4.2, Mimi skin map, Celestial Hair, Celestial Jewels, Shadow Dancer costume, bikini and strappy sandals from Horizon Redux, plus all the textures and displacement maps on the above. Save this as a new file. I call this character Agatha. (Other female characters are called Elspeth, Ethel, Harriet, Muriel, Theda, Esme, and similar names you will NOT find of the characters at DAZ and renderosity!)

Then, reopen the hunk character project and do the same thing. (I call this character Albert. Other male characters are called Jasper, Ebebeezer, Cecil, Percy, Ethelred, Angus, and other names you sure as heck won't find at DAZ and Renderosity!)

So now I had 3 files: Albert only, Agatha only, and the backdrop. So, open a new project, set to the same size as the background. Import said backdrop. Hit MERGE to bring in Agatha ... and save it. Hit MERGE to bring in Albert --

And go away, do something else for 5-10 minutes. It's a loooooong second merge. Then, save it quick, before it falls over ... and buzz off for 5 minutes, because it takes that long to save now!

Right: position and size both characters. Albert is scaled at 105%, so he's just visibly bigger than Aggie. Now, start tweaking the poses ... and SAVE after every 3-4 tweaks, because it's a case of the jerk-jerk-jerks as you move anything at all, and it's inclined to c-r-a-s-h. (And every save is one of those "buzz off and do another job" jobs.)

Then, when it's all set ... do the lights. This one took five distant lights to get this effect, which is like a cross between Boris and Frazetta. It's a gorgeous effect, but this is absolutely as far as this video card will take me. So -- only two renders.

And tomorrow, I see about tracking down a new video card. I'm looking at, maybe a Gig on the card, and double the RAM on the machine, too. Then, we should be cooking! It was easy in the days of yore when it was just a figure and lights, maybe a prop or three, and a backdrop. Now, even a simple shot is loaded up with stuff. I'd love to be able to get two characters in full costume, plus two horses into the same scene (hi, Linda!) but with this video card --? Not a chance. So... bright and early Monday morning, let's see what we can do about this!

Jade, 1 May (May Day)

Thursday, April 29, 2010

3D Art: The Barbarian Queen ... stormlight

Butting in, in 2019 before I let the original post scroll -- check out the new version of this render. 
I always liked this idea, and a long time later thought I'd come back to it, do it again with the skills and hardware to do it justice. The new version is still a raytrace, and I find myself wondering if this project would render in Iray. Hmm. Now, there's food for thought!
Okay -- that's enough enough butting in for one post. Here's the link to the new version of this project, and now ... I'll return you to the original!


3D art in its purest sense: The Barbarian Queen; Stormlight ... in DAZ Studio 3, with a backdrop designed in Bryce and postworked in Gimp. And because you and I both know it's bloody COLD where she's standing, and nobody in their right mind would go out near-nekkid in this weather (only happens in comic books and teen male fantasies), let's exercise the power of 3D, and play it again, Sam:

There, the poor woman has something to wear, and the click of a mouse. Well, not quite. Okay, it takes quite a bit to get it to look like this, but ... good gods, can you imagine having to go back and repaint the whole picture because the editor said, "Awww, we wanted her nekkid," or, "We can't use this because we have a PG rating."

And there's the magic of 3D for you ... the ability to change things on the fly, so everyone can be happy with the result without the artist working for $3/hour!

This painting uses...

Victoria 4.2
Mimi skin map (but not the face or body morph)
Celestial hair
Celestial jewels set
Bikini from Horizon Redux
Color and texture on bikini, my me...
Strappy sandals from Horizon Redux
Pants and shirt from Shadow Dancer
Colors and textures on pants and shirt, by me...
Face and bod designed by me
Shrubs from PNature set
Concrete slabs from DM Instances set
Bunch of violets from Vintage Darlings set
Background: sky in Bryce, repainted in Gimp.
Lights: six distant, four point, all with shadows set.

If you're at all interested in how the set was built, and what it looks like without a babe standing in front of it, click back a couple of days, to this ... and if you're interested in the hunk who wandered into the same set, click back to yesterday ...

And tomorrow (and I can't give you a link for that; I don't have a time machine), I'm going to get both these characters into the set together ... and my video card is going to give me a hard time! Monday, with any luck at all, I'll be getting a new one.

Jade, 30 April

Wednesday, April 28, 2010

The Barbarian Queen and her warrior ... in DAZ Studio 3.


Bryce, Gimp and DAZ Studio 3 working in cahoots and loving it! The only problem for me is -- time! Domestic stuff has utterly swamped me, so you're getting half the story today. The warrior has wandered into the set, and the storm is about to break. Here's the other character who's supposed to be here:

The Barbarian Queen, in DAZ 3D ... and here's the story: there's a battling coming, and this tribe worships the God of Storms. Right on the eve of battle there's a biiiiig storm coming in, and they're out on the moor to petition their deity to stand by them on the battlefield.

And I am so seriously out of time, I have to pick up and run as soon as I hit "publish" on this!
So join me tomorrow when the Barbarian Queen stalks into the set ...!

Jade, 29 April

Tuesday, April 27, 2010

Bryce, Gimp and DAZ 3D working in concert: Stormlight

Bryce sky ... foreground composed in DAZ Studio 3. I call this piece "Stormlight," and it's fully intended as a set for a gorgeous guy and/or gal to stand in (they can take turns) but I'm so out of time today, it just isn't funny, so ... today the set, tomorrow the models! Bear with me, folks. It's a combo of domestic stuff and a lot of work.

So, the scene above was done in layers. First, a Bryce sky:

Then, get the Bryce sky into GIMP and paint the heck out of it:
The painting was done with a set of brushes called "Cloudy," from something called "Jenna's Sanity Brushes," which you can get at this link: http://scully7491.deviantart.com/ ... [2024 NOTE: the link is still live, it doesn't return a 404 error, but this user is no longer active on the platform, and I couldn't find any reference to the brushes, or where to use them] ... they're very interesting brushes, with good results, if you know just what you're doing -- and it's a lot of fun learning this stuff.

So that got the background done, and it was the background that set the tone for the whole image. Now you needed to load up the props:

Concrete slabs from the DM Instances pack ... load 'em twice, stack them and skew them to look like an old wall -- you'll easily figure it out;

Concrete slab -- singular -- from the same pack. Scale it up to about 250% and stand it on end to look a lot like a megalith;

Four shrubs from the PNature shrub pack (they're Poser models but they work brilliantly in DAZ ... get these from Renderosity;

The climbing plant from DM The Gate, for the ivy. Put the plant put at 0% opacity, then scale and rotate the ivy to look like it's growing on and through the old rocks;

The violet bunch, from the Vintage Darlings prop set. Place it on the wall at a nice angle ... this tells you that there's a human very close, because only a human would have picked a bunch of violets and put them down for a minute (probably to grab an umbrella).

Then the fun starts: it took 8 lights to get this effect ... blue, purple, gray, green, peach and white lights. And fiddling the lights into position is something you just have to learn! You can get fantastic results though, if you just start fiddling somewhere and have a bit of patience.

Join me tomorrow when some gorgeous models are going to wander into this set...

Jade, April 28


***Posted by MK: my connection is intermittent, too slow for this.

Monday, April 26, 2010

Working with textures in 3D art - Part 3


The last remaining hint of the original images: a couple of thumbnails I found hiding away on a hard drive. Sorry, folks ... a lot of the old, old stuff is gone. Images from this era are mostly Deep Shadow Maps, and pretty simple stuff, so it's no great loss. But it does make you pause and reflect upon the ephemeral nature of the internet. As I go through this blog and polish it up for 2024, I'm finding constellations of dead links: never mind missing images ... whole websites are just not there any more! 


2014 Edit: some of the original images from this post have gone down the black hole -- like the links, which have also been removed to prevent confusion. I've padded the post with like-spirited images from the same era to give a sense of cohesion. 

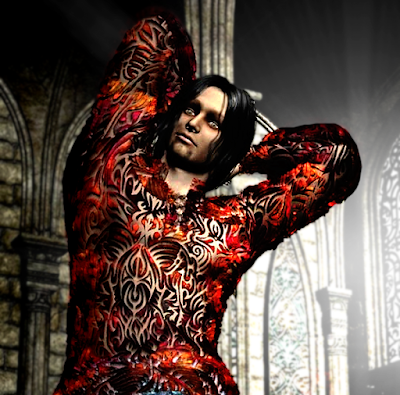
Perhaps a young Apollo ... in DAZ Studio 3. And once again, all textures created by hand, by me, in the last couple of days, including the backdrop, the floor and the hair Michael 4 is wearing today -- and we're here to figure out how it's done. So -- now that Apollo and I have captured your attention, let's let to it!

NOTE: all images were uploaded at FULL SIZE so you can see every detail. Click on the display images to enlarge.

Let's create a texture first. We're going to start absolutely from scratch:

Make a tile ... use a big of a digital image, or get into your paint program and actually, uh, paint something! This one was painted in Gimp, using various brushes. incidentally, the brushes are free, and so is Gimp! If you're interested in brushes, try these: [snip! Dead links removed. Sorry]  There's oodles of free Gimp brushes out there, and they're a load of fun. You'll enjoy playing.

So, you have your tile, however you got there! Then the tile becomes the seamless pattern:


And this seamless patern is what's going to be imported into Gimp or Photoshop, or whatever you use. Pull it in from your patterns menu, and the program will automatically tile it. Then you save the pattern it's made for you ... and this is your texture map.

Remember! The more times the one little seamless pattern (made out of your tile) appears in your texture map, the SMALLER it will be when applied to the 3D model:

The 1970's Psychedelic on the left is the exact same pattern as on the right ... but the texture map made from it shows the pattern about ten times more often. So juggle the size of the pattern till you get exactly what you want. Now...

Apply the pattern to the 3D object!

This is what you're trying to achieve (they're not even rendered: just captured off the workspace):

On the left there is the 3D model of the shirt and pants. What I've done is to strip out the default textures applied by the designer. These are the textures that load along with the models. If you delete them, by changing the settings to "none," you see eactly what's really there: white plastic. And now it's ready for you to slay YOUR textures onto it! This is what I've done in the shot on the right.

It's the same pattern as above, on the shirt -- you're just seeing it ONCE, rather than repeating multiple times. And on the pants, a different texture, making what looks like a nice ensemble of body shirt and stretch slacks. So far, so good.

And the question you're asking is, "When is she going to shut up and tell me how to do this?! So let's get to the nitty gritty. If you've been following these posts, you know that it's something to do with the Surfaces tab in DAZ 3D. (Poser users ... sorry, can't help you. I don't use Poser. I have a fair acquaintance with 3D Studio Max, which is where I learned the theory behind all this, but my version of Max won't run on Vista, and it's waaaay to expensive to upgrade it, so I'm on DAZ Studio 3 plus Bryce 5.5, and, frankly, loving it. If/when I change away from these two, it'll be to "trade up" to their biggie, Cararra.)

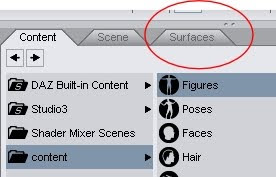
So, first ... find the surfaces tab:

It's probably been hiding there in plain sight. It ought to be a tab sitting beside CONTENT and SCENE on the left side of your screen, being ignored. Not there? No problem. Go VIEW > TABS and select Surfaces. It'll probably teleport in as an island, but you can drag it over and dock it, if you like. Or leave it as an island!

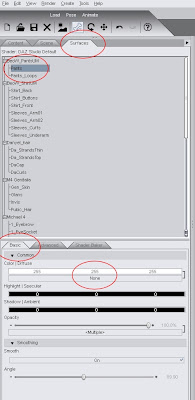
Now, when you open up the surfaces tab, it can be a bit unnerving -- and click this to see it FULL SIZE. (This post sponsored by the Optometrist's Association.)

Notice, you have BASIC and ADVANCED tabs at the bottom there? You want to be in the BASIC tab at first. So (follor the red swooshes), you're in Surfaces Tab ... Basic Tab. A list of everything loaded into the scene pops up. Handy, that. So, select the shirt or the pants, or whatever you want to change. Then, look down at where it says COMMON > Color Diffuse ... then a bunch of numbers, and the word NONE.

Forget the numbers. They're the same ones you can set if you want to change the color of objects on a webpage. You don't need them. But, the word NONE refers to a JPEG texture map which has been set as the default.

Now, on this model here, I turned them all off to start with (the white plastic outfit, above) ... which is why you're seeing NONE. If you're loading another model, it might easily have a default texture map set, in which case, where it says NONE here, it could say, "Shirt_Blue01.jpg" ... aha. Penny drops. They're only JPG images

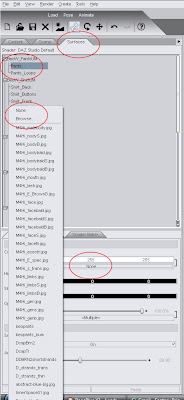
So, obviously, all you need to do here is to change the name of the file given, or the NONE, to the name of the file you want. So -- click on the NONE or the filename. And a menu pops up:

It gives you a long list of all the texture maps the program already knows about, which are not what you want. It also says BROWSE at the top. Click this ... keep clicking till you're in our onw textures folder, and double-click the one you want.

It will set itself automatically ... and now you can start playing with textures:

Now, changing ot the textures turns out to be dead easy. In the left-side shot here, I've got the same shirt but I've changed it for a kind of nice oatmeal texture map. The only problem is, the pants still look plastic. In the shot on the right I added something ... now the pants look like they're made of fabric. And this was easy to do, by adding a displacement map.

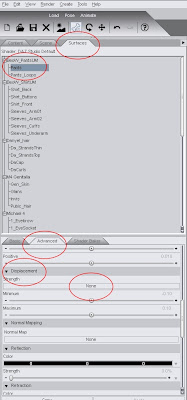
I talked about what displacement maps are, and how to make your own, in yesterday's installment of this saga. But I promised to come back today and tell how to apply them. Again, you do this in the Surfacex tab ... but now you have to click on the ADVANCED tab, because the controls for the displacement map settings are buried there...


Again, follow the red swooshes. You're in Surfaces > Advanced. Now, scroll down till you see the word DISPLACEMENT ... it's about halfway down. And it's the same as with the texture maps. You'll either see NONE or a file name, and they're only JPEGs. The trick is to switch out the NONE or the filename for the designer's default, for the one you want to use.

Click on the filename or the word NONE, and again, you get a menu. Click BROWSE, as above, and keep clicking till you find your own map. Double click it to apply it.

IMPORTANT: there's a slider bar to big pulled over from 0% to 200%. If you forget to pull the slider over, nothing will show in your render. Try it at 100% and wiggle it around from there till you get what you want ... and you're in for a nice treat!

The image on the left has texture map but no displacement map ... looks like a shirt made out of plastic, right? The image on the right...

...has a displacement map, and when you look at these pictures full size, the tactile pattern in the surface of that fabric invites your fingers! That's so nice.

So, what do you use for your displacement map? Go back to yesterday's post for a few minutes ... all was revealed there, with instructions for making them!

And here's something good: you don't have to use the same displacement map with the same texture map. You can switch them out, mix and match, for great effects:


See those at full size and see what you can do. 

And you're on your way. That's all you need to know, so -- have fun! Come back soon, because I'll be looking at how to make complex textures to fit costumes and objects. But for now, continuous, seamless textures are easy and they work on just about everything. Enjoy!

Jade, 27 April

Sunday, April 25, 2010

Working with textures in 3D art - Part 2

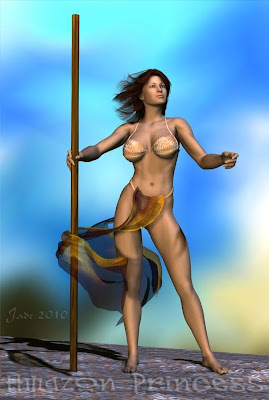
The Amazon Princess in DAZ Studio 3 ... with every single texture, from the floor to the staff, hand-made by, uh, me, this morning! Go ahead, click on the pic and see it at full size -- I uploaded it at 600x900, so you can see the details.

The question is, how d'you do it? Well, the first thing you want to think about is the pattern, or texture -- the visible texture. And this is going to be a JPEG wrapped around a 3D object, as I said yesterday:

All the fabrics above were done with ONE pattern. Notice, it appears once in the first image, and about 10,000 times in the last image. How BIG the original pattern looks when it's applied to the fabric depends on how many times it appears in the JPEG texture map...


For the purpose of this post, I wanted to start from absolute scratch, create something by hand, from nothing. So I made the above in Serif ... it's just a square with a texture fill and some whirly objects with colors and lights added. It could have been anything, something dreamy and subtle ... but I wanted something LOUD, so it would be easy to pick the pattern...

So, you start with a combo of just about anything, and the tile (above) becomes the seamless pattern, like this:


So far, so good. Now, if you paste the combo tile (above) directly onto the 3D object ... which in this case is a skirt ... it just wraps around, and because it's BIG (1000 x 1000 square) you can see every individual little detail from the original design...

But if you took this tile and made it waaaay smaller, and used something like GIMP to tile it into a background where it appeared in a square 5x5 times, you get the second effect ... and at 10x10 times, you get the third effect, and at 20x20 times ... the last effect, where the pattern has vanished and become a texture in the fabric. Just save your tile at incrementally smaller sizes and have GIMP use it as a pattern to tile the background. Keep going till you get what you want ... save it right there, because you can use this, well, forever, and because it's a seamless pattern, it fits ANY 3D model. Whack it onto anything at all, it'll fit.

The easiest way to get more mileage out of the same pattern is to swap the colors. In these two, below -- on the left, it's the same old pattern from above, which has been greeeeeeened up and resaved, and reapplied, and looks very different. On the right ... it's the same texture (a kind of thorny tile which was made into a seamless texture, as above), and then the whole pattern was color-swapped into two different and equally nice fabrics.

Now, sometimes you want a BIG pattern so that you can actually see said pattern on the dress. To do this, just make the texture ... big. It wraps around, and in case you're wondering if it fits in back ... check it out. It does.

Not only that, but when patterns get big, they actually hold their, uh, pattern, as you can see in the two below. You could have used either one of these as tiny little tiles and had GIMP repeat them 20x20 on the same texture, and you'd have come up with a fabric with a herringbone or hounds tooth kind of pattern. In these below, the original design appears ONCE, just as in the very first image of all, way above:

So, there you are ... start with nothing in a DTP or art program, and end up with fabulous fabrics -- welllll, maybe. They look like fabrics from a distance, but if you get in close you see that the patterns (which, being fair, are only JPEGs slapped on a 3D object that, itself, has a finish like smooth plastic) look as if they've been printed into plastic.

And what you're dying to achieve is this:


Chainmail bikini. Right. Well, I can't imagine any woman in the real world every wearing any such thing, but it's a grand old fantasy tradition, so, what the heck?!

Go ahead, click on the above images -- they open up at full size, so you can see the whole deal. See the texture ... not just printed into the fabric like an iron-on on a teeshirt!! Looks like the bikinis are actually MADE of chainmail, in copper, and silver, and gold.

Now, the copper and silver and gold are (obviously) visible JPEGs that you apply in DAZ, just the same as the textures in the skirt and top, way above. But if you just put the JPEG on the 3D model of the bikini top, it looks like a fabric (or even plastic) screen-printed with the pattern. Hmm. You wanted some way to make it look like the very material of the model was made of iron links.

To do that, you'd have to actually rip up the surface of the 3D model ... and luckily there's a way to do it. Even more luckily, it's dead easy! It's called a displacement map.

So what the heck is a displacement map anyway?

Now, you've probably heard about bump maps, but I don't mess about with bump maps much. Why? Because bump maps create the illusion that a surface has a tangible texture. It's be like looking at the surface of cracked old leather, and seeing the grain and cracks and roughness, but when you slide your hand over it, you feel smoooooooth vinyl.

A displacement map, on the other hand, actually does "deform" the surface of the object it's applied to. And there's a "eureka!" moment for you. Now, the only questions are, where do you GET displacement maps, and how do you apply them?

You can buy them ... but I wouldn't, because they're too easy to make. Seriously. Save your bucks to buy the actual OBJs, the 3D models, which it takes a hell of a lot of skill to make. Making displacement maps takes almost no skill at all...

All you need is a bit of "theory," and you'll groan, "Is that all they are?" Yep, that's all they are

A displacement map is a monochrome (grayscale or zipatone) image. And these two colors tell the program how to deform the surface you apply the image to. All the black areas in the image (also known as the "map") get pushed in. The blacker they are, the further they get pushed in, to a max of "pure black." Grays get pushed in less and less as they get paler. All the white areas in the image get pulled out of the surface, to a max of "pure white." Grays get pulled out more and more as they get whiter

So, if you have a grayscale image with 100 shades of gray between dead black and pure white, stands to reason you'll have a steady gradient of ups and downs in your surface texture. If you have a zipatone image -- 2 colors, black and white, only -- also stands to reason you'll have hard, sharp edges and lots of "relief" in the surface.

Here's what a displacement map actually looks like -- but you won't see this in your 3D picture:

This is the displacement map that put the visible, feelable texture into the blue-and-gold patterned bikini on the bikini babe yesterday:
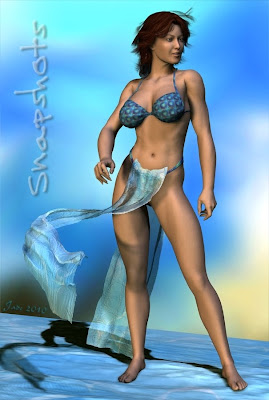

Click to see it full-size ... and see, the actual surface of the model has been pulled and pushed into the same shape as the pattern printed on the fabric. This was done by applying the displacement map you see right here.

So, after you've got your visible pattern--


-- you need the exact-same thing only as a displacement map.

Well, the displacement map IS the same thing, except for being B&W. So get into your imaging program and at the very least switch to grayscale ... but if you want big differences in the surfaces you're applying it to, reduce the number of colors to 256, or even to 2. If you use 2, you'll get big changes. 2 is best for chainmail and patterns beaten out of sheet metal etc.

So, when you've gotten your visible pattern, use IT to make the displacement map! And they can both start life as a photo. Want chainmail? Then find a good quality image, crop out a tile, make up the seamless texture, and then figure out how many times it needs to repeat in the texture map. The more often it repeats, the smaller the links of mail will look, when applied. Use Gimp etc. to make the texture map. Then use the texture map to make the displacement map in b&w.

So, now you have your texture map AND your displacement map. How do you apply them?

It's all in the Surfaces tab. Explore it. Look out for how and where you can set these maps. Click on the name of a JPEG used as a map -- a menu pops up. Click Browse ... and set your own texture and displacement maps.

I don't have time today to go into the absolute details of the Surfaces tab in DAZ Studio 3, but I'll be doing that tomorrow...

So, go all the way back to the Amazon Princess. Here's what I did:

Load Victoria 4.2...
Add the high-rez "all naural" skinmap as supplied with Victoria.
Design the face and bod (sorry guys ... you can't buy this model ... I designed it myself).
Add Rock Star hair, by Neftis, set to auburn.
Add the AK Lilian bikini. (Any cossie would do, but this has the wrap doodad too.)
Add a bit of floor for her to stand on. (I made this OBJ in Bryce 5.5.)
Add a texture to the OBJ floor.
Add an image as a backdrop (I airbrushed this one as a separate JPEG.)
Arrange the pose however you want...
Create the staff as a primitive (cylinder) and scale to fit your needs...
Add a brownish texture to the staff --
Add a displacement map that looks crinkly like wood.
Add a gold texture to the bikini (I used sandstone: it's perfect
Add a 2-color displacement map to the bikini for beaten metal or chainmail.
Add a deep gold texture to the bikini-wrap...
Add a displacement map to it...
Set the opacity to about 40% to make it look like silk.
Set up three lights -- left, right and top. Adjust till just right.
Turn on deep shadow maps on L and R lights, not top.
Decide on the wind direction ...
Tweak the hair and silk wrap into shape.
Render.
Adjust the percentage of the displacement maps till just right.
Re-render ... and call it good.

And that's it. Seriously.

Join me tomorrow, and I'll explore the Surfaces tab with you! (We'll also recruit Michael 4 to model for us, and see how some of these fantastic textures look on him...)

Jade, April 26

Combining Terragen Basic with Daz Studio 3

Guest post from dave today. I know it's been a month since I've guest posted here but remember I'm only a guest.

Living down in Australia right near the beach with a west-facing shore, I get to see lots of sunsets over the ocean. I've always been amazed by them and my favorite type by far is the type where clouds are lit up from the bottom and have a beautiful dark red glow as the sun sinks down into the ocean.

Naturally, I decided to try to replicate that using the free version of Terragen Basic. I do believe I succeeded! Have a looksie and don't forget to click the pic to see it 1280 by 960.


Ta-da! One tropical sunset. If you use Terragen then you may be interested in how this was done. I'll give you a quickie rundown here.

Make your clouds waaaaaaaay higher than they should be (these are at 4000 metres above sea level) and set the thickness very low. Also make sure the 3d button is on instead of the default 2d. Then go ahead and make a normal cloudscape. You'll find that as you set the sun closer and closer to the horizon, the bottom of the clouds light up nicely.

The sun... Remember the sun appears larger close to the horizon so first make your sun at least 4 degrees wide. Set the colour to whatever sunset colour you are aiming for and then crank up the intensity --I used 225%. This will REALLY make the clouds glow!

The above sun settings will also, unfortunately, light your water up if you use the default water reflective settings. Easy fix, just go into the reflection settings and turn max reflectivity and the reflectivity curve way down. Don't forget to do some quick low rez renders to see how the changes affect the water. Then you also want to turn the direct sunlight waaaaay down and also the reflection spread.

Poof! One sunset.

What does this have to do with Daz Studio 3? Well, you take your fully rendered sunset and use it as a background in Daz to add goodies. I decided to add a critter. Specifically, the Millinium Dragon.


Believe it or not, I only needed one light for the dragon. Obviously a reddish coloured light about where the sun is. To get the rest of the effects I only used the diffuse, specular and ambient surface controls. Get the colours and the strength of each right and I then only had to use the one light.

I, uh, had to use only one light cus on my ancient dinosaur of a PC I wasn't sure if this could even render more than one light without barfing. There's always a way around problems, right?

And don't forget to practice posing the dragon! Fun and practical!


Saturday, April 24, 2010

Working with textures in 3D art


Textures in 3D art are the easiest way to bring things to life -- not just people, but the props and landscapes under and behind them, too. If you're in DAZ Studio 3, all 3D things (people too!) start out as .OBJ files, which are lumps of plastic which can be morphed into all kinds of shapes. What makes them look "real" is the texture(s) you slap onto them. (Click on the pic above to see it at full size ... check out those textures -- even the floor!)

Almost every model you're going to buy from a store like DAZ or Renderosity will come with its own textures. With luck, you'll score 2 or even 3 changes of texture to go along with, say, a shirt or a pair of pants. Then, if you want more (and you always do...) you'll wind up back at the store buying texture packs.

Now, if the packs are made by the designer, they're going to be "made to measure." You'll get fantastic textures made specifically for that one shirt. But ...

Supposing you just want "ordinary" fabrics. And you aren't thrilled about paying another ten or fifteen bucks for six or eight fabric patters. It occurs to you, "I wonder how they make these fabric patterns? I wonder if I could make them?"

And you probably can...
Every fabric pattern in the renders on this page was made by me. And if I hadn't come down sick -- like half of this group! -- it's going around like the plague -- I'd be telling you the whole story today, in fantastic detail, about how to MAKE them as well as use them.

As it is, I'm sneezing by brains out and everything aches, so I'm going to do this over two or three days. I'll make a start today by explaining the process with hints but not too much detail, plus how to to change out textures at whim. I'll add the detail to the story tomorrow!

First of all, you need to have some textures to change to. What you want is to have all your textures to hand ... and so that they don't "tile" when you apply them (that is, come up looking like squares on a bathroom floor), you need to make sure they're "seamless" textures...

It starts as a singel pattern "module" and these are wallpapered together in something like Photoshop -- or Gimp, which is the free, open source clone of same. You need to wind up with a good-sized square, at least 1000x1000 pixels, so the textures look nice when applied. Too small a square, and you can start to get low-rez appearances.

Here's the trick: how BIG or how SMALL the original pattern appears in the applied fabric, can be adjusted by changing the number of times it appears in your texture square. The more times it shows up in the square, the smaller it'll be when you apply it.

So you can can get a half dozen different effects out of just one seamless background pattern ... and it's going to come out looking something like this:

So play around and make a bunch of different ones. Store them in their own folder -- on the desktop is handy, because you'll need to be getting back to them when you apply them.

And you apply them by using the Surfaces tab in DAZ Studio 3. In the Surfaces tab, click on the name of the default texture which is used -- this loads along with the OBJ model. Click on the .jpg name of the default texture ... a menu comes up ... click BROWSE. Then, go Desktop > Textures (or whatever you called the folder), and just double-click the one you want to change to.

Shazoom! The texture changes, and it's wall-to-wall, and because it's seamless it looks like fabric. The next thing to think about, though, is how to put some surface texture into this fabric, because right now it looks like a printed plastic bag, right? Not the effect you want? The effect you want is this:


...and if I wasn't about to expire, I'd be telling you how to do it! As I am about to fall face-first into the desk --

Join me tomorrow, and I'll tell you about displacement maps ... what they are, how they work, and (even better) how to MAKE your own!

Jade, 15 April (Anzac Day)

Friday, April 23, 2010

Textures for 3D models, in DAZ Studio 3


Textures for 3D models ... creating textures ... hand painting textures for your models ... a whole panorama just opened up in front of me, and it's like Christmas just came in April!

Change of plans from what I'd expected to be doing. I did go to Renderosity and buy a pack of fantastic textures ... these are not them. I assumed the textures would be JPEGs, which most of the rest of the world uses. They're not: they're "process" items, where a handful of base materials are plugged into an engine, and the engine generates the texture for you, from the selection of overlays. Here's the snag: the engine is in Poser, and I used DAZ. In DAZ Studio 3, all you wind up with is the handful of fantastic base materials, none of which, itself, is one of the textures you'd been hoping for --

Which got me to thinking: if an engine can combine them, what's going to stop an artist from doing the same thing? So I did -- and it's easy --

After which I ran about on the Internet a bit and gathered a few seamless textures (FREE ones, people ... no need to steal anything. Try this: http://www.grsites.com/) and then just doodled to see what would happen...


Now, if you've been on this blog for any length of time, you'll know most of the basic props. I don't have an endless props room, so I mix and match everything. But ... will you just look at what happens when you slap two things onto a boring old .OBJ (object ... 3D thing) ...! Go ahead and click on the above -- in fact, on any or all of the pics in this post -- they're all uploaded at large size, so you can see the details.

There's two things contribute to this effect 1) a texture, which is the JPEG you just made in your imaging program(s); and 2) a displacement map. And the displacement map contributes as much to the effect as the JPEG.

Have a look at these, full-size:

You can probably see that there's a visible texture made up of colors, and a second texture made up of "roughness" or "surface detail." This is the displacement map.

I've reworked a couple of "detail shots" from the leader renders from this post, so you can see the effects a bit more clearly:

Every texture you're looking at in these shots was made by me from free textures you can pick up off the web, in a few minutes flat ... including the one that looks so fantastic on the coat; and Michael 4's calypso pants, and the sweaters -- all of them. Also the colors and textures on the candles, shield, pillar, mask. The objects themselves (boots, candles, shirt et al) are 3D models which you buy from online stores like DAZ 3D and Renderosity. But all the colors and textures you're seeing on this post here started life about two hours ago in my imagination.

Intrigued?! Come back tomorrow, and I'll tell you how!

Jade, 23 April