Showing posts with label render settings. Show all posts

Friday, December 18, 2020

Twilight at the old sanctum


Now we're cooking. So many experiments in this one render -- and they all worked out. This is Michael 8 standing in DM's Abiding Sanctum, with Iray lights set, and Iray creating the sky (iue., "Draw Dome" is turned on). I've also changed the shaders on the costume; the DOF is set on the camera ... and the whole whole thing rendered in six minutes while the computer stayed cool as a cucumber!

I'm juuust about through the experimental phase, in many ways. Everything is working just fine, and I've also thrashed out how to get the third party content to install properly, and (just as important!) be FOUND after it's installed! Turns out, it's the SAME file path to install both DAZ Studio Content and Poser Content. Studio reads the content differently and pushes it into two different menus, when you come to load it into scenes (which I wish it didn't), but during installation, it's the same file path. So we're happy here.


Next, I'll be installing lots and lots of third party content (something like 250 items), and then ... we're good to go. This is juuust starting to turn (back) into real fun! 

Wednesday, October 9, 2019

Xurge fantasy goodies, and chasing image quality ... whoooo!


Nope, that's not an Iray render, and that ain't Genesis. That's good old Michael 4, and a Studio 4.11 raytrace right out of 3Delight, with the render settings cranked way high. Now I'm amazed. Also thrilled to bits. Take a closer look, see how the mapping renders up:


Firstly, that's believable sunlight, and the higher sampling rate brings the skin tones up brilliantly. I've dialed the render settings up so high on this, the render took a whole whopping 43 minutes, as against nine or ten for the default settings. Whooo! So, let's go again --


Wow. Seriously. The costume is Xurge 3D's Druid Shaman, which is optimized for Poser ... I only needed to overdrive the displacement mapping and dial down the specularity for it to render up beautifully in Studio. The skinmap is SAV Atlas (from Renderosity), but the vascular map is the M4 Displacement from the DAZ marketplace. The eyes are the dark brown option from The Eyes Have It (DAZ marketplace). The set is DM's Elven Shed again (Renderosity), and the trees you see here are the Deluxe Trees, also from DAZ marketplace, I think. Depth of field is turned on, and the virtual aperture is set to F/15 to get this effect. I have two lights on it, with softer shadows.

I did a tiny bit of painting in Photoshop afterward, largely because the mask needed a little help to look good in a screaming closeup. Seen very close, it's obviously made in halves and "stuck together:" the diffuse map doesn't quite match down the nose. But it's a dead easy fix in post, if you just give it a few minutes. And the costume has an impeccable fit on Michael 4. Take a close look at the sandals.

So, since raytraces are done in a lot less than an hour, let's go again with two Michael 4 characters in Xurge 3D costumes, and a set --


This time I wanted two very different skinmaps, hair, faces. Aside from a couple of "artifacts" in the render, and adding highlights to the hair, I did nothing at all to this. Oh -- I hand-painted the body hair on the paler character. Otherwise, you have two M4s, Xurge's Untamed, their Druid Shaman sans the headdress and mask, DM's Mirador set, the Aether hair on the swarthy character, the My Rock Star Hair from Neftis on the paler character. Faces and body morphs designed by me, and again, the vascular mapping is the M4 Displacement map set. (You have to be careful with that one. It has four settings, low, medium, high and super, but anything over medium crumples the mesh on the base figure, so really, only low and medium are useful.)

I switched out materials in a couple of places, changed some diffuse colors, to make the costumes "pop" a little more in Studio -- Xurge warns that they're configured for Poser, and some of the textures do render up rather flat on the default settings. Easy to  fix...


This was just a twenty minute render, even at high-quality settings on 3Delight ... no trees, LOL. Like hair, trees really slow a render down. Even so, a forty minute render is screamingly fast by comparison with anything I can get out of my old PC in Iray, so I'm happy.

Been looking at systems and components. Went to the IT Warehouse site and picked out all the components I'd like built into my new system ... added by the retail value and had to laugh. I just built a (hypothetical!) $3,030 system. We're going to have to come down to earth here, when I finally go shopping, this time next year. We'll see. For the moment, I have tons of toys to play with -- scores of things I haven't even installed yet. So -- more soon! 😁

Thursday, September 5, 2019

Greek temple ... Genesis 8, M4 ... Iray throws a hissy --


As promised ... the ancient Greek temple set. Above, you see the result of about an hour's work to configure it for Iray with shaders, because the original textures, maps and materials from 2013 do not work in Iray. They look a treat in an old fashioned raytrace --


-- but those textures, maps and so forth go completely bonkers when you send something to Iray. Have a closer look at this version of the image, both in Iray and raytrace:


This is the Iray version, where the temple is build of various kinds of granites, with marble ornamentation. The OBJ imports cleanly into Studio 4.11, and I worked with the "Stone shaders" pack, which I believe might have come from Renderosity. It's pretty good, actually.


This is a detail shot from the raytrace, with Michael 4 standing in it. Keeper of the Temple.  Nice render, all in all ... but I have to say that the work of reskinning it with stone shaders was well worth the time invested.

Now, up to this point I'd been working with the low-poly set, and the low-poly figure (good old M4 himself). So last night I thought, what happens when you add a Genesis 8 figure to this? The experiment was too delicious to refuse, so, rather than doing another long shot, I drove the virtual camera in closer, for a good, close look at the set itself. I also kept the costume as simple as possible. What you have here:

Genesis 8
Dae face and body morphs
Michael 8 skinmap
Varun hair
Cool Style pants
Palladio set
Stone shaders
...and a lot of work to make the set viable in Iray


Here, have a closer look at the figure:


Welll, phooey. The Palladio set must be lower-poly ... and also, I admit, I added a low-poly tree, and a whole lot of shaders; and the Varun hair is probably very high poly. Harrumph. The picture rendered for about six or seven hours, then I spent another two hours painting out unresolved pixels -- or, fireflies, or sparkles, as they're also called. No way would this image finish rendering. Soooo...

Don't laugh. The next experiment (after I've had another cup of tea) is to render the background separately, then stand the figure against that as a backdrop, and do a second render. Sure, I realize, it'll still be five hours of render time -- but at the end of it the picture is done, there won't be swarms of fireflies to paint out. Hmm. Let me think about this. I'd also have to eye-match and hand-paint shadows. I can do that. Takes me back to 2009, the very early days, when I'd always have to hand-paint shadows, because the moment I turned them on, in Studio 3, my poor old computer crashed!

Speaking of backdrops, I used a Terragen render as the sky and horizon line for this -- an image I rendered about six months ago, I think:


I haven't don't a heck of a lot with Terragen in the last couple of months. Been too busy figuring out Studio 4.11 and Iray. I'd love to get back to Terragen, but the truth is, Iray commandeers the computer for so many hours, I run out of time. Duh.

My imagination is full of images, and my wishlists at DAZ and Renderosity are full to busting with about five grand's worth of products, LOL. It'll take years to get the lot, but -- what a hobby! It's all about having fun and and keeping the brain functional which, as we enter our Golden Years, is no mean feat. Ack.


Friday, October 7, 2016

Fantasy warrior -- again! (Wow ... two posts in one day)


Fantasy warrior -- again! Yes, I managed to get the second cover for today finished, and here it is. Not much to say about this one, save that it was a bear to get the lighting right. There's something DAZ Studio does, and even after all this time I have no idea why/how it does it. Basically, one or all of your lights will look dandy with the shadows turned OFF, but when you turn them on, sure, you get shadows ... but they seem to be comprised of thousands of gray freckles. They look very daggy indeed, and you can end up painting for hours to get rid of them --

Now, the smart thing would be to fix this in the render. And I've learned that it's something to do with the softness of the shadows cast by one or more lights ... but it has zip to do with the shadow bias. The ONLY thing that improves the "thousand gray freckle effect" is to dial down the shadow softness till the effect is almost imperceptible. Eventually you'll reach a point of compromise where you'll get just enough softness out of your shadows on the one hand, and few enough of the freckles on the other, and you can live with it.

So here we are with another fantasy book cover starring DAZ's Michael. For those who came in late: nope, this is not Genesis anything. This is the grandfather of the recent Genesis figures; and if you're clever with how you handle this "digitoid," as Mel Keegan has called the digital actors, you can do a lot with them. In fact, I've been looking at some renders, lately, of the Genesis figures rendered in -- I think -- Poser; and they're not all that impressive. In other words, you still have to be careful and clever with them, or you can get plasticky results (and yes, I know there's no such word.)

We're going to call this an "artistic male nude," because most of him qualifies!

One more cover to go. Counting down to the end of this assignment...

Thursday, September 22, 2016

The cover artist's quotidian conundrum

Your mission, should you be unable to dodge it: After all this SF and fantasy art, with the tonnage of gravitas and all the high-powered heroes ... now, sit down and package a domestic comedy which doesn't have the slightest bit of gravitas or so much as an erg of high-power! Oh...boy.

For those who came in late:


Okay: so far it's been all guns and swords, rain forest, stone circles on the tundra, the planet Jupiter ... and now you have to design an engaging cover for a tale that's witty, quirky, often downright hilarious, set in an ordinary house, in an average Californian suburb, featuring an ailing cactus plant and an elderly lady with a deadly vacuum cleaner. Eep.

Well ... try this:


With about thirty minutes to spare -- literally -- I remembered that good old DAZ Studio renders to cartoons. What better way to change pace, strip away any hint of seriousness, than to fall back on comic art to illustrate a comic situation. And it works!

Which is not to say that comic art can't be absolutely astonishing. If you're 17 or older (!) go do a Google image search. Here's your search term: "Warlord of Mars Deja Thoris," Ye gods. It's a Dark Horse comic. (Where was John Carter when all this was going on?!) But --

All that blood 'n guts 'n bare flesh -- exactly what we don't want here, today. So ... a cartoon render (lightning fast), plus a quick recombination of old elements in the trusty Photoshop; then splatter a lot of digital paint around, and -- there. Done.

Incidentally, if you're trying to find this function in Studio, it's in your Render Settings dialog. Have fun playing!

Saturday, August 22, 2015

When things go wrong -- you learn something new!

Good old Michael 4 himself ...
The actor: "Screentest, take two!"
(He's pinup size . Enjoy.)
LuxRender: an exterior noonday sun render:
Street scene in Mos Eisley. (Well, that's what it looks like!)
Byce 7 Pro:
A surreal arctic land/seascape with fog and glare
LuxRender: an exterior sunset render:
Sunset in the woods.
WTF?! An all night render, and
Lux gives me crap? Say, what?! And --
Problem could be inherent in the skinmap, because it has gobs of probs
even when you just attempt an old fashioned raytrace, Hmm. But --
LuxRender and a DAZ Studio raytrace of the 100% exact samemodel. You gotta be kidding!
Lovely detail rendering up in the street scene ... LuxRender. Nice.
Extreme closeup in low light ... also LuxRender. Nice!
There's an old saying that you learn a lot more when everything goes wrong than when it's all going smoothly. The old wisdom is absolutely spot on. It's been a long, long time since I had a render go catastrophically wrong and take two days to fix, but I guess you're never too smart to never have this happen!

The other day I had a fancy to create a whole new Michael 4 character. Fact is, I'll be using the old M4 for a while longer at least, because I don't have a spare grand to invest in the Genesis 2 system and new Reality gear. So, if I'm going to be flirting with Michael 4 for the foreseeable future, why not have fun? Cool in theory. So ... okay, one new character coming up. Here's the idea: he's a young actor trying out for a part in a fantasy film. The original idea was to have "ooparts" in there somewhere ... like, a wristwatch, smartphone, camera. In fact, I never got that far!

A new face and phsyique (designed by self), new arrangement of an existing hairdo (Aether hair); one of the really nice skinmaps, with a very good venous map (JM Falcon for M4). Set it all up with a quick series of test renders in DAZ Studio, send it to LuxRender, and --

Urk.  The wheels came off utterly. There's something about this skinmap that Lux hates. I tried a dozen different things to get better results, all to no effect, by which time I was frustrated enough with the process to go right back to Studio and see what I could wring out of a raytrace. Set it up again, and --

Urk. The skinmap is glaring with highlights as if the model is coated up with a gallon of baby oil. I tried everything I know in the surfaces settings to fix this, with absolutely no result at all; and confess to being rather flummoxed. It's been a long time since I abandoned a render! Then, on a whim...

I went into the parameters for the lights. Not the skinmap. The lights. Selected "diffuse only," and did another test render. Well, now. That certainly cured the glaring highlights -- the only trouble being that the "diffuse only" render is so flat, the model now looks like he's wearing a thick coat of body makeup, that "bronzing mud" the catwalk models wear. Then inspiration struck.

The solution was to do two renders and blend them in Photoshop. One shot with the glaring highlights, t'other with the bronzing mud effect. Lay one over the other and fade 'em together till it's juuust right. Then, lay over a blue-gray cast to dial down the brilliant colors, plus a couple of "washes" in the margins of the shot to make them more interesting. Done!

So what you see here is "just" a raytrace, but if I do say so myself, it's a very nice on. Fact: it's way superior to a bad render from Lux. Sure, it ain't gonna  rival the photographic effects they'r getting with Michael 6, whom LuxRender appears to adore; but that's fine. Those days will come.

(Speaking of which, it was mentioned to me that I was "courageous," showcasing the cutting edge figures and art on the blog here, when I know I'm not competing. Courageous? Well, it's not a competition, is it?! And if it were, I know what it'll take to put me on the touchline in front of the Liverpool goal, with the goalie flat on his face twenty yards away. Anybody got a spare grand?! No, I haven't, either! Not right now, anyway.  Next year. Also, am thinking of the thousands of fantastic renders done over several years by great artists in Poser and Studio ... the fact is, if the photographic realism of the later Genesis models, added to the super-realism of the top-end plug-in render engines, will negate all that gorgeous art --! No way. That's not just wrong, it's daft. A great picture will always be a great picture.)

But what went wrong between this skinmap and LuxRender? Search me. I never did get it figured out. And it's not like I haven't used this skinmap before -- I have. A lot! Like ...

L-R, Gil Cronin and Joe Ramos, from the NARC series.
Inspired by, and courtesy of, Mel Keegan.
 ...this one, above, for a start -- posted Feb 15, 2012. Joe Ramos (a key supporting player from Mel Keegan's NARC series of novels) is wearing it. Swoon, am I right? It's a gorgeous skinmap. So what in the name of the patron saint of 3D artists went askew?! if anybody out there knows, drop me an email. You can still reach me at jade @ dream-craft (dot) com. I should mention, for the record, that since Dave and I officially left DreamCraft behind, the domain itself has passed into the hands of Mel Keegan.

Back to the drawing board! There's a lot more to learn about LuxRender ... and it's not to late to learn a thing or two about good old DAZ Studio itself. Experiments will commence, LOL.

Tuesday, June 30, 2015

A grab bag of goodies, all over the spectrum

LuxRender: Leaning on a Lamppost
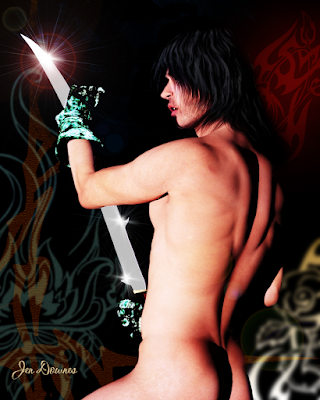
LuxRender: Fallen Angel
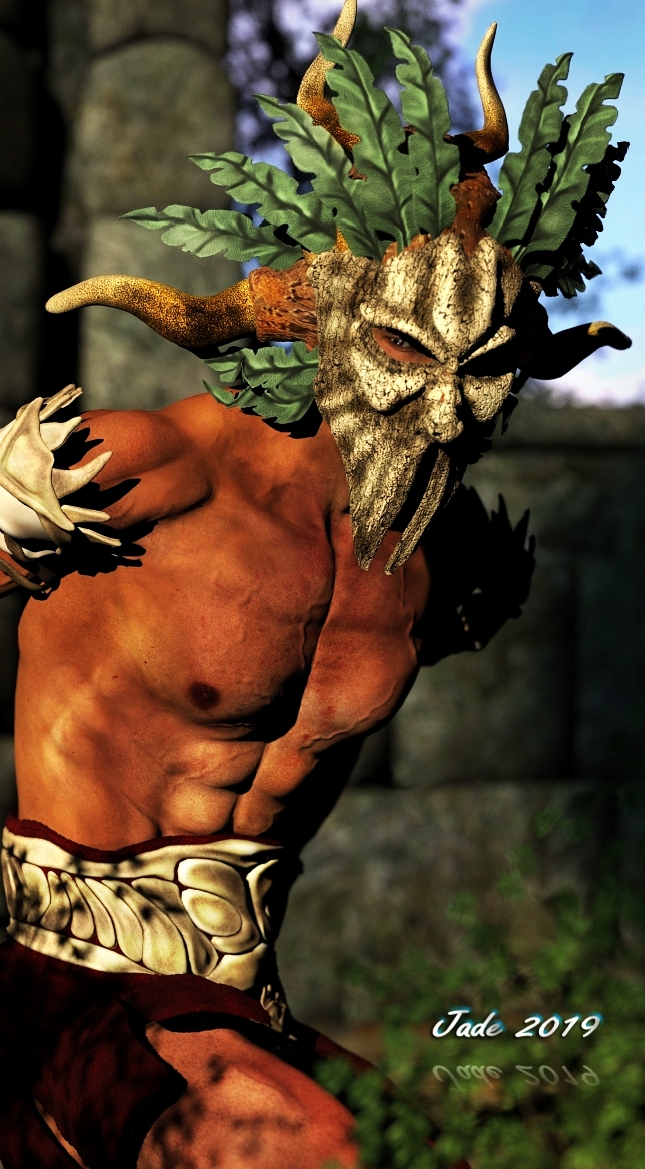
Bryce 7 Pro: Forgotten
The first image -- "Leaning on a Lamppost" -- was an experiment to find out how you force LuxRender to honor a transparency/opacity map set in DAZ Studio. Sometimes it does, and sometimes it doesn't, and if your whole picture pivots on getting an effect like this:


...and LuxRender (or perhaps Reality) leaves the opacity map behind, your picture will actually fall apart at the most fundamental level. The answer to this question was -- don't fight it. If LuxRender is leaving the transparency settings behind, just set the whole thing in Reality instead --

And the only problem there was working out what in the world reality calls an opacity or transparency map. Turns out, in Reality it's called the Alpha Map. Aha. Once you know that, you're pretty much off to the races. The only chore left is numerous test renders to find out what percentage you need to set on the Alpha Map to get the effect juuuust right. The test renders can consume a lot of time ... roll on the next version of Reality, which will be seven times faster!

The next one -- "Fallen Angel" -- is a re-working of an old, old idea. I wanted to ee what LuxRender could do with it; and I wanted to see if I could just do it better in good old DAZ Studio itself. So I not only ran it through Reality/Lux, which you see above, I also ran it through Studio 3 again:


This one has different, subtle lighting and depth of field turned on -- you'll need to see it at much larger size to get the most out of it. Hmm. The truth is, occasionally good old DAZ Studio comes up with a render that's very good indeed, and some subjects suit the "artwork" type of render as much as they suit the more photographic treatment. Which is best? Well --

Here's the comparison; I leave it to you to decide:


Sometimes the "depth" of a picture only comes out when you see it at large size -- or if, during the course of working out composition, you add in, and take out, various elements to see what works best. In the third picture -- "Forgotten" -- which was done entirely in Bryce 7 Pro, the original idea was  that this was a forgotten temple, overgrown and decaying, in the foothills of the mountains. It was going to be a mountain range in the background, dwarfing and overshadowing the man-made structure, which was falling into ruin. Then a better idea occurred to me. I took the mountains out and added this into the background:


A futuristic city shrounded in its own smog, where people are so absorbed in their high-tech lives that their own history is forgotten and decaying within sight of the city. This was the picture I wanted, yet it's very different from the one I actually set out to create. The atmospherics in this shot are what make it -- and Bryce 7 Pro lends itself brilliantly to dense, smoggy air and low, brooding skies.

The 3D model for this one is Palenque, which came from the DAZ Marketplace, right here. The model is very fine; the catalog images are not. This, at left, is one of the pictures from the DAZ online catalog, and the designer of the model has made something of a rookie mistake, which has the effect of making his beautiful OBJ look like a toy. Can you pick it?? It's the backdrop. The palm fronds at the right hand side are nicely blurred out, but they're so far out of scale ... if this temple were real, those palm trees better be as tall as skyscrapers in NYC, with fronds the size of airliners ... otherwise, if those fronds are in scale, this temple is the size of a dog kennel. Dang.

Don't let this put you off: the model itself is terrific, it's just the catalog images that let it down. I've used the model several times; in fact, you can get your virtual camera right inside, and I used it as the stage for "The Man in the Hat." (The thing that I really can't believe was that that image was done over three years ago. Dang, where did time go?!)

Still messing about with digital painting (and loving it), an idea occurred to me:


A shot from Hubble Space Telescope?? Did Dave and I just buy a massive Celestron?? We wish... Ahem! Nope. this shot is purely digital and took about five minutes flat. The secret?

It's a cloudy sky, turned upside down to get rid of the obvious gravity and distance effect of the right-way-up shot; then you drop it to grayscale and crank the contrast to make space BLACK. Then you can add some layers and paint in colors, which is pretty much what astrophotogtraphers do, since all deep-space images start life b&w. The big stars are Photoshop brushes; the small stars are just pale dots. Done!

I could get excited about this trick. Next time I need nebulae in the background for a space shot -- say, something for a Hellgate illustration -- I don't need to look at Hubble shots. Cool.

Still fiddling with digital painting, I was running every experiment I could think of in Photoshop, combining and re-re-recombining filters, to get an idea of their aggregate effects. Check this out:


You may have to see this at larger size to see what's been done. I dropped the old Tag Heuer commercial into grayscale, converted it to a sketch, recombined it, recolored it, and painted over the top with a variety of brushes for effect. The result --


-- is pleasantly weird. But even weirder is that the process took LONGER than some of the stuff I've done from scratch! So this is not something you could use to save yourself a lot of time in painting.

Lastly for today -- was playing with the DAZ Studio cartoon render settings:


It's a really neat effect, and too-often overlooked as we all scramble towards ever-more photographic effects. This is Leon and Iphigenia from a scene faaar down the chapter list in the Abraxas story. Yep, it was all plotted, miles into the future, and I did rafts of illustrations. What, you say -- write it?! Yes. Definitely. Starting to think seriously about that. Soon. Promise.

Tuesday, February 10, 2015

Phororealism in LuxRender ... flights of Bryce fantasy

LuxRender, using one spotlight only ...
and you really can't tell this from a human model.
The overlay effects were painted in Photoshop later,
using various third-party brushes.


Bryce 7 Pro lends itself well to SF and fantasy subjects. One of the
spacecraft (the big one) is an OBJ imported, but the glider-plane is
actually an OBP, or Bryce Object, from a pack I bought from
Renderosity ... oh, a long, long time ago.
Very nice "lines" on this design -- an OBP for Bryce ...
check out the Renderosity catalog for this one. In the background,
that's one of the Dystopia City Blocks imported into Bryce and then
all of the textures switched out for Bryce textures...
A closer look at the water in this little stream, reflecting the sunset sky. Am
very happy with the way this turned out.  
The big spacecaft is an OBJ from Renderosity ... I think it's called
the Allied Fleets Frigate. Very good model -- renders brilliantly
with the Bryce atmospherics. Have used it several times.
DAZ Studio's "cartoon" render setting is a lot of fun
to play with. Am re-rendering some old, old projects
just to see how they turn out as 'toons.
More images from the bottomless stash I've been accumulating for the last year or so, while not having the energy or the braincells to upload so much as a postage stamp!

The swordsman image is a re-render of an old, old project: Fantasy swordsman ... GIMP brushes .. Yaoi romance ... and to save you a click, I'll pull the prehistoric render over here, to show you the diff between what DAZ was doing at the time, and what LuxRender is doing right now:

The old DAZ Studio render, done almost five years ago.
For the new LuxRender image, I used the same file,
same light, same everything.
Now, that's not a bad render at all, and you can certainly recognize the lighting as being identical with the file shipped into LuxRender. But the new render is ... well, so close to photographic, you're sitting there frowning over it, saying, "Is that a render or a human model?!" And that, guys, is the object of this exercise...

Well, it is and it ain't, after all. Because just as often as we want to achieve photorealism, we want to take off on a flight of artistic fantasy. Which is where I went with the second picture. Anybody old enough to remember the artwork of Chris Foss, from the British edition SF paperbacks way back in the 1970s? I used to drool over this art, way back when, and have always wanted to do something like it. Now that Bryce 7 Pro is largely doing as it's told, I'm enjoying the heck out of it!

Oh -- Chris Foss has a marvelous website: http://www.chrisfossart.com ... more than well worth a look, if you're into space art. I still love this work, and have enormous respect for this artist. He's one of several who influenced me over the space of decades.

Lastly, another of DAZ Studio's cartoon renders. Occasionally, I take one of the old, old files (never throw anything away) and push it through Studio on the cartoon settings, just to see what'll happen. Takes about two minutes to get a carrtoon, whereas it takes anything between four and 40 hours to get a LuxRender picture. (Speaking of render times, the atmpspherics on the Bryce 7 Pro image pushed the time on that one out to something like four or five hours.)

More soon. Promise.

Jade, February 11, 2015.

Monday, February 25, 2013

Let there be Lux! Chino revisited...


click to see all images at larger size

I've been wanting to get back to LuxRender for weeks now, and this was my chance. The weather has been too hot to do much ... well, much that didn't involve sitting infront of a cooling device! Go far from a cooler, and you walk into heat and humidity. So this was a great time to experiment with Lux, see if I can get back to where I was a loooong time ago.

The first thing I learned when I started it up was that I had forgotten just about everything. So I set off again with simple subjects. A couple of props sitting on a table, with a simple background:


...so far, so good. There's a bit of "burnout" on the skull there, but I'm not too bothered about it, because I know it's a pretty simple fix, messing about in the Reality materials. I did this, and the next two experiments, at small(ish) size for quickness. The bigger the image (not to mention the more complex), the longer it takes to render. This little one, above, was about 40 minutes, and told me enough for me to get a grip. It's actually worth comparing the LuxRender render (!) with the raytrace:


So, if you were wondering why you'd bother getting into Lux, here's your reason! The LuxRender image has a quality very close to a photograph. In fact, when you get very, very good at this, the renders are impossible to tell apart from photos --

For those of you who could really get into this, you need to visit the Lux homepage, and take a look through the galleries of user images. It's www.luxrender.net, and the link to the galleries is at the bottom of the page, not the top. Bear with me while I learn this. There's a LOT to figure out, but I'm getting there...

The next thing was a more complex image -- an exterior, in sunlight. The top image, here, has been Photoshopped a leeetle bit to add clouds into the sky; the second image is just as she comes:


All right! That's nice, that's very nice. Still simple enough that the render took only about 50 minutes, but not to bad at all. So the next thing was to go back to a couple of old projects and re-render them; and I wanted to add a figure. The 3D human figure might not look a hundred times more complex than a whole garden set, but it is. So this one was always going to be more of a challenge both for self and the software:


This one was still rendered small (if you call 1000 pixels wide small. Three computers ago, I considered this a pretty good size to be working at ... because the 'puter would "barf," as Dave so delicately puts it, if I asked much more of it), and it took about 90 minutes to get to a really good render. 

Sooooo, time to get ambitious!

I pulled up the old file for the leader image for The Legend of Chino Vollias, and worked with that. First step: delete all the lights. ALL of them. Second step: import a Reality mesh light, and render it small, so I could check to see it was working, and working properly, before I set it to render full size. Because rendered at 2500 pixels high, it was a 24 hour render. I left it going overnight, stopped it this morning, when it got to 1500 "samples per pixel." (I've learned many things -- one of them is, the smaller the image, the more samples per pixel they need to look good. The render, right above, was 2000 S/p, as Lux terms it. The big one which leads off this post, was only 1500 S/p, and looks extremely good. I kept an eye on it between 1200 and 1500, and not much was resolving after the 1200 point. So -- time to call it good and start painting.

There's a lot of Photoshop post work on this, I admit. Lux didn't render the whole thing looking like this ... but it could have. It will yield a raw render that looks like this, if you have almost unlimited time to fiddle with the lights and materials. Right now, I don't have that kind of time, so -- Photoshop to the rescue.

So -- how good is LuxRender?! I'm just getting my feet re-wet with this, and there's so much to learn. It's going to be fun!

Jade, February 26, 2013