Monday, January 30, 2012

A little romance, between punch ups and chases --


click to see at large size, 1000 pixels or more...

A little romance -- gay romance at that! -- I couldn't resist, since the characters are back "out of the box" and I'm working with them every day, while I get the series prepped to go to Kindle. A lot of you will be looking for a progress report, so here goes:

Scorpio is just about finished. The last one of the NARC novels to be fully packaged, ready for Kindle, will be the cult classic itself -- Death's Head. And the date for uploading is February 9th. The Kindle "process" takes a day or two, so ... second weekend in February, you'll be able to download all five novels direct from Amazon itself. Jarrat and Stone on your Kindle at last!

Speaking of which, did you know that Kindle has an app, "Kindle for Android" --?? In other words, you can shop Kindle to feed your smart phone or your android tablet. I was at the Kindle store just the other day, basically taking a look to see what it looked like on the phone. On the Samsung Galaxy, which has a 4" screen, the store looks very good. I browsed the lists of our writers and was impressed. So you can be on your smart phone, and buy/download Kindle books right there. Now, that's handy.

Anyway --! As I said, I couldn't resist these shots: a little (gay) romance between the punch ups, shootouts and chases. Here's Jarrat and Stone in a romantic setting for a change. Sub-text on the images? Well ... take a good look. Time has passed between the two shots ... it's raining out now. Missing shirt; Jarrat's barefoot. Hey, enjoy the daydream, right?

These shots were so complex, they had to be done in three stages. The characters were posed in one file; the set was built in another file, then they were combined. Then a huge amount of Photoshop work was done after the renders were complete. I think I spent more time painting in Photoshop than I did on the renders! What made it complex was the details: so many props, lights, shadows, reflections. Originally, I'd wanted to do the background -- the city outside the windows -- as a separate scene, and just put it in as a backdrop, but life never works out the way you hope or plan! So, instead, those buildings are actually part of the 3D scene, in DAZ Studio; and making them look realistic -- blurred with distance -- is something I organized it in Photoshop. Take a look at this:


It's, uh, raining out there. You're looking at about five Photoshop effects stacked one on top of the other. The whole scene was painted in about 12 layers. Oddly enough, it didn't take as long as you might think -- and it was huge fun.

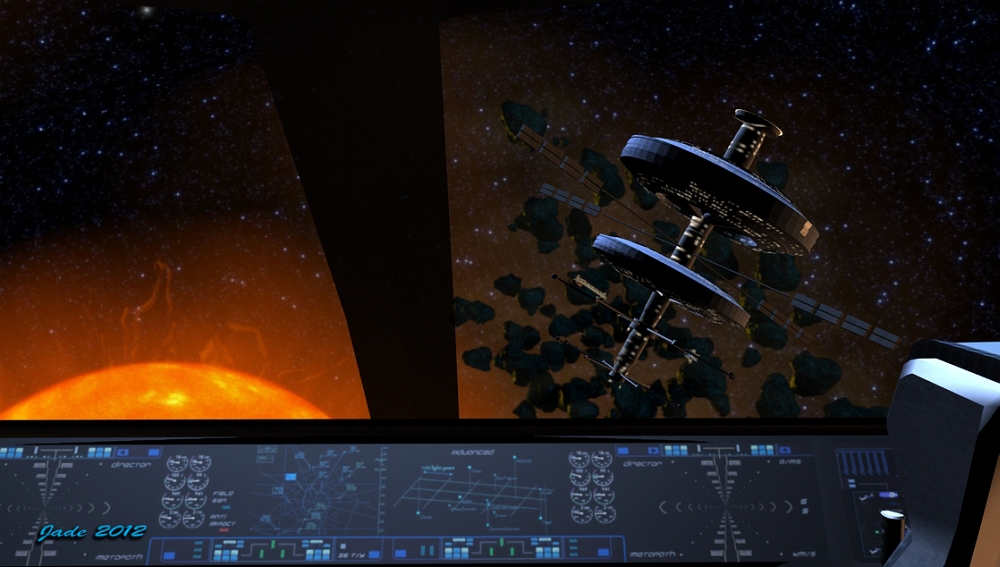
The other shot today, I call "Launch to Orbit." This was done n Bryce 7 Pro and Photoshop. Am very proud of this piece -- it's well worth seeing at large size (it's uploaded at 1100 pixels wide). The raw render was done in Bryce, incorporating the sky, land, buildings, water, moon and ships. Then the fun began. That one took a load of painting. When your eye gets used to the finished version, and you look back at the raw render, it looks oddly plain, or empty.

As I type this, Dave is investigating Vue, finding his way around the interface ... and loving  it. Vue Esprit is on the shopping list for the very near future, and I look forward to playing with it myself. I could wish Vue would run on a computer that's quarantined from the Internet, as mine is; but it won't. You can set it up, but the images don't just carry the company logo, they're "watermarked" all over with obnoxious overlays. There is no way I'm going to take my month-old computer anywhere near the damn' Internet! So I'll explore Vue on Dave's system, and keep on playing with Bryce... 


...like this abstract. Now, that's a weird one, which just "happened" in the course of figuring out how shapes, transparencies, lights and reflections interact. Very cool indeed.

Jade, 31 January


Saturday, January 28, 2012

Cities in the air ... Jarrat and Stone are back!


Click to see all images at 1000 pixels or more -- they're uploaded large!

If you're on the Mel Keegan mailing list, you know what's going on behind the scenes: we're working on converting all the old files for the NARC books (yep, Jarrat and Stone!) to the requirement for upload to Kindle. It's a monster of a job, because these books only exist, in electronic format, in DTP software and in the PDFs made from those files. They have to be shipped out of the desktop publisher and into Word, and then the fun begins. Three are finished (Equinox, Stopover and Aphelion), and two remain to be started on (Death's Head and Scorpio). And then, when Mel is done with the sixth and final novel in the Hellgate series, Jarrat and Stone will be back...!

(If you have no idea what Jade is rabbiting on about, go here to find out: Mel Keegan OnLine. A word of caution before you depart: these novels have glbt content. Gay heroes. Gay science fiction -- SF that will stretch your imagination, plus the most delicious gay heroes ... what a combination! Mel Keegan is best known for this work, and if you try some of the free samples, you'll soon see why. Content waring? Not for juniors. Nuff said.)  [2023 EDIT: the dot-com web address is defunct as of early this year. For some reason, the system utterly denied access to it, and it could not be renewed. Then some joker bought it as a zombie domain name, and MK would have to buy it back at significant cost. Not going to happen, but the web pages are all still there and still viable. Find MK online in the same place.]

So yes, you bet, these novels are very much on my mind, and you'll have to forgive me if I'm rendering my favorite science fiction heroes again, while I work on developing the cover elements for the new covers for these books...

The element that had me the most concerned was the floating sky-cities which are a pivot point for Scorpio. They float in the sky of a world called Aurora ... and NARC is expected to fight major battles around structures that are this fragile, this delicate?! It was a heart-stopper of a climax to a book that had already been "out of this world," and I knew I had to really, seriously, do justice to these cities.

So at last I girded the loins and grabbed the bull by the horns. These renders were done in Bryce 7 Pro. Moreover, you see the cities -- buildings, trees, domes, antigravity platforms and all ...? I built those. Also in Bryce. Now, I won't tell you that I'm up to making the buildings -- not yet. Those skills come right after I (somehow!) master the Bryce materials lab. To this point, it's starting to make sense, but there's so much more to learn. One of my new year's resolutions was to stop being a bloody grasshopper ... settle down and learn one thing at a time, learn it properly, fully, then progress to the next level.

But I lucked out and found a Bryce "scene" on sale at Renderosity -- Alien City Blocks. These scenes are packaged and sold so that you can reverse engineer them, and learn. There's all sorts of scenes, like frozen mountain lakes and forest glades. The space city was the first one I've ever actually worked with. I borrowed a few of the buildings; added a park in the middle of the city -- micro-miniaturized trees and hillocks! Then I built the decking underneath, and popped a sphere on top. The rest of my floating city scene was done with some mountaintops and a sky -- which I also designed ... I've got my head around the Bryce Skylab. It's started doing what I want it to do. At last.

While I was messing around in Bryce I also did this...


...which came to me when I was fiddling around in the materials lab and spotted a certain texture that looked like a city at night. It made me think of Death's Head, and the spaceport city, simmering under its smog blanket, while the sky lights up with the sternflares of big ships heading up for orbit. (Damn, I love these books! It's "my kind" of science fiction ... then, if you add in the most gorgeous gay heroes who ever walked on paper or celluloid ... how could you go wrong?)

So elements of that one could end up on the cover of Death's Head, and now I'm starting to play with images of the planet Earth, and massive spacecraft, because the signature "thing" of Aphelion is that the carrier NAC-Athena returns to Earth after a whole career in the rimworlds. Hmmm. Lemme think.

Anyway -- that's where I am at this moment. Before I go -- have some more Jarrat and Stone pictures. You didn't really think I stopped at two --?


And if you notice, in this last shot, I put one of the floating sky cities in the window. I need to get the camera in close to the cities themselves, and show you the parklands. The whole gist of this was that Aurora is a world which is strategically positioned for navigation and "staging" colony ships out beyond the frontier, but the world itself is cold and harsh. An engineer-architect called Leo Michiko made his fortune on constructing these cities ... or did he? What's his connection to the Angel (drug) cartel known as Scorpio --? And of course, that's where the title of the book comes from.

In fact, Scorpio is the one I'm converting next -- and sure, it's a chore. But the source material is so delicious, it makes the work a pleasure too!

Jade, 29 January

Friday, January 27, 2012

A bit of this, a bit of that...


click to view at large size -- 1000 pixels wide, or more...

Something for everyone today: male nude, action, fantasy, science fiction, space ships, landscapes, Bryce, digital painting, CG art ... the works! This is what I've had going through in the last couple of days.

The top three images are a sort of "pet fascination" of mine. Movie directors these days use a thing called "pre viz," or "pre-visualization" to help them frame up the shot before they waste a million bucks an hour on the set. I would dearly love to work as a pre-viz artist for a movie comany. *sigh* They email me something like stick figure sketches, and I render up "quickies" such as you see here -- they look like frames out of the movie, and they'll tell the director what'll work, and what won't, and why not. These shots took a matter of minutes, and it's a load of fun. Now, how in the world does one go about getting a job doing pre-viz --?! These images have no post work on them at all. Nada. These are just as they rendered up...

Next: a spaceship on approach to a blue-green world. Ship and planet rendered in Bryce, and all else done in Photoshop -- basically, some surface detail on the planet, the starfield, the lens flare. The nebula is a Hubble image that was dropped into the background, blended down, and a mask applied to the ship to make the nebula drop behind it. Neat.

Next: a rather lovely Bryce landscape -- fully photo realistic. At last! This is the first time I've managed to get photo realism, and it's still a leeetle bit of a crap shoot for me. This one was almost easy (almost too easy, in fact), including the Instancing lab, which "paints" plants and flowers onto the ground. The result is actually rather superb, so --

I thought I'd have another go, see if I could do it again. Nope. The Instancing lab started to crash the program over and over. I barely got the foreground set up before I just couldn't keep Bryce up on its feet for long enough to put enough into the shot to make it realistic. So I rendered what I had, and then shipped it into Photoshop and painted the hell out of it. That one there classifies as a digital painting, not a render, and this was what I wound up with after tearing my hair out by the roots...

In fact, I would up on Google, searching on "Bryce crashing when Instancing used," and it turns out ... it does. The publisher actually issued an upgrade about five months ago -- I missed it, because at the time my computer wouldn't run Bryce well enough to make it worth getting into, so I wasn't paying any attention to the website. Now, my mission is to find out of I can get the upgrade. Then maybe (and I know it's a long shot) I can get the Instancing lab to work. If not -- well, there are other ways and means, not as fast, but far more stable.

The last image for today -- the pony in the paddock -- was supposed to be photorealistic too. It's based on a piece cut out of the meadow shot. Easy enough to use it as a backdrop and put the pony into the foreground ... and then, wouldn't you know it? I had every render problem under the sun! I wound up with an image that had "problems." If you saw the actual render, you'd be saying, "Hmmmm." So I shipped it right into Photoshop and converted it to a painting, which also gave me the opportunity to just paint out the problems, and paint in the solutions! Grrr.

Suffice to say, I'm still working on getting the drop on Bryce ... I'll see if I can get the upgrade ... and I'm groaning for a decent render engine! If I won lotto next week, it would be Poser Pro 2012 -- mind you, I'm told it's buggy as an ant farm. Better to wait six months, and get the fixed version, yes? Yes.

Jade, 27 January

Monday, January 23, 2012

The archangel, the mammoth and the gum tree. Say, what?!


Click to see at large size ... all uploaded at 1000 pixels or bigger...

Here's an eclectic assortment! Fantasy guys, landscape, Bryce, DAZ, Photoshop ... and a mammoth. Yes, a real, genuine mammoth. Have been looking at dinosaurs in the catalogs at DAZ and Renderosity. Now, there's some serious "wow" factor. Not that I have any use for dinosaurs, you understand! The mammoth was on sale at 100% off, so how could I go by --?

The first piece today is essentially the same character as you saw a while ago -- the raven-winged archangel. You must have been wondering when I'd get around to depicting the character in flight! The sky was rendered separately in Bryce, custom designed for this piece, and after the raytrace in DAZ, I shipped it into Photoshop for some painting. Birds, smoke from the chimneys, a light in the window. Also, I "painted down" the building on the right to make it darker, and to hint an sunset colors on the walls. The result is actually lovely -- do check it out at larger size. It was rendered at about 1500 pixels wide, and I've uploaded it here at about 1100 (also compressed. Full size, uncompressed images get a little ... large.)

The landscape is designed to look like South Australia in the summer -- and it really does! But what's neat about this render is the big tree, the "hero" tree in the left of the shot. It's not a bad emulation of one of the big types of gum trees, and I designed, built, that one myself. It took about 15 minutes, maybe 20, and most of that time was learning how to do this stuff in the Bryce tree lab. I'm rather tickled with this tree. The render ...? It was done at 1500 pixels wide, and it took (!) 7.5 hours. I rendered overnight -- set it to go when I took my aching head to bed, and when I got up at 3:30am with a monster headache, it was still going ... and at 6:00am, when I made it back to the computer, full of pills for said headache, it was juuuust finishing up. Patience is a virtue. It was finished off in Photoshop, basically to have some gamma and contrast correction -- and I'm very pleased with this. There's places in this state that look just like this, especially in January, when the heat is relentless. 

The last shot is a study in light and shadow and color -- one thing that's interesting is that I exported my gum tree out of Bryce, and it left its trunk behind! I got fantastic foliage and no woodwork ... go figure. So I imported the skeleton of another tree -- a prop I've had for eons which has a great trunk and comparatively poor foliage -- and plopped my foliage on it for the best of both worlds; added an abstract background and set some dramatic lights, purely for effect. For fun. 

More soon. Head still aching. Must close eyes now...

Jade, 24 January


Saturday, January 21, 2012

SF, fantasy, horses, spaceships, landscapes -- a bit of everything today


click to see all art at large size: they're compressed, so shouldn't take long to download

I've been busy with art ... time to post the images is a whole 'nother question! So I'm posting them all today, because it could be another couple of days before I can get back on and post more.

The first two images follow on from the spaceport scene you saw in full daylight a few days ago, and there's a story that goes along with this. It's the same character, same spaceplane ... but it's night now. It's hot. And the damn' thing won't start up for love or money. He's working on it, trying to get it fixed, when he hears someone approaching. A guy steps out of the night: "Looks like you need a hand there." But the hero knows there ain't no such thing as a free lunch. Yes, he needs a hand, but what does this tall, handsome stranger want in return...? Naturally, he's a tad bit suspicious, and... 


Sure enough, two days later our intrepid hero is flying a dangerous mission over an inhospitable world where the atmosphere would strip your lungs!

The top two pieces were done in DAZ Studio ... and I'm starting to long for a proper render engine. I'd committed to this skinmap (SAV Eros), and discovered way too late that it won't render properly in DAZ. As soon as you turn on raytracing, the whole skin turns into a mosaic, with "join lines" showing everywhere. It was biiiig fun painting them out in Photoshop. I chose to do the work because it was great practice for me -- I'm still trying to wire up my brain to handle a mouse pen well enough to make it worthwhile putting down some serious money to get a proper one. This was a fine exercise.

The horse picture is lovely ... it uses this Bryce landscape render as the background: 


This was a separate project, and done in daylight. Turning it into moonlight involved putting a "color cast layer" on it inn Photoshop (using a bucket-filled layer) and jiggling the settings till they were just right. The results are very nice indeed. Check out the grasses and plants in this Bryce picture ...! For the first time ever, I have the chance to use what the call the Instancing Lab. Basically, you create a plant, or grass, whatever, and then you "paint" the object onto the terrain in swatches and bunches. You could grass up a whole hillside with a stroke of the virtual brush. The downside? The render times blow out. This picture was rendered at 1500 pixels wide, and even with the PC I have now (thanks to my husband, may blessings be upon him) it was a 2 hr 36 min render. But worth every minute! A little bit of color and light correction was done in Photoshop later; and when it turned into a nighttime shot to be used with the horse, the moon was painted on using an .abr brush, last of all.

Those are stock trees: the big ones in the middle are the Special Acacia, and while it's true that most Bryce trees don't look so convincing, some do. Speaking of trees...


These coconut palms were created in Bryce by Dave, and exported over to me -- handed to me on a jump drive, and I built this landscape around them. These trees are really cool ... great work from Dave. Check out the clouds drifting in front of the volcanic mountain there ... you might assume they were painted on later in Photoshop. Nope! They were created as objects and plunked right there in midair! You make a primitive shape and apply "materials" to it. Fuzzy, transparent, pale, soft ... result, clouds. In fact, the little pool in the grove in the previous picture was also done as a flat primitive, with a water effect slapped on it. Neat!

The last thing that I want to mention about today's images is the mane on the horse. It's glorious ... it's hand-painted ... but not by me! I'm still at the crayon stage, trying to figure out how to make my hand behave itself and use a mouse pen as easily as it uses a pencil or paintbrush. These manes and tails were painted by a designer called CWRW, and you buy them (via Renderosity) as PSD files filled with layers. You lift out the layer(s) you want, and then use the tools in Photoshop to reshape, skew, resize, flip, color and so forth, to make the pre-painted elements fit your scene. As soon as you're used to Photoshop, it's quite easy, whereas actually painting the manes and tails is a job for someone whose hand will behave itself with a mouse pen just the way mine won't. Kudos to CWRW: marvelous work. In the picture above, the mane was built up from various hanks of hair; I did about 10 layers of them, and I love the result.

Don't give up on me: it might be a couple of days before I can get back with another post, but you just knooow that the artwork is rendering away to itself in the background!

Jade, January 21

Tuesday, January 17, 2012

Trees, elves, daylight and playing god in the vitual world


click to see at large size (they're compressed for quick download)

The quest for Bryce 7 Pro daylight appears to have been rewarded! I won't claim that these renders will appear fully photo-realistic on close examination (especially not the second one, featuring the really neat tree in the foreground -- more about that later) ... but at quick glance, your eye is just about fooled, because (hee hee!) that's a pretty good representation of daylight. 

What's the trick? Well ... I was hunting through the Atmospheres pane of the Skylab (that really is what it's called), and I saw something called Basic Daylight. Now, everything in the Skylab is a preset ... you can get alien planet skies, midnight storms, storybook mornings, whatever you want, basically ... anything except for real, genuine, normal, ordinary, garden variety daylight. So when I saw something called Basic Daylight, I had to take it for a spin...

Hmm. Not too bad -- at least, it gives you a place to start. What you do is, load up the Basic Daylight sky, and then get real busy: change the sun position (by dragging an icon on a virtual globe), and then ... gird your loins and get into the actual sun/moon controls, and literally "play god" and tell the sun how bright to shine, and what color! Me like. A lot.

And speaking of playing god ... something about "Only Zeus can render a tree" (with all due apologies to Joyce Kilmer; who is no relation to Val. I think). I know, I know, it was make a tree. But, sheesh, you'd need to be zapping lightning bolt around (or maybe your name better be James Cameron!) to render proper trees properly...

This one you see here --? I, me, myself, actually made this tree in a program called Carrara, which is DAZ Studio's bigger, brighter brother. They're up to Carrara 8 Pro now, so they're giving away Carrara 6 -- it was packed on the disk in the back of their promo book, which I bought via Amazon about two years ago. Frankly, I never even bothered to install it on my old computer. It would have been a world of grief. But with the new machine, I loaded it up the other day and Dave, who has some acquaintance with it, showed me around ... showed me the tree lab.

Aha, says I ... I shall play god big time, and make a tree! The upside: the perogram makes it quite easy to get some very good results with tree making. The downside --

Dang. This tree, which looks about 500% more realistic than your average 3D tree, has over 650,000 polygons!! I exported it out of Carrara, got it into Bryce, set it to render (and not even on the top settings, either), and even with a super-fast computer, Bryce was going to take thirty HOURS to render it at a large size. So I rendered the picture at half-size, about 750 pixels wide. That took about three hours, and it's all on account of the polygon count.

Well, shoot. Now you know the reason why 3D trees usually look pretty poor! They're made simple, of necessity, because anything more complex would take the rest of your life to render, or crash the computer, and probably both! Unless your name is James Cameron, and you're rendering on about 50 processors ... or you happen to be Zeus, and you have access to every processor in the known universe.

Not being either one of them, I'll tread carefully when it comes to making trees! But daylight is doable, and I just stumbled into how another part of Bryce's materials lab works. You can sometimes scale your materials to fit the object you're slapping them onto. Not all the time, but sometimes. And that's so handy.

Speaking of daylight ... before anyone asks, the sun rays in today's figure work were not done inside DAZ studio. They were painted on in Photoshop, in post work. In fact, they could have been done in DAZ, but I didn't have time or inclination. To have these render as part of the scene, you'd paint them in Photoshop, save them to a black and white image, and load up that image as an opacity (transparency) map, which would be applied to a primitive, a plane, which you make in DAZ by clicking "create primitive." You'd jiggle the plane into position, so that the rays were in the right place, and render. But there was quite a lot of other post work to be done on these shots anyway, so I thought, why bother?

Here's the detail from the second one:


...and as nice as this is, I knooooow what it would look like, if it were rendered in a proper render engine. I'm drooling over the Firefly engine, which is built right into Poser. Meh. Whimper.

Notice the background in the figure shots?! The view outside the window. Yep, it's the Bryce landscape (or a piece out of it), which you see today, with full daylight over the craggy skyline with the canyons in the background. I just cut a swatch out to fit the render size of the figure shots, and adjusted the gamma and contrast waaaay up to simulate the brightness of "outside" which your eye would expect, when the virtual camera is getting a correct exposure on a figure in the dimness inside. Neat.

The cute little sparrow is a prop I bought from Content Paradise a year or more ago. The costume is the vest from The Hunter, and I wish I could remember what the bottom half of the costume started life as! I changed out every texture and map, and I've totally forgotten what the original prop was, sorry. Likewise with the skinmap. That's one of my own face morphs, and I have 100% forgotten what the skin is. But the hair is the Akaste Hair prop, that much I can recall. (Makes note to self: get brain examined.)

Jade, 18 January 

Sunday, January 15, 2012

A bit of SF, a winter's day, and the quest for daylight


click to see at large size -- 1100 pixels wide

Adventures in Bryce ... but the first image up -- the spaceport, or skypark -- was done n DAZ Studio. It's well worth viewing at full size, because its loaded with detail, and that's not a backdrop ... all the buildings and so forth are objects, right there in the shot. Talk about processor power --! It would have been an impossible render with my old machine. Here's a snap out of it -- the character himself. That's one of my faces, wearing the SAV Eros skinmap and the Casual Slick hair by Neftis. The costume is the Forgotten Warrior, by Slide 3D -- but a lot of the textures have been changed. There's three different aircars in this shot -- the Stinger, the Wasp and the Skyrider, all from DAZ. Two out of the three were freebies on the cover CD-Rom, with a recent issue of ImagineFX magazine.  


Steadily, slowly, I'm getting happier with the Bryce work I'm doing. At the moment, the experiment is about "how do I get true daylight?" Because the renders I've been getting are fine and dandy, but they're not what you'd call photorealistc, and they don't feature anything remotely like real daylight. Now, sometimes this works to the advantage of the piece -- like The Sword in the Stone, for instance. But I would just love to be able to get true photo realism, true daylight, which are features which programs like Vue and Terragen manage automatically!

I spent a pleasant half hour drooling over David Brinnen's work from about 2006, on his Deviantart gallery, the other night. The work he was doing in Bryce 5.5 was ... amazing. Very, very close to photo realism, in a program that's well and truly obsolete now. So this stiff has to be doable in Bryce 7.0 Pro. Now, how?!

The experiment continues. Brighter lights? More complex shadows? "Volumetric" clouds? Sure. I'll be happy to try anything I can think of! There's a long, long way to go, but -- it's a load of fun. 

Jade, 16 January

Friday, January 13, 2012

Fantasy and SF in Bryce and DAZ -- plots, and all!


click to see at large size -- images are compressed, so they shouldn't take too long to download.

It worked! It worked! Am doing laps of the room without quite touching the floor. The second of these renders is The Sword in the Stone ... it was done in Bryce, and -- heee hee! -- this was the image that was in my mind when I started up the program. Nothing happened by accident -- I know exactly what I did. In other words, I was driving Bryce 7 Pro, it wasn't taking me for a ride. The penny is starting to drop rapidly now, and it's actually a bit thrilling! 

The sword is the High Fantasy prop from DAZ, a Viking sword. The big stone is the "Big Brick" from H3D's "Lost" standing set. These were imported into Bryce as OBJ objects, whacked into position, and so forth. Now, I did change out every texture on the sword for Bryce pro textures, and it's well worth having a look at it, at large size (I uploaded this at about 1250 pixels wide, something like that, so you can really see it). The grasses in the foreground are Bryce OBP objects. Loads and loads of them to create some nice, rank grasses before the plane stretches away to the hills at the edge of the heath, and then the mountainous structures lost in the mist, way beyond. The rock was retextured with a digital image of a piece of mossy sandstone, and then when it landed in Bryce I whacked one of Bryce's bump maps onto it and cranked the settings way up. 

All the mist was generated in Bryce; the birds were painted on in Photoshop, using Ron's Birds. Now ... if I told you the one render was good enough, that would be a lie. In fact, it took four renders to get every element of the picture "right," and some of them were mutually exclusive. For instance, to get detail into the hilt of the sword, the blade washed out, and to get nice toning on the mountains, the foreground went a bit weird. (I might be doing something wrong in the render settings ... dunno yet. Am still learning, right?) So what I did was, get all four renders into different layers of Photoshop, and systematically erase everything I didn't want, keeping only what I did want, so that all the best bits showed up in the one frame ... flatten the image (drop if to a single layer) and save it, quick!

Is there a story behind this image? Well, half a story. Imagine ... you're taking a vacation somewhere off the beaten track -- the Orkney or Shetland islands. An unseasonable storm comes through and floods the lowlands, there's lots of washaway damage, the landscape gets rearranged a bit. It dries out, and you take a hike and find ... this. The sword in the stone. But here's the rub: it's the Odinsword. Enter the archaeologists, one of whom is a martinet who doesn't believe in anything he can't catalog; the other is a (secret?) pagan, who knows just what she's looking at here. She tries to save the sword from being boxed and shipped off to a museum basement -- it comes to a shouting match in the local pub, which makes it onto Twitter, and someone from the Norway pagan group sees the Tweet. The sword ... goes missing. The police arrive, to accuse the archaeologist of stealing it. And ... so on. What a novel this would make! 

The other image, I call The Conjurer ... not a magician, or a sorcerer -- a stage magician. Showman. Or maybe something along the lines of the character of Drake Stone, in The Sorcerer's Apprentice -- he actually is a magician, but he makes a fortune on the stage. (There's also a lovely old book by Paul Gallico, The Man who was Magic, which has the same sort of central character -- he's a real magician, competing with stage magicians (and boy, do they get mad when he can do "tricks" they can't). I read this when I was about 14, and have never forgotten it. Don't have a copy, sad to say. Never owned it, in fact; it was a library book. 

There's half a story that goes with this picture too. Try this on for size:

It's way in the future, when civilization has crashed due to climatic change and pollution. Mankind survives in pockets of "grunge resistant" strains of homo sapiens, some of whom have mutated due to the pollution. The physically deformed are hounded, hunted, destroyed. Those whose mutation is not visible can "pass" for human, and get by. This guy, here, can do magic, and he earns his living in a traveling medicine show, as a conjurer ... till someone, somehow, realizes what he is. Then he's captured and dragged off to the laboratory of a bunch of mental giants (genius is their mutation!) who are trying to figure out how the "special" ones work. The lab is in the decayed and crumbling ruins of an old, old city, where survivors camp out in shanties built of the rubble. The last computers are here -- super-computers, since this is long in the future. There are way too many people for the resources, and one of the super-geniuses has been charged with fixing the problem. This is why he's researching the "magic" of the special mutants ... because the alternative is something that was suggested by various SF writers back in the 1960s: people have their consciousness "uploaded" to a whole world inside the massive computer systems; then their bodies can be recycled. They haven't been exterminated, because they now live in a fantastic, perfect world. The only problem is, the system of upload hasn't yet been perfected -- it's not working properly. Test subjects are just dying. So, can magic come to the rescue --? Does our hero make it out of the lab alive? Do people get uploaded -- are they still alive in there? Can they be downloaded into perfect android bodies, that don't need food and water, later --?? Again, what a novel this would make. 

Those experiments I mentioned yesterday ... seeing how far the DAZ render engine can be pushed: no joy. I maxed everything out, and the software fell over consistently. Throttled it back to what it would tolerate, and there's no visible difference in the render quality. Meanwhile, I've been looking at the render quality one can get out of Octane, and drooling. Problem: DAZ Studio exports a Collada (.dae) file that it can't even read back into Carrara or Bryce, which are from the same company! So, expecting Octane to open the same file is an improbable fantasy.

So... I looked at Poser Pro 2012. The Firefly render engine. Mmm hmm. Uh huhh. Heading that way. Definitely heading that way. Damn, but the Firefly engine generates some fantastic renders ... and I'll just bet the shaders work properly in Poser, too (which they don't, in DAZ). Now, I also read the reviews, as I always do, and the current version of Pro 2012 is a little bit buggy and crash prone. So -- wait six months, and watch out for a sale!

And now -- back to work. Duty calls, and so forth...

Jade, 14 January 


Thursday, January 12, 2012

The Wood Goddess ... and having a ball in Bryce


click to see at full size -- 1000 pixels wide ... but I had the presence of mind to zap these guys with a bit of file compression, so they''ll download faster.

The main picture today is called The Wood Goddess ... do you remember the Spirit of Winter I uploaded for Christmas -- the one with the ice wings? I guess this would be the female equivalent. In fact, it's the antlers from the Wood God costume (they're actually attached to a goshalmighty hood, but you can easily make the hood go transparent and leave the antlers behind), and the Yaana skinmap, and the Celestial Hair. The element I like least about this image is the hair, because no matter how you render it, it looks plasticky, and the only thing you can do is paint over it in Photoshop later. I didn't have a whole lot of time to paint on this, but I did enough, I think, to "get away with this"... here's the detail shot:


The thing I like most about the shot is the way the snow came out -- that was done with a terrain created in Bryce and imported into DAZ Studio 3 as an OBJ, and then mapped to hell and back. The backdrop works well ... a digital shot which was adjusted into night colors, then had the moon zapped on with an .abr brush and the stars hand painted ... which was just the start of the fun. There are about 12 layers of additions and effects in Photoshop, to get the image to look like this. The original render was ... glaringly bright and "plastic." You wouldn't have been impressed. The final result? Me like. Muchly.

The second image is a Bryce project, which represents an experiment: this is the first time I ever imported an OBJ and used a real 3D model in a Bryce shot, rather than using Bryce's own trees. Remember the other day, I was grumbling about Bryce's trees not looking very realistic? These little spruce trees are the Rhodi-Design props, which I think I got from Content Paradise (which is SmithMicro's store). There are also some fantastic new trees appearing on the market  now -- so I can't have been the only one grumbling about the ticky-tacky appearance of so many 3 trees! These are on my wishlist at DAZ:


I'm having a ball with Bryce, now that I have the processor power to run it properly. Today's landscape, I call "Craggy Skyline" ... ooooh, I wish I could tell you that was one of my textures on the terrain (the ground), but it would be a horrible fib. It's one of David Brinnen's materials, which were shipped as Pro Materials with Bryce 7 Pro. This is such a complex material, it took only a tiny bit of post work in Photoshop to make it pass muster at any size. But I did configure that sky myself ... and the next thing I'm going to experiment with is what they call "volumetrics," which is a way to make devastatingly realistic cloouds...

It's just possible I started to learn Bryce backwards. You actually can figure out a lot if you play with abstracts first ... shapes and colors and textures. Like this:


Well ... I guess I probably did what everyone else does: jump in headfirst and start with landscapes! In fact, playing with mapping and so forth first would make it easier to learn the tricks. The problem is, it's nowhere near as interesting -- and who starts up Bryce with the idea of doodling with abstract shapes?! You want misty mountains and fjords and stormy skies, and all that good stuff. You tend to make a huge mess for the longest time, and then eventually the penny starts to drop.

There's an image rendering in the background right now, which I hope to show you tomorrow. Even on my new system, it's going to be a looooooong render, but it should be worth it. The original render settings called for a "maximum ray depth" of 12 ... which would have resulted in a 15 hour render! Hmmm. Revert to the defaults, and it comes back to a 2-3 hour render. I can live with that. And when it's done, I have another experiment to run --

Get into the advanced render settings in DAZ, and see how far the render engine can be driven. The default settings are low, and I never had the ability to go past these. In the last few days, Dave and I have been looking at every render engine from Lux to Reality to Octane ... but the problem is compatibility. Getting DAZ to shake hands properly with anything is a major issue.  As much as I love DAZ Studio, I'm facing the very real possibility (probability) of being compelled to change up to one of the more industry standard programs, in order to get access to the render engines. If you're interested, have a look at Luxology, which is a cool grand. Don't even think about AutoDesk's Maya ... it's five grand. Oomph.

Will let you know how the experiments work out ...!

Jade, 13 January (yep, it's a Friday)

Tuesday, January 10, 2012

A grab bag of digital goodies


A grab bag of pieces today ... what I've been fiddling with in the last couple of days -- and it's an eclectic mix. A bit of everything. I've uploaded these at large size, so folks who are curious can see details -- but you might need to be patient with the downloads. They're a little large, and could take a few moments.

There's a portrait of the barbarian you saw the other day -- I'm quite pleased with this face, and in the render I uploaded before, you don't really see it. Then ... an experiment in reflections, transparencies and surface textures. Exotic science fiction, complete with the next-to-naked female and the robot, which are two prerequisites -- but the real gist of it is about the surfaces! A lot is going on in the picture; it's definitely one frame out of a large story, but search me what the story is. Anyone...?

Then, Bryce landscapes ... misty mountains, trees and all ... and the second one is a re-visitation of the one I was playing with a few days ago. I went back into it, and put in cliff walls, with weathered rock formations. A... ha. I think. I do believe a couple of pennies have just dropped. Bryce is starting to make a tiny little bit of sense -- in other words, when good things happen, they're not 100% accidental. Maybe only 80%! Theres so much to learn.

Then -- simple shots, but so effective. A couple of models I knew I'd bought about five months ago, and couldn't find for love or money; they showed up while I was looking for something else. The space sphere is the key model in these last two images. It's the spherical environment in which the spaceship and space observatory are positioned. The ships are inside your actual, genuine sphere, so you can point the camera virtually anywhere. What you see here are pre-set textures -- those backgrounds. My next challenge is to paint my own textures for the sphere, and go fly around in it. The last picture of all is shot from inside the cockpit of the Vanguard spacecaft model, on approach to the space observatory...

Loads of fun, and all down to the processor power I have now. Thanks go, once again, to my husband, for sliding the new PC under the Christmas tree while I wasn't looking! 

Jade, 11 January