Showing posts with label textures. Show all posts

Friday, March 15, 2024

As you like it...

Genesis 8, Iray

Michael 4, raytrace

Digital painting, Photoshop

One factor has characterised the last month or so here in South Australia: heat/drought. The rain stopped. The heat came. It's been ... interesting, to say the least. Not fun, but -- interesting. No, I haven't done very much art in that time. Most days, I couldn't even turn on the computer. The PC enjoys the hot weather about as much as I do. In other words, not at all.

But for what it's worth, we're close to the end of this nonsense now. It's been autumn, officially, for two weeks, and we've had some actual rain (enough to end the drought, though it didn't go on for more than a day). Temperatures will be down by ten and fifteen degrees Celsius in the days and weeks to come, and I'm looking forward very much to getting back down to some art. Also writing.


For now ... these are repaints of old renders, some of which never even saw the light of day. They were done as tests and experiments, and appear to have been shelved, several years ago. Digging back through the archives is like hunting for buried treasure -- and finding it. 


So, what's your fancy? Iray, raytrace, painting?? It's tremendously interesting to compare results across a couple of engines. For instance:

Amadeus: firelight ... raytrace; and

Amadeus, identical costume -- Lux Render

Amadeus; same costume but the textures
have been switched so shaders ... Iray is different

What makes me chuckle a little is that the textures on the costume in the raytrace and Lux renders -- well, the pants he's wearing appear to be made from the cushions on the couch we had about ten years ago, and his shirt, I kid you not, is the crochet handbag I used to carry around 2012! Ooooh, I used to enjoy making textures and the displacement maps and opacity maps and reflection maps ... why did I ever stop?! 


Must get back to this. Start up Studio, go right back to good old Michael 4, finish reinstalling all my oooold Renderosity content (I only got about a third of it reinstalled before Genesis lured me away and everything started going awry again) and just ... have fun.


Note to self: have fun this time!


Wednesday, February 28, 2024

Painting on a hot, humid afternoon

a repaint of an old raytrace... second life.

also a repaint: coming back to the original,
it looks dull and boring. Now look at it!


At the end of summer, time seems to slow down. You're hanging on, waiting for the hot weather to end, desperate for rain, and everything ... slows ... down ... as if you're in the grip of some deadly time dilation. Falling into a gravity well where something you can't even see is going to roll you flat. Wellll, that's what it feels like when it's hot and humid and you're fed up of the season! 

Not much is going on, artistically (or any other way, come to that). Most of what I'm doing at the moment is editing, though I'm about to collaborate on a story project -- a true collaboration for the first time. Can't recall ever having done this before, but my writing partner and I have developed a very easy, almost symbiotic relationship, and it should be rewarding. Even easy. We'll see.

So I spent the afternoon editing and painting to pass away the time. Only the landscapes are truly new today; the others are repaints of old projects -- the barbarian on the horse really needed it. Coming back to it in 2024, I found it pretty dull and boring, though the idea was fine. Photoshop to the rescue. In fact, I like this one enough to recut and remount it. I'll leave you with this:


It also is a raytrace ... those are not shaders, which we use in Iray. In raytracing, you're responsible for all your own textures -- and I'm just remembering how much I used to enjoy doing that. Shaders can make the work easier, but it's nowhere near as rewarding as designing a whole suite of textures yourself -- some of them, hand painted. Soon as the weather breaks, I must start up Studio (for the first time in two years!) and ... play. 


Thursday, February 4, 2021

Old props, new surfaces, and lighting fires in Iray


Spending a cold, wet day installing old, old props and working with Iray shaders and surfaces to bring them up to spec for rendering as we understand it today. This, above, is DM's old Fantasy Musings, which goes back to about 2012, and is actually still available. The product notes say, "The entire content of this package has been optimized for Poser 6 and above. Not tested in Daz Studio. Some materials will need adjustment." And of course, when this was uploaded, Dannie and Maforno were talking about the 3Delight render engine, not Iray! The truth is, to get it working in Iray took some considerable time, but it was worth it. It renders up nicely. And of course --


--even if you were inclined to stick to poser (I bought Poser Pro 9 and never really got into it; I didn't have any space whatsoever on my C:\ drive to install the figures and props, and Poser wouldn't load content from any other drive, so I was sunk!) ... well, if you were inclined to stick to Poser, the aforementioned Poser 6 is long, long out of date. Ahem. Anyway...


This, above, is the old Dinokonda, which I used to love rendering ... in 3Delight. I just gave it a shot in Iray, and honestly, you had to cringe, LOL. So I spent an hour with the texture maps and redid everything; I still can't get quite the response from Iray that I keep hoping for, but it's not bad. What I'm still trying to work out is gloss and reflection. Right now, it seems to be a kind of "all or nothing" scenario: if the Glossy Layered Weight controls are there, bonza. You can do it. If they're not there -- you're up the creek. I'm sure I'll find a way to do this eventually, but for now I'm pretty happy with this; It's looking almost as good as it did in 3Delight -- not quite. There's room for improvement, and the next time I'm in the mood, I'll keep on experimenting, see if I can get closer to the old work:


More soon ... now I must get some actual "work" done! It's writing and editing stuff, of course ... but it won't do itself. I'll leave you with a closer look at the part of the picture I'm most pleased with -- the flames. I managed to turn the props into light-emitting fire -- gotta like this Ciao for now...


Saturday, December 12, 2020

Installing third party shaders in DAZ Studio 4.14 ... done!

One thing at a time! I wanted to be sure all the old Studio content has installed properly, so -- can we get Victoria 4.2 to load properly, and render nicely? Answer --


-- yes. That's Victoria 4.2 rendered in Iray, with one of the old costumes given a makeover with Iray shaders, Not bad. In fact, the low-poly models render FAST; just keep in mind that when you get very, very close to them, Iray shows up all the cockroaches. You will see polygons, if you get too close! So keep these figures for background scenes, presumably.


The next question was, since the old 3Delight render engine is exactly that, old, does that mean simpler renders -- raytrace! -- will go fast, because they're not Iray renders? Answer -- a resounding no! Not only do raytraces take about 4x longer than Iray renders, when you see the results side by side, they're disappointing...


 That's still just the old low-poly Michael 4, wearing Neftis's Mon Chevalier hair (which is a Poser prop), and Xurge3D's Mediaeval Royalty costume (also optimized for Poser). So the surfaces had to be adjusted for Iray, which turned out to be tricky but far from impossible. The thing is that M4 renders up quite nicely in Iray ... in four minutes. The raytrace is cartoonish, and was at least 20 minutes, even with The Hulk running "high and hot." Hmm.


I rather think I'll be sticking to Iray from here on out. So that's another question answered. Next: how in the hell do you install all your Renderosity content into Studio 4.14, under Windows 10? I knew the answer to this for Studio 3 and Windows 7, but this is very, very different. Well, one step at a time. I installed a pile of shaders first, and it turns out, they work just fine. So far I've applied them to many props, costumes and so forth, and they look a treat:

I did the ground, the column and so forth, in shaders to make the simple old props look good. This little scene here has 10 props and four lights ... I think I've got the photometric lights worked out (bear with me; I'll write about this as we go, when I'm sure). Right now, the only thing I can pass along with confidence is the answer to this:


Where do you put third party shaders from Renderosity into DAZ Studio 4.14, to have they work properly?


Here's the file path:


C:\DAZ 3D\Applications\Data\DAZ 3D\My DAZ 3D Library\Runtime --


After which, copy shader sets (or packs) into Runtime\Iray or Runtime\Shader Presets.


It gets more complex if you're installing props, because you need to know if the assets you're installing are DAZ 3D format, or Poser format. In the case of the Xurge3D (Poser) costume Michael 4 is wearing here, I've got it to work, but I want to check the installation process a couple more times before I quote you exact addresses. It can be bloody confusing!


More experiments to come. I need to thrash out a lot of questions about lighting, and then I need to install about 500 Renderosity items, from shaders to lights to poses to hair to costumes and props. This will take a wee while. Patience! 

Thursday, December 10, 2020

So, does Michael 4 work in Iray?


Michael 4 in Iray; costume by Xurge3D


The short answer is -- yes, Michael 4 does work in Iray ... it just takes a bit of nipping and tucking! The top image is the Genesis 8 figure, Michael 8, with all materials, textures, surfaces designed for Iray -- it's plug and play, just click everything into place and hit render. This took about eight minutes (!), and I'm fairly happy with it. (The lights are unimaginative, but they're not the focus of the experiment. Time to get fancy with Michael 8 as we go along.)


But about 95% of everything I have is designed for the old raytrace engine; it's thousands of bucks worth of stuff ... surely there has to be a way to save it? I can't actually afford to buy everything again! So the question uppermost in my mind as always been, "Does Michael 4 work in Iray?"

Here's the answer to that! If you can configure the materials, surfaces, textures, the old low-poly models render up very nicely indeed. They don't have the "oomph" factor of the Genesis figures -- but they also render in a tenth of the time! Not too bad at all...

I've worked out how to install shaders and Poser content, and third party content to DAZ Studio 4.14 in Windows 10 -- and I'll share the details in my next post. I'll also share how to fix the surfaces to get Iray to render the old models nicely. So far, so good!  

Friday, September 13, 2019

Something magickal for Friday 13th, with a full moon...


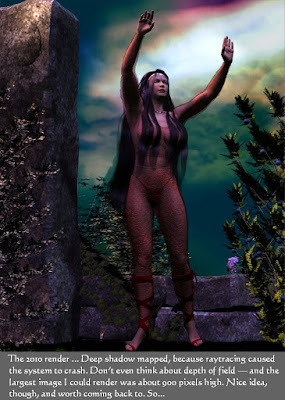
Behind the scenes, I'm working on the update of my gallery, which is seven years out of date. Going through the old files, I'm coming across a number of idea from as far back as 2010 ... great ideas which couldn't be done properly back in the day for any number of reasons. The main two were the shortcomings of the hardware (the computer would crash if I tried to raytrace), and the sheer lack of expertise. I started in on 3D art in September, 2009 (yes, it's been ten years, all but about a week since I turned on DAZ Studio for the first time and said, "Woooooow...).

One of the projects that really deserved to be redone is this one -- Stormlight. The original is only about 880 pixels high, that being the maximum I could render, and the best I could do was deep shadow mapping, and don't even think about turning on depth of field --


It's a heck of a nice idea, though, and coming back to it today -- Friday 13th, with a full moon! -- seemed quirkily apropos. I was lucky enough to find the original project file, right down to the background sky image, which had been painted in GIMP! Everything needed to be redone, and was. The final result ...


Nice! This one is a 1200 x 1800 raytrace. I set three lights, turned on depth of field and set the virtual aperture to f/15. The original backdrop was much too low-rez and small to serve, but I saved the color set and used it to rebalance the new render. I also redid the transparency mapping on the costume ... so easy to do this in Studio 3! Speaking of which --

This whole project was done in Studio 3. I did try to open this in Studio 4.11, but it dumped most of the props, and I just couldn't be bothered going through the process of exporting to OBJ, then importing that, and going fifteen rounds with the transparency mapping to get the shrubs to look right. Another time, maybe, but -- not today. So much easier to run back to Studio 3, where everything was quick and simple ... until it came to the rendering itself, of course. Studio 4.11 would have done this raytrace in about ten minutes. LOL, in the old program, it took about half an hour. I can live with that.

What you have here is good old Victoria 4.2, wearing the Celestial Hair, and a costume so old, I can't even remember what it's called. I designed the face and body form, and did all the surfaces on the costume. The props are PNature bushes, and the big slabs of rock from DM's Instances. For the life of me, I can't recall if the props were from the DAZ store or Renderosity. I used to buy loads of stuff from Renderosity, when installing it into Studio was dead simple. Now, getting third party content into Studio 4.11 is such a crapshoot, I'm a bit leery. Note to self: get this problem solved!

Happy Friday 13th! (Any Space: 1999 fans out there? You gotta know what day this is. According to the show, the Moon was blasted out of Earth orbit twenty years ago today. Don't we wish the technology had happened that way! Right now, we're watching From the Earth to the Moon on dvd, and I'm reminded of the way we all believed, before 1970, that by 2000 there'd be cities in space and a colony on Mars. Whooo! Never happened, but it might. Today's literary science fiction is full of stories of Martian colonization. Makes you wonder, and cross your fingers, dunnit?


Thursday, September 5, 2019

Greek temple ... Genesis 8, M4 ... Iray throws a hissy --


As promised ... the ancient Greek temple set. Above, you see the result of about an hour's work to configure it for Iray with shaders, because the original textures, maps and materials from 2013 do not work in Iray. They look a treat in an old fashioned raytrace --


-- but those textures, maps and so forth go completely bonkers when you send something to Iray. Have a closer look at this version of the image, both in Iray and raytrace:


This is the Iray version, where the temple is build of various kinds of granites, with marble ornamentation. The OBJ imports cleanly into Studio 4.11, and I worked with the "Stone shaders" pack, which I believe might have come from Renderosity. It's pretty good, actually.


This is a detail shot from the raytrace, with Michael 4 standing in it. Keeper of the Temple.  Nice render, all in all ... but I have to say that the work of reskinning it with stone shaders was well worth the time invested.

Now, up to this point I'd been working with the low-poly set, and the low-poly figure (good old M4 himself). So last night I thought, what happens when you add a Genesis 8 figure to this? The experiment was too delicious to refuse, so, rather than doing another long shot, I drove the virtual camera in closer, for a good, close look at the set itself. I also kept the costume as simple as possible. What you have here:

Genesis 8
Dae face and body morphs
Michael 8 skinmap
Varun hair
Cool Style pants
Palladio set
Stone shaders
...and a lot of work to make the set viable in Iray


Here, have a closer look at the figure:


Welll, phooey. The Palladio set must be lower-poly ... and also, I admit, I added a low-poly tree, and a whole lot of shaders; and the Varun hair is probably very high poly. Harrumph. The picture rendered for about six or seven hours, then I spent another two hours painting out unresolved pixels -- or, fireflies, or sparkles, as they're also called. No way would this image finish rendering. Soooo...

Don't laugh. The next experiment (after I've had another cup of tea) is to render the background separately, then stand the figure against that as a backdrop, and do a second render. Sure, I realize, it'll still be five hours of render time -- but at the end of it the picture is done, there won't be swarms of fireflies to paint out. Hmm. Let me think about this. I'd also have to eye-match and hand-paint shadows. I can do that. Takes me back to 2009, the very early days, when I'd always have to hand-paint shadows, because the moment I turned them on, in Studio 3, my poor old computer crashed!

Speaking of backdrops, I used a Terragen render as the sky and horizon line for this -- an image I rendered about six months ago, I think:


I haven't don't a heck of a lot with Terragen in the last couple of months. Been too busy figuring out Studio 4.11 and Iray. I'd love to get back to Terragen, but the truth is, Iray commandeers the computer for so many hours, I run out of time. Duh.

My imagination is full of images, and my wishlists at DAZ and Renderosity are full to busting with about five grand's worth of products, LOL. It'll take years to get the lot, but -- what a hobby! It's all about having fun and and keeping the brain functional which, as we enter our Golden Years, is no mean feat. Ack.


Wednesday, August 28, 2019

Xurge 3D costume in Iray ... wow! But -- how?!


Doing a small dance around the desk, because -- I found where DAZ have hidden the diffuse map controls. You'd never guess it in a zillion years, but I stumbled over it while looking for something else entirely, LOL And it's not without its problems, because when you plunk a diffuse map onto an OBJ, it's glossy as a mirror -- every surface has to be configured ten ways to get it to render properly. It takes quite a long time to get a good result out of it, but if you can just sweat through the process, you get this result, above ...

Now, that's the Xurge 3D Adventuring Leathers on Michael 4 ... but Xurge 3D costumes will not, no way, no how, install into Studio 4.x, and of course, if you want to render them in Iray, they have to be shipped into Studio 4 somehow. Why are we so dead keen to render this in Iray? Well, now:


Take a squizz at that, at full size, and your question will be answered! I have enormous problems rendering the high-poly figures. Genesis 8 + hair +costume, and my video card is so far maxed out, put a fancy shader on a costume and it chokes ... I paint for half an hour in Photoshop to finish the picture. Meanwhile, the lower-poly figures render up very nicely, and FAST ... Michael 4 renders in Iray in one hour. Yes, one hour ... not five.

The thing is, to get a lot of the existing M4 content in Iray, the only way is to export M4 with the hair and costume out of Studio 3 as an OBJ, then import it into Studio 4, apply all the materials and textures ... takes a looong time to get to the point of being ready to render. So --

You could use shaders to re-skin the costume on the OBJ --?? I looked into this, and the result is not quite what you were hoping for:


Sure, you're done in one tenth of the time, but, but, but ... there just isn't any substitute for the original diffuse maps, is there?! So, OBJ export/import is the way to go.

Not that the system doesn't come complete with its own suite of problems. Basically, you can't export any of your own characters (the exporter ignores the Morphs++ adaptions), so you're stuck with stock, off the peg characters ... also off the peg expressions and poses! Yep, the OBJ exporter also ignores all your posing! So you can't just do anything with M4 and his fantastic cossies, and send them to Iray. You're limited in what you can do. But even so --

Mix and match head/body morphs and skinmaps helps to create some very nice characters. This one, here, was done by mixing the morphs from the Chase character with the skinmap from the Alexander character... and (sorry guys) that skinmap is no longer in the DAZ store.

This is Chase, with its original skinmap:

catalog image from DAZ. Search on: Chase for M4
I never had much use for this face morph, because it didn't render up so nicely in the simple old 3Delight render engine, which was all I had at the time. But when I added the Alexander skinmap to it, it came to life. And I can't show you a catalog image, or give you a link for Alexander, because it's gone. Too bad, that, because it was a fantastic skinmap. Ah, well.

Anyway -- this is the basic plan: custom design an M4 figure (alas using all off the peg poses, morphs and what have you). Export to OBJ, import to Studio 4 ... apply the original maps (for reasons which became apparent above!) and plunk it into Iray for just one hour. Low poly figures and sets, see? Zoom! Render complete, with vast improvements over the raytrace. This will keep me happy till I get my new computer (Christmas 2020), and can send my old favorites to Reality again!

One last thing for today --

Happy New Camera. Uh, phone. 
Uh, well, whatever it is --


Yep ... new phone with a 16MB  camera, plus a bokeh lens. It's the UmiDigi A5 Pro. You wouldn't believe these were taken with a phone, but they are. Am pleasantly astonished ... and will be using the phone as a camera when Dave and I head back to the Grampians in a month's time!

Speaking of Dave: Happy Birthday to my One and Only today!! 💕😀

Sunday, August 25, 2019

New leathers for Michael 4 -- nice!


I got back to Xurge 3D, as intended, and got those extra costumes for Michael 4. This is the Adventuring Leathers -- it renders up beautifully. All I had to do was add a bump map; a displacement map is supplied with the costume, but it's in the TGA format, which DAZ  refuses to read. It's too late tonight, and I'm too tired, to track it down and convert it (to the JPG that DAZ is looking for), so I just slapped a generic leather bump map on all the leather, and so forth. This is a very good costume indeed!

Also, I left this one rendering overnight, last night:


Well, I guess there are some things I just can't render ... the satin shader is one of them. After five hours of render time, it was still nowhere near "cooked," so I painted it in Photoshop to get rid of 247,993 unresolved pixels. Ack. Don't expect to see this shader too often before the end of 2020, when I get a computer that's 5x more powerful than this one is ... too much work, painting.

And really, seriously, there's stuff you just can not render with the older computers --


This is the Starcarrier set, which I used for the hangar bay in the NARC images. It looks pretty decent at this size, but it you look at it full size, you'll see that it really isn't anywhere close to "cooked," and this little image was a four hour render! Can't wait for Christmas 2020, and a new computer!

Anyway, we can certainly have a lot of fun along the way ... I actually like the raytraces. They have the feel of artwork. They also take a matter of a few minutes to render, LOL. Anyway -- next thing is, I want to put the Adventuring Leathers into Iray, via a OBJ export/import to get the costume out of Studio 3, and see how it looks with a set of Iray shaders, in Studio 4. I just wish I could find a way to make Studio 4 add a simple diffuse map! Or install 3D assets from third parties -- but it won't; and I tore the directory structures apart till I found out why.

If you've ever tried installing third party content to DAZ Studio 4.x, you'll know it's a terrific crapshoot. Why do some things work, and some don't??? Because some 3D assets have "data" files, .dsf files, which make Studio 4.x recognize what they are ... and some don't. Without those .dsf files, saved to the \data folder, you're sunk. Nothing is going to work. Uh huh. So ... OBJ export and import is the way to share files across the great divide ... and then whack shaders onto everything, because ... if there is a way to make Studio 4.11 add a simple diffuse map, I can't find it! How weird is that?

Thursday, August 22, 2019

Import, export, textures, painting ... check this out!


Still having fun wit the new costume ... playing with the textures -- diffuse and bump maps, plus gloss and reflection values. Yes, it's a painted raytrace Also, check out that floor! Love this character, too (one of my own):


Very, very pleased with the results on this -- all done in DAZ Studio 3, of course, with some painting in post, in Photoshop Elements 9 (the 2009 version, when you could buy it outright, own it ... ah, those were the days!). In fact, I was enjoying this so much, I did a second project:


Same character and skinmap, but I switched out the hair. The first wig is the My Rock Star Hair from Neftis (DAZ Marketplace), and this one here is the Aether Hair, from Renderosity...


The other thing I do love about working with raytraces is that you get to PAINT a lot with them. And you can paint on raytraces, whereas if you paint on Iray renders, it looks totally fake. There's so much more art goes into raytraces. Sure, I know Iray gives you more photographic renders, but there's times when I actually want, and prefer art, But...

I've been dying to get the new Xurge costume into Iray, to see how it would render up. Sigh. I beat my brains out, trying everything and anything that anyone could think of, to get it to install into Studio 4.11. What a joke. People on the DAZ forums have been saying for eons, DAZ have "done something" to Studio 4 to make sure it can only use products you buy from the DAZ Marketplace ... and I'm sad to say, I think I agree with that. I cannot get anything I didn't purchase from them to install. So...

I thought, how about we export the product as a OBJ, then import the OBJ into Studio 4.11, and render it? Sounded like a good idea. It's also dead simple ... and to one degree and another it actually works:


BUT... when Studio 4.11 imports the OBJ, it refuses to import it with surface maps "on." Up to Studio 4.10, when you imported an OBJ, it was "ready to go." Well, not now. When it leads, you get a plain white plastic objeft (above, left). There is also no way to add simple diffuse maps to the OBJ. You have to re-do everything with shaders ... fortunately, I figured out how to do it fast, and of course when it renders up, it's pretty stunning in Iray...


...except for one key thing. His face. You notice his face? Compare the face on this model here, to the face you saw in the top renders. That is the same guy, as exported to an OBJ file, right? But the face morphs dropped out. By the time you've got the mapping onto the OBJ, you realize --

That, there, is Michael 4, right out of the box (wearing the Jagger skinmap). The face I designed, for my character, did not carry over through the OBJ conversion. Soooo ... yes, we can get costumes like this into Iray, via OBJ export, but every time, you're going to see the Michael 4 base figure. You can't have the costume and the character you designed. Well, rats.

Still, it's a hell of a nice picture, and I learned a lot, and had a lot of fun. More experiments to try tomorrow, but I know by now, M4 Head Morphs++ do not get copied into the OBJ. I also know that two out of three skinmaps won't apply cleanly to the OBJ. So it's a bit of a crap shoot.

If anyone, anywhere, knows how to get third party content into Studio 4 ... don't keep it to yourself! I'll keep on trying. More soon!