Showing posts with label IBL lighting. Show all posts

Thursday, March 11, 2021

Race Day ... and the magic of shaders


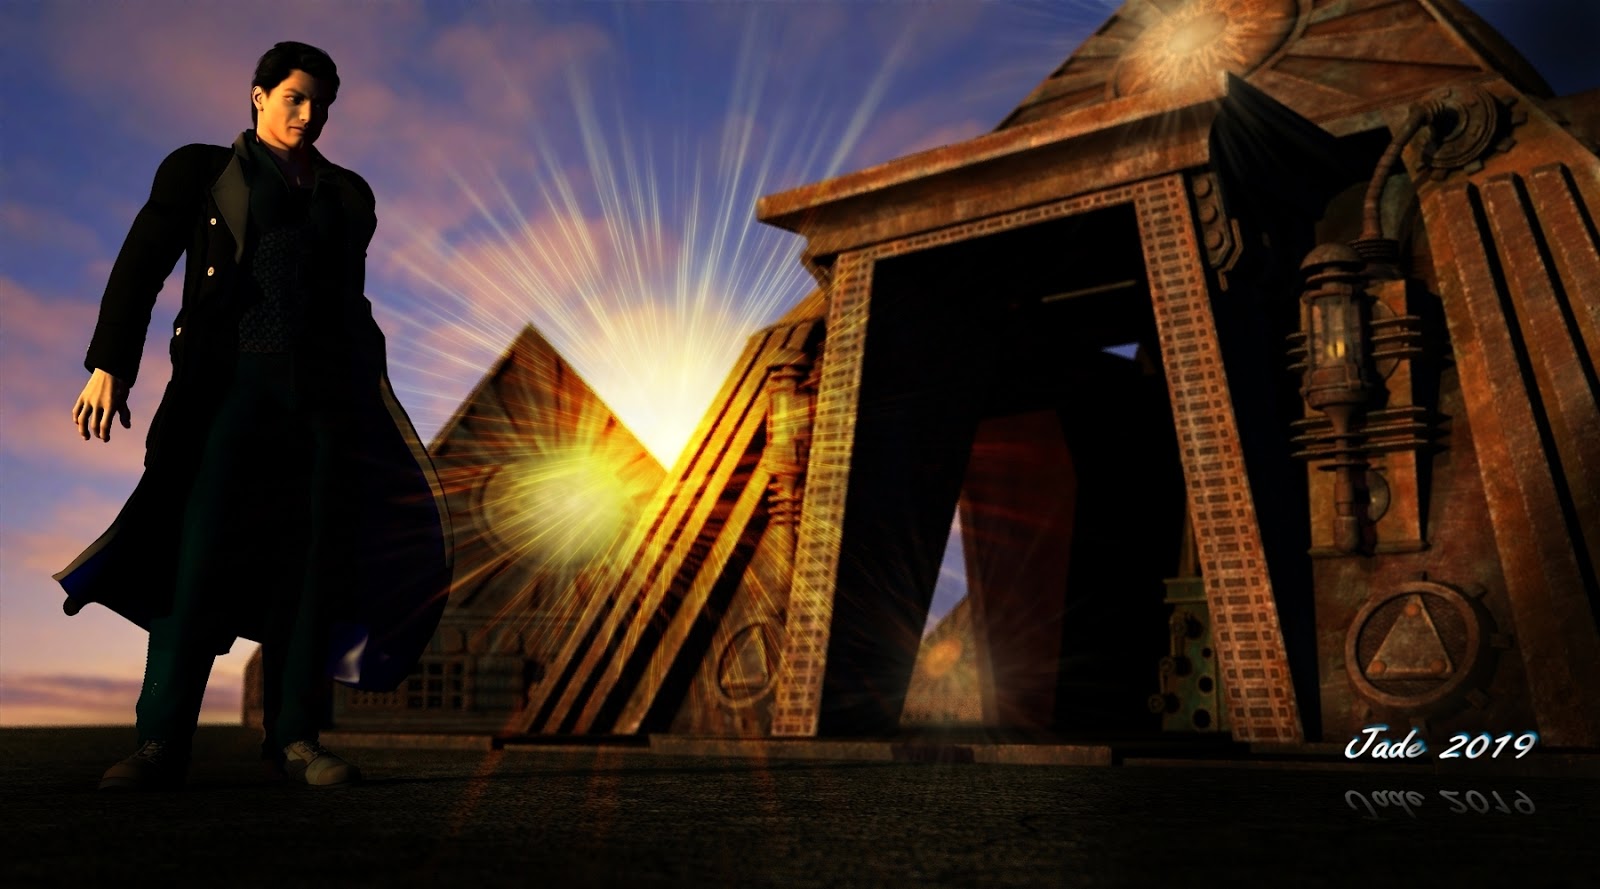
Race Day, just on dawn ... the story is, this guy has rebuilt an old machine, it's faster than it ever was, and today's the day he's going to prove it. This was a fun project. It started with Rex for Genesis 8, but I re-re-remoulded the face till it's another face entirely ... I guess we ought to call him Roy now. I used one of the pre-done Adama poses for G8 Male, and when I saw it, a scene just popped into my imagination. The challenge was to take the old Pacificator prop and remake it with new shaders. The original prop is by Powerage, and the oooold version I have doesn't have all the fancy new Iray materials It's fairly rusty and renders very flat. So ...

I used various shaders for this and that bit, but I also got into the Surfaces pane and just reworked the original mats to bring them to life. Am just really starting to get my head around Iray Surfaces. Then -- the ground. This is "just" a shader, set it with a single click:


The realism of this is such that the rest of the render pops. This shader, I think, might have been a freebie from Deviant Art; or do I mean the car paint shaders I used for the fingernails?? Anyway, the result you get here is a combination of the shader itself plus the environment map for the IBL lighting (a free HDR image. Try this, if you're interested), and one spotlight configured to look like early morning light. (The sky was rendered in Vue, a decade ago -- by Dave. I never got into Vue, and I must get back into Terragen, to render custom skies.) The result is astonishing! In terms of complexity, this is by far the best Iray render I've done yet. Very, very happy with it. Not a bad way to spend a couple of hours in the afternoon! 

And this morning --


I do enjoy a challenge, and the old Generation 4 figures stretch you, in every way imaginable. This is a Victoria 4 ... I designed the face and body; the skinmap is Angel, the hair is Nana, and it's a fifteen minute render in Iray. The dress is ShadowStorm, with new shaders from Sveva's Shimmer and Shine and Satin packs -- I used the fabric from one and the bump map from the other to get this effect, kind of mixing and matching shaders. Nice! And the eyes --


If you've got a second going spare, see this at full size. The eyes have rendered brilliantly. In fact, I'm enjoying V4.2 so much, I might buy a couple of extra skinmaps, LOL. Sure, Genesis makes it easy, but the challenge of the old Generation 4 figures is such fun!


Wednesday, January 13, 2021

IBL and Photometric lighting -- which, or both?


IBL and Photometric lights

Today's experiment was to work out the best way to light a set. In the olden days (ha!) of raytracing, you were always working around the old tried and true method of "key, fill and back" lighting, which basically meant that if you had three lights on any one thing, the scene would "pop," and if that didn't work well enough, you added a "bounce" light to simulate light reflecting off the floor/ground, or whatever shiny surface. Then came unbiased rendering, environment lighting, and ... okay, how does this work now? So --

Photometric light only

In the top render, that's a combination of an HDR image used to light the scene, using Image Based Lighting (which is controlled from Studio's Environment menu, inside the Render Settlings pane. This thingamajig here:


I can't show you exactly where on the screen it'll be, because the interface is free to float, you can park the panes anywhere. But if you know where to find your RENDER SETTINGS, click on ENVIRONMENT, then look for the thumbnail pic of the default image. Don't use the default. The results are just not that good. You need some genuine HDR (High Dynamic Range) image that suits your project ... and there's a great free place to get them -- problem solved, give this a shot:


So I used their image of an artificially lit factory floor, and with only the HDR image set to generate the lighting, I came up with this:

IBL (Environment) lighting only

To get that effect, I had to crank the settings to Environment Intensity = 10, Environment Map =10, and Lighting Resolution = 2000 (all parameters to be set inside the aforementioned Environment menu). It's actually great, but a bit flat. I might have wanted more dynamic shadows??? So the idea was to look closely at where the soft shadows are falling in that image, and create a spotlight ... look through the light while positioning it, to make sure its angle matches the fall of shadows in the IBL-only render, and then (!) crank the Luminous Flux to 5,000,000, plus 100% on the blue end of the scale, to simulate daylight --


Result -- nice! And (which is just as good) I'm 100% in control of what's happening. Put another way, Studio isn't taking m for a ride, I'm driving! Then, out into my favorite Irfanview to give the render a few dramatic tweaks, just in case we want an astonishing image...


Okay. This was a success, and I learned a lot. Also, the new computer handled this fairly easily; with maximum render settings pumped into the first of these renders, it was about 25 minutes, and that way way more render time than it actually needed. I scaled back the settings for other renders, and the time was more like 15 minutes from "go" to "cooked." (test renders at 600 pixels wide, an minimal settlings, were about two minutes.) Neat!


Friday, September 20, 2019

Old props and sets, new shaders and surfaces. And check this out --


This is where it gets really, really interesting! That's Michael 4, rendered in Iray ... and I've figured out how to get decent results:


When you first set up the character, more often than not it loads with incompatible surface mapping. Basically, it shines as if it was cast in colored glass! But it only takes a few minutes to go around and apply the "Uber shader" to every separate "UV island" in the figure and hair, and then dial down the gloss. Then, Iray can make sense of the render, and the results are actually extremely nice. That's Michael 4 wearing the Marco skinmap and the Alexander head morph, the Mon Chevalier hair, and the Journeyer Scout pants with the texture switched out.

The set is a whole 'nother story. DM's Circular Shrine (from Renderosity) won't load into Studio 4 for love or money, so I went back into Studio 3, exported it to an OBJ, and imported that into Studio 4 and spent about half an hour applying shaders, where I couldn't save the original diffuse maps (I think I managed to save about two ... the rest are just so Iray-incompatible, the set simply looks better with some really good shaders applied.

Now, it gets interesting. Here is the standing set, but the time I was done with the shaders:


That's pretty good. So, how about we drive the camera in there and add a characer? Here we go:


And yes, that's M4 wearing the Xurge costume you saw yesterday ... and yes, the metal parts have been fixed with a metallic shader. Yesterday, Studio 4.11 refused to recognize two file paths for various stashes of content. Today, it played nice and I could get hold of the shaders. Go figure. I didn't do anything different today; the program just decided to work, out of the blue. The render is pretty nice. I lit it with IBL lighting -- using this --


-- which I painted up from an old image, and it worked a treat. So far so good. I just did the character render at small size for the sake of speed; it's nothing special, just an experiment to see how the shaders worked out; and the final experiment was still to come. Could I save the file, since Studio understands its file paths now? And the answer is --


--forget it. The second you hit "save," Studio loses any content it previously loaded -- with one exception. You notice it saved and reloaded the OBJ properly! The circular shrine set came in as a simple white plastic OBJ, and it saved cleanly. Well, now. There's food for thought.

So right now, I can work with Michael 4 characters, but whatever I'm going to do, it has to be done fast and be fairly simple, because the file can't be saved. This is actually what deters me from taking the next step at this juncture:

Catalog image. See this. 
There is actually a script you can install into Studio, which does the work for you: makes the Generation 4 characters render properly without the messing about. The problem is, it's A$30, and with the best will in the world, I can't save a file! Also, right now, I can't get the computer online in order to install this properly, using the automatic, online Install Manager. Studio also isn't recognizing anything I install manually; something's not right somewhere ... but I am finding answers one by one. I don't say I'll figure out how to save a file properly, because this is the problem that beat tech support, who gave up on the issue after three months of trying. It must be something to do with the vagaries of my own specific PC?? Well, end of next year we'll try this again with a new one. Chances are, everything will "come good" without me sweating over it. And that's the time to be buying the Iray Converter for Generation 4 ... which I adds layers and layers of functionality. Something to look forward to!

Monday, September 16, 2019

Moonlight, swordsman -- the Genesis figure in place of Michael 4. Whoo!


Only one image today, because it's been rendering all day! As promised yesterday, let's repeat the process and see about the starlight, or moonlight, Iray project, but using a Genesis 8 character rather than the old Michael 4. The beauty of the Michael 4 figure is that it renders so fast -- this would have taken about 45 minutes. Then again, you wouldn't have a figure that rendered with this kind of integrity. Flip back to yesterday's moonlight shot and compare. Sure, that's a heck of a nice render too, but this one is a knockout. Moonlight, starlight ... got it.

For those of you who're rinkering with Iray right now, and ready to give up (I know, it's a bear) ... the trick is, it's done half with an environment lighting (ie., an image used for IBL lighting) and half with a single spotlight. And this seems to work every time, so -- happy, happy.

More tomorrow, I guess. There just isn't any more time today to do anything ... this was a looong render. Well worth it, though, right? Right.

What I used here...

Genesis 8 male
Michael 8 skinmap
Custom body morph
Custom face morph
Elan hair for G8
Legendary Swords prop
Ivy props from the Reparation set
Pedestal and planter from the Mirador set
Backdrop, blurred to be out of focus
One very blue IBL environment image
One orange (!) spotlight
DOF and big virtual aperture on the camera, to match the backdrop blur

Shake and bake. Set that to cook and come back in six hours. One becomes very adept at thumb twiddling. My kingdom for a faster computer! Anyway -- good results are their own reward. I like this. I also like the character ... will use him again soon!

And so to bed ... yawn.

Sunday, September 15, 2019

Sunlight, moonlight -- and a pirate, in Iray


Natural sunlight ... and pretty darned convincing ... I even remembered to have the character squint a little, which he would in these lighting conditions. I'm very impressed with the Michael 8 skinmap -- I rarely if ever use the M8 face of body morph, but the skinmap itself is wonderful. This face and body you see here --


-- is a dial-up / dial-down of so many different features to create a new face and form. I'm glad I got the G8 head and body morphs; they make it so easy to create new characters. There's only one light on this scene, representing the sun; the rest of the scene was lit with IBL lighting to "fill in" the environment. It works well. The magic is in the details:


So, having got the hang of conjuring sunlight in Iray, let's test the theory with a completely different scene and see if it works every time! Try this -- a (very cute) pirate:


And this lighting trick -- the balance between a single distant light and a specially chosen IBL environment light -- does work every time. The character is interesting: mix and match. This is what happens when you apply the Kingston skinmap and Rex face morphs to the G8 base!


And you have to admit, that's extremely ... appealing. A bit of set, a couple of props ... a shader on the shirt; Varun hair styled differently from the previous project. Very nice indeed!

So, okay ... that's sunlight. How about starlight, or moonlight? I don't have it completely worked out yet, but early experiments are promising. I used Michael 4 for this, because I wanted quicker renders. The lower-poly figure renders in a quarter the time:


I think I'd buy that as starlight or moonlight, and this was done completely in Iray, rather than just rendering the scene as it comes, then creating starlight in Photoshop. Sure, you can also do it that way, but I'd love to know how to do it "properly" before I start to cut corners. Neat. I resurfaced Merlin's Katana with new shaders, and that's a backrop rather than a bit of set. This image rendered in about 45 minutes, as against six hours for the guy sitting in the field, and 150 minutes for the pirate. You might remember the figure and pose from a couple of other renders across the years ... the original 2010 picture, and the Lux Render version from something like 2015. Now, what about if we put a Genesis 8 figure into that project?? Hmmm!

One more image for today; just a bit of creative doodling:


Couldn't resist! "Then something happened that the ring did not intend..." It's based on a photo taken at Hindmarsh Falls a couple of years ago. The stream was running, deep in the chasm, and Dave and I did a couple of "ring" images as a chuckle. I promptly forgot about them, and only found them this morning while I was clearing flash cards, setting up for the Grampians trip we're about to take (leaving this time next week). Just had to do this...

Alas, computer problems again: I've lost my connectivity on the desktop, 100%. So I can't buy anything new from DAZ until I somehow (how???) get the computer back online. It might end up going back to the workshop. Until then, I'll just be working with the new things I've bought since May or so, and also working through the dragon's hoard of old 3D assets that I bought back in 2013 and couldn't install for want of harddrive space. The new shaders resurface the old models beautifully. Can't even think about tackling the computer till we get back from this trip, so I don't expect to be back online with my desktop till October. Rats. 😮

Tuesday, September 10, 2019

Creepy cloisters -- and a new Genesis 8 hero. Neat!


That's pretty good -- it took a lot of wrangling, but at least you can see where the work was invested! I'm actually very happy with this, and I'll be setting up this character to render again later. This one rendered long into the night, and when I got up this morning, it was done --


First, I started with a commercial backdrop which I could never have rendered in a year of trying with this computer. It's from the artist "Sveva," whom you'll find at Renderosity. I wanted something to get me into this quickly, with good results, a way to test the water before I start to invest tons of time in backgrounds. Good choice, here, it turns out. But Sveva's art was the wrong shape, so I kept the width I wanted and introduced a flat black "margin" at the bottom, adding about a third to its height. Then, I added the floor to run up to meet the backdrop ... slapped a battered-concrete shader onto it. Then, add the bench, and a stone shader on that ...

 If you reckon we're going a bit "shader happy" here -- uh huh. You have to, to get old (low-poly-count) props to look good in Iray. When they render wearing their own original (3DLight) maps, they often look nothing short of awful. Sooo ... when it came to the lantern, I redid the whole thing: frosted glass and cast iron. The result is rather good. Very happy with that part of the image.

The Genesis character gave me some problems, largely because I'd wanted to use the Rex character, who has the look of a Jamaican pirate. Unfortunately, the lighting in this scene is so low, the deliciously swarthy Rex rendered up so dark, you could barely even see him. So I swapped out the skinmap for something that would render in these lighting conditions, changed the face a tiney bit (rats: I do like the Rex face. We'll come back to him, and this costume, later ...)

The costume is a mix and match: coat an boots from Crimson Seas for Genesis 3, and the pants and belt from Badlands Gladiator for Genesis 8. The hair is Varun, set to brown rather than black; and I changed the eyes to a brown shade from the GP Character Eyes set.

Okay, now mess about with Iray lights. I have two on this, a distant (photometric) light, and a point light sitting inside the lamp. I also used the backdrop as the IBL environment light, set to about 0.5, I think, just to lift the picture a bit. Ready to render ... and several hours later I staggered through from the bedroom (am still soooo sick: throat, sinus and lung virus: pure torture) and figured it was "cooked"enough to go back to work on it. So --

Back into Photoshop to have the light rays added in, and some extra highlights and shadows around the bench, and the lamp-glow on the figure (which wouldn't render; hmmm). Also, a bit of digital grading in the character's face, to make it stand out a little more. With that done, I put the painted image back into Studio 3 (!) to add the foreground ivy -- which no amount of jiggery-pokery will make viable in Iray. The foreground ivy here is just a raytrace in Studio 3, which at least recognizes its old maps!

With that done, back into Photoshop for some "marginal shadows" which lead the eye into the picture and blot out a tiny bit of demarcation from the existing backdrop and the new floor.

Interestingly, the lamp had to be done as an OBJ import: nothing I can do with this set of props will make Studio 4 "see" any of them. Fortunately, the export out of Studio 3 to OBJ is dead easy, then it takes all of about five minutes to resurface whatever prop with appropriate shaders. No biggie.

Okay ... let's call this one a success. Complex image, very pleasing. If I can stay alive long enough (this virus has me on my knees. No joke or exaggeration), I'll do something with this guy this afternoon, and we'll have another look at him later today.

On the other hand, I might fall face down and come up for air on Friday! We'll see. Bear with me, guys!

Saturday, August 31, 2019

Stargate, anyone --?!


Stargate, anyone?! As I said in m last post (this morning!) I've just started to unpack a load of goodies I bought in 2013 or so, and couldn't install because I didn't have the hard drive space. Truth is, I'd forgotten what I have! There's oodles of stuff packed away there, forgotten! Costumes, hair, skinmaps, characters ... old stuff, which means low-polygon count ... which means I can render it in a flash! This is DM's "Pyrego," which has a real "alien pyramids" look about it --

Rendered in Studio 3 in no time flat, and painted up in Photoshop just as fast...


And the result is so striking, you're wondering what movie you missed! Tomorrow I'll see if I can coax these props into Iray, and see how they look in the unbiased renderer. Speaking of Iray --

On a whim, I went back to the black-winged character you saw this morning, and deleted the wings, which take about six hours to render. The rest of the character, leathers and all, rendered in two hours. Now ... if this was Stargate, the story wouldn't be complete without a Goa'ould, right? Someone to be the nemesis for Jack, Daniel, Sam and Teal'c. Okay, try this for size:


He has that supercilious arrogance and the physical perfection the Goa'ould always seemed to have. I could buy this character as a subtle villain. Not your over the top bad guy, but dangerous:


That's also a heck of a nice render. I've been using IBL lighting lately: it's a hell of a lot simpler than trying to get Iray to play nice with lights -- also, the more you try to light a scene, the longer it takes to render. IBL lighting works a treat. What you have here is Genesis 8 with a face designed by me, body morph designed by me, wearing Shavonne hair and one of the pale skinmaps supplied in the Michael 8 Pro bundle. What's it called? The one starting with a Z. Uh huh -- ooooh, my memory is loads of fun, isn't it?! He's wearing the Huntsman leathers ... and that is pretty good, if I do say so myself.

Can't wait to see if I can get Pyrego into Iray -- tomorrow's project. I also unpacked another set from 2013's shopping spree: Palladio, an ancient Greek garden and kind of temple. Now, I have some lovely stone and marble shaders for Iray which might just work with those old OBJ props. This is going to be interesting!

Monday, July 8, 2019

First look: new character and hair. Hello, beautiful!


Just one image today ... but it is a humdinger. A new character and hair -- and I'm running tests to see how it renders. A treat, is how it renders! This is Rex, and if I tell you the truth, this was the character that made me bite the bullet and get involved with Studio 4-point-whatever and Iray, because this is a Genesis 8 character and it can only be done in Iray, which demands Studio 4.9+ ... so!

In fact, DAZ has been having a 50% off sale, so I got this  character and another, plus this hair, and a set of the best eyes for Genesis, and (ouch!) the G8 Male Body Morphs, at full price. Yes, I know, I just dropped over a hundred bucks, but at least you came home with a swag of goodies!

There are so many permutations of these characters and hair props, it'll take eons to work through them. You could actually use any one of five different permutations and call it a new character. And, I wonder ... could you take the skinmap from one character, the face morph from another, and the body morph from a third?? The possibilities are endless, even before I start designing my own G8 characters -- which I will be doing as soon as I get the head morphs, to accompany the body morphs. (Alas, they're sold separately and cost A$30 each, so it'll take a wee while.)

Also -- I think I might have Iray performing properly, to wit, this render, above. The thing is, I think I'm cheating. This is, I think, the best render I've had so far ... and I didn't create a camera. I did IBL lighting and rendered the perspective view, and -- 1) the eyes are good; 2) the shadows are good; 3) the shot is beautifully balanced. The missing element is the camera. And yes, I know you can't get DOF working without a camera, but I have to admit, it's a relief to just get a really good render, DOF or not, camera or not!

Speaking of depth of field ... it does work differently in Iray than in 3Delight, and I'm planning to spend a whole afternoon getting it figured out, as soon as this splitting headache stops ... yes, this is Day 5 of the skull-splitter. I live for the day when it ends. Then, I found a really great tutorial on YouTube, and I'll just have that running on the laptop and Studio running on the desktop right beside it ... skip over all the preliminary stuff, because 85% of it theoretical and pertains to 3Delight, which I can drive in my sleep. But close to the end it gets to the Iray DOF stuff, and that's where it gets interesting.

So there you have him: Rex in one of his permutations! The catalog images look like this:


...that hair is listed as being the Elan wig, but I do have that one, and it doesn't look like this -- or, I haven't found the way to make the prop look like this yet! There's also some displacement mapping on the character in these renders, that isn't in the default load -- need to find that too. But as a first look, first test of the character, I'm very happy indeed.

Incidentally, the hair he's wearing in my render is Shavonne Hair, which was actually designed for Genesis 3, but it turns out that almost anything for any of the Genesis figures does work with G8, so that's a mercy. Means I can buy just about anything, and it'll work. Big grin.

Stay tuned. Soon as I get this headache stopped, I have tonnes of stuff to do. If it doesn't stop soon ... well, the words 'doctor' and 'MRI' have been spoken, so ... ask. Bear with me.

Thursday, July 4, 2019

Step into my parlor ... and the best images from our Cape Jervis 'getaway'


Hmm. Not bad ... I left this rendering for a couple of hours after I went to bed last night, and it's fairly creditable. That's most of the Dae character face (you can dial it up and down), and the Dae skinmap with one of the warpaint options; a different hair prop ... a shader on the pants, a pose. Add a couple of low-poly props, IBL lighting and a single spotlight to give it at least some shadow ... chuck in a backdrop. Render for two hours, then ship it into Photoshop and overpaint it to make it more interesting, because it's a very simple render which was basically designed to run a bunch of tests...

First, I wanted to figure out how to stop the G8 eyes shining like a pair of flashlights! The sclera -- that is, the white of the eye -- is inclined to be incredibly white and bright. Now, the tip is always, "go into the surfaces pane and add a little color, like a chromatic gray, to the base, or diffuse color." Uh huh. Well, that didn't work. I wound up setting the diffuse color to black ... and every other color associated with the eyes; and setting gloss and reflection to zero ... and still the sclera looked like it was illuminated from within. Goa'uld. I wondered if it was something to do with the specific eye maps on this model, so I bought a set of Genesis 8 eyes and tried those, to see if any difference would appear in the renders when a new range of settings was applied along with the new maps. Nope. I tried everything under the sun, and still ended up putting this into Photoshop and blatting some color onto the eyeballs:


That's just Genesis 8 Male, just it comes, with one light plus IBL lighting, and the sclera is shocking. It's a bit better for being painted, but it's still not right. So I set this aside and went back to playing with every element in the scene. And from what I've seen so far, it comes down to this: do not point a light directly at his face. If you do, the sclera glares, no matter how dim you make that light. This can't be right, but this is the result I'm getting to date, even with eye shaders purchased separately. Hmm. Well, not pointing a light right at him did get us natural-looking eyes in the top shot, which I call "Step into my Parlor." The experiment continues!

I also re-rendered an older image, to see how Iray would handle it:


That was something like a 100 minute render ... very nice indeed. This was also the first image I've tried rendering at 1200x1800 size in Iray. Have been working at 600x900 for the sake of speed ... I don't have a crash-hot video card, remember. This, however, is terrific. I'll see how the other one renders ... The Horse and his Boy, where the hunky hero is standing with the black horse. With any luck, it also will be very lovely, but rendering Michael 4 in IRay can be something of a crap shoot. Cross fingers.

Last art for today: a wallpaper at 1980 x 1020, which should suit a lot of monitors, and is easy to convert:


This looks good, with all the system icons stacked on the left to leave the eye candy free. You're welcome! More wallpapers to come.

Lastly, a half a dozen of the most astonishing shots from the short 'getaway' Dave and I took at Cape Jervis and Deep Creek, last Monday-Tuesday. I took about a thousand shots, but these are just perfect! Back in a day or two with more art ... as soon as this splitting headache goes away...