Monday, April 30, 2012

The snake ...the colony world ... and Son of Michael 4


click to see all images at large size...

Just puttering today, because my health has gone down the gurgler. Again. And this time it's my own fault, so ... grrr. Anyway, I thought, what the hey, why don't I rest up and putter with some art? And here it is.

Top pic: it has been said that if God wanted to avoid the problem completely, he ought to have created Adam and Ed, not Adam and Eve. The fact is, he did. You want to guess what happened next? (It's all the snake's fault, right?) So here you go: Male Nude: Adam and the Snake. Or is it Ed and the snake? That's the LightDome Pro sky dome, but I set the lights myself. Loads of props, and tons of overpainting in Photoshop. See it big ... nice effect.

Second pic: colony world, in the style of Chris Foss. When I was a kid, Chris Foss was my #1 favorite artist. I used to drool over his work, and wish I could do that stuff. Lately, I've been playing a lot with spaceships, and even thinking of getting one of the organic model making programs, so I can actually make the models as well as pose, render and paint them. This sort of shot is kinda where my brain is going. There's a lot of painting on this picture, and it was done in three programs, staring with the backdrop, which was rendered in Vue by Dave:


Then I used a model from DAZ, plus a model from Rendrosity, plus an OBP model that was exported out of Bryce as an OBJ that could be imported into DAZ, and the shot itself was rendered in DAZ (in about five minutes flat, after an hour of setting it up, complete with the atmospherics). I put a small craft in the foreground -- that one was a freebie on one of the CD-Roms attached to an issue of ImagineFX magazine; and in the background, a ginormous model that came from Renderosity about 18 months ago, and which I couldn't even load into DAZ studio before last Boxing Day and the advent of The Mighty Thor, as I call my art computer. Neat. Then the render was shipped out to Photoshop, and painted, and painted, and painted, with .abr brushes and good old fashioned brushes. Neat!

So, not feeling so brilliant and spinning my wheels today, I thought I'd go over to DAZ and see if I can find some really fantastic trees that would render up looking a bit more realistic -- 3D trees usually have leaves the size of hubcaps or tea trays, and about 10% as many as they should have. They're one of two elements that always make a 3D shot look fake (the other being human head hair ... the toupees are still not really good enough to pass muster). And what should be right there on DAZ's homepage?

Michael 5 just made his debut. Check him out in these catalog images:


Well, now. Hmmm. If Michael 5 were a free download like all the previous Michaels, I'd be giving him a shot right now, but he's expensive. And he's an "add on" for Genesis ... which means he only works in Studio 4, which is an interface I hate. Also, there's a very limited number of skinmaps and toupees available yet for M5, so there's nota whole lot you can do with him. And then there's the little fact that none of the M4 costumes and toupees are going to fit M5, so you'd have to buy everything over again...

Is Michael 5 so much better than Michael 4 that I'm ready to spend about $500 on costumes, hair, skinmaps, and sweat my way through the stupid/horrible/aggravating Studio 4 interface? Hmmm. On the basis of what I'm seeing here, I'm not 100% convinced:

...that's very plastic-looking, and that physique is more of a sophisticated, upmarket digital 'toon than a real guy (over-pumped muscles, totally ripped, yet no veins anywhere to show for the intense effort, and not a hair on his bod ... means he looks artificial). I have a feeling that it's not so much the base model itself, it's how clever you are with posing and rendering it. The Genesis figure is superior in the fact that it doesn't crush and buckle and the joints when you pose it ... but there are loads of "fixes" for the generation 4 models which get around this problem. Newbies will probably get into less trouble with Genesis figures, because they don't need the fixes. And anyone joining the club right now will be starting off with Studio 4 and Michael 5, so they'll be in at the "off," I guess. But I think I'll wait a wee while. See the Michael 5 reviews as people work with him, let the inventory of accessories, toupees, skins and so on, begin to grow, before I shell out some big money and change to an interface that, frankly, I hate. I use it only as the bridge to get my work into Lux/Reality...

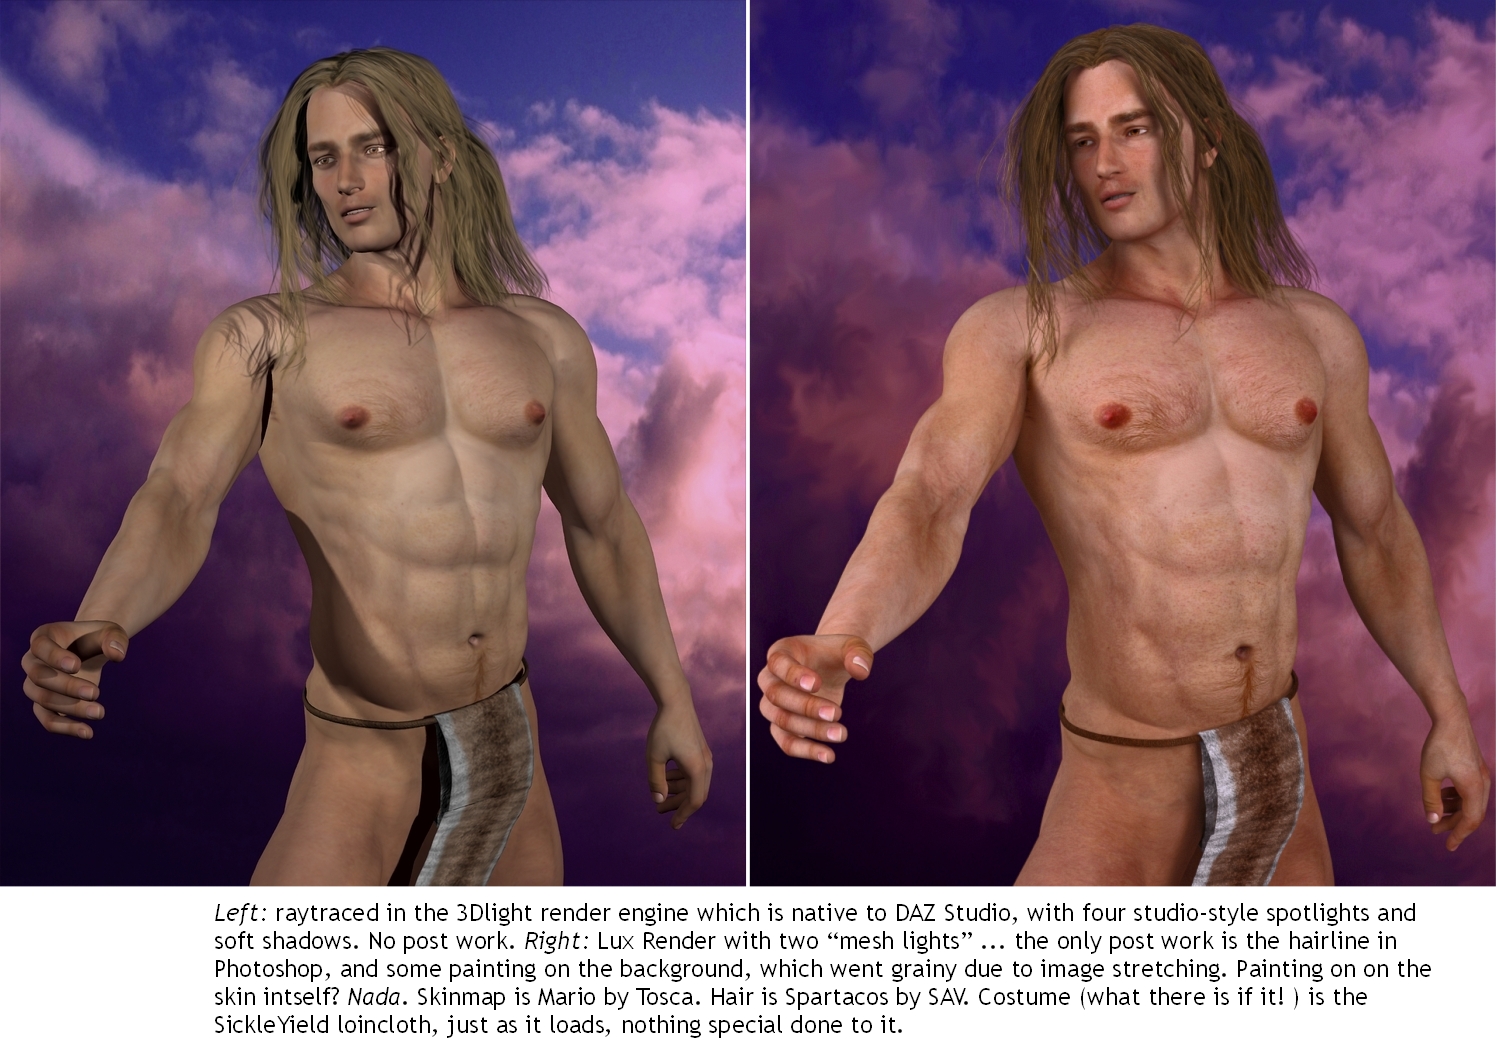
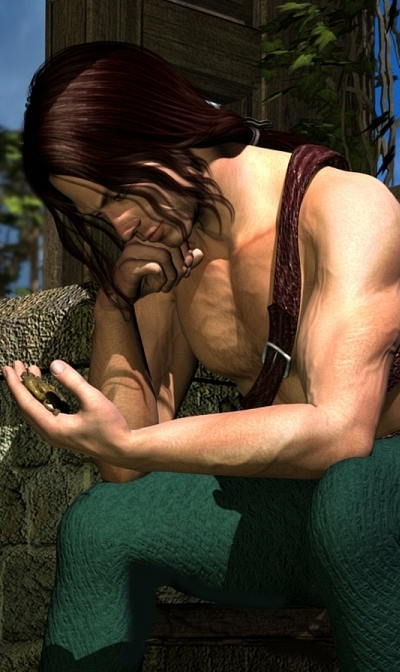
So for the time being, let me see how clever I can be with Michael 4 and my own skinmaps, and Lux --

And on that note ... see you soon, with more.

Jade, April 30

Sunday, April 29, 2012

Playing happily with lights and cute guys. And snakes. Yes, snakes.


click to see all images at large size

Been busy! As the post title says -- playing with lights and cute guys. Again, I'm going back into a few of the old projects from eighteen months ago, and more, and seeing the difference that new techniques will make. It's pretty amazing. The top image is "Michael 4 as Tomb Raider," and if I can only persuade you to look at that one at large size, you'll be amazed at the photographic quality. Here's a thing ... if your monitor is set really dark, you won't see the floor and wall behind. Brighten it up for just a minute and check this out. Neat!

Now, that one is a Lux render ... urk. 37.5 hours. Hours! I hit the PDF manual, looking for ways to get faster results, and there's one or two things that might bear fruit. There are loads of experiments to be run...

The second shot is a 3DLight raytrace -- the "star" of the shot is actually the sky. It's one of the many skies supplied with the LightDome sky sphere, or dome, and here's the really cool thing about it: you can rotate the dome to make the sun rise and set, and you can spin the dome on its axis, as if you were moving the camera around a full thee-sixty. So there's virtually limitless skyscapes you can wrangle out of this. Didn't have any luck lighting this one with the LightDome Pro lights, though. 2.5 hours while it calculated the shadows for 256 skylights and then rendered the piece, and I got a picture that was screamingly bright ... hmmm. What did I do wrong? Nothing that I'm aware of, so -- as a quick fix I deleted all their lights, and whacked four spotlights on this to give me what I wanted fast...

But this one was a 10.5 hour job in Lux, and below it I'm also pasting in the original render of the same shot, which was done about six weeks ago -- the garden scene:


The bottom shot here is just the deep shadow map in 3DLight, for the simple reason that I have about two dozen lights on this scene, and the raytrace was going to take 18 - 20 hours! I didn't have the opportunity at the time to let the raytrace go for so long. So knowing that Lux breezed through it in 10.5 hours is actually saying a lot -- and the result is astonishing. Overlook the fact that the texture on the wall is very different ... I was much more interested in seeing what it could do with the sunlight than in tracking down the displacement map for the brickwork ... instead, take a look at the dappled light on the yukimi (lantern) and on the capstone on the top of the wall pillar right in the corner. Whoa. Now, I'm impressed. You can see right inside the Yukimi! And this scene was done with ONE light, representing the sun. Lux calculated everything else from there...

Want the clear comparison? Here you go -- see it big, if you're looking at investing in Lux/Reality and are looking for a really good look at the difference it makes:


Left is the raytrace. Right is the Lux render, albeit at the cost of 37.5 hours. My mind is filled with images that need to be realized! There just aren't enough hours in the day. Need to find a way to go faster, or make time stretch. Anybody know where the Doctor parked the Tardis --?!

Jade, April 29

Wednesday, April 25, 2012

Glorious skin tones? We wanted glorious skin tones? Done! Thank you, Lux!


click to see all images at large size...

If you've been following this blog for any length of time, you'll know I've been hot on the trail of glorious, realistic, luminous human skin tones for ... well some time now. And if you would care to click on the above, you'll see that I think we can stamp this project "done and dusted" ... and thank you, Lux! He's a face/body morph designed by me (the skinmap is Mario, by Tosca; the hair is Spartacos by SAV; and costume, or what there is of it, is the SickleYield Loin Cloth), but if I'd rendered this guy last week, the best I could have done, and uploaded, and shown you would have been this:


There you go -- same guy, same scene, same everything, and raytraced in 3DLight, which is native to DAZ Studio. It's a very nice render, but there's a dimension missing, if you're wanting the skin tones I've been rabbiting on about for so long. But --

Now we're cooking. The penny is really starting to drop for me, with Lux. This current render is something like the 8th Lux project I've done since getting the engine, and I'm juuuuust beginning to drive it, rather than letting it take me for a ride.

If you're into this sort of stuff as an artist, with a view to squeezing the utmost out of DAZ Studio by way of the Reality "bridge" to Lux (ie, the Reality plugin that gives you access to, and control over, Lux) have a look at this, below, full-sized, because having the two pieces juxtaposed is the absolute best way to make the comparison:


... and if you're not into the artwork with the object of doing it yourself, then just enjoy the pinup guy for his own sake -- in which case, here he is at full-size:


...and watch out for more Lux renders. Now I'm beginning to get it figured out, I can start reaching a bit further, to see what I can do. The next project is a garden, which I was never able to raytrace in DAZ. The raytrace was going to take something like 30 hours, because I had about 18 lights set up on a whole lot of trees and plants; and at the end of the project it was still "only" going to be a raytrace, which has such limitations, you have to ask yourself if the final result is worth beating the hell out of your computer for a day and a half! But with Lux, I'll set ONE light. The sun. And then buzz off and leave it ... and even if it takes a day and a half, the final result ought to be well worth it. 

Yee haw! Starting to make some real progress! 

Also learned something about my new computer, and why it's so screamingly fast. 

It has a solid state boot drive. Now, this is something I never even heard of before the other day, when I had a bit of a 'scare' with it. 22GB of free space on the drive vanished. My available space dropped from 41.5 to 18.5, and I couldn't find anything to account for it, after an inventory of everything on the drive. Thought to self, hmmm, does it need defragging? So I went ahead and defragged it, and sure, got the space back. But the next day I was talking to one of the specialists at IT Warehouse, and was told in concrete terms, never, never, never defrag a solid state drive. With three exclamation points. The reason is that there's a maximum number of times you can write to any sector on the drive, and when you exceed this, the disk will start to die by chunks, and your storage space will dwindle and dwindle ... and these drives are only small (111GB) to start with. So I won't be defragging my hard drive again. Ever.

But my question is this: the next time I mysteriously lose 22GB of disk space, after installing nothing extra to it, how do I get the space back??? Because I'm elbowing for drive space even now. You can always install a bigger sold state boot drive: $500 for 250GB. Ouch. Not for a while! But given what just happened ... how do you lose 22GB of drive space for no reason?? And if you can't defrag to get the space back, what do you do?? And let's say you only had 22GB of space available to start with, on account of these drives are so small, does this mean your boot drive is suddenly 100% full? Drives don't function when they're 100% full! So, given what just happened, I'm pretty sure the bigger drive is hovering out there on the horizon as a necessity, accompanied by its hefty pricetag.  

Ain't technology grand? Hopefully, I can baby the existing boot drive along till mid-2013 or so, and with a bit of luck the price will have come down a lot, as usually happens with gadgets. Speaking of which, did you see the press release about Intel's new 3rd Generation processor? It's going to be up to double the speed of the Generation 2s. I have the fastest of the Generation 2s, thanks to Dave and the big box that was under the Christmas tree last December, so I'm trying to even imagine something twice as fast! 

Jade, April 26

Tuesday, April 24, 2012

Let there be light! LightDome, Lux, and a whole lot more


click to see all images at large size...

These two renders are both Lux renders ... and boy, can't you tell? You know that's Jarrat and Stone, and you know they're the fantastic figments of Mel Keegan's incredible imagination., but there's a photogaphic quality to these images that makes your eye want to believe you're looking at real guys, maybe actors on a movie set -- and the closer you get to the image (or, the bigger it gets), the stronger the illusion becomes -- and even this detail shot,below, is not the full-size image -- click on the pic above to see it  big...


In fact, I rendered this shot twice, once in DAZ, using the LightDome Pro II lighting sets and "sky sphere," which is a giant shell surrounding the whole scene, with the sky texture/image pasted on the inside of it; and then again in Lux...

Now, if you didn't have Lux, or just didn't want to mount the learning curve for a top-end render engine -- which, admittedly, is like trying to run up a wet slide, backwards -- then I would have to strongly and seriously recommend LightDome Pro. It's actually fantastic, and only falls short when you come to compare the results with something like Lux, which has the potential (if I can just get the details figured out) to generate the kind of results you see coming out of major studios. Take a look -- give this a click:


Left: a raytrace using LughtDome Pro II with 186 lights set automatically by the plug-in! Right: the Lux render with just one light which represents the sun. The raytrace fook 4 hours. The Lux rendender took 10.5 hours. Both of them needed a lot of post-work to redo, or unto, a number of anomalies, or "artifacts" which showed up in the renders -- and the little glitches were different in both pictures. The results are very different indeed. The photographic quality of the Lux render has a high wow factor, but you don't notice it so much till you get to the fine details, like human faces. If you just stepped back and looked at the whole shot, as rendered in LightDome with 186 raytraced skylights...


...as you can see, the integrity of the shot is already very, very high. And LightDome Pro costs just a few bucks, will run on an average computer, and renders in less than half the time, with a learning curve that can be climbed in about ten minutes flat. So --

Do I recommend LightDome? You bet! I'll be using it a lot, because a Lux render is something you set up before dinner, and you get your picture, for better or worse, in the morning. Sometimes you come back in the morning and find something that the piece can't be saved, no matter how clever you are in Photoshop, because the settings were wrong, but you wouldn't have seen them for four or five hours ... by which time you were sound asleep! 

Also, Lux will not render the actual dome prop -- the giant sphere that encompasses the scene. The first time I set up this scene, I just imported it exactly as it had been rendered in DAZ, but with all the LightDome lights turned OFF and replaced with a single sun light, as Lux likes for its exteriors. Clicked "go," and came back in several hours to see what was going on. Gibberish. Turned OFF the skydome and went again, with the alpha channel set for the background.

The other thing Lux won't do is render a backdrop -- which is an image pasted in like wallpaper behind the shot, to become the sky or background. So you're always fiddling around with cycloramas, if you want the sky to be part of the image, or you're fiddling about with the alpha channel in Photoshop, to replace the black pixels with a background ... which doesn't work out so well, if your image has a lot of black pixels that are not in the background. You can waffle on for half an  hour trying to get the background set properly. If you have the time and tenacity, the results are very, very rewarding, but sometimes you just don't have the time. In which case, SkyDome is going to be a marvelous alternative. 

Am starting (and I stress, starting) to get the hang of Lux. I'm seeing (or think I'm seeing) how it actually works, and the program is just beginning to open its doors to reveal its inner mysteries. To get absolutely top-notch renders in Lux, though, takes days per images, rather than the images per day I'm used to achieving. For instance, in the detail shot here...


...you notice that the car's raised canopy didn't render with any, many, or very good reflections. Grrr. If I'd had time, I'd have gone back in, hiked the reflective property, and set it to re-render. Then hours later you come back and see if it's reflective enough, or too much. Adjust again. Rerender. Adjust again ... and so on. Time flies by. I'm sure I'll learn how to set all this up ahead of time ... it's part of the learning curve I likened to trying to run backwards up a wet slide in the rain! (The headlights, lamp glow and lens flare were all painted on in Photoshop -- but Lux will do these things "in camera." I just need to learn how.)

So at the moment -- and I'm the first one to admit this, in the interests of full disclosure! -- there's a lot of Photoshop fixing going on, to "save" renders and get useful pictures, without the re-re-re-rendering which would give me about one great picture a week at this stage in my development. But I'm definitely getting there.

My next project is to concentrate on skin tones in Lux, and get those beautiful, liquid, luminous tones I've been drooling about for eons in the work of various other artists who have a head start of years on me. They've all trodden this path, climbed this hill. Now it's my turn to plod and climb. At the same time, I need to be painting skinmaps, so can get exactly what I need ... for instance, it's very, very difficult to render Jarrat and Stone in the same shot, because the skinmap I'm using for Jarrat is actually too dark. He's tanned, but actually not as dark as he usually shows up, and especially not in the shots where he appears with Stone -- the reason being that the skinmap I'm using for Stoney is quite pale, and pretty accurate for the character, who's a Londoner by birth. If the lights and exposure are set up to favor Jarrat, Stone will wash out to ghostlike qualities; but if the lights and exposure are set up to favor Stone, Jarrat tends to turn bright orange! 

So one of the first things I'll be doing is generating a specific skinmap for Jarrat which is adjusted for tone, pigmentation and detail, and this should make my depiction of Jarrat much more accurate, and it should also make it much easier to depict the two characters in the same shot. Can use this project as the test piece, and learn enough while doing it to be able to paint skinmaps specifically for certain characters. There's a lot to learn -- and it's going to be fun!

Jade, April 25 (Anzac Day downunder)

Sunday, April 22, 2012

Playing with a swag of great new toys


click to see all images at large size...

One of the things that puts a major crimp on your artistic license is that you tend to be limited by the skinmap you paste onto your model. Many of them look ... depilated. And it's true, a lot of guys do the hot wax thing. But not all of them -- not all the time. Sometimes, I think it would be soooo nice to be able to depict an actual guy rather than the product of the waxing salon! Uh huh ... so check out the first of today's pics. Call him Francisco. Why? Because he's something like an Italian, or maybe a Spaniard, and I like the name. I designed the face morph, and then slapped on an almost featureless skinmap actually, it's probably the most boring skinmap I've ever seen. And then -- what?

There's a "second skin" bodysuit type of "model" you can get from DAZ. It's been there for years, and I've always known it was there, just never got around to it. (Plenty of square and trianular tuits; just no round ones, you understand.) But last month DAZ was having a sale, and I picked up several new toys, including the Skydeck (parking bay for air cars), and a set of fantasy earrings for Michael 4, which you'll be seeing shortly, and ... Jepes M4 Body Hair.

And it works -- but it's tricky. Verrrrry tricky. Basically, all that body hair is sitting on a skinmap with an alpha channel -- which means the skin itself is transparent. So, when you slap it on the model, Michael 4 vanishes into the ether, leaving his hair behind ... along with his eyeballs and teeth, which looks hilarious, in the way that Chuck Jones cartoons are hilarious. Get over your fits of giggles, boys and girls, and figure out how to do this! 

In fact, if you know anything much about DAZ at all (also Poser, admittedly), you'll know that you can have several models occupying the exact same spacial coordinates. Penny drops with a clanging sound. You load TWO Michael 4 models ... put your boring old skinmap on one of them, and put the hair bodysuit with the transparent skin on the second. Aha! So far so good.

I was concerned that the render time would be a week long ... hair slows it way down ... but it turns out, DAZ treats the hair layer as an ordinary texture map. In fact, the first render did look very flat, almost as if the hair were painted on. So I found my way into the hair layer in the Surfaces tab and played around with the bump and displacement settings --

In fact, I overdrove it a good bit, and had to wind it back again. The result is pretty realistic, up to a very considerable point. The only place where the illusion breaks down is right on the "edge" where you're seeing through the hair to the backgound, or something behind the hairy limb. That's the place where it doesn't look 100% realistic, so --

Hmmm. Didn't I just get a set of skin-painting brushes from Renderosity? And wasn't one of them a body hair brush? Yep. So, the model was rendered with the hair layer, and then painted in Photoshop to add in the final bits of the illusion .. and you really will have to look at this full sized, to see it! I've uploaded it at 1200 pixels high, so you can see the detail. Nice effect!

The second render is another in my Quest For Realistic Daylight adventures. This one just about has it nailed, what with depth of field and shadows and all. I rendered it big, so I could get into the fine details and paint them invisibly ... in fact, there's a lot of overpainting on this. It was done in about 20 layers in Photoshop, based on the original idea/theme:


In this one, above, I ran an experiment with the Depth of Field tools inside DAZ Studio itself. The camera controls are just about the last area of DS that I don't have a death-grip on, and I've promised myself I'll get my head around them. Usually, when you see the DOF-blurred backgrounds in my work, I've pulled the trick in Photoshop. Not so with this one, above. First, I overdrove all the bump mapping in order to make the stone and wood look nicely realistic, then gritted my teeth and dove into the camera controls. 

Well ... I made it work once, but when I tried the same stuff on Take Two (the one where Leon is studying a cloak brooch in the palm of his hand, second from the top today), no joy. So I don't have a full grasp of the system yet. 

I got a bunch of other toys at the same time. One was a lighting set, which I'll use sparingly -- Light Dome Pro. Yes, sure, it does make the job of setting about 30 lights at a time as easy as a click or two, but using these lights in experimental stages the effect I wanted on the Skydeck set just wasn't happening for me. So ... what the hey? I lit this whole thing with spotlights and point lights -- and then painted the hell out of it in Photoshop. Here, get closer to it:


And (gulp) even as I type this, I have this scene rendering in Lux. I've set it to render using the same lighting set as I used in the DAZ render -- all spots and point lights. It's distant lights Lux hates. So in a few hours I'll know if I have a Lux scene here. (Meme: get ram, get ram, get ram get ram...)

You can't tell in the small images Blogger pastes to the page, but it's a dirty night on that Skydeck -- it's raining; you can see the rain in the haloes cast by the lights. This was done with Photoshop brushes, of course...


So, in fact, how much painting goes into this kind of work? Well, actually, a lot ... but you don't see it:


In this one, which I call Absent Friends, the fist thing I did was paint the textures for the fabric and leather, before slapping them on the models, and then rendering it all up. Then, the skin tones are overpainted to get a couple of effects, and a lot of the shadows are hand-painted. Good thing I enjoy painting in Photoshop!

A little while ago someone was asking what brushes I use. The truth is, I have scores of brush sets, and some of them can have scores of individual brushes zipped into the .abr file. In the renders you see here, today, I've used mostly Photoshop's own brushes (default and caligraphy) to paint the shadows and a lot of the lighting effects; then I used the FS Wild Weather brushes for the rain, and Ron's Bokeh Lights for the lens flare effects, and something called Channing Body Hair for the edge work on the Francisco character, and the Gypsy Brows brushes for his eyebrows:


...the effects are very subtle. Believe me, you'd tell in a heartbeat if they weren't there. The skinmap I used on this character is one of those (and there are loads of them) where the eyebrows are so insubstantial, you wish you had an alternative. So I indulged myself in the Brows Brushes by a designed called Gypsy, and experimented to see what results I could get. It's not point-and-click, but you can do some very nice things with these brushes --

One thing I'm about to do is ... I wanna paint my own skinmaps, so I'll get exactly what I need. Having brushes for body hair, brows, and also skin texture details, like pores, really helps with this. 

So, if you're trying to follow in these tracks, you'll need Michael 4 (duh), and some kind of skinmap that gets you into the ballpark; the eyes are one of the photographic eyeball sets, The Eyes Have It. The hair is the Jepes M4 Body Hair "prop" ... you'll work it out. The brows are done with the brushes I was just mentioning, like the hair along the edges of the limbs and so forth. The toupee is an old favorite, Mon Chevalier by Neftis, set to a lovely dark golden brown, and with the morphs tweaked ad infinitum. That's my own face and body morph though ... you're on your own there, guys. In the Absent Friends image, that's also a character of my own (Leon), wearing the Midnight Prince hair and Michael 4's own High Rez skinmap, but with another bump map applied to it to enhance the details. The location is comprised of two of DM's sets -- The Gate and Gadomar. Gadmoar is the building in the background. The sky is a photograph of my own, just a backdrop, nothing too clever. The sword and knife are from the High Fantasy prop set; the bottle and cup are from DM's Anardhouse, but I changed all the textures. The costume is actually the Euros set (top, kirtle, pants, boots), though you could be forgiven for not recognizing it: bits turned on and off, all textures changed. The harness straps in particular are neat: that's a liquid chocolate diffuse map (!) and a huge bump map made from a swatch of rhinoceros hide! All the props, sets and brushes, you can get from DAZ and Renderosity. The character morphs are my own, and I did some work with my own texture and bump maps here and there...

Now, I wonder how that render is going in Lux? Time to gird the loins, and go find out!

Jade, April 23

Friday, April 20, 2012

Yaoi and other fantasies ... moonlight, lamplight -- and Lux


click to see all images at large size...

Ooof. I need more RAM. That's the next big thing on my artistic agenda. But here's a couple of pieces I'm really happy with, and the top one, which I call "Ronin to the Rescue," is a re-render and recomposite of a project you might recall from a loooong time ago, back in the days when I was rendering in a keyhole and couldn't raytrace much if I wanted the computer to keep itself up on its feet. You have got to see that one at full size, folks --!  It was a 90 miunte raytrace, and then a 30-layer Photoshop painting over the top of the best render I could get...

The second picture was about the same length of time in rendering, and then the painting was done in something like 15 layers. Result: pretty fantastic, actually. The original idea was that the courtyard where he's standing was supposed to be moonlit with a single lantern in the background, and it came out like this:


Then, on a whim, I actually decided to see how it would render up in Lux. Well ... I'm learning. I still haven't got a true grip on Lux, and the biggest bug-bear for me is the lighting. I'm just feeling my way, but this is worth a look -- it's very different from the raytrace:


It's actually lit with one light, and there's an enormous amount of Photoshop post work on it in the backgrounding, even though, when you see it at full size (please do) it's almost photographic. I'm really pleased with how the lamp came out, because (!) in the original, raw Lux render, the lamp is not lit at all. In fact, here's the raw render, just as Lux handed it to me after TWENTY HOURS of render time: 


That's actually a nice picture, and very true to the lighting that was set. Just one light, as I said ... why? Because I have next to no idea, yet, about how to properly light a scene for Lux, and it takes anything up to five HOURS for me to find out the lighting and/or textures I'd set were no good. So ...

I need more RAM. That's the only thing that's going to speed this up to the point where I can learn it inside of this year. However -- I'm guardedly congratulating myself for having figured out how to get the most out of the render engine which is native to DAZ Studio, so am having huge fun revisiting old projects, while trying to "nut out" the lighting for Lux. Right now, it's a question of ... how do I get realistic shadows to fall where I want them to, so that I can predict how a picture will turn out -- in other words, I can achieve the result I had in mind when I started, instead of getting something very different in a crapshoot of cosmic proportions!

Bear with me, guys, while I get this figured out, because the potential in Lux is phenomenal. The magic is in the fine detail...


...like his lips and teeth and eyelashes, and so on. The raytrace of the same subject is more striking at this stage in the artist's development...


...but only because it's properly lit! The detail ain't there. Teeth, eyelashes, lips, what have you. My goal? To get a fusion of the two: the detail of which Lux is capable, and the proper lighting I know how to do, to get nice results in raytracing. I'm figuring it out by a process of elimination: you make 24 mistakes and hit the jackpot on the 25th try, perhaps even by accident. Actually, this is how I learn. I'd love to say that I can learn from a book, or take a class, but the truth is, the info doesn't "stick" unless I'm hands-on and muddling. 

So: RAM is on the agenda! And till I get that organized, I'm going to revel in reworking some of the ideas I had a year ago, and two years. On that note, I leave you with this Yaoi fantasy:


...when you see it at full size you'd be forgiven for wondering, how much of it is 3D render, and how much is painting? There's a lot of painting in it.  A lot. Enjoy! Back soon with more...

Jade, April 20

Tuesday, April 17, 2012

666 ... the number of the post ... uh, beast. Whatever


click to see all images at large size...

Would you believe it -- post 666! So we thought, why not do "the number of the beast," or something similar. You have got to see the top one at large size ... it took the both of us to wrangle this one! Dave did the original render in Vue, and then in PhotoshopI did all the overpainting, of which there is, ooooh, a lot. Here's a 90% scale detail shot:


I did the demon character in DAZ -- it was mostly about playing with the morphs and over-driving everything till you wound up with a creature that's humanoid, but a long way from human. Then, I just couldn't resist this (and in case you're wondering, the text objects were done in Serif): 


And last night, just out of curiosity, I set The Man in the Hat to render in Lux ... bearing in mind that I still have about 2% of an idea of what the hell I'm doing in Lux ... and here's the result:


Even at this level of proficiency (and I stress, I'm an absolute beginner at Reality/Lux -- the results are almost photographic. Check out the comparison:


On the left, artwork -- very nice art, but art nonetheless. On the right -- something that's so close to a photograph, you look, and then you look again, and there's only a couple of things that tell you it's not a photo. To me, what gives it away is the trousers. There are no creases in the fabric, and in the Lux render, this shows. Why no creases? Because the 3D model and its accompanying textures don't provide any. What's the cure for this? I need to hand-paint the textures to look creased. And if I hadn't run out of time, I would have done that! Next time, I intend to.

But I was very very pleased with the way the skintones rendered in Lux. I'm starting to see the luminosity I've been hankering for, for so long. My impressions of Lux so far? It's amazing -- and also, full marks go to the "bridge" that connects it to DAZ Studio. The Reality bridge is the magic that makes it all go. There's a 115pp user guide that accompanies Reality, but what people need, I think, is a hand-holding walk-through of the process. It was hair-raising the first few times out, and it's still confounding at times. But I'm getting there, sloooowly but surely. It certainly isn't confusing or intimidating now.

Anyway, the Man in the Hat that you see here as a Lux render took about five hours, to render at 1000x600 pixels, which brought it up to 3000 "samples per pixel." At that level, you can see minor differences in the resolution of the background over the 1500 samples capture, but the skintones were "cooked" at 1500 samples per pixel -- basically, what I do is to set the engine going and come back every hour or so, and capture a copy at the level of progress attained by the software up to that point. Lux is called an "infinite render" engine, which means it will render ... well, forever, till you stop it. It saves its work every three minutes, overwriting the same PNG file, and you can come along at any time, open said PNG and save it back on a new name, so you have a record of what the render looked like at 500 samples per pixel, and 1000, and 1500, and so forth. What I have found so far is that skintones are generally "cooked" in 1500-2000 samples; and brighter areas "cook" faster than darker ones.

My next experiments will be in closeups of human beings, where I should be able to make micro-adjustments in the skin mapping ... and in using "mesh lights" to get a photo studio effect ... and then in rendering exterior scenes using image based (IBL) lighting, and then in interior scenes, in where you can turn an object into a light. Which is so cool. (Gimme time to learn this stuff. It's, um, complicated.) And I would like to know how long it takes to render at L-A-R-G-E size, maybe 1600 pixels wide and 1000 high. I have a feeling it's a long, long process. Do I need more RAM? Mmm ... I need more RAM.

So there you are -- Post 666. Amazing. Where did the last two and a half years go? I want them back!

Jade (and Dave), April 17

Monday, April 16, 2012

The Man in the Hat, the Guardian Dragon, and more


click to see all images at large size...

And speaking of heroes (well, I was, in the last post, a couple of days ago...) try this one: the man in the hat. Uh huh. Try looking at the shadow, not the figure -- and in case you don't want to click to see the pic at full size, here's the detail shot:


Indiana who --?! I think anybody in the world would recognize that silhouette! I just couldn't resist this. The project started off as a "working class hero," and he was going to be (probably still will be) a partner for the PI type character you saw the other day. But as it started to go together, something just made me chase that shadow, and I'll admit, it took an extra half hour, but it was huge fun. Mind you -- the character himself is pretty darned good. Have a look:


...and he's actually standing inside the Palenque ruins standing set, which is an enormous structure. You can get into the temple at the top; and here, I've overdriven all the bump maps in order to bring up oodles of detail which will work well in close-up. Though I confess, I did hand-paint the edges of the big column that appears in the foreground in the full-frame shot. It has perfectly-square edges, which an ancient ruin wouldn't. Easy to fix that, in Photoshop...

The second piece today is Dave's "Guardian of the Mountains" ... a 50-hour Vue render! He's doing fantastic things in Vue, and the render engine is amazing. He needs more RAM -- his computer will max out at 16Gb, and we'll take care of that in a week or two. With more RAM, you could get images like this every day or two, instead of waiting most of a week. He loves to work with dragons, but getting him to do a guest post is like trying to squeeze blood out of a turnip, so I decided to just post this one myself. This piece is really fantastic. Dragons, SF, fantasy, and the gray zone where they cross over is where he likes to work --

Meanwhile, on my side of the desk, the quest for photorealism in 3D goes on:

Adventures in Reality/Lux, Part Three:

Here's the car I promised. I actually did it several times, with different results every time. The top shot, here, is ... welllll, it's a cheat. I took two versions and composited them to get the shot I was trying for. The second shot, below, is the raw Lux render, with just a bit of color correction in Photoshop. I learned a lot. A lot. And I still have about 95% of the learning curve ahead of me. It's an amazing engine, sooooo different from anything I've ever used before. 


The third and fourth shots are revisitations of renders I did not much under two years ago, relit and re-rendered to bring them up to speed. I can do so much more, now that I can handle stupendously large scenes without the system just crashing. This one, below, has a close-to photographic quality:


That's Curt Gable, standing at the parapet of the NARC Air Park, on the roof of the NARC building in Venice, Darwin's. I'm rather proud of this one, because I designed a lot of the textures and mapping myself; I did the atmospherics and depth of field ... and this is still a DAZ Studio render. Am still seeing how far the 3DLight engine can be pushed, for two reasons. One is that it'll be weeks, maybe a couple of months, before I can get Lux to do exactly what I want (!), and the second reason is that 3DLight raytrace renders take a matter of minutes, whereas Lux renders --? Well, the second of the two car shots took five hours.  So, with the best will in the world, and all the skills to boot, you can still only have one Lux render in a session, whereas you could have a whole pile of raytraced images. So it behoves me to get the "ordinary" renders up to the absolute max that can be achieved, right? Right.

Speaking of which -- the last image today (Jarrat, Stone, Cronin and Ramos in the hangar) was completely relit, and marginally reposed. Thank gods I didn't trash any of the original project files! What I've done  here is to reimport the new, improved Joe Ramos character: I redesigned him a while ago, and he's much, much better than before. Then I reposed Jarrat and Stone a little ... deleted all the lights and reset them. Changed some of the texturing, and rerendered it. The original of this, way back when, wasn't even raytraced -- four characters in the shot, plus a set, and a half dozen lights --? Crrraasshhhh! Impossible. Couldn't get anywhere close to it. Can now. Cool! So this one, here, is very nice. Four completely different skinmaps, face morphs, the works. To my eye, Gil Cronin is the one (second from the left) who renders up the best in this shot. It's the way the shadows fall around his face. 

(Incidentally, if you're wondering: sorry, you can't buy these face/body morphs anywhere. Two out of the four were completely designed by me, starting from the raw Michael 4 model; another started life as JM Falcon and was heavily reworked to make Joe Ramos, and the other did start life as a stock morph -- I forget the name -- but he was re-re-reworked, including having the skinmap repainted, for Jarrat.)

Dave and I have something special for you tomorrow. The renders are already done, so -- join me then!

Jade, April 16