Sunday, February 28, 2010

The fantasy hero comes alive in 3D


The fantasy hero ... the icon ... 3D art is so perfectly suited to this genre, I'm amazed every day. And the more I work with the one character here, the more I like him. When I developed this face, this personality, I was actually trying for Rogan Dahl (from The Lords of Harbendane), but I didn't even get close to Rogan.

Instead, I wound up with something very different, and absolutely magnetic. Picture this: he's close to immortal ... genetically engineered by several generations of sorcerers, not merely physically perfect, but with a searing intellect too. And then (Jade flying kites here, and loving it) the civilization that bred a handful of his kind collapsed due to corrupt politics (!), leaving people like him adrift in a world that's crumbling. Nobody trusts them, because they're too big, too strong, too smart ... probably too arrogant! So they wind up alone, doing off-the-wall jobs, like being an assassin.

And then he meets this guy...


...who's on a mission. And everything changes...

Ouch! This is a book I would love to read. It's a movie I'd love to see!

Jade, 1 March 2010

Saturday, February 27, 2010

DAZ 3D environments ... a Yaoi jungle fantasy


Yaoi 3D meets George of the Jungle again ... want more George?! You're in the right place! However, today's post Yaoi 3D meets George of the Jungle again ... want more George?! You're in the right place! However, today's post is actually about the DAZ 3D environment -- the cyclorama. Still, it's not a proper post without a beauty shot or two, so let's do it again before we start talking about mundane stuff like cycloramas!

There ... nice! Very nice. But what about the cycloramas?! A cyclorama is a big projection screen, ofter curved. The DAZ 3D environmental ones are close to a semicircle, so you can get in there and pan and tilt the camera, and get a different view, different backdrop, every time.

There's the main cyclorama and a couple of smaller ones featuring outtakes from the main one; and these can be set up several at once, in the same scene. If you're really clever, you can get a terrific illusion of tremendous depth.

However, you can also just click on the main environment and have the program load everything up to the palm trees and a lot of plants. Then amuse yourself adding more plants as "props" anywhere you need them ... before you add in your figure.

Here's the full panoramic shot -- cinemascope -- right across one of the smaller outtakes. The main one has the waterfall and pool (see yesterday's renders, which were shot in the full set). The detail is amazing, and the trick is not to get too close to the backdrop, with too much resolution in the shot. You're asking yourself, where's the back wall of this set?! Well...

If you shine a light right on it, and do a high-rez render, you can see the background -- click on the above image to see it at full size. There's your back wall!

So ... duh ... don't drive the camera in so close, and don't shine a light directly on the background! You also have to be careful when lighting these scenes, not to have your character(s) cast shadows on background elements that are supposed to be faaaar way. In fact, it's all an optical illusion -- the waterfall isn't far away at all. It's actually standing right behind George, and if you're not careful with the lights, his shadow will be on the water! If you can handle them just right, the effect is stunning. Have you every read Edgar Rice Burroughs's original Tarzan stories? They're nothing like the movies ... they're nothing like the real Africa. They're a fantasy-scape with a rich darkness which is absolutely separate from reality. And that's what these backdrops look like.

All art is about illusion. This goes double for 3D art!

Jade, 28 February

Friday, February 26, 2010

Yaoi 3D meets George of the Jungle ... wow!


Yaoi is an art form that's gaining momentum right now, and it'd gain a hell of a lot more momentum, and do it faster, if it were more widely recognized that Yaoi does not mean underage kids!! It means "young," and "youthful," and -- invariably -- Beautiful.

Something clicked in my imagination yesterday. I was thinking Brendan Fraser as George ... I was also thinking about The Jungle Book (Brendan Scott Lee as Mowgli). And I was remembering waaaay back to Ron Ely as Tarzan.

Then I recalled that I had downloaded the Heart of the Forest cyclorama set ... and the rest happened. George as seen with the yaoi art filter on the binoculars!

Y'know, I grew up with George of the Jungle (Brendan Fraser probably did too ... if you were around in the 60s and 70s, George was just part of a Saturday morning). But George Primate didn't turn into a drop-dead gorgeous hunk until 1997, and suddenly he was on the sides of buses! That was the point when I sat up and started taking notice ... a lot of notice! It was also the first time I saw Brendan-- not his first movie, I know, but the first I'd seen myself.

And since 1997, "George of the Jungle" has meant the gym hunk from heaven, with the long, flowing locks and the chiseled physique and ... all that stuff ... until yesterday a whole suite of concepts clicked in my imagination, and after I'd done playing with the cyclorama set to see how it all worked and what was available in it, I could resist adding a figure ... a Yaoi figure ... George.

This is what you're working with in the cyclorama "environments" ... this is not "true" 3D as such. They're 2D "planes" which are set up in ranks and give a fantastic illusion of depth and perspective. If all the trees and plante were true 3D, the computer would soon overload with the number of models in the shot. So these cyclorama sets are a great compromise. You just have to bit a clever with how you set them all up, and where you put the camera. Every time you change the camera position, you get a new view, or scene. Fantastic!

So here you have Michael 4 wearing the Jagger skin map and the Danyel hair, and one of my own faces (same as you've seen on the dancer-assassin several times now ... I cast him over and over because he's one of my favorites).

Yaoi meets George. Or, George meets Yaoi -- whichever way you want to put it. Nice!

Jade, 27 February

Thursday, February 25, 2010

3D book covers ... again

What was I saying a couple of hours ago, about 3D art for book covers? here's another fantastic example of the flexibility of the medium. I painted the "rough" for this piece about five months ago, when Jayne DeMarco showed the next-to-last draft of the gay romance, Painting Stephen, to DreamCraft. We immediately said, "Yes! Let's package the book and go to market!"

Five months later, the book is about to launch and I was able to go back to the rough ... just open the fine and light the model ... make a few changes, such as closing his eyes (Stephen is a dreamy character, this suits him), and in about fifteen minutes I had the whole cover done!


There's no way you could do anything remotely like this with a paintbrush, and the finished painting is gorgeous!

Here's the beauty shot -- the painting without the overlays:


Trying to get through with work today, so I can do some new renders ...

Jade, 22 February

Book covers: working in 3D, in concert with the author


Victoria 4 is still rare on this blog ... I don't work with her very often. As I've said a few times, there's oceans of fantasy female images out there, you don't need me to add more! But sometimes the job needs Victoria, and Michael 4 just won't do! Like the ebook cover I just did for Sara Lansing ... this was a great exercise for me, because I had the author sitting right beside me saying, "blond," "redhead," "nose larger," "eyes greener" and so on. Driving the software on command was something new -- a challenge. I am reliably informed, I passed the test!

The biggest challenge in this piece was starting with two identical dolls and making them look very different, and lifelike. Victoria 4 is a piece of plastic. Sorry, you designer dudes at DAZ, but she's Barbie. She's so un-lifelike as she hits the DAZ Studio 3 stage, I reckon I've seen more life in a kid's toybox. What's wrong with Victoria 4? Her eyes are too huge and her body is as spaghetti-like as a 14-year-old gymnast, except for the mammaries, which are as well developed as was never seen upon a 14-year-old gymnast. A teenage guy designed Victoria 4. Duh. 

You work hard to make Victoria 4 look alive -- especially if you don't yet have the Morphs++ for the base model, and I don't! They're $30, and since I don't have much use for them, I've never bothered getting them. If I get more commissions to produce artwork featuring females, of course I'll get them, but right now, there's still so much I need for the Michael models.

This is just a very short post. Basically, I wanted to share the really nice cover! Sara's delighted with it and so am I. But I'll be back later with guy-candy.

Jade, 26 February

Wednesday, February 24, 2010

Native American ... beauty and fantasy


Still on the Western theme ... the Native American side of the fence ... pretending to have a fantastic vacation in Colorado and meet this really cool guy who's actually shooting a movie about three yards out of the frame to the left --!

Seriously: the backdrop is a tiny swatch out of a wallpaper image of Colorado ... and I didn't soften it by much to make it look realistic for these conditions. Why not? Well (I slap my photographer's hat on here!) look at the daylight. It's brilliant. To get a well-balanced shot here, you'd be shooting at f/22, if your camera "stops down" that far --

There's a generation of digital photographers going, "Huh? Say what?" But this is the photographic theory behind great shots. The modern camera is closer to a computer than a camera, and it's doing the work for you, but here's what it's doing: it's closing your lens to stop most of the light getting to the virtual film, so the photo doesn't "burn out." Now, f/2 is a BIG aperture, and f/22 is a tiny aperture. Small holes let less light through, right?

But there's one other thing that tiny apertures do! Here's the rule: there smaller the aperture, the more depth of field you get. Meaning, everything from about five feet from the lens to infinity will be in focus. (Penny drops! Loud ringing sound! here's a Eureka moment.)

So in these lighting conditions, don't soften the backdrop image. When you get your model(s) set for the shot, throw loads and loads of light onto them to brighten them up to match the backdrop.

This shot needed six distant lights and our point lights to get enough light onto it to look realistic enough to match the glorious Colorado backdrop. The rest of the shot is:

Michael 4
Midnight Prince hair set to raven black
Falcon skin map with some of the warpaint turned on
Falcon face heavily modified by me (it's Joe Ramos from NARC!)
Loincloth from the Wood God set
Moccasins from the Wood God set
All costume set to "brown"
Millennium Horse
CWRW Pro texture: appaloosa
MAT-Mor Mane Pack to design the long, curl mane
Western Horse tack -- saddle and bridle
Textures on the tack ... lose the saddle blanket.

With everything imported, then you have loads of fun getting the poses right. It ain't easy -- and the toughest part of it is getting the reins to lie right. Yeeouch, that's a job!

Lastly ... the lights. Light maketh the picture. Trust me, the first time you render a shot like these without any lights, you'll see the difference!

Jade, 25 February

A very special thanks!


A very special thanks to author Linda Hines for doing me a great honor! In these last weeks, I've been working behind the scenes on character creation ... bringing to life some of the charismatic men and horses from Linda's wonderful western novels. It's been a source of great delight to me as an artist, and the author has been wonderfully kind and supportive in many ways, not least in the publication of this very special page. Please visit and enjoy ... please also click through to Linda's other pages, which are linked from this Emeric von Gondrecourt page, some of which I've been honored and delighted to illustrate.

Thank you Linda ... this page is deeply appreciated!
Jade, 25 February

Tuesday, February 23, 2010

Props for a 3D goldrush ... figure model and all!

Western 3D props! Seriously -- a realy fantastic set of odds and ends that put a huge kick into many historical scenes you're setting. "Western" is a time-frame as well as a location ... bet your bottom dollar, the bits and pieces would have looked the same in England, Europe or Australia in 1870, so they mix and match beautifully...

Now, you might have noticed that it is Impossible to sell, demonstrate or display anything in this universe (or at least on this planet) without having a near-naked babe draped over it. I was looking at fancy paper stocks yesterday. Paper! And sure enough there had to be a young female in what was supposed to be provocative costume partially obscuring the product (actually it just looked like her corsets were so tight they were cutting off the circulation to her brain ... or maybe it was the height of her heels making her dizzy). So, in the interests of fair play --

You there, sonny Jim. Yes, you in the blue jeans, pretending to be a male model. Yes, you! Lose the jeans, let's see the color of your undies!

Being a nice lad, he didn't seem to mind. Maybe he reckons sexist advertising is a right royal pain, and if it's going to be done at all, it oughtta go both ways...

Yes, well, thank you, dear. Now, git out of the picture and let's see the props. Go! You and your scarlet undies can go get a coffee while the props speak for themselves now you've grabbed everyone's attention for us.

And they really are a heck of a nice set of props. There's about 20 items in the set, including a tripod for the campfire, a coffee pot, a branding iron, several bags, crate, box, chest, trunk, pail, and so on.

The whole kit looks like someone's struck gold in them thar hills, and won't be seen again till they show up swanning around on a Mississippi river casino boat, like James Coburn in Maverick! Best of all, this great set of props cost the princely sum of $9.99, and it wasn't even a sale.

Jade's verdict: highly recommended, 5 out of 5, great quality, great value.

Also, I couldn't resist using these renders as an exercise in shadows and light too ... have you notices the shadow cast by the lantern? Is that nice, or what?!

And yes, I hear what you're saying: it's not a proper post without a beauty shot! So here it is -- proving that Boris and Julie aren't the only ones who think these things:

3D art for book covers: the answer to a prayer


Painting book covers is always a challenge, but painting in 3D gives the artist one heck of an advantage. I've always vastly preferred to work in cooperation with the writer, who knows what the characters too like, for one thing! A publisher might send along the first chapter, or even the first five or ten pages, and the artist might have to come up with a cover to sell the book on that much alone. (You ever wonder why the cover of a book is often an idea drawn from something around page four? Like, the story starts out with an orphan thief being chased through a marketplace ... and this lands on the cover, even though the character grows up into Charlton Heston by page 50! Now you know why. The artist is usually largely in the dark, with no contact whatsoever with the writer.)

No matter which way the job is done, though, it all comes down to this: the artist creates a piece of work and sends it to the publisher. The publisher can be critical of it and want changes -- and this is where it gets interesting.

When the cover was really painted, with paint and brushes, the finished art was ... finished. It's very hard to change an actual painting, though I've heard of artists being told to go back in and change the color of this and that, make the heroine thinner, or more "pneumatic" and either paint a bikini on her, or paint the existing bikini out of the picture! Basally, out come the paints and another coat gets slapped on over the old ... which creates a lot more work. Maybe a doosie of a hot more...

And that's okay, if an artist was getting paid well. But in today's publishing industry, cover artists are earning nickles and dimes. There isn't time to do the job like Boris, when the pay check is going to be $75 ... much less take the thing back and change half of it on your own time, on the whim of a publisher who prefers green over red today! (Been there, done that, guys, back in the days of paint and brushes. It was such fun. Not.)

And this is where 3D comes to the rescue big time. Today's post is a really cool project: concept art -- the top image -- gets trimmed into a 2:3 aspect ratio cover set up for the logos to be overlaid at the bottom, over the legs, and a teaser-text or a quote from a great review at the top. Looks good so far? Think you're done? Brace yourself: after the work is fiished, the art department changes its mind. They now want the logos at the top, like the classic book cover...

If this were a traditional painting, it would be a big problem. In 3D? Nah. Back to the project and change the camera position. Result? this:


Time taken? Ten extra minutes. Thank you, DAZ!

Now, that cover is only a mockup -- I came up with a really cool title, but honestly, I have no idea what it means. I think there's a heck of a story in there somewhere, and this could easily be the cover, but at this point it's a just a mockup, because today I wanted to talk about how 3D art is superbly suited to book cover work...

And yes, I do a lot of book covers, and I am available for commission!

Jade, 23 February

Sunday, February 21, 2010

3D environments and lighting ... poetry in light and shade


3D environments are a whole new playground, and I'm having all kinds of fun in them! As I said in yesteray's post, I just discovered a whole new dimension in this kind of art ... 3D imitates life with a vengeance! Like this...


The magic is on three levels. First, the "architecure" of the scene, which gives you the ability to "shoot on closed sets" with 360-degree details, plus floors, plus ceilings. Then, the textures that get slapped on these, which bring them to life with the richness of stone, granite, marble ... and then the LIGHTS. Oooooh, the lights!

And if you're wondering "why bother?" Click on this to open the full-size versio, and compare these "in progress" renders with the final ones you see above!

It's amazing what a differnce the lights make. I set two distant lights up high, playing the part of daylight streaming in through the high windows these structures have. I made one blue and the other beige-ish, so they'd balance each other out. Then I rendered one, to make sure all the elements were in the right place, and that the colors were what I wanted. So far so good...

Then the moment of truth! You turn on the Deep Shadow Map for each of the lights, and give it a couple of minutes to render. And suddenly the results are amazing.

The last one of the images with lights in, and on, is the one with the colors stripped into the background. I did this to bring up the fantastic textures worked in the granite. There's about five point lights set, to get this effect, but I could have done it a couple of other ways to "save lights." The more lights you set, the longer it takes to render the scene, because the Deep Shadow Map needs to be created separately for every single light. (And of couse if you turn on ray tracing with five or six lights ... come back after dinner, because it's going to take a looooong time.)


Now, there's plenty of work that could still be done in this scene. If you take a close look at the font in picture 3, it's close enough to see details, and you can see that it's smooth and "plastic" looking. This can be fixed ... if you can work longer on the images ... and am sad to say, I can't. Getting fantastically detailed and realistic images takes a long, long, long time, and right now (you guessed!) I have to run back to work!

Jade, 22 February

Saturday, February 20, 2010

The 3D Environment: battle of the shadows


This post almost doesn't need text ... the 3D environment, in the DAZ Studio 3 interface ... it just about speaks for itself:

The big challenge was to go from no lights whatever (which doesn't look too good), to having the lights-trees-shadows-on-the sky effect (!), to getting the set ready for the characters to walk in -- and click on this, below, to see it at full-size. I uploaded it at 1:1, so you can see the details:

What else can you say? Actually you can say plenty -- and right now I'm going to give DAZ a plug, and give myself a plug at the same time. You can buy DAZ environments for $1.99, and there's loads to choose from. I just treated myself to "Heart of the Jungle" and Cloisters, and Silence. The cloisters in particular are amazing. I'll be doing fantastic Gothic things with these. Fantastic architecture and textures. And if you are going to get into this and start buying 3D models to feed your habit, don't forget to start your shopping from the banner-link on this blog, because it is an affiliate link, and a couple of percent comes to Your Artist here ... all grist for the mill. Groceries on the table and go-juice in the little car.
Jade, 21 February

Friday, February 19, 2010

Character creation and 3D serendipity


Character creation is one of the biggest thrills in 3D art, especially when you're bringing a character alive for a story. And DAZ Studio 3 is the perfect medium for this art, because you can start with what they call a "base" -- for me, it's always Michael 4 -- and change every last thing about the character. You could give him ingrown toenails, if you wanted to!

If you know your Hellgate, this is a Very Big Moment. About a week ago I was just playing around while I took a break from work (incredibly boring stuff. Code. Javascript. Gak) and this happened, literally accidentally...

Do you recognize him? If you take the beard off Remendado, and give him one of the NARC jackets, and Alexandre's necklace, and the aviator's glasses and Nomex gloves from the M4 Aircrew kit ... Mon Chevalier hair left on golden blond ... you get Sergei van Donne. And if you know your Hellgate, you'll know that this is the character who's been the bane of Richard Vaurien's life for years! He's six-foot-six, Richard's age, a mercenary, a pirate, drop-dead gorgeous ... and absolutely wicked. He's a technology thief on top of everything else, and he's been after Barb Jazinsky's work, one time tried to snatch it right off the Wastrel, from under Barb's and Richard's noses...

If you have no idea what's going on here, you need to catch up on Hellgate. No, you haven't missed a major TV series ... well, not yet, anyway. It's a monster series of SF novels by Mel Keegan, due to be finished this year, and one of my favorite "universes." You might know, I've been Mel Keegan's cover artist for a loooong time, and it's one of my guilty pleasures to create, in 3D, the characters from the NARC and Hellgate books.

Anyway, MK took one look at this guy and said, "Label that dude: Sergei van Donne!"


Next, Neil Travers' other half, Curtis Marin. Message to DAZ 3D: somebody needs to model real good curly-hair, because this is what Curtis Marin needs.

Jade, 20 February

Thursday, February 18, 2010

A touch of 3D fantasy, with DAZ Michael 4 and the Millennium Horse


The classic male nude meets the Yaoi styling, in its perfect medium: 3D art ... and then, with a little bit of digital magic, the Yaoi beauty vanishes out of the scene and...


The fantasy horse takes is place -- seen from the other side of the temple ruins! The versatility of this location is delicious...

I took my own advice, and created the set first. I wanted a woodland glade with a tumbledown temple that could have been there for a three thousand years. Into the glade wanders a glorious Yaoi-style young man, and you can do a whole photo shoot ... and then, when he's gone home and you're packing up your cameras, who should wander into the glade but a horse right out of fantasy!

Here's the magic: create the set first, and then merge in the figure, or figures. I got through all the above renders with ONE software crash, and if you know your DAZ Studio 3, that's amazing.

So now I'm starting to collect up a library of sets, along with my library of characters. This is so cool, and so much fun. [sounds of chortling] It's only taken six months for it to occur to me to make the set first. I must be getting slow...

Jade, 19 February

Wednesday, February 17, 2010

The fantasy barbarian revisitied ... in 3D, naturally


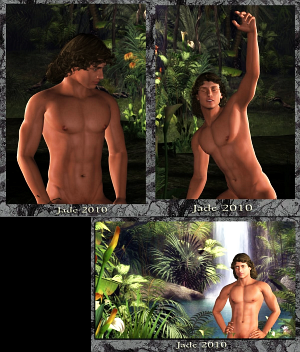
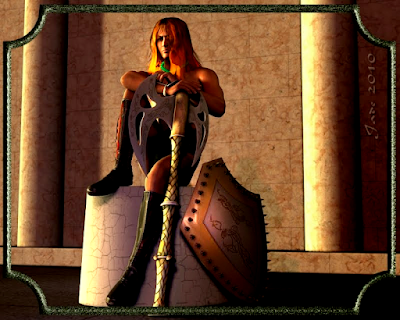
  • Here, once again, is the fantasy icon, the greatest hero since Conan, and also created by Robert E. Howard. Kull of Atlantis himself ... and I'm revisiting the barbarian from yesterday's renders because I promsed to write about how it was done!

    This one is a major mix-and-match session, and a lot harder than it looked. I did 12 renders yesterday to get the last 3 for unploading ... what was tough? Everything! But so long as you know how to drive DAZ Studio 3, there is no problem you can't answer. So here goes!

    First, collect your models:

    Michael 3 Base
  • Alexandre skin map -- but not Alexandre's face
  • Alexander's green eyes
  • Evangelique hair (I'll talk about the color later)
  • Puka necklace (from the Alexandre kit) with color changed
  • Moccasin boots (from the Wood God kit)
  • Kirtle (from the Wood God kit)
  • Axe from the Fae weapons kit
  • Shield fro the Fae weapons kit
  • Marble column from the EROC construction kit
  • Background Easy prop
  • Archer's forearm guard from the Horizon redux kit.
  • Textures:
  • Alexandre's "smooth" skin variation
  • Kirtle set to red
  • Moccasins set to black
  • Marble column, dark gray texture applied
  • Background: pinkk marble wall and edge
  • Floor: big concrete tiles
  • Lights:
  • 4 distant lights in various colors
  • 3 point lights in various colors


Now, here's a tip that'll save you some grief: build the set first!! Set the whole thing up and have it ready to go before you import the model. Then, you can get the model into shape in another file, if you like ... get the costume on him and all the textures applied. With the set saved as one finished file, and the model dressed as another file ... MERGE them together. Save under a new file name ... and start again.

You have two jobs ahead of you. One is to get the model posed -- and get all the props sitting just right; the second is to set up the lights to get the effect you want.

First, then ... get the model to sit on the low marble column. Your best bet to save time is to use a stock pose to get you into the ballpark, then modify this. There's another trick you can do, also: you can apply the SETTINGS from one model in one scene, to the same model in another scene. This really comes in handy ... it's almost (not quite) as good as being able to clone props.

What you do is this: find a model in another scene you did last week, last month, where the pose was perfect. Might have taken you quite a while to get it dead right. Open that file, select Michael 4, then click on EDIT > Copy settings. The settings are now on the clipboard. Eureka! Go back to the file you're currently working on, select Michael 4 and click EDIT > Paste settings, and Michael 4 will be a good lad, do as he's told, and get into this pose.

If you don't have these resources, consider a stock pose to get you close. There are some great collections of poses. Really good sets are M4 Nuance, M4 Combat, Journeyer Scout, Everyday, Variety, Together, Expressive Drama, and so on. These poses won't get you all the way there to the finished picture, but they'll get you close, save a lot of work.

Getting the shield and axe into place is tricky. Select them, and move the in small increments -- and don't forget your Top View and Front View options. These help a lot. You can get a big surprise, when you change to Top View, when you find out that the prop you're moving is nowhere near where you thought it was! Welcome to the world of x,y,z coordinates. Takes a bit of getting used to, but it's very well worth the work.

The hair on Kull, here, is actually the Evangelique hairstyle designed for Victoria 4 ... and it's not supposed to fit Michael 4. In fact, it actually does, but there's no automatic fit. You have to fit it yourself, and it can be a heck of a job. I finally gave up trying to fit the hair to the model ... I fit Michael 4 to the hair instead! See this post to see how it was done.

The Evangelique hair is very good for the barbarians, but it only comes in "dark" and "light," so if you want anything else, you're on your own. Good thing we know how to use the Surfaces tab, right? (Okay, I need to post about this ...)

In a nutshell, here's what you do: open the Surfaces tab. Select Evangelique hair, and change THREE of the color settings. Go into the ADVANCED tab and change the DIFFUSE color, and the GLOSSINESS color, and the AMBIENT color. Then adjust the glossiness to about 50% ... and do this for each of the three "layers" of the Evangelique hair: Inner, Mid and Outer. These layers refer to the different parts of the wig. So, by changing the diffuse, gloss and ambient colors, you can change the wig to bright green, if you wanted to!

(There's a lot more in the Surfaces tab, but if you don't know this stuff, don't worry about it. All you want to do right now is give Kull purple and green hair, right? And now you can!)

Getting the props posed just so is ... fun. You also need to set the right size for the props. Then you'll rotate them around (x,y,z rotations) and lean them up against things. Make sure, for instance, that the axe hasn't embedded a point into Kull's left forearm, and that the forearm guard is clear of his left hand! Keep doing renders and looking for things out of place. Don't worry if it takes a dozen to get it.

And when the props and model are set up just fine, it's time to set the lights. You won't see the scene come to life till you set the lights! On this one, I used 4 distant lights set to shades of brown and cream, and three point lights in (!) purples and greens! You won't know what you want and need till you try ... move them all around, change the intensity of the lights. Render the picture again and make sure the colors are all right, and THEN, last thing --

Turn ON each light's Deep Shadow Map, and render it with shadows. Make sure the shadows are falling where you want them to fall. Don't forget to set the Shadow Softness, if you want soft shadows.

If you're not getting shadows, check that you have Deep Shadow Maps turned ON ... also make sure that "cast shadows" is turned on, on each prop. If you're still now seeing shadows, use the Top View, and make sure the distant lights are pointing where think they're pointing. The usual reason for not seeing shadows is, the lights are pointing in the wrong direction!

And that's actually all there is to it. With the lights right, and the props right, you can then change the camera angle around, over and over, and get as many different shots as you like.

Jade, 18 February

Tuesday, February 16, 2010

3D Fantasy -- Kull the Conqueror


Not much to read today, guys: work has jumped up and bitten me where it smarts, so I don't have time to rattle on. For today, it's "just" some rather glorious and very very complex renders ... you would not believe how bloody difficult these were!!

But if you come back tomorrow (same time, same place...) I'll spill the beans and tell you how the whole thing was done! Just quickly, right now: I'd finished the renders and was bordering and signing them ready for upload when it hit me ... I knew the character reminded me of someone, somewhere, and just before I uploaded these shots as "The Warlord" it hit me: Kull, King Kull, the Exile of Atlantis ... By this Axe, I Rule ...!! Do you know your Robert E. Howard? (Or your Frank Frazetta, or even your Kevin Sorbo and Tia Carrera, come to that...!!)


Join me tomorrow, and I promise I'll tell all: secrets are not for keeping, not in this neck of the woods.

Jade, 17 February