Monday, February 28, 2011

Digital twilight, book covers, and a hair raising tale...


I have a somewhat hair-raising experience to relate ... this is a good one, well worth telling! You might recall me mentioning a few days ago that I'd just ordered up a new graphics tablet -- and it arrived today. It's a Kanvus, and a pretty thing -- which sorta-kinda works. The pen is great but the tablet part is only functional over half the drawing area. This could be something to do with the configuration, and I'll mess about with that tomorrow, see if I can get it working properly. This wasn't the hair raising bit, because --

Something made me try the new pen, with the new drivers installed, with the OLD tablet which didn't work under Vista, and you'll never believe this. It works! Ooooold tablet, new pen, new drivers, very close to perfect combination. Could be better when working in GIMP with the huge .abr brushes, but hey, I'm not complaining, because it actually is working. But --

Before I installed the tablet drivers, I had Opera installed on the computer here. I use Opera quite a lot, because when you get on some sites that are powered by certain persnickety java engines, IE starts to jack around so badly, it's a major headache, and Firefox doesn't -- yet -- shake hands properly with a lot of the top-end java-heavy sites. Opera is the perfect standby. So I had Opera v11 installed, and ...

Then I installed the new graphics tablet drivers, the end of which process requires a reboot. Fair enough. By that time this computer was getting "tired RAM" in any case, so it was time for a restart. So I hit the button to reboot, went for tea, and when I came back it was up and running. And Opera had been utterly, completely, totally uninstalled. There wasn't a trace of it anywhere on the system.

Say -- what? Or if you want it in modern parlance, WTF?!

Obviously, you just go back to opera.com and run the installer again, but I mean --! Installing the drivers for a new USB device, right off the company's CD-Rom, uninstalls some of your existing software?!

Of course, I took inventory, made sure nothing else had vanished. No problem, just Opera. And I think I'll be shaking my head over that one for some time to come.

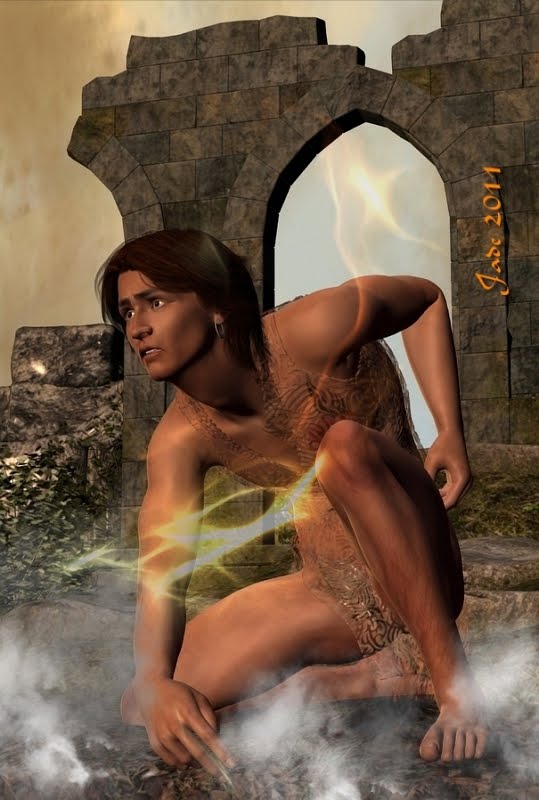
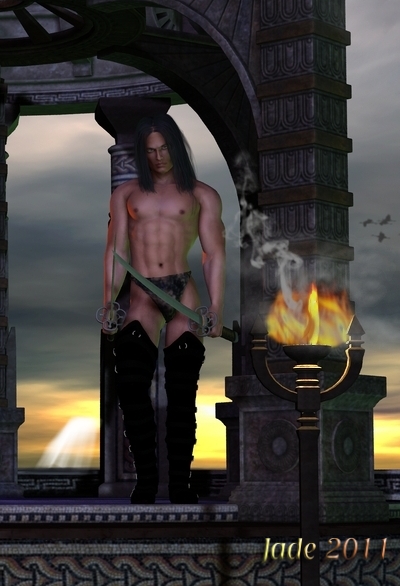
Today was a blizzard of work after which I rewarded myself with twenty minutes of art time. There was no opportunity to put a figure into the above set, but it was lovely playing with the lights. The front-lit shots look a little plasticky; I need to get into DAZ and figure out some of the virtual camera controls, which are nothing like the controls on a real camera, incidentally. You need to forget everything you ever thought you knew about cameras, and work this out from scratch. I can do that.

But when I turned the camera around and did a couple of renders in the other direction, which put the columns into silhouette ... ah. Now, set up a light to reflect in the polished floor. Then take the render into GIMP and add the moon and some birds. Nice.

The set is Temple of the Shadows, which I got from either Renderosity or Content Paradise in a sale a long time ago. I actually forgot I had this, and stumbled over it this morning while looking for something else! I like this a lot, and I'll be back on this set, with a figure or figures.

The other project for today was a new cover for the old Mel Keegan thriller, Storm Tide. That's a fantastic book, but we put a generic cover on it ... nice cover, but generic nonetheless, and I think it's the cover that's killing the book. So we're going to repackage it:

...and that's worth a closer look at the art, where you can see the lovely process effect on the background, as well as the delicate shadows on the male nude in the foreground. Okay, so we went from generic cover to male nude. Let's see what happens now!
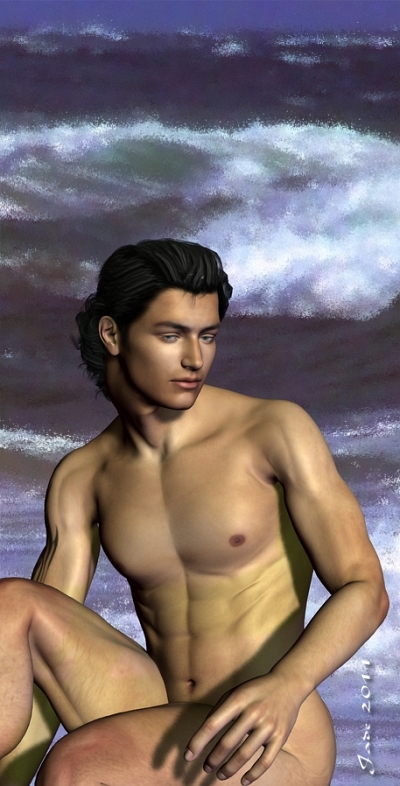
Jade, 28 February

Saturday, February 26, 2011

Enhancing images


At last! Fifteen minutes to call my own ... and here I am to talk about working with lighting effects as overlays. It's actually not as complex as you might think. In fact, it's not actually complex at all. The new generation of imaging programs (Photoshop and its stablemates, and GIMP, which is the open-source equivalent which a lot of people use because, being free, it's also affordable!) have actually made working with overlays a lot more complex than it needs to be, or used to be.

Circa 2400BC, before the modern software, we used a different system. And it worked. And it was easy. What it didn't use was layers. Back in those days, we used inks and masks and objects, and you could have fifty objects all floating around in the same frame, all with different blends and filters and transparencies and feather effects etc,. etc. applied to them

(I think I must be the last person in the world who still works (ooooh, a lot!) in the old gem, Micrografx Picture Publisher. It was perfect. In fact, it still is! The only problem is, on anything after Vista Service Pack 2, you can't even get the installer to run! So I spend a fair bit of time lately, trying to make GIMP behave itself the way Micrografx does, because I do know that when I lose this PC, I'll be losing Micrografx forever. Sob.)

Now, GIMP works with layers, and I still have to "nut out" how to make them do what the old software did much more easily, but even so, the fundamentals are the same. You have your basic image, you have your flame effect, and you want to get the lighting effect whacked on over the image as an overlay.

Someone who's much more familiar with GIMP than me will say, "Import the overlay into a new layer, on top of the old one, set the alpha channel, pick a color to be transparent and set a Gaussian feather on part of the image that's left non-transparent." Cool. Except my GIMP won't configure an alpha channel for love or money ... I'm starting to think it's corrupt and needs to be reinstalled!

And the process is exactly the same -- identical! -- to the old process we'd use when Alexander the Great was a lad, only we'd do it in the same layer, or frame, or whatever you wanted to call it. You'd have your picture open ... you'd paste the lighting effect into it. You'd select the lighting effect and use your color picker magic wand to pick all the black (or whatever) pixels and tell them to vamoose; then you'd "feather object," and play about with your inks and filters and transparencies, and resize the pasted-in light effect ... all right there in the same layer, all the while toggling back and forth between this and the original image, and painting on either one to your heart's content.

Nostalgia. These were the same tools you'd be using when you enhanced images, which were usually scans of photos -- because remember, Julius Caesar still hair hair, which means, yea, digital cameras had not yet come to pass. You got very, very used to digitally enhancing images, and it turns out to have been great skill-forming stuff ... because the same techniques are used on CG artwork, to get the best out of images.

A few weeks ago I was asked, "Why do you enhance images, and how do you do it?"

The best way to answer the first part of that is to delve into my photography rather than my CG art or digital painting, and show you this:


That shot is gorgeous! It's just absolutely beautiful -- but it didn't start out that way. Even with a very expensive camera, a lot of patience and no little skill, it started out like this:

The beauty of it is, if you have a good camera, bet your bottom dollar all the information is in the image, even if you don't see it at once. There's nothing wrong with this picture; but the Monarch butterfly was sitting in the shade, not in the sun. And you need sunlight, or full frequency light from some source, to bring out the colors. So you process it in the computer the way we used to work with images in the darkroom.

The object is get that "magickal" effect, as if the picture is not quite in the real world...


...and the only thing you need to keep an eye open for is that you don't "over process" the work. You can tell if you're "overcooked" when the black areas go chromatic (pick up color casts), or when the edges get the "jaggies" due to the picture being sharpened too much. Photographers who're just starting out learning how to process images often go too far with contrast, color saturation and sharpness. In fact, you might or might not want to muck about with sharpness and contrast in a digital image, because digital pictures are inclined to be too contrasty ... and pictures don't want or need to be so sharp, they look more like diagrams!

You need to work with your software of choice (and I use the freebie, Irfaniew), and use you eyes. You can only learn by doing, and only you will know when you've got it right. People can and will tell you when you're getting it wrong -- listen to what they say, and if your blacks are chromatic and your straight lines are jagged, you know what to fix. I can't actually tell you how to do this stuff, because you could be using any one of two dozen different programs; but the fundamentals are always the same: gamma, contrast, color saturation. Everything is a balance between these values. Work with BAD images, and see if you can make them good. It's a lot of fun learning!

Jade, 27 February

The NARC armor: second look


Just a few new images today, because these took a looooong time to render, and they're not even raytraced. I've been trying to get the time since Christmas to get back into the NARC armor design and add a helmet...

You might remember this:
...which was the armor sans helmet. It's put together from loads of bits and pieces borrowed from other costumes -- based on the M4 Bodysuit, and then adding pieces from Cyberpunk and
even a couple of bits of Stormtrooper armor (meaning Tatooine 3000AD, not Berlin 1943). But it needed a helmet.

A while ago I lucked out with something called the Sedition Solider, which was band new from a designer called Mestophales (not to be confused with Mephistopheles, one imagines), and the helmet is 80% right. In other words, I can get renders that are close enough to correct to be able to finish them off with some post-work. Painting. These renders today don't have any post stuff done to them. They're just as she comes. What I've done is to change the textures on the model to the ones which match the rest of the armor...

It would take a bit of painting to get the design spot-on the descriptions Mel Keegan gives in the novels, but right now there I don't have the opportunity to do that work, and as it is, that's a hell of a nice helmet!

While I'm here, I'm going to upload a couple of the "publicity stills" I did a while ago ... I'm pretty sure these have ever been uploaded. If I'm repeating myself -- sorry!


Rafts of art have been, and are being, produced behind the scenes for the new NARC website, which is due out at mid-year. to coincide with the release of all five books at Kindle, and as a celebration of (get this!) NARC's Twentieth Anniversary. Good gods, can it be that long? Yep. 1991 to 2011. Scary stuff.

Jade, 26 February

Wednesday, February 23, 2011

The boy in the bluejeans, and the sixty-hour render


I know I promised to talk about the fire/flame effects today, but ... tomorrow, guys. That's going to be a complicated post, because I need to yack on about alpha channels and masks and feathering objects and ... yeah, right. Not with the headache from hell, y'understand!

(And yes, I see my chiropractor tomorrow, and I'm going to hit her with this problem. You know the way chiropractors swear up and down that spinal problems cause everything from warts to cancer?! Well, let's put that to the test. "Doctor Alice, stop these headaches of mine!")

So today, just a couple of things. Above: a new skinmap I'm taking for a test drive: Raphael, which is on sale at DAZ right now. They're having a "We Love M4" sale, with scores of real M4 items at 50% off, plus a lot of M3 and V4 stuff that's crept in by accident, I guess. I bought a dynamic teeshirt, a new toupee, a new skinmap, and a shirt with flannel textures. Today, I had a few images rendering in the background while I slogged through work.

So here is the Raphael skinmap -- this is also the stock Raphael face and body morph (very nice ... it's so rare that I actually use a stock face, but I like this one. I think the only other one I use as-is, is Remendado, which reminds me soooo much of Sean Bean).

The hair is the Daryl Hair by Neftis ... it isn't an actual M4 style. It's an M3 model that actually shouldn't have been on the sale table, but is anyway. The good news is that with a bit of pulling and stretching, you can actually make any toupee fit any model, and this one is very "modern" with sticky-uppie bits at the front (David Tennant's Doctor!) which I actually flattened down a lot for these renders.

The result is so nice, I raytraced the top one ... now, that's getting pretty close to photo realistic, if I do say so myself --

Is it me, or does he look like a rentboy? Cuz if he's a rentboy, I reckon he just scored.

The other thing I finished off today is this:

I've uploaded that at 1200 wide, if you'd like to see it near to 1:1 ... it's a Bryce render that took (ready for this?) SIXTY HOURS, and by the time it was done to the bottom, which was the third overnight render session, I found out the bloody program hadn't rendered the shadows. *sigh* So I just painted in the shadows, and then added enough grasses and weedy bits in GIMP to make it a bit more realistic ... added some extra mist, and a flight of geese. (The .abr Photoshop brushes are Ron's Birds, and Ron's Fog, plus Designfera's vegetation.)

Sloooowly, I'm learning my way around Bryce, and actually understand what I'm doing. BUt I'll tell you what, guys: it takes more processor power than I have to get photorealism out of Bryce. In fact, looking around at the work of other artists, I'm not actually sure if anyone is getting photorealism out of Bryce. Art -- yes, and very lovely it is. But if you want CG landscapes that look like incredible photos, you want Vue or Terragen 2. And here's the bad news: not only are they a tad bit expensive, but you need a bigger, better computer to run them. Already, this PC is dancing around the edges of a crash-to-desktop situation half the time with Bryce!

So, I have a fantasy. Picture, if you will: Quad Core, with 20GB of Ram, the fastest processors in the store, on the most powerful motherboard; and the top of the range video card. How much for that? Ooooh, about three, maybe four grand, as a custom build-up from IT Warehouse.

All I need to do now is win lotto. Right. Step one: buy a ticket.

Jade, 24 February

Monday, February 21, 2011

In the mood for fantasy


The set is DM's Phantasy Moods, with a hand-painted background you'll be recognising by now! The character -- you know him as Sebastian, one of my faces and body forms, wearing the HZ Victor skinmap and the Rock Star hair by Neftis. The overpainting is all done in GIMP using Ron's brushes -- Birds and Fog.

The images go together to make a kind of story -- something's happening here, and it's not good. He looks like he could be a young acolyte sent out to petition for the life of the tribe! He's out there, staff in hand, and he seems to have it all under control in the first image. Then it all goes pear shaped and he tries to run, but that doesn't work out either. He lands on his knees, scared silly, not sure if he should be trying to run, hide or just pray a lot. Then it's an expression of resignation, and the body language is resigned.

What in the world happened? There's a lot of smoke in these pictures, and if you notice the background -- the birds are out of there, fast! Something nasty happened along. I find myself wondering about the traditional UFO encounter -- or is it just a visitation by something that looks like it just dragged itself out of the Necronomicon? (You know, I actually have a copy of that in paperback, the edition done in the 1970s, with the glue that fell apart on the spine.)

What's he wearing? Well, that's the vest from a buccaneer costume, the G-string from another one and the loin cloth from The Hunter, but I changed out the textures to match, added an opacity map and a displacement map, so they they all turned from leather to the flimsiest of transparent silk. Hey, I was in the mood for exotic fantasy, right?!

Anyway --

On a more sensible note, many apologies for being absent from this blog for a few days. Have been very unwell -- migraine is a major bummer, especially when it hangs around for days, and you can't see properly afterwards.

On a brighter note, I just stumbled over a sale in which I can get a new graphics tablet, and I'm rubbing my hands together in glee! I do have a graphics tablet, but it's a couple of years old and, predictably, it won't work properly under Vista. The hardware itself is okay, but I'd have to run it on my OLD laptop (not the new one, which is Windows 7) so that I could get back to an XP environment. The trouble with that is, the screen is only LCD, which is too dim and "gray" to be good for very delicate artwork. So for the last year or so I've been muddling along without being able to paint properly. Now, at last --! A sale, and I can get hold of a graphics tablet that will shake hands with Vista! It's being shipped today or tomorrow, so I'm hoping it'll get here this week. Can't wait...

UPDATE: There's an adults only continuation to this set of renders, and with all due arm waving and purple flagging about "nudity alerts" and so forth, here's the link. Enjoy!

Jade, 22 February

Saturday, February 19, 2011

GIMP and DAZ shake hands -- pure fantasy


In the fully finished shot at the top, sharp eyes will see that the smoke from the torch is behind the model -- and some inveterate (and notice, I didn't say invertebrate) digital artists will be thinking, "Oh, she painted in layers in Photoshop," or whatever program. Nope --

Simpler than that, and perfectly doable by artists with skills that are a lot more minimal. In fact, painting in layers in GIMP is a pain in the rear. (Does anyone else have the problem of GIMP crashing to the desktop when working, or trying to work, in layers? Does Photoshop Elements do this -- in other words, is it down to the deficiencies of the PC?) Anyway ... long story short! ... here's the easier way:


(This was uploaded at full size, so give it a click to view.)


Get the character posed just right – lights set, textures, opacities, the lot. Then turn OFF the character, costume and hairdo, and render ONLY the background. Ship this backdrop image into GIMP and paint the smoke in, just as you want it to appear behind the model. Save this. Import it into DAZ as a backdrop, then turn ON the model, and turn OFF the background props so that the backdrop shows. Leave the foreground prop (in front of the model) turned ON. In fact, it’s parked right in front of the rendered image of itself in the backdrop! Now, re-render the scene...

After the whole thing is rendered as one, you can finish off with whatever foreground painting you need to do. I added some fractals and swooshes in the foreground to give it a spooky kind of "charged" look, as if there are ghouls or energy creatures around here. A dozen fresh stories leap into your mind when those swooshes are added -- the human brain immediately tries to explain things it sees, and plots are born...


Vertict: dead simple technique for a really nice result!

Jade, 19 February

Wednesday, February 16, 2011

Skin maps, green acorns and spider bites!


Taking a new skinmap for a test drive today. This is the Jerome skinmap, but not the Jerome face. The actual Jerome character is very African-American, which is grand, but I wanted to design a character who looked more Melanesian, or Micronesian, with something of the Indigenous Australian. No reason -- just because. This character is very South Pacific -- as clearly distinct from Polynesian. It's a challenge, and a lot of fun, working with different "faces and races."

But the skinmap it all started with is Jerome, and I have to give full marks, ten out of ten, to the designer, Tosca. This is a gorgeous skinmap -- I don't think I've ever seen a more realistic, higher rez map, and that includes the Elite map I have (Lee -- you know it on Achilles, Neil Travers and also the Chinese boy with the dragon -- remember him? I reember telling a cute litte story with those pictures. Now, where's that post? Hmmm...).

The eyes were changed for the light brown eyes from The Eyes Have It, and the hair is Mon Chevalier set to very dark brown, and the result is lovely. This skinmap is from DAZ, and I got it on sale a couple of months ago ... this is the first chance I've had to experiment with it. Between my health, which has been lousy, and work, which has been ballistic, the last few months have just raced by --

Add to which, I got a spider bite a few days ago -- !! Now, that made life interesting for a while! How did I get a spider bite? Standing under an English oak tree, photographing green acorns. The critter must have been blown down, landed on me, and about one tenth of a second before it died as I brushed it off without even seeing it, which could only have killed it because it was a tiny one, it bit me. Yeeouch! We're talking serious pain here. And the pictures?

There you go, green acorns on an English oak tree. I now know there's nasty little spiders that live in those trees, so don't stand under them in windy weather, with bare arms! David Attenborough, where are you when we need you?

Jade, 16 February

Sunday, February 13, 2011

The barbarian swordsman


New toys from Renderosity -- that pair of boots! It's the Euros boots, which go along with a costume of the same name, but today I wanted to play with the boots specifically. And I ran out of time, as usual. There were supposed to be at least four renders, and I actually managed two before work caught up with me. Panic stations complete with blue lights ... all fixed now, but it soaked up the extra hour or so I was supposed to have for art on Sunday afternoon.

And if there was one thing in this life I regret the most, it's actually the fact that one spends so much time working that there's little left over for the creative things! While waiting for my downloads I was on one of the artist galleries at Renderosity, drooling over the work of an artist from Germany who's one of the best I've ever seen anywhere, working in Terragen 2 and Vue. And one of the vast differences between her and myself, quite aside from the difference in artistic vision, is that not only does she have the computer power to run programs I can only dream of, but she also has the time to spend on her art. More than anything, lately, it's the time I long for the most.

Anyway --!

Here's the Barbarian swordsman, and what started out as a project about a new pair of boots took a sharp left turn! After these renders, you were going to see him in closeup with the boots beautifully lit and so forth. But I very soon realized it wasn't going to happen today, so --

Barbarian swordsman today. Boots tomorrow!

The background is a revamp of a Bryce sky I did for a commission piece a few months ago. This was both darkened and resaturated, then sunrays were painted in, and flights of birds. This was then used as a backdrop for a complex set -- it's actually two sets nested together, the Mirador and the Fantasy Musings. Then, add Michael 4 and the HZ Victor skinmap, the Spartacos hair, Merlin's katana, the undies from the Wood God costume (with new texture) and ... the boots. Then add braziers and torches (all props from various sets by DM), and go to work with lights and reflectivity. Finally, ship each whole render out to GIMP to have the flames retouched and the smoke added in.

I particularly like the reflections on the sword blade, which you can see in the top shot, but you really can't see the boots. And believe me, you want to see the boots, so --

Join me tomorrow for a "barbarian glamour shoot!"

Jade, 13 February