Showing posts with label portraits. Show all posts

Friday, March 31, 2023

Adventures in painting, misadventures in 3D...


I'll leave it to you to decide what was painted, what was rendered, what was generated by some machine ... suffice to say, the machine hands you images that are so whacked-out weird, if you don't paint -- a lot -- you wind up with nothing at all. Maybe it's just me, and the penny hasn't dropped yet, but I can't seem to get AI to give me a human face that doesn't look like it's been panned with a shovel! Sooooo ... it mostly comes back to painting. And it's lucky I enjoy painting! Not that every stroke you see here is painted: some come from the machine. But if you don't pick up the pen/brush --

What in the world are you going to do with images like this one, at left??? The horse on the bottom has five legs, and appears to have shed a hoof; the one flying along on top has three legs, and its front two are deformed and tied in a knot. That's eight legs between the two of them, and not one able-bodied animal in the picture. Insert eye roll. Again.

I need to start up DAZ Studio. Seriously -- need to. I haven't had the courage to run its gauntlet in a year now ... the crashes and system problems got to be more than I could handle. Hence this flirtation with AI twaddle, I suppose. But I'm enjoying painting far more than the machine aspect of this, and I do believe it's time I "ran home" to what I know best, and give it another shot. Let's go right back to good old Michael 4 and see if Studio will mind its manners and work properly, when it's not overburdened with the gazillions of polys it takes to build Genesis 8 characters, right? Right. Okay ... next opportunity I get --

But wait, was that the sound of procrastination or dread?! Very likely! But if I don't start up the dang software and give it a go, we'll never know! So. Stay tunes, folks...

Thursday, October 3, 2019

A wood elf at dawn ... Photoshop to the rescue!


A wood elf at dawn, in Iray ... hmm. I won't say I'm super happy with this one: Iray did some very strange things (or was it Studio??), and it took a lot of painting to rescue it, even after something upwards of six hours rendering. The fact is -- I can't render this! It was nowhere near rendered after six hours; another six wouldn't have finished it, but my computer was running hot (too hot?) and it was time to call quits on this project. We're starting to climb back up into the hot weather now; there's a limit to what I can, or will, ask of the system in summer. So --

This, again, was a high-poly figure + hair, but a low-poly costume, set and props. I was pretty sure it would render, but -- nope. Whats different between this one and the last one, which did render? Well, purely as an experiment, I put the vegetation into this image rather than rendering it separately as a top layer. Even though the tree props are low-poly, this made the difference between getting a finished render before my system "choked," and, uh, not! It would have been nice to render the vegetation as part of the same picture; it looks more integrated if it can be done that way. However --


I'd have to say I'm actually more pleased with the result of rendering the vegetation separately (above), than I am with the overall render of the Genesis figure in today's picture (detail, below) -- and I realize I'm comparing apples and oranges! Still, take a closeup look for yourself, you decide:


So?? You were hoping for something absolutely photographic, and we got about halfway there before the hardware "choked," and it was time to get Photoshop going, and start painting. Okay, it's a nice image, but not quite what I'd wanted! Worth six hours of rendering? I think so. I'm also delighted with the way DM's Elven Shed renders: the set looks a treat in Iray -- it was from Renderosity many years ago, and I tracked it down in case you like the look of it: you can still get it:

DM's Elven Shed. Catalog image. See this.
This is a Poser set, actually configured to render in the Firefly engine, but Iray seems to like the original mapping, wh\iih makes a change! It looks lovely in the new engine, and the price is right ($16, on sale now and then for $11 or so).

Tootling around the internet on my laptop while I twiddle the thumbs, waiting for things to render on the desktop, I can't help stumbling over some amazing stuff. There's a page showcasing Zbrush "portraits," and you really need to shoot over there and take a look. I'll borrow a couple of images here, in the hopes I can interest you in going to look at the rest -- no, the site isn't done by a mate of my mine; I'm just hellaciously impressed. There's a collection of thirty on the page, but I've chosen Bruce Lee (in Fist of Fury), Russell Crowe in Gladiator, and Stan Lee (no relation to the aforementioned Bruce):


Isn't that utterly amazing? Here's the page -- see the rest! And from that page, they linked me on to another (on the Webneel site), where a Russian portrait artist by the name of Igor Kazarin is featured. Kazarin is not a 3D artist; he works in traditional media ... looks like oils or acrylics, perhaps a combination of both. Again, I'm gobsmacked. There's fifteen celebrity portraits on the page, but I've chosen Harrison Ford (circa 1984) and Jackie Chan (circa 2005) to grab your attention:


Here's the link ... remember the name of Igor Kazarin. I'm very impressed. I vacillate between figuring the Zbrush work is more amazing, or the traditional oil painting. In the end, I couldn't make up my mind ... I leave it to you!

I'll be back with more art soon, but the plan is to back off a couple of steps, return to simpler things and see if I can figure a work-around for the problem of my computer "choking" before it finishes a render. Before anyone says anything, yes, the trouble is my graphics card, I know, I know. Am hanging on for a whole new computer! 


Sunday, April 22, 2012

Playing with a swag of great new toys


click to see all images at large size...

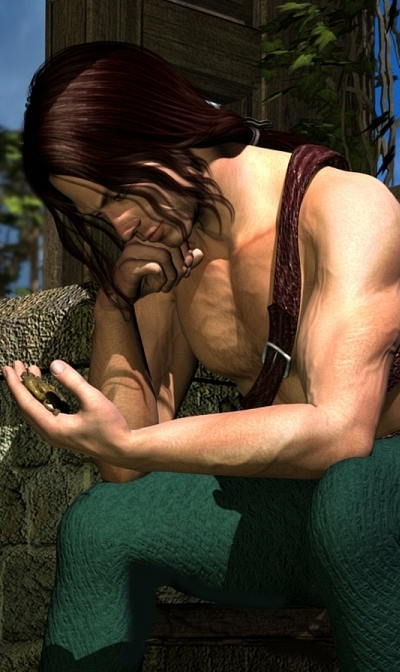
One of the things that puts a major crimp on your artistic license is that you tend to be limited by the skinmap you paste onto your model. Many of them look ... depilated. And it's true, a lot of guys do the hot wax thing. But not all of them -- not all the time. Sometimes, I think it would be soooo nice to be able to depict an actual guy rather than the product of the waxing salon! Uh huh ... so check out the first of today's pics. Call him Francisco. Why? Because he's something like an Italian, or maybe a Spaniard, and I like the name. I designed the face morph, and then slapped on an almost featureless skinmap actually, it's probably the most boring skinmap I've ever seen. And then -- what?

There's a "second skin" bodysuit type of "model" you can get from DAZ. It's been there for years, and I've always known it was there, just never got around to it. (Plenty of square and trianular tuits; just no round ones, you understand.) But last month DAZ was having a sale, and I picked up several new toys, including the Skydeck (parking bay for air cars), and a set of fantasy earrings for Michael 4, which you'll be seeing shortly, and ... Jepes M4 Body Hair.

And it works -- but it's tricky. Verrrrry tricky. Basically, all that body hair is sitting on a skinmap with an alpha channel -- which means the skin itself is transparent. So, when you slap it on the model, Michael 4 vanishes into the ether, leaving his hair behind ... along with his eyeballs and teeth, which looks hilarious, in the way that Chuck Jones cartoons are hilarious. Get over your fits of giggles, boys and girls, and figure out how to do this! 

In fact, if you know anything much about DAZ at all (also Poser, admittedly), you'll know that you can have several models occupying the exact same spacial coordinates. Penny drops with a clanging sound. You load TWO Michael 4 models ... put your boring old skinmap on one of them, and put the hair bodysuit with the transparent skin on the second. Aha! So far so good.

I was concerned that the render time would be a week long ... hair slows it way down ... but it turns out, DAZ treats the hair layer as an ordinary texture map. In fact, the first render did look very flat, almost as if the hair were painted on. So I found my way into the hair layer in the Surfaces tab and played around with the bump and displacement settings --

In fact, I overdrove it a good bit, and had to wind it back again. The result is pretty realistic, up to a very considerable point. The only place where the illusion breaks down is right on the "edge" where you're seeing through the hair to the backgound, or something behind the hairy limb. That's the place where it doesn't look 100% realistic, so --

Hmmm. Didn't I just get a set of skin-painting brushes from Renderosity? And wasn't one of them a body hair brush? Yep. So, the model was rendered with the hair layer, and then painted in Photoshop to add in the final bits of the illusion .. and you really will have to look at this full sized, to see it! I've uploaded it at 1200 pixels high, so you can see the detail. Nice effect!

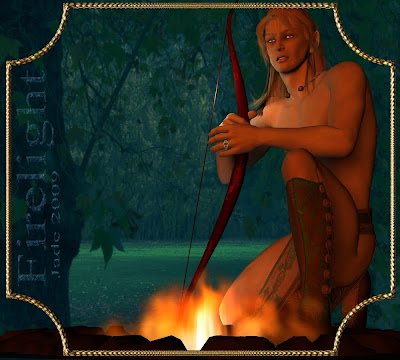
The second render is another in my Quest For Realistic Daylight adventures. This one just about has it nailed, what with depth of field and shadows and all. I rendered it big, so I could get into the fine details and paint them invisibly ... in fact, there's a lot of overpainting on this. It was done in about 20 layers in Photoshop, based on the original idea/theme:


In this one, above, I ran an experiment with the Depth of Field tools inside DAZ Studio itself. The camera controls are just about the last area of DS that I don't have a death-grip on, and I've promised myself I'll get my head around them. Usually, when you see the DOF-blurred backgrounds in my work, I've pulled the trick in Photoshop. Not so with this one, above. First, I overdrove all the bump mapping in order to make the stone and wood look nicely realistic, then gritted my teeth and dove into the camera controls. 

Well ... I made it work once, but when I tried the same stuff on Take Two (the one where Leon is studying a cloak brooch in the palm of his hand, second from the top today), no joy. So I don't have a full grasp of the system yet. 

I got a bunch of other toys at the same time. One was a lighting set, which I'll use sparingly -- Light Dome Pro. Yes, sure, it does make the job of setting about 30 lights at a time as easy as a click or two, but using these lights in experimental stages the effect I wanted on the Skydeck set just wasn't happening for me. So ... what the hey? I lit this whole thing with spotlights and point lights -- and then painted the hell out of it in Photoshop. Here, get closer to it:


And (gulp) even as I type this, I have this scene rendering in Lux. I've set it to render using the same lighting set as I used in the DAZ render -- all spots and point lights. It's distant lights Lux hates. So in a few hours I'll know if I have a Lux scene here. (Meme: get ram, get ram, get ram get ram...)

You can't tell in the small images Blogger pastes to the page, but it's a dirty night on that Skydeck -- it's raining; you can see the rain in the haloes cast by the lights. This was done with Photoshop brushes, of course...


So, in fact, how much painting goes into this kind of work? Well, actually, a lot ... but you don't see it:


In this one, which I call Absent Friends, the fist thing I did was paint the textures for the fabric and leather, before slapping them on the models, and then rendering it all up. Then, the skin tones are overpainted to get a couple of effects, and a lot of the shadows are hand-painted. Good thing I enjoy painting in Photoshop!

A little while ago someone was asking what brushes I use. The truth is, I have scores of brush sets, and some of them can have scores of individual brushes zipped into the .abr file. In the renders you see here, today, I've used mostly Photoshop's own brushes (default and caligraphy) to paint the shadows and a lot of the lighting effects; then I used the FS Wild Weather brushes for the rain, and Ron's Bokeh Lights for the lens flare effects, and something called Channing Body Hair for the edge work on the Francisco character, and the Gypsy Brows brushes for his eyebrows:


...the effects are very subtle. Believe me, you'd tell in a heartbeat if they weren't there. The skinmap I used on this character is one of those (and there are loads of them) where the eyebrows are so insubstantial, you wish you had an alternative. So I indulged myself in the Brows Brushes by a designed called Gypsy, and experimented to see what results I could get. It's not point-and-click, but you can do some very nice things with these brushes --

One thing I'm about to do is ... I wanna paint my own skinmaps, so I'll get exactly what I need. Having brushes for body hair, brows, and also skin texture details, like pores, really helps with this. 

So, if you're trying to follow in these tracks, you'll need Michael 4 (duh), and some kind of skinmap that gets you into the ballpark; the eyes are one of the photographic eyeball sets, The Eyes Have It. The hair is the Jepes M4 Body Hair "prop" ... you'll work it out. The brows are done with the brushes I was just mentioning, like the hair along the edges of the limbs and so forth. The toupee is an old favorite, Mon Chevalier by Neftis, set to a lovely dark golden brown, and with the morphs tweaked ad infinitum. That's my own face and body morph though ... you're on your own there, guys. In the Absent Friends image, that's also a character of my own (Leon), wearing the Midnight Prince hair and Michael 4's own High Rez skinmap, but with another bump map applied to it to enhance the details. The location is comprised of two of DM's sets -- The Gate and Gadomar. Gadmoar is the building in the background. The sky is a photograph of my own, just a backdrop, nothing too clever. The sword and knife are from the High Fantasy prop set; the bottle and cup are from DM's Anardhouse, but I changed all the textures. The costume is actually the Euros set (top, kirtle, pants, boots), though you could be forgiven for not recognizing it: bits turned on and off, all textures changed. The harness straps in particular are neat: that's a liquid chocolate diffuse map (!) and a huge bump map made from a swatch of rhinoceros hide! All the props, sets and brushes, you can get from DAZ and Renderosity. The character morphs are my own, and I did some work with my own texture and bump maps here and there...

Now, I wonder how that render is going in Lux? Time to gird the loins, and go find out!

Jade, April 23

Tuesday, January 26, 2010

The Buccaneer: the Remendado 3D model in review


Buccaneers come in all kinds (including 3D!) and today's renders feature several takes on the theme. In fact, this is actually a model review. A friend tipped me off the other day (thanks, Linda!) that DAZ 3D was having a sale, and I managed to get something I've wanted for ages, for 50% off. Today's renders feature the model almost right out of the box (not quite). This is not one of my faces, but I've admired this character since I first started browsing the 3D catalog. Someone modeled Sean Bean ... and boy, did they get it right!


So this post is a deliberate review of the model, and it's a 4.5 out of 5 stars review. This is a great set of textures, and this face is so expressive -- a lot more so than many of the other characters. The model is Remendado, and it only has a couple of drawbacks -- worth a mention, but only after I've extolled his virtues and given a firm recommendation.

In the two shots above, he's easily portrayed as the classic buccaneer. One of Jack Sparrow's mates, by the looks of him. He's got a few years on him (which is something I like a lot in a guy), and the bead mat is perfect. You can get in for a super-closeup on this skin texture, and it's top-notch. Ultra realistic.

I also like that the physique is normal, not "gym-pumped. I can believe this character as a real human being. You also notice the rose tattoos and the barbed wire around the left bicep...


This is a major advantage of the skin map. You can also load the skin map without the tattoos.

The Remendado texture has a lightly hairy chest, very natural. Michael 4's own high-rez skin map is a lot more hairy; Jagger is either depilated or one of those rare natural hairless dudes. (Either way, the Jagger skin map looks fantastic on the Vampire Amadeus, and Jarrat...) Now, put a cowboy hat and a pair of sunglasses on him, and he turns into a bit of a villain. Makes me think of one of the villains out of Aquamarine -- that Mel Keegan novel set in a "drowned future" in the Pacific islands, after the planet got hit by a comet. You know the one. Remendado can be used in a number of different settings, and you believe him totally, but he can turn into a villain really easily. Which is probably a good thing. If he were an actor, you'd applaud: he's still a pirate, but it just looks like he belongs in the future.

Take off the cowboy hat but keep the shades ... I'd buy this as a Wall Street buccaneer: slick operator, smooth as ice, dangerously sophisticated. He's a pirate, of the share trader variety.


And lastly, if you lose the costumes altogether, the physique is ultra natural, and the rose tattoos also look great across the shoulders and right where his lumbago will hit him when he throws his back out like any other normal human being. This shot looks like you surprised Johnny Depp who'd been sunbathing au naturel between shots lined up for Pirates of the Caribbean 4...!

Marvellous model, perfect add-on to Michael 4. Also has a clean-shaven face mat, as part of the kit, and several sets of eyeballs in various colors.

There's only a couple of downsides -- I'd have given the character ten-out-of-ten, except for these. The Remendado download does not have a hairdo. He arrives on the DAZ desktop bald -- and this is fair enough, because it's an inexpensive model even at full price. A hairdo would have added about $10 or $14 to the price ... but a hairdo would have been sooooo nice to have, even if it made the model more expensive. To fix this, I fitted the Mon Chevalier hair and set it to red-brown, long and windblown.

Several eyeball options are included, but the guy who was scanned for the skin map had some serius broken veins in his eyeballs, and I'm not too fond of this. I replaced Remendado's eyeballs with Jagger's eyeballs, which are just as realistic and look nicer because they don't have the broken veins.

The Remendado skin map doesn't have a genital map, so you're on your own here. The high-rez map for Michael 4 is too tanned, and so is the Jagger map. But the Albane skin map is pale enough to look very realistic against the rest of this fair skin type. Just means our pirate doesn't skinny dip too often!

Lastly, the promo shots for Remendado in the DAZ catalog depict the character with a signature headband type of bandanna, and I was quite surprised that this is not included. I'd have dearly loved than headband, or bandanna, or whatever it is. Shall have to track it down separately.

The only reason I'm not giving 5 stars out of 5 is because of the omissions. Rest assured, the content of the Remendado model is first rate. It installs cleanly, and it's exactly where you expect to find it, when you want to add it to Michael 4. Great value -- and if you can get it on sale, even better!

Expect to see this skin map many times in renders to come -- it's a beauty!

2024 Edit: I did track down the costume, which as it turns is sold separately! Surprisingly, I;m very glad to say that both Remendado and the costume for Michael 4 are still available in 2024! Here's the DAZ catalog photos, and the links to get them:


Get Remendado here...

Get the cossie here.

Jade, 27 January


***Posted by MK: my connection is intermittent, too slow for this. Seriously, guys, I've got dialup speeds. How are you expected to do anything these days, at 1990 dialup speeds?!!!

Thursday, January 14, 2010

Art meets life in 3D: Carnival in Venice


Again, art meets life, 3D and all: Carnival in Venice, and these characters look like they're planning something nefarious. To me, it looks like they're planning to murder someone undercover of the furore and fracas of the carnival ... also, is it just me, or does this have a really medieval look? You can't help thinking about that part of Cry To Heaven by Ann Rice. (Good golly, I haven't read that in ten years. Must drag it out and read it again. Always though it was Ann Rice's best book. Better than the vampires, and less "soap opera ramble" than that other one set in New Orleans, what's it called? The Feast of All Souls, is it? I forget. What a memory. Also, I think the writing is better in Cry to Heaven. In The Feast..., Ms Rice rivalled Charlotte Bronte as "the Queen of the Run-On-Sentence -- and that's going some. Have you read Jane Eyre?!! Ye gods and widdle fishes, to quote me auld Irish grannie.)

And I did it again ... did three renders and can't choose which I like best, so I'm going to upload them all and let viewers sort out which they prefer!

The background is a digital painting, blurred out to make it look like the character there is standing a few meters back and is out of focus. If you're not photographically minded, here's how this works:

When it gets dim, the camera's shutter opens up wide to grab enough light to make a good photo. This is called "large aperture." There's a hard-and-fast rule working here: Small-aperture = crisp focus and loads of "depth of field," and Large-aperture = soft focus and poor "depth of field." The bigger the aperture (meaning, the lower the light), the softer the focus and the crappier the depth of field gets...

So right here, in very low light conditions (looks like they might be under a bridge, maybe in a gondola, at a little landing stage, waiting for somebody who doesn't know it, but he's about to take a deep breath of canal water!) the camera's aperture would be huge. About f/2.8. This means the camera will have a hard time holding focus across the breadth of a single face. So, to make it realistic, the background needs to be very blurry, or "soft."

The easiest way to do this is to finish the background image off totally, then open it in Irfanview and use the Blur effect till it looks soft enough. Save it, then import it into DAZ Studio 3 as a backdrop. (The digital painting was done in Micrographx Picture Publisher 7.)

For the sake of interest, this shot uses...

  • Michael 4 (face designed my me)
  • Jagger skin map
  • Jagger's green eyes
  • Danyel hair set to golden blond
  • The mask from the Wood God costume/prop set
  • Distant light
  • Two point lights
  • The backdrop

You might not believe it, but that's all there is to it! Works a treat, doesn't it?

I'm also working on a different "canvas size" here. It's a variation on the old 8x10 size, and there's method in my madness. At risk of sounding like the Doctor, what this blog needs is a little shop. Nothing too over-the-top, just ... a little shop. And can you think of anything better to sell in it than 8x10 prints of the artwork, ready to be framed?

I've looked at this, loads of services, and have decided to go with Flickr/Snapfish. I looked at Zazzle, but they demand the phone number of the person who's getting the prints! Noooooo. So I looked at other services, but everybody wants to sell canvas prints, framed prints, poster-size prints, photo-products ... which cost an arm and a leg. Nobody wants to sell an ordinary 8x10 that you can stick in an album if you want, or pin to the wall if you prefer, or put in the old frame that you've had lying around for ten years ... you know, the kind of print you can get, post-paid, for $8.99, and actually be able to afford.

So I looked at Flickr, and it turns out they're linked to Snapfish, and I just happen to have a Snapfish account in any case. What happens is: I make a little shop, put paypal buttons on the pics. If you want one, click a button, and give me an address to send it to. Done. And you're out of the shop for nine bucks. I check paypal (which I do every day in any case), see that someone has ordered a pic. I go to Snapfish, where they live in a cache I just made. I order one and put in the client's mailing address -- and I'm done too. Takes about 6 days for manufacture and delivery, and they offer a money-backk guarantee. Made in heaven.

So the next thing that will be added to this site is (thank you, Doctor!) a little shop.

Update on the DAZ Studio 3 Tutorial PDF: almost done! This will be in the shop when it opens. It's been test-driven to destruction, and we reckon it's bullet-proof. We could have rushed it out, but the fact it, beginning-level 3D artists will be getting something much better in exchange for the annoyance of waiting a couple extra weeks.

Jade, 15 January

***Posted by MK: my connection is intermittent, too slow for this. Seriously, guys, I've got dialup speeds. How are you expected to do anything these days, at 1990 dialup speeds?!!!

Saturday, January 2, 2010

A bit of the quite, um, exotic


Here's where art has an almost unlimited potential for exotica, if not your outright erotica, Call it Yaoi, if you like: just about the only art form I can think of which, today, allows the young male beauty to be depicted in the same kind of eye-candy way that females have been depicted for eons. Not a muscle-bound gigantor. Not a craggy, weather-beaten charmer who'll knock you right off your feet (I'm thinking Tom Selleck in Quigley Downunder). Not a slick young executive in a three-piece -- which is not to say that can't be, and aren't, a treat in their own right, but there's something different. Something artists have been doing with, and to, and for, gals for ... how many thousands of years?

It's the boys' turn. And about time. Yaoi.

This one is a study in light and gold. It uses only three models, a texture, and a background:

Michael 4 (would you believe this is still DAZ's Michael 4?!)
The Mon Chevalier chair set to golden blond
The "head jewels" from the Destiny jewels set
The Jagger skin map on Michael 4
A background JPEG.

Now, the Destiny jewels set is not designed to be used with male models. There's precious little jewelry designed for the guys, and what there is, is clunky. Extremely. So, though you can buy plenty of jewelry bits and pieces, there's no automatic fit for them...

It really is no problem. Once you learn how to get around the x,y,z controls, you can move the object up, down, around, rotate it, skew it, whatever ... you drag the object down on top of "neck" in the scene contents list, and it locks to the model and stays where you put it. And if you want jewelry which looks great on a guy, just take the light-and-airy little wispy things created for Victoria and the rest of the 3D female regiment, and scale it up. Make it bigger, more robust, more masculine, if you like. The design is the same; but not it looks great on a guy in a fantasy setting.

The Jagger skin map is so useful. I use it on my Gypsy characters and on Jarrat too. Got this in a sale for about $14. (I got the Destiny Jewels in a sale this morning, for abut $6 ... hence, I'm playing with them today! Keep an eye on DAZ's specials -- there's always something on sale, ad even free. You'll have to spend a few bucks eventually, but if you're smart, you can keep the cost way down by knowing what you want and being a bit patient.)

The background is a heavily-painted photo of some faux marble columns. I admit to being clueless as to where the image comes from. Looks like it started life in a clipart set. However, I did everything imaginable to the pic, which is not very good quality ... changed the color balance, the gamma, the contrast, and then got to work painting on it. Originally, there were doorways messing it up, confusing it, to left and right. They had to go. Then there's a mess of pixely rubbish in the top of the shot, where someone bounced a flash off the ceiling. So, a not very good photo was heavily painted to make a rather nice, artistic backdrop.

Then the fun with lights began ... and I actually remembered to render progress shots today. I often forget, but -- here you go:


Click on that, it opens up at 1000 wide, so you can see the steps. What you have here is one gold distant light angled up from the bottom left to simulate off-camera candles or a lamp, or a brazier; then a white point light off the left shoulder to simulate the light falling in through that window or doorway on the right of the picture (his left). Then a blue point light on his left him, adding to the effect of candlelight from one direction and daylight from behind and opposite.

The whole project was suggested by the jewelry, but I actually got into this one -- went as far as designing a new face. If you don't recognize him, this is because you never saw him before. I "made this face" about an hour ago. And the face looks as good in closeup as from a distance ... sometimes, when you put expressions on a face you just created, something's not right, it doesn't look so good. But this one -- click to see it at 1000 pixels high, it's a treat:


So there you are ... a new character, as well as a lovely picture! Exotica, and call it Yaoi if you like.

Jade, 3 January

***Posted by MK: my connection is intermittent, too slow for this. Seriously, guys, I've got dialup speeds. How are you expected to do anything these days, at 1990 dialup speeds?!!!


Thursday, December 31, 2009

Heroes from the cult classic ... on New Year's Day!


The heroes are of course Jarrat and Stone ... the cult classic is the NARC series ... and no, you haven't (yet!) missed something fantastic on tv -- an incredible gay sf movie didn't (yet!) blow by you unnoticed. The characters are from the series of books by Mel Keegan, but the more I render these guys in 3D, the more I work with them, the more I drool over the idea of a movie.

And I know it's impossible, because no one would spend that kind of money on a gay movie. But it's a nice dream ... and it has a epilog. The software to do an "animated fan production" is landing on the desktop. You've only got to look at what I'm doing in the very early days (been doing this about five months) with the absolute entry-level version of the DAZ Studio 3 ...

You know there's one (could be two) more level(s) of DAZ above this one?! The Advanced level is out of sight. Check out the video:


[Sorry guys: DAZ have removed the video ... it no longer exists]


Ye gods. Now, I'm nowhere near being up to speed with the first level version of the program! I looked very briefly at the animation controls, and then decided to start with baby steps and learn all the other stuff first. I think I'm about 50% of the way through what you need to learn with working with the models and lights, working in the x,y,z environment and what-not.

Next comes the deformers, and ... a whole lot more. Like creating my own textures and applying them, for a start! I'm just starting to feel my way into this part of it. Another couple of months, and I could look at animations -- if (and it's a big if) my computer will handle it. I'm not sure it will, so ... before the animations comes the new video card, and the new operating system (because Vista sucks, and I want Windows 7 as soon as they've shaken the bugs out of it ... when did they stop calling that Windows Horizon? I lost track).

And then comes the lure of the fire, smoke and fog effects ... and ... and ... and I think I need a 64 bit system.

Anyway --! Let's learn to ride the bike before we start drooling over the Lamborghini But you take my meaning...!

Getting back to today's renders: what you have here is literally two frames out of the movie; two sides of the same conversation, where Jarrat and Stone are setting up or winding down -- the action is not actually going berserk, and for once they don't look like they're carrying the weight of the world on their shoulders!

In fact, the other day someone asked me why they look like they're fighting world war III every time I render them -- and the reason is because they are fighting something along those lines! In the books, the Angel War is one of the biggest things that every hit mankind.

So here you have Jarrat -- tanned and fair, the colonial who has that slightly "different" look of somebody whose genes have been drifting in the colonies; and Stone, with the Irish skin and the absolute-earthling genes, which you expect of someone who was born in London.

Both these characters were designed by Mel Keegan and executed by yours truly, and I like to pat myself on the back for the way they turned out. I, uh, did good!

The faces were designed using the Michael 4 Morphs++ pack. (Michael 4 is the base model; every character you see in these posts started life as your basic Mike.) I the Morphs++ pack you can change every characteristic of the model, down to the shape of his ears. Then you add the high-rez skin maps -- and of course I used two maps. Jarrat tans faster, according to the books, and comes back from vacation "honey brown," while Stone has to watch out for the sun, being much more "Euro-mongrel" and pale-skinned.

I've also been asked when I'm going to do an African, or African American, character -- and I would love to. I relished doing the cover for The Lords of Harbendane:


But this is a painting -- a real, genuine painting, not a 3D scene. I need to get an African or Afro-American skin map to make an African (etc.) character really doable. I mean, I can adjust the features on Michael 4 to African, and use the surfaces tab and lighting to change the skin tone, but ... that's a hulluva lot of work, and I'm busy like you wouldn't believe. So ...


Thirty bucks. This here is a skin map by the name of Rob -- what they call an M4 Elite Texture. This is the real deal, and when you really get into this work, you won't accept less. Thirty bucks. And five small words: when I can afford it!

If you've been following the blog, you'll also have noticed the huge change today: I redesigned the whole format. I was on two columns up until this morning, and the blog had seriously outgrown that template. So I spent several hours switching it out for the template I worked up for other content-rich blogs, and it looks quite something.

New Year's Day is getting some long shadows here on the other side of the dateline. Dinner is impending, and it's time I left the computer and devoted some quality time to the clan.

Happy New Year! Notice the 2010 date stamps on today's renders ... woohoo: it's 2010!

Jade, 1 January

Tuesday, December 29, 2009

3D Art: beauty shots ... ars gratia artis


Just beauty shots today, folks ... but I am putting up three of them! ... because I'm in a hulluva rush, work to do, New Year stuff to do, domestic stuff to do.

The top image here, I call it "Ripples in the Mirror" ... 3D Fantasy, and here's the fantasy: is it a mirror? Stick your finger in it, and it ripples, and you could ... and I say could! ... step through!

The middle shot is actually the same character, and the same mirror prop in the background. All I did was change the pose, zoom right in, and put a different expression on his face. When I rendered it, I though, my gods! He's the first cousin (on his mama's side) to the Angel from the Madonna of the Rocks! You know the painting? Here's the Angel:

And the bottom render is something new ... I never worked with proper sets before, but I just got something called "Space Blocks," which was on sale for about $14, and therefore within my price bracket! There's so much to learn when you start working with sets. The results you can get are amazing, but I'll tell you this much: it ain't easy! When I get this figured out, I'll be able to write about it, but right now it would be like the half-blind wearing coke-bottle glasses, leading the blind!

The penny is slowly dropping about how to navigate around a closed set. Here's where it's very different from anything I ever did before: these sets have two walls, floor and ceiling. You have to fly the camera inside them! You switch over to the camera's eye view, which isn't hard as soon as you realize what you're doing.

What's hard is setting up the lights to render the set properly:


I'm pretty good at this stuff, and figuring out how to get the lights inside a box, and chase after them with the camera ... took me about six goes!

So -- just beauty shots today, folks, before I run back to work.

And here I go...!

Jade, 30 December

Tuesday, December 22, 2009

Michael 4 ... same actor, new role ... thanks, DAZ!

I was looking at the Michael 4-based elven archer from a couple of days ago, and looking at those pointed ears, and thinking to myself, there's not a world of difference between the ears on Legolas and Spock (and yes, I know, I'm a product of the cinema generations. I can read, but. Honest). And this train of thought lead -- logically, I guess -- to wondering ...

I already cast Michael 4 as the archer; how about if I went in there and changed the skin tones from very pale to, uh, green ... and changed the hair from golden blond to black. Leave the pointed ears alone, but change the costume from fantasy to science fiction.

How hard could that be? So you start with this:

...and by changing Michael 4's attributes and props around you end up with an alien beauty! I took out the kirtle and the props (the bow, quiver, ring and torc), and then I added in the SF costume:
This a real mix-and-match ensemble. It's the vee-neck sweater from the Stylin' pack, the pants from the Hardcore M4 Utilize pack, the boots from the Wood God pack, the "Odin" texture from the Dark Gods add-on pack, with the fur trim turned off; the leather jacket from the Utilitize, the Mon Chevalier hair made back and really long ... and then the fun started, because I changed the color of everything.

One of the best things about DAZ is that you can get in and change the color of absolutely every last thing, down to the toenails! For this character, I really wanted him to come up green but still be believable as a mammalian species, so I didn't make him too green when I set the diffuse color, and also for variety I set the ambient color to a blue-green and the specular to yellowish-green...

Diffuse, ambient, specular ... glossiness, index of refraction ... what in the world is all this stuff? Well, these are the ways we use to describe how light behaves. And it's practically impossible for me to translate into English! You can be told, and told, and told again, and it doesn't make any sense at all till one day you're looking right at something and you see the effect. Then, whump, it hits you, and you just know.

Ambient is the color something is when no light is shining on it at all -- other words, in the deep shadows. So something that's green might have deep blue shadows...

Specular is the color something shines, when a light is shone in it -- and unfortunately this changes every time you change the color of the light that's being shone on the surface, so this one is very hard to grasp.

Diffuse is the color something "really" is, before shadows and lights affect it at all.

Now ... this particular Michael 4 character is very pale -- I made him that way deliberately because I was thinking "Mirkwood archer," and we all know how pale Legolas is (or is it Orlando Bloom who was pale?) ...

When you cast light on this model, you don't get too much "interference" from the diffuse color of the surface, because it's so pale. So when the firelight hits him (see above), it really has an effect.

When a surface ... skin, sports car, beachball, anything ... has a strong color to begin with, though, and you shine a color on it, you can get huge departures. A bright yellow car standing in a red light is going to look orange. A bright blue beachball sitting in a yellow light turns green ... and so on. The color change is the "specular" value ... in other words, the color something glows when you shine a light on it. And, obviously, every time you change the color of the light, the whole thing changes again.

This is why working with lights is probably the hardest thing in DAZ 3D. You have to get a grasp on about five things simultaneously ... might help if you could juggle. With cactus plants.

The screen capture shows the DAZ Studio 3 workspace for working with surfaces ... the Surfaces pane is the bottom left one. (Have a look at this at 1000 pixels wide -- click on our hero.) It's basically a loooooong list of things you can change. You can set the color of everything.

And here's his portrait ... his fan photo:

Jade, 23 December