Thursday, October 31, 2019

HAPPY HALLOWEEN! Featuring ... 'The Possessed'


Happy Halloween, guys! And the last piece of 'Halloween Spirit' art for 2019 is The Possessed. It's the half-seen, half-materialized figure in the background that creeps me out. How about you?!

Looks like a job for the Exorcist we saw the other day, right?

This week's been fun ... psychic warrior, vampire hunter, exorcist, warlock, possessed, the works! This one, today, took an hour in Iray: Genesis 8, Landon hair, costume -- and one light. That's it. The rest is a blurred out, painted-over backdrop, and all the other effects are Photoshop over-painting.

The character reminds me of -- well, has anyone seen Look What's Happened to Rosemary's Baby, starring Stephen McHattie? This guy has McHattie's cheekbones, no doubt about it! The other movie you might have seen is The Possessed -- 1977, a TV movie with Harrison Ford (!) in a costarring role, looking exactly like Han Solo in spectacles. I kid you not. Too cute, right? You think I'm kidding? Nope. Try this for size:


...and if you fancy scaring the willies out of yourself, you can watch it on YouTube. You're welcome! I actually have a copy. 😝

So -- Happy Halloween to all! More soon. Only one image today, because I was out of commission with a migraine for half the day, didn't even start to come back to life till about 4:00pm, so there was only time for one project. Blisteringly hot weather is migraine weather for me, what's new?


Wednesday, October 30, 2019

Don't go down to the woods tonight ... really. Uh, Halloween!


Halloween spirit! If you go down to the woods today, you're in for a big surprise ... there's no teddy bears, for a start! The battle between light and darkness is being fought out on this turf. There's a 'night warrior' abroad, armed and dangerous, and he's on the hunting trails.

Which means we need the reverse shot here -- get a look at what, or who, he's hunting! Here we go:


The warlock -- weird, and altogether not nice! Let battle commence...

That's CC Foster in the first picture, which is an Iray render. The costume is "kit bashed" from three different cossies ... that's the grave marker from the Reparation set, and a lantern from one of the DM sets. A couple of the Gnarly Old Trees props ... also some lovely props from Merlin's Wild Borders in the background, but with the DOF set so strongly (ie., a big virtual aperture), alas, you can't see them properly. In the second picture, that's a raytrace of Michael 4 wearing the Warlock morphs and skinmap, the Hermes hair, the Lockwood shirt, which I painted out into a robe, plus a couple of very neat props from the Staff Pack. Both were painted quite a bit in Photoshop to increase the atmospherics and spooky factor.

No particular story attaches to these images: it's too obvious! There's evil on the loose, and the locals have sent for the warrior who takes them out, or down, or whatever it is they do. Fun!

Tuesday, October 29, 2019

More Halloween spirit: this vampire plot thickens!


Is it me, or is the vampire hunter Jean Pierre Marin as irresistible as the plot? I couldn't leave this alone so soon, so we're coming back to the hero one more time. This would be the scene where he seeks help from his friend, who is an exorcist with a power to handle energy--

Did you miss Part One? See it here. Now: The exorcist, an Englishman by the name of Daniel Crowe, has followed the vampire Alighieri from place to place through France, for months trying to put an end to him. Crowe was summoned to deconsecrate the church, where Alighieri slept in the crypt for over a century. The tumbledown ruin -- long said to be cursed, and avoided by all who knew it -- was watched over by an old, retired priest who knew its sect. Nothing Pere Andre could do would prevent the demolition of the church, and he saw Alighieri leave the crypt on Midwinter's Night. It was Pere Andre who wrote to his old associate, the exorcist, Daniel Crowe. Now, a trail of blood has led Daniel to Paris, where he and Jan Pierre meet, on the same hunting trail...

And Daniel, of course:


It's delicious, isn't it? In fact, I could really get into this! It needed to be a movie, starring Keith Hamilton Cobb and Hugh Jackman about 15 years ago, when they were both at their most delicious. Anyway --

The set-up for the piratical young hero is the same as last time; just switch out the backdrop. The set up for Daniel Crowe is obviously Michael 4, wearing the Lee skinmap and Neftis's GQ Event hair, and the Beowulf suit. Because I used a backdrop (another clip out of a Sveva image) it rendered fast ... it also rendered so flat in Iray, I did a second one as a raytrace, slapped both of them into Photoshop and blended them together, then over-painted almost everything to get the most out of it. This one is mostly painting, while the top image is almost entirely pure render. No matter: the M4 render took about eight minutes, and the Photoshop post work, another ten. Who's going to complain, at that!

More tomorrow! I have another idea, and if it comes together fairly quickly, I'll leave it to render while I head for bed. Yaaaawn...

Sunday, October 27, 2019

Halloween spirit ... vampire hunter, anyone?!


With Halloween coming up in a few days, I couldn't help clicking into the vampire hunters mode. Am not such a huge fan of zombies, to be truthful, but I can get interested in vampires, given the right setting. (Uh, Frank Langella hits the spot for me, nudge, wink.) Sooo...

Let's say...

THE STORY (indulge me)

Paris, 1893. A foggy night at the end of October ... you hear the horns of boats on the river, you smell the still, oily water. The clip-clop of horses' iron-shod hoofs, cabs and carriages going by; the shrill sound of laughter in the taverns and bordellos of the oldest part of town. Our (gorgeous) hero, Jean Pierre Marin,  is abroad, hunting an and ancient, immortal abomination who is known only as Alighieri. This vampire is so old, he was painted by Caravaggio in 1604 ... he slept in the ruins of a church outside Boulogne until the building was demolished, the crypt emptied out -- which brought him back into this world. Alighieri has already taken two of Jean Pierre's friends and captured his young sister, Roxanne, who's hardly more than a child. It's been a week-long hunt through the docks and slums of areas of Paris that were standing when the Musketeers were this city's heroes. At last, Jean Pierre has tracked Alighieri to a place from which he cannot fly, and where he cannot hide. With the life of Roxanne in the balance, the two meet in a street in the old quarter, for a  battle from which only one will walk away.

And the reverse shot --? Here we go:


Uh huh. Wouldn't like to go up against this one on a dark night!

What you have here is two NVIDIA Iray renders ... The Hunter: Genesis 8 with a body more or less designed by me ... the face is actually Rex, and the figure is wearing the Kingston skinmap and Varun hair. The cossie is the bottom half of the Buccaneer costume known as Crimson Seas (for GM 3 and 8). The backdrop is a snap out of one of the Sveva "Variety" set, with Photoshop effects applied to it; and I just flipped it horizontally for the reverse shot. In the second image, The Vampire: that's Michael 4 wearing the Bart skinmap and the JM Alexander face, the Aether hair set to dark brown. The cossie is the pants from the Lockwood costume. I did some Photoshop painting on the M4 render to make it a bit more interesting.

The good thing about rendering M4 is that you can get a render in half an hour flat ... low poly count figure. The bad thing is that M4 can render very flat. So far I've only discovered two skinmaps that render up in Iray looking superb -- Ferendir, which is very Norse, and Atlas, which is very swarthy. Am working my way through my whole collection to see what works. This one here is Bart; again, flat and matte, just like the high rez Michael 4 skinmap; but at least it doesn't dither up a red and green storm, like JM Falcon! I can just about work with Bart, but I could wish it had a healthy glow about it. Mind you, being flat, like this, it was the perfect choice to slap onto the Vampire Alighieri.

More soon -- Halloween stuff! I have some neat ideas and a few nice things to work with, so...

Ciao for now, and take another look soon.

Friday, October 25, 2019

Dark Prince meets Elf, in Iray -- technically impossible, but...


You know that saying, the one that says you learn a whole lot more when things go wrong than when they go right? Well, safe to say I've learned a hulluva lot in the last few days! Because nothing worked out the way it should. But I managed to find enough work-arounds and fixes to say that I know a lot now that I didn't a week ago.

Dark Prince Dae meets Ferendir the woodland elf ... both rendered in Iray. That's a Genesis 8 figure and a Michael 4 character in the same shot. Anyone who's ever tried this will probably tell you (rightly) that you can't render the two together, because the Iray lights that suit one are disaster for the other. To get the light right for G8 --


-- means setting Photometric lighs, which are way too bright for M4, by a factor of 4x or 5x. If you tone down the light so Michael 4 looks right, the G8 figure looks like he's standing in the dark. Soooo, what's the plan, if we want to have the two standing in the same scene?

First, make it simple and use a backdrop to cut down on render time, because you need to render the scene twice. Pose both characters as if you were about to render them together. Set up the lights, too. Then go into the Tone Mapping and play with the shutter speed on the virtual camera (!) to change the light levels -- figure out two levels, one for each character. Jot this down! Now -- whichever character is standing behind gets rendered first, with the shutter speed set for him: but while you make this image, "hide" the other character, plus hair and costume. Store this "bottom layer" render. Now, re-set the shutter speed for the character who's in front, and "hide" the other character ... render again.

You now have two renders, one of each character, both shots perfectly exposed. Paste them into two Photoshop layers and just ... erase the area of the background in the top layer, the part of the background dude is standing in the other shot. Yep, as you erase a swatch of the background in the top layer, it's as if you're painting in the other character, he just ... appears, perfect.

Well, mostly perfect. The truth is, the lighting is off a tiny little bit: Genesis 8 should throw a mild shadow over Michael 4 ... but you would need a very keen eye to spot this. I could have hand painted it, if it was critical, but it isn't so important ... and it's a rather nice picture. Yaoi image, anyone? I get definite Yaoi vibes off this!

So we'll call this done, and file the trick for future reference.

Less success with the experiments with the JM Falcon skinmap, though. I'd had high hopes for this, since it raytraces so well. Based on great results with the Ferendir and Atlas skinmaps in Iray, I'd rather hoped for another stunning result with Falcon, but --


Nope. It looks halfway decent when you see it at postage stamp size, as above -- but see it at full size, or even at 50%, and you'll see the truth. It dithers! This means it refracts, or breaks up, into a mottle of red and green in the Iray lights; and on top of that, it's so matte, I had to do all sorts of things with it to give it anything like the "glow" of healthy skin. Well, dang. So Falcon is purely for raytracing. Harrumph. Then again, I wasn't overwhelmed with the way the High Rez M4 skinmap rendered in Iray either. In a raytrace it looks pretty good, and in Lux, or Reality, it looks fine. But Iray didn't seem to get hold of properly it at all. It was basically ... pale and matte and fairly ho-hum. Is the term naff?

Anyway, there are plenty more maps to try out, and lots of things to play with. I shopped a couple of sales at Renderosity ten days ago, picked up some lovely toys and a couple of new shaders. Here's a quick look at two of the many items a acquired -- catalog images; see Sveva's Store for the lot:


It's just a question of finding the time to play with all this stuff. Have been so busy lately -- but I'm getting there. Back soon with more -- loads of experiments just begging to be done!

Tuesday, October 22, 2019

Iray shakes hands with Michael 4 ... nicely!


Back in Iray today with a couple of experiments that produced extremely nice results. You don't too often think of rendering Michael 4 in Iray, and in fact, sometimes it doesn't work at all. But when it does, the results are rather rewarding.

This, above, is the high resolution Michael 4 skinmap, rendered for about 90 minutes ... that's an actual set in the background (another of Jack Tormalin's, 'Curious Passage'), with one of Merlin's Trees as filler, DOF set on the camera, and a very mix-and-match costume put together from several different odds and ends. The only thing I had to change was the texturing on the shoulder harness. That, I switched out for an Iray shader. Now --


By now you recognize this guy: my woodland elf, wearing the Ferendir skinmap with the facial tattoos turned on. That's the shorts from The Wood God costume, and I must say, that looks amazing in Iray -- just as it comes, nothing done to it. This one, I used one of DM's columns from some set or other, can't remember which, sorry; and that's a clip cut from a commercial backdrop (look up Sveva on Renderosity). The backdrop made this one fast -- just an hour to get this, whereas the top render really needed closer to three ... if had a lot of fireflies, or unresolved pixels; but I've figured out a five minute Photoshop fix for those. Turns out, it's dead easy to get rid of them with a couple of clicks, which saves a tonne of wear and tear on my tired old processor. Phew. That's a weight off my mind, actrually.

Okay ... one thing left to figure out here. You notice that Iray has dropped out the vascular mapping. You're supposed to be seeing nice venous mapping as you saw on this one, which was a very successful raytrace; but Iray just doesn't see the displacement map. I need to get this figured out for M4. One or two ideas, which we'll try tomorrow. I'd also like to see how the JM Falcon skinmap renders in Iray. It looks fantastic in a good raytrace --


-- this "big beauty" is Joe Ramos, whom you may know from NARC, and ... that's the MJ Falcon skinmap. Raytrace. Soooo, if a raytrace looks like that, what can we hope for, from Iray? Uh huh. Stay tuned, lets' find out!

Monday, October 21, 2019

The render from hell. Seriously.


The render from hell -- no, not this guy, above. That's a Genesis 8 character based on the Michael 8 skinmap, Varun hair and a lot of dial-in tweaks to make a new-ish face and body -- dead easy, with a couple of Merlin's trees set in the background plus the raytrace of the Moon Gate you saw the other day blurred down  and set as a backdrop ... two hours cooking in Iray, and I haven't done anything to it. Nada. That's just the raw render. Okay, soooo --

This was the render from hell:


...this was a render that just didn't want to be done. Studio 4 crashed repeatedly, and since I can't save a file out of Studio 4, every crash meant starting from scratch; then, the textures drop out on the Xurge 3D costume and have to be reconfigured every time ... and the lighting gave me hell. The Ferendir skinmap that rendered so beautifully the other day looks plastic on the older human figure. The elf looks okay, but what's going on with the human?? I got this two-hour raytrace out of Studio 4, then it crashed yet again and I said, stuff it. I am NOT doing it over. Sometimes you just can't win. I suspect there's something "wrong" with the lights, making the skinmap look plastic on one figure, but I don't have the time or patience to start yet again. We'll try a whole new project tomorrow, and run some experiments.

So, just as I switched back to raytracing when Iray was jerking me around, this time I switched back to Iray when 3Delight was jerking me around. The results are pretty nice ... though I do admit, the Iray shot is soooo simple, while the raytrace was many times more complex. If Studio hadn't been crashing, I'd have worked it out ... if I could save a file in Studio 4, I'd have worked it out. As it is, what you see is what you get. I'm not 100% happy with it, but it's not bad, so... there you have it.

Try again tomorrow. 😐

Saturday, October 19, 2019

Evening rendezvous at the Moon Gate...


Yes, a new set: Jack Tomalin's Moon Gate -- and it renders up beautifully. "Evening Rendezvous," you ask? Doesn't a rendezvous requite two characters? Uh huh. Yep. And I had the whole thing ready to render when Studio 4 crashed to the desktop. And since I cannot save a file in Studio 4, the whole thing is gone as if it never existed at all. So what you wound up with is one of the characters (the woodland elf wearing the Ferendir skinmap and facial tattoos), who came here to meet someone. He's, uh, still waiting. I'll try again tomorrow to get the second character into the shot, but the thing of it is, two characters + the set + render settings high enough to get a raytrace so gorgeous you can barely tell it apart from an Iray image = way over three hours render time on my machine; and that opens the gate to the same sort of crash. Soooo...

I might render the set separately and use it as a backdrop, which will take eons off the final (difficult) render. Interested along these lines, I did this:


That's a twenty minute raytrace, and it's beautiful -- very, very happy with this. Moon Gate at evening. As I said, the set renders up like a dream. So, how about this:


Now, that one is Iray, and it's a mix of two sets: Jack Tomalin's Moon Gate and Merlin's Wild Borders (all the plants and grasses, the ground and tree. Very nice sunlight; and I used the skydome to light it rather than messing about with spotlights and whatever. Nice result. So --


Same camera angle, processed into night, complete with stars. Before you get excited ... it's a Photoshop job. Yep, I did one in Iray, but I was rather disappointed with the result, after about two hours cooking; so I went back to the sunlight shot, put it into Photoshop and did "day for night," which used to be the old cinematic trick, where the action was supposed to be taking place in the dark, but it was shot in broad daylight and they slapped a filer on the camera. It worked. You can also do it with bucket-filled overlays and blend modes, in minutes in Photoshop ... save the wear and tear on your groaning old PC!

Okay, so my "rendezvous" ended up as one guy waiting at the gate to meet someone, LOL. I'll try again tomorrow, see if I can get Studio 4 to play nice. If it won't, well, damnit, Janet, I'll shove this whole thing into good old Studio 3 (in which I can save a file!!) and although it will take a lot longer to render, and you won't get progressive rendering, at least you'll get a blasted picture, right? Right.

Back soon with, uh, the rendezvous! Hint: Yaoi vibes, anyone...?!

Tuesday, October 15, 2019

Woodland elf ... enchanted forest, Yaoi daydreams...


A woodland elf ... and I'm getting distinctly Yaoi vibes off this! The character would bear some more exploration, yes??! (nudge, wink)

Just daydreaming today ... still playing with the Ferendir skinmap, exploring ways to get the most out of it in DAZ Studio without -- yet -- seeing if Iray loves or hates it. You can't know till you try it and see what happens. This is "just" a raytrace, with the render settings cranked way up; and I also played with the tattoos packaged with Ferendir. The face and body morphs are my own design, though, using Morphs++. I'd forgotten how much I used to enjoy making new characters -- and this one is a beaut:


Sooo, because it take a fraction of the time to get a raytrace (rather than waiting all day for Iray), let's go again -- same character, new scenario, telling a story, or at least hinting at one:


Treasure -- a hunt for the stuff, by the looks of this! A ruin, a lantern, something sparkling with jewels. And take a look at that skinmap. This is marvelously responsive, and with a slight adjustment in the lighting it can look either very pale or deeper colored, almost Hispanic. Me like. I also really like this new face morph:


So, what you have here is Michael 4, custom face and body done in Morphs++, Ferendir skinmap, plus the facial tattoos, M4 Displacement to achieve the vascular mapping, Neftis's Danyel hair set to black, one of DM's columns used as a plinth, and the lantern from DM's Pyrago. In the top render, I used the Euros skirt with lots of surface mapping, plus two of Merlin's trees sized to be bushes, and the menhir from DM's Elven Rock. The backdrops are just that: backdrops. If I'd done this as sets (which I could have), they'd have been rendering for three times as long. Backdrops save a ton of time.

That's it for me, for today. Must sleep! Also, thunder is rumbling and it's probably wise to turn the computers off. Lots more to play with -- the only new toys I got around to today were the tattoos, the lamp and the backdrops! The toy box is overflowing with goodies! (Boom goes the thunder ... it really is time to log out and turn off...)

Monday, October 14, 2019

A swordsman in the snow ... whooo!


Hunting around through the "assets" I bought a long, long time ago -- and never had the harddrive space to install! -- I came upon this skinmap: Ferendir, by a designer called "SixthSense." It's a gorgeous skinmap, and renders beautifully ... though I do admit, I painted the eyebrows, which are too pale and thin for my liking; and I also applied the SAV Atlas displacement mapping on the torso and arms to bring up good venous mapping. But just take look at this skinmap in closeup -- if you can, see it at full size:


That's superb. A pleasure to watch it rendering! Using the Atlas displacement maps adds an extra dimension to it; and I designed a new face to go with this map. This is not the Ferendir face morph, as packaged by the designer. To be honest, the original face doesn't do anything for me. You might like it, and the good news is, it's still available from Renderosity.

So, not wanting a teenager, I designed a face and body I like, and came up with this:


This is what I love about working with Michael 4: it's so easy, and so quick, to get results. Sure, Genesis  can be significantly closer to full-on photo-realism, but it takes soooo long to get anywhere, especially on a slow system like mine. With M4 you can create new characters on the fly in a snap. I rather like this face -- and the eyes are the brilliant green item from The Eyes Have it set:


The hair is hand-painted, based on the old Mario's Hair for M4, from Neftis Hair Salon. That doesn't render up so well (well, it's quick, but the downside to that is, you pay for speed in low-rez results: human hair isn't supposed to go around corners, and so forth), but it does give you a good base to paint over, and ... Photoshop to the rescue again.

The snow is an old .ABR brush, Ron's Magical Snow, from the days when Ron's brushes could be used with Photoshop Elements. Alas, his new brushes need the full on Creative Suite version, or whatever it is these days ... I can't use them. I'm still running Elements 9! It works, I own it outright, and I've no reason to change it, since it does everything I want it to! The only thing is, sometimes people come along with fabulous new brushes which I can't use; but there's a free site, All Free Download (dot com), which is loaded with old fashioned brushes. They are absolutely free and this is not one of those sites plagued with viruses and such antisocial rubbish. It's perfectly safe, and the worst thing you might have to do is look at a couple of pay-per-view commercials in exchange for downloading some very good .abr brushes. Enjoy!

This sword is Merlin's Katana ... but I've been unpacking loads of props from years ago, and just discovered that I own Xurge 3D's Ranger weapons! I had no idea I had these -- expect to see them very soon. I honestly have no idea what I have stashed away from 2013 or so. Even though I didn't have the harddrive space, I shopped a lot of sales, grabbed fantastic special offers. Now's the time to bring them out, dust them off and play! The Ferendir skinmap is one such stashed item. It renders as well as anything I've ever seen, and with the pixel and shadow sampling settings cranked way up on 3Delight, the resolution is brilliant. That skin absolutely glows.

The costume is the bottom half of Xurge 3D's Medieval Royalty cossie; you saw the whole thing yesterday. Now I've got the surface texture adjustments worked out to get good results in Studio from an item configured for Poser, it's easy to work with...

And so to bed. More tomorrow! 

Sunday, October 13, 2019

Moody lighting, fantasy sets ... Genesis 8 and Michael 4


Genesis 8 (the Dae character wearing Varun hair, in fact), standing in the old Reparation set -- which renders up well in Iray, by some complete fluke. Half the time, the old materials don't work in Iray; and half the time they do. Curiouser and curiouser. Anyway, this was Take One on an idea I've been pursuing for a couple of days --


Very nice render quality on that -- but the strength of the image is in the lighting and camera settings; and those I did in Studio 3 (!) before sending the whole thing over to Studio 4. In fact, I designed and built this set, lighting and camera around a scene using Xurge 3D's Medieval Royalty costume, on Michael 4 ...


Again, that's a heck of a nice render -- it's "just" a Studio 3 raytrace, because ... well, the guys at Xurge are not joking when they warn you, their costumes are optimized for Poser and may not work in DAZ Studio. Some do, some don't; and this one really doesn't. It took about an hour of working around and around it, to come up with a compromise, where the costume might not look as if would in Poser, but at least it looks terrific.

Borrowing a catalog image from Xurge, this is what it ought to look like:

Catalog image. See this.
Well, after an hour of work, I was about halfway there and decided to cut my losses and call it good! It's fairly reasonable:


...in another hour I might have got it, but I'd had enough of fiddling about, for a couple of reasons. The best I was going to get was a Studio 3 render on this, because in Studio 4 it would have to be reconfigured all over again ... and I can't save a file out of Studio 4, so any work I put into renders on that platform is ephemeral: one shot. Soooo -- I decided to call it right here and be satisfied...

Well, okay, not quite. Just for fun (ha!) I let Iray have a go at rendering this same costume, and the results are idiotic. Laughable. I actually spent another half hour trying to get Iray to "shake hands" with this costume, and it utterly refused, so -- stuff it.

The set rendered beautifully, though, so I left the set, camera and lights just as they were, deleted the Michael 4 and put in a Genesis 8 in his place ... which is where you came in, today!

The last image for this post is left over from yesterday. I didn't get to an upload because I had the headache from hell, but I did finish out the work with Xurge's Druid Shaman costume...


Now, that's a Studio 4 raytrace, with progressive rendering turned on and all the settings cranked up till it took about half an hour to render. Oh, yeah ...


I actually find myself wondering if Iray can make sense of this costume??? No way to tell, without trying it! I'll come back to this in a few days. I have a couple of things to render while they're burning in my imagination, so we'll set this one aside for a little while and come back to it.

Also, I treated myself to some new toys from Renderosity right before I came up with the aforementioned headache from hell. I'd love to get them installed tomorrow. So -- more soon!

Wednesday, October 9, 2019

Xurge fantasy goodies, and chasing image quality ... whoooo!


Nope, that's not an Iray render, and that ain't Genesis. That's good old Michael 4, and a Studio 4.11 raytrace right out of 3Delight, with the render settings cranked way high. Now I'm amazed. Also thrilled to bits. Take a closer look, see how the mapping renders up:


Firstly, that's believable sunlight, and the higher sampling rate brings the skin tones up brilliantly. I've dialed the render settings up so high on this, the render took a whole whopping 43 minutes, as against nine or ten for the default settings. Whooo! So, let's go again --


Wow. Seriously. The costume is Xurge 3D's Druid Shaman, which is optimized for Poser ... I only needed to overdrive the displacement mapping and dial down the specularity for it to render up beautifully in Studio. The skinmap is SAV Atlas (from Renderosity), but the vascular map is the M4 Displacement from the DAZ marketplace. The eyes are the dark brown option from The Eyes Have It (DAZ marketplace). The set is DM's Elven Shed again (Renderosity), and the trees you see here are the Deluxe Trees, also from DAZ marketplace, I think. Depth of field is turned on, and the virtual aperture is set to F/15 to get this effect. I have two lights on it, with softer shadows.

I did a tiny bit of painting in Photoshop afterward, largely because the mask needed a little help to look good in a screaming closeup. Seen very close, it's obviously made in halves and "stuck together:" the diffuse map doesn't quite match down the nose. But it's a dead easy fix in post, if you just give it a few minutes. And the costume has an impeccable fit on Michael 4. Take a close look at the sandals.

So, since raytraces are done in a lot less than an hour, let's go again with two Michael 4 characters in Xurge 3D costumes, and a set --


This time I wanted two very different skinmaps, hair, faces. Aside from a couple of "artifacts" in the render, and adding highlights to the hair, I did nothing at all to this. Oh -- I hand-painted the body hair on the paler character. Otherwise, you have two M4s, Xurge's Untamed, their Druid Shaman sans the headdress and mask, DM's Mirador set, the Aether hair on the swarthy character, the My Rock Star Hair from Neftis on the paler character. Faces and body morphs designed by me, and again, the vascular mapping is the M4 Displacement map set. (You have to be careful with that one. It has four settings, low, medium, high and super, but anything over medium crumples the mesh on the base figure, so really, only low and medium are useful.)

I switched out materials in a couple of places, changed some diffuse colors, to make the costumes "pop" a little more in Studio -- Xurge warns that they're configured for Poser, and some of the textures do render up rather flat on the default settings. Easy to  fix...


This was just a twenty minute render, even at high-quality settings on 3Delight ... no trees, LOL. Like hair, trees really slow a render down. Even so, a forty minute render is screamingly fast by comparison with anything I can get out of my old PC in Iray, so I'm happy.

Been looking at systems and components. Went to the IT Warehouse site and picked out all the components I'd like built into my new system ... added by the retail value and had to laugh. I just built a (hypothetical!) $3,030 system. We're going to have to come down to earth here, when I finally go shopping, this time next year. We'll see. For the moment, I have tons of toys to play with -- scores of things I haven't even installed yet. So -- more soon! 😁

Monday, October 7, 2019

Genesis 8 gets new hair ... and I discover new depths to 3Delight ... whooo!


Been amusing myself making new faces with Genesis 8. I rather like these ... might use them agaibn. They were just done quickly to test-drive the new wig I bought the other day. I wasn't 100% sure the hairdo prop would work, since manual installation is still a little bit iffy, but there's the proof of it -- it works!

The hairdo is "Side-Part Hair for Genesis 3 and 8," from DAZ. It has six different styles and numerous colors, so you can mess it about, make it long or short, tousle it -- stand it on end. It works well, and I got the installation figured out, first jump out of the gate. I think the basic file structure is going to be the same for newer DAZ materials (not Poser formatted files, of which Michael 4 himself is one). In the case of hair props, it's this:

My DAZ 3D Library \ People \ Genesis 8 Male \ Hair \ Side Part Hair  ... with extra drop-down folders with \!!Styles and \Materials sorted for Iray and 3Delight.

These two snapshots were done in Iray, obviously, before I changed projects. I wanted to get back into 3Delight; and I haven't said that in yonks. In fact, I've spent the last four years or more trying to escape from 3Delight, which was the one true bugbear of Studio 3, if you ask me. The freebie installed in the interface was too rudimentary, and the pro version was too expensive. Well, that was then and this is now --

Iray was yanking me about so much the other day, I got so cross with it I said, 'Nuts, I'll just raytrace this!' And I stumbled into previously unknown depths in the Studio 4.11 version of the old engine; additional features which appear to be specific to Studio 4.x, and possibly even to the later versions of 4. Soooo...

This is a re-render of a Studio 3 image done five or six months ago:


I have never seen such response out of 3Delight ... this is a fairly quick raytrace, just ten minutes; and what I'm seeing is already getting fairly comparable to the work delivered by the Firefly engine built into Poser 9 and 10. I'm still 75% clueless as to what I'm doing as I configure the raytrace engine, but I'll work it out. You can configure this version ten ways from Tuesday, and I've barely started, but I like what I'm seeing! Can I persuade you to look at this, at full size (roughly double the size you see on the page here):


Even with just a little nudge in the pixel sampling and shading rates, gamma and gain, there's easily twice as much response in the skinmap. Whooo! Exciting, innit? Michael 4 is wearing Xurge 3D's 'Untamed' costume. I painted a new diffuse map for the metal parts, to make them gold; the original costume has steel gray, which looks a bit drab, I thought. The good news is that the new map applies itself automatically on the old UV coordinates, so -- cheers. 

And if you want to take a look at the hairstyle Genesis 8 is wearing in these snapshots:

Catalog image. See this. 
The good news is, this wig renders much faster than some other G8 styles, and at the same time it looks more realistic than the Landis Hair -- I'm having a tussle with that wig, trying to get it to look more like hair, less the a plastic hat. I know it can, and should, look great; but I'm not getting good results so far, to the point where I'm wondering if I'm missing a map. Is an opacity map not working out?? That would do it. Must look into that.

More soon -- probably not tomorrow, because we're going out for the day. The day after, I think, because I still have a Wilverine-style leather jacket for Genesis to install, and an SF costume ... and I'm dying to get back to playing with the raytrace engine into which I blundered by chance, LOL. 😎


Sunday, October 6, 2019

A grab bag of goodies -- barbarian, dancer ... vascular mapping, shaders and all


Back to basics -- a raytrace right out of good old Studio 3. The skinmap and face morph are Atlas (which I think is by SAV; from Renderosity), and the render pulls virtually every trick in the book, with a good result. I fell back to basics after a fruitless hour trying to get the M4 Displacement to manually install properly ... it gave me the right, royal run-around, but in the end -- just as I was about to yank my hair out by the roots and run around screaming, I did get it to work:


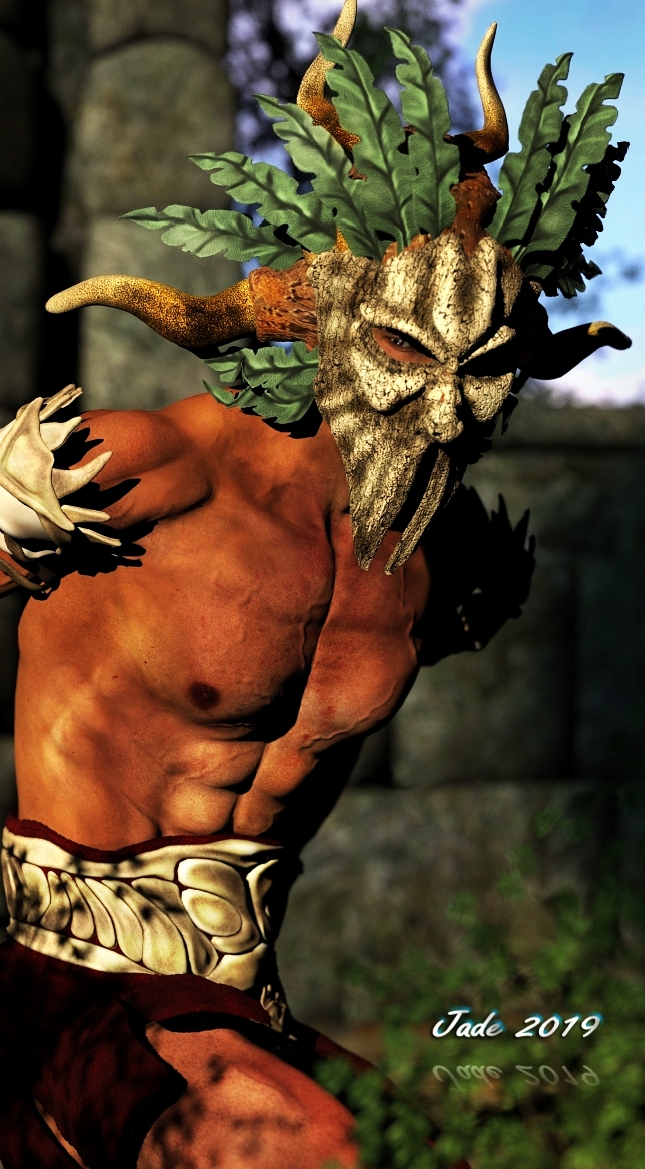
This one is a Studio 4.11 raytrace, and I cranked up the sampling to get higher fidelity. I'm actually fairly pleased with this. (The only downside is ... I can't save the project file. Whatever I do, I do on the fly as a one-off, which makes for more work, but -- hey ho._ As you can see, I got the M4 Displacement to work in the end -- there's only one proviso: it doesn't work in Iray. So finding out that you can get higher quality raytraces becomes more important! Remember how much you love raytracing, and explore the new depth in the 3Delight settings.

The vascularity adds a dimension of realism ... it's going to be fun playing with this. The big challenge was finding the package, once it was copied over. If you're having the same problem, take a look here:

My DAZ 3D Library \ People \ Michael 4 \ Materials \ M4 Displacement

...and whaddaya know, there it is. The way Studio 4.11 reads files and folders is confusing, and can be confounding, but after six months I think I'm starting to get the hang of it. 😜

There's a package for Genesis 8 called "Add Some Veins," which essentially does the same thing for Genesis 8.. I don't have that package yet. Still going fifteen rounds with Studio, trying to get it to install things manually, and do it reliably, coherently. I had six items to install today, and got through three of them because with the exception of a set of poses (from Renderosity) the rest gave me a fight. But --


Genesis 8 -- "Going Dancing:" new poses and shaders, installed and working. Phew.

It was a bit of a chore getting the Polygonal Miniatures Iray Shaders Collection to work properly, because although everything copied over to the letter, and is in place, Studio can't find any of the texture maps ... meaning, every time I apply a shader, you have to "locate" the map. Just one more hoop to jump through I guess; so I went through the motions with a test piece --


-- using eight shaders on one prop, the Chinese screen from the Folding Screens set. Fair enough, I can go through the "locate" routine for this. The only "hmm" I have about this shader pack is that, as you can see immediately, the shaders visibly "tile" over large areas. They're beautifully seamless, but the texture maps are quite small, and you can pick the pattern at a glance. These will have to be used with considerable care, to hide this.

The poses are really good, and I think they were a freebie from Renderosity. Ain't it odd? The freebie is the item that works perfectly, installed without a fuss and just clicked into place. The only thing I need to remember is where Studio finds this item! So I'm going to make a note to myself here, LOL, so I can refer back to this post if I forget where it is! Note to self: the Thorvan Poses are here:

My DAZ 3D Library \ People \ Genesis 8 Male \ Poses \ thorvan-poses

...simple and logical, when you think about it, but I had to hunt it down. Worth the hunt.

Three more items to install, if I can manage it: a new hairstyle, a Wolverine-style leather jacket for Genesis, and an SF costume. I'll get to them tomorrow, and with a bit of luck they won't mess me about the way the M4 Displacement and Polygonal shaders did. Cross fingers.