Tuesday, March 30, 2021

A new barbarian, a dragon, the black horse, and more


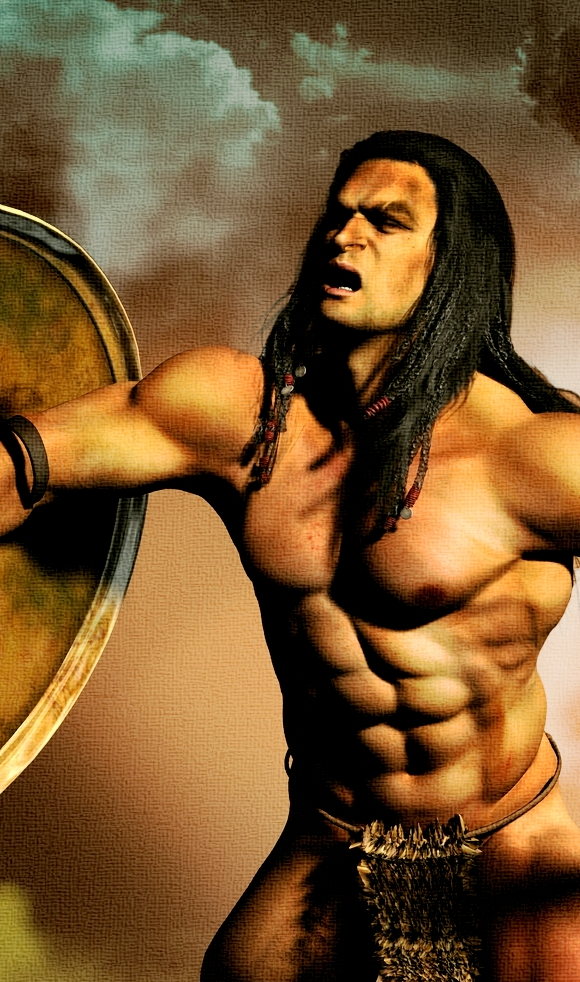
A new barbarian ... the skinmap is Kingston (though not the face or body morphs -- those, I designed myself), and though I'd had high hopes for this skinmap, I'm not thrilled with it. It took a lot of post work in Photoshop to fix it -- and sure, you can do this, but surely you shouldn't have to, when you've paid quite a high price for the materials? What was the problem? Well, this:


You can clearly see the seam, where the torso mapping adjoins with the limb mapping. I suspect something is way off in the specular values, and yes, next time I fancy having a struggle with a skinmap, I'll delve into the numbers and see if I can straighten it out. But wouldn't it have been nice to just render this up and have it turn out properly. Hey, ho. Next --


If I were to caption this, I'd call it, "Starting to think this wasn't such a good idea!" Or perhaps the caption should just be, "Ruuuuun!!!" Ha! This one is for fun, whereas the other day I was in a mood to do a picture purely for beauty:


That golden portrait of a black horse came out of an experiment in turning surfaces into light sources, in Iray. It's actually easy, and so effective. And the practical outcome of that was, "I wonder how far I can go in lighting a whole scene only with surfaces???" So --


In this on, the fire is the main light source. I almost, almost got there, lighting the whole thing just with the flames. Not quite. I had to turn on a 0.2% environment light to back it up, and in the end I stopped waffling around and put a soft point light on his face, just to brighten it up a bit. But these are small things by comparison with the light being emitted by that surface. (The flames are an object, obviously.) With the barbarian standing back far enough out of the light, you didn't see how the skinmap doesn't quite work. I didn't have to do any post work on that one. And that's all from me, for today ... more soon!


Friday, March 26, 2021

Iray materials on Michael 4 ... now, that's nice!


Well, now I'm impressed! I've had my eye on the Iray Converter for Generation 4 for about a month, and it was on sale today, so I couldn't resist. I've been hoping (putting it mildly) for Iray materials for the old Michael 4 and Victoria 4 figures, and -- yep, there's a smile on my face now! This skinmap, above, is SAV Atlas; it's difficult to work with because it has red overtones and tends to render up with silvery patches in Iray, but even this one (which is the torture test) looks great; and as for the M4 skinmap itself --

I don't think Michael 4 ever looked this good before. This -- Leon -- is not even the HD skinmap, just the regular one; and it has a lustre, a velvet quality, created by the SSS and translucency. This is very good ... in fact, in all the world, the only thing I can't work out (and no one can, apparently!) is how to get vascular mapping onto the Generation 4 figures in Iray. People will advise using normal maps, but that Does. Not. Work. So I'm very pleased indeed with the Iray Converter for Generation 4. While I was shopping the sale I also got a couple of new skinmaps for the Genesis 8 female ...

This is Ginnie, with one of the two supplied faces, and the tanned version of the skinmap. The model, right out of the box, is rather a stick-figure, so I put some meat on its bones and muscles on its limbs, for the long-shot --


That looks better -- athlete's legs rather than spaghetti. I also bought a second G8F skinmap, which I haven't had a chance to test yet. Tomorrow, with a bit of luck. But the other day I was working with the Zahra skinmap, and creating faces, and came up with this, which I call "Gypsy Girl" ...


This one was mostly to try out a new hairstyle -- SA Hair, from Renderosity. I'd had some misgivings about getting Genesis assets from Renderosity because I've been having a devil of a time trying to install them. Then, two or three nights ago -- he he he ... I worked it out. Yep, I can get Genesis stuff from Renderosity now, because the SA hair is working perfectly. Now, I need to use this as a rout map to install other assets, and if it works right every time, I'll blog the file path for the Windows 10 installation right here ... you're welcome.


I've been working on this last one for a month or more -- there was so much to figure out. The lighting. It's almost entirely lit with surfaces within the 3D model which have been turned into light sources. (You do this by putting the model into the Surfaces pane, applying the Uber Shader to each individual component and then setting the Emissions Color to white. As soon as you reset the color an extra control point pops up, where you can set the strength of the emissions in lumens -- millions of lumens, to light a scene with surfaces. It took a while to figure this out. I painted the city/sky background specifically for this; and I wussed out and painted the atmospherics in Photoshop. I know you can do this in Iray, but it's such a chore, I honestly can't be bothered.

That's all for today. I have loads of new and new-old stuff to play with, so I'll be back soon!


Thursday, March 18, 2021

Making faces ... and repainting old images


Having a lot of fun creating faces ... that's the Michael 8 skinmap, but a whole new face designed to go along with it; and that's the DMM Rebel skinmap, complete with tattoos, but that's a face as designed by me -- largely because, at this moment, I can't get Rebel to install properly. I might have mentioned this before, but the file structure for Genesis assets is different; even when you've put them where they're supposed to go, Studio can't access them. I seriously need to think this through, work it out.

It's also been a day for revisiting old projects -- and repainting them! Like --


These are infinitely better than the versions I did a few months ago. That's actually just the Genesis 8 figure wearing Georgia's makeup options! It was mostly a mix and match experiment for costume bits and shaders. But I have to say, I do like the G8 male figure who's wearing Michael 8's skinmap. I think I could do a lot with that. Hmm... A few ideas are occurring to me, even as I type this! This is going to be fun.


Monday, March 15, 2021

Just Another Day on Mars ... and repainting The Berserker


Now, here was a challenge! This is the Rebel character from Renderosity ... but no alchemy I know will make it install into DAZ Studio, so I wound up with a whole suite of gorgeous maps to slap onto Genesis 8 Female; and with the skinmap, makeup, tattoos and eyes configured, I basically designed a face that suited me! I have absolutely no idea how to install Genesis content from Renderosity: the file paths quoted by the designers do -- not -- work. They were probably designed for Windows 7, I suppose, and now that Windows 10 has booted all that out of an airlock, there's quite a bit of chaos going on. I spent a couple of hours on various forums, looking for answers, and I'm not alone in not being able to get Renderosity Genesis stuff to work --

Understand: the old stuff works just fine. If it was intended for Poser, and if you plunk it into the Runtime folder, it's soooo easy to get anything at all to install into Studio. But Genesis characters don't go into the Runtime folder! They live somewhere else ... and I'm still trying to figure it out. I have a few ideas, but to get this up and running now -- today -- fast -- I went the manual route, and came up with this. Nice! But yes, I'll continue to work on getting the file structure sorted. If I ever work it out, I'll tell you what I learned.

With an hour to spare, I went back into an old project that I was satisfied with a few years ago, but looking at it now, I knew for a fact, I can do better. So --

Please do have a look at this full sized, because it's worth a look -- and because the oil paper texture I stripped into the finished version doesn't show at this small size! It really adds a dimension to the picture --


That's about it for me, for today ... but something lovely is rendering in the background while I'm typing this! Got to run, now ... Dave is putting on a movie. 

Thursday, March 11, 2021

Race Day ... and the magic of shaders


Race Day, just on dawn ... the story is, this guy has rebuilt an old machine, it's faster than it ever was, and today's the day he's going to prove it. This was a fun project. It started with Rex for Genesis 8, but I re-re-remoulded the face till it's another face entirely ... I guess we ought to call him Roy now. I used one of the pre-done Adama poses for G8 Male, and when I saw it, a scene just popped into my imagination. The challenge was to take the old Pacificator prop and remake it with new shaders. The original prop is by Powerage, and the oooold version I have doesn't have all the fancy new Iray materials It's fairly rusty and renders very flat. So ...

I used various shaders for this and that bit, but I also got into the Surfaces pane and just reworked the original mats to bring them to life. Am just really starting to get my head around Iray Surfaces. Then -- the ground. This is "just" a shader, set it with a single click:


The realism of this is such that the rest of the render pops. This shader, I think, might have been a freebie from Deviant Art; or do I mean the car paint shaders I used for the fingernails?? Anyway, the result you get here is a combination of the shader itself plus the environment map for the IBL lighting (a free HDR image. Try this, if you're interested), and one spotlight configured to look like early morning light. (The sky was rendered in Vue, a decade ago -- by Dave. I never got into Vue, and I must get back into Terragen, to render custom skies.) The result is astonishing! In terms of complexity, this is by far the best Iray render I've done yet. Very, very happy with it. Not a bad way to spend a couple of hours in the afternoon! 

And this morning --


I do enjoy a challenge, and the old Generation 4 figures stretch you, in every way imaginable. This is a Victoria 4 ... I designed the face and body; the skinmap is Angel, the hair is Nana, and it's a fifteen minute render in Iray. The dress is ShadowStorm, with new shaders from Sveva's Shimmer and Shine and Satin packs -- I used the fabric from one and the bump map from the other to get this effect, kind of mixing and matching shaders. Nice! And the eyes --


If you've got a second going spare, see this at full size. The eyes have rendered brilliantly. In fact, I'm enjoying V4.2 so much, I might buy a couple of extra skinmaps, LOL. Sure, Genesis makes it easy, but the challenge of the old Generation 4 figures is such fun!


Wednesday, March 10, 2021

Something old, something new, something borrowed --


I call this "Gate of Secrets," and it'll get more interesting when I tell you, that's Genesis 8 wearing Micahel 4's costume! Yep. That's either Dae wearing Michael 8's skinmap, or Michael 8 wearing the Dae skinmap, and I've forgotten which! But the loincloth is an eons-old wardrobe bit for M4; and whaddaya know? When you import it through the wardrobe wizard -- it fits! I put a new Iray shader onto it, and there you go. The second interesting thing about this is the prop sword ... and old, old prop with new shaders:

You might want to take a look at that, full-sized, because it's astonishing. If you recognize the pose, you're not wrong. This is a re-render of a Genesis/Iray scene I did just before I realized I was going to kill the computer. At the time, the moment I turned on Photometric lights, the old system had a hernia. At this point, I'm going back into good ideas that weren't really possible back in the day, and doing justice to them. Nice! Sooo...

Being on a roll, I decided to take a look at a Generation 4 figure, hunt down one of V4's old costumes, install it, and see what Iray makes of the ShadowStorm dress. Hmm.


Well, here's Victoria 4 wearing the Angel skinmap, the Gypsy hair, and a a face and body morph designed by me. The dress was far, far harder than the figure! Iray didn't like it at all, and it was a major challenge to get it looking good. But worth the work --

The good news is that Iray likes this skinmap; it renders up very nicely indeed. I'm not saying the Generation 4 figure (or its mesh!) looks like G8, but there was a time when this would have knocked your socks off --


Since I had some more time (not doing anything much today; should be doing housework, but I'm so sick and tired of housework, I just can't even look at tidying and cleaning), I hunted down the skinmap for the HZ Victor character. Iray isn't as happy with it as with the Angel skinmap --

It's not bad, but it doesn't have the realism one expects and demands these days. Yes, I applied the Uber Shader. And it's ... okay; but it's very flat and "off" somehow, and the closer you get to it, the more you can notice that it's "off" by comparison with the Genesis skinmaps we're accustomed to now:

...and we won't even talk abouy M4's notorious elbows, which never looked realistic, even ten years ago, and these days? Phhhttt. Okay ... next experiment (after Dave and I get back from our road trip to Millicent, Robe, Naracoorte, Mount Gambier, and with any luck at all, Halls Gap), I'll get the Iray Converter for Generation 4, and see if it livens up all these old skinmaps that, frankly, could be so much better. Look at the velvet and lustre on the G8 skin. Yeah, that. 

Tuesday, March 9, 2021

Soft shadows in Iray -- solved; and "an ordinary bloke" for a change


Today's challenge was tougher than yesterday's "glam" shot of a girl ... you can't hide behind makeup or fancy hair, or shimmering fabric, or costuming -- I wanted an "ordinary bloke," not somebody who's drop-dead beautiful. Okay, he's built, but he doesn't like like a movie star --


-- in other words, there is nothing to divert the eye, and anything not-believable in the render would jump out and bite. So I went through about 100 test renders to get to this point, and I have two spotlights (key and fill) on this, in addition to a verrrry subtle environment IBL light. This is the Michael 8 skinmap, and Dae's bright blue eyes, but I designed the face from scratch deliberately to be a bit older and a lot more "ordinary." I wanted a guy who looks about 35; and none of the stock characters seem to unpack with any years on them; you have to get in there, and add them -- done. Next: second challenge for the day:

Create soft shadows. Suuuure, it's easy to get Iray to render dramatic or "interesting" shadows. As soon as you set a key light and crank on some serious "lumens," you'll get fabulous shadows (and if you don't, it means your environment light is so high, it's just filling them in. Try turning it off -- set all values to 0, test again, and see what happens). But supposing you want lovely soft lights. What now?

Okay, it's not a secret. Here's how you do it:


Any new spotlight is automatically created as a point, and its shadows are going to be hard. But if you go into the "Area" parameter and change the "Light Geometry" to Disc, and then make the Diameter quite large, the shadows magically soften up. The bigger the disk, the softer the shadows. Phew! Now --

Challenge three, however, was not solved today ... I gave up and opted for the Photoshop fix, because I'm tired and I basically want to get away from the screen for the day. This is the Michael 8 skinmap, which looks a treat -- from a distance. But when you get very close to it --


The torso surface texture is "overcooked." I turned OFF the normal mapping, and played in the Surfaces tab till I ran out of things to try -- no joy (yet). If/when I get this question sorted, I'll tell you how. But for the moment, I just airbrushed it in PS to get the "orange-peel" effect to soften up. Hmm. Later on, or tomorrow, when I'm not so tired, I'll use this same character, morphs, pose, lights and camera, but I'll put a different skinmap on him and re-render this, just out of curiosity. Say tuned. Next thing I want to try is some SF ... textures on a vehicle, chrome, costumes, and FX in Iray. Tomorrow, I hope! 


Sunday, March 7, 2021

Glam: "I'm So Blue," in Iray


Okay ... I'm up to my eyeballs with wrestling with Generation Four skinmaps, and trying to get them to look ab fab in Iray! So fed up, I'm running back to Iray, and let's do something EASY. You reckon those glam shots of pretty young girls in fancy clothes (or none at all...) are difficult? Nope --

Too easy. The fact is, you sweat blood on the kind of render you saw this morning -- a scene, filled with props, massive amounts of light, a difficult pose, whatever. Glamour shots are easy by comparison. So, right here, what do you have?

Genesis 8 Female wearing the Zahra face morph and the Georgia skinmap, and a body morph designed by me (because she's a bunch of spaghetti, right out of the box). Eyes from the Ultimate Eyes for Genesis collection; the hair is Aldora for Genesis 3, and the costume is the Persian Top (there's also a pair of pants goes with this) for Genesis 2 -- the Wardrobe Wizard really works, thank heavens! Then I switched out the boring, boring MATS on the fabric, using shaders by Sveva, (from Renderosity) and conjured a backdrop to match by putting a zoom/motion blur on a winter scene, to get the right colours. About 90mins later, it was done -- I'd set the Iray parameters massively high, off-scale, as an experiment, to see if that produces any visible result --

Here's the bottom line of that experiment: past a certain point, or sweet spot, you could leave it rendering forever, but you wouldn't tell one Iota of difference. I could have shut this down at 45mins, it would have been just as good. So the Iray sweet spot is something around a minimum of 40 or 50 samples, a max of about 12,000 - 15,000, and ... in fact, why don't I just take a screen shot and paste it in here?


That should get you where you need to be. The lighting for this render was also dead easy. I set an environment map that started life as an HDR photo of an apartment, but I cranked all the tones into the blue range; then I put one (just one) spotlight on the model to make the shot pop. Mind you, the photometrics might seem a bit extreme if you're not accustomed to this:


Yes, I have 100,000 lumens on this face; I've also pulled the colour temperature into the blue zone (red to the left, blue to the right, right?). There was just a bit of painting to do in post: the hairstyle is old, and in super closeup you can see that strands "go around corners," LOL. Also some of the mesh on the shirt collapsed, or crumpled, so there was some fix-it work which took about three minutes flat; and -- done! 

In fact, I'm so tickled with this, I'm going to do a G8 glam shot tomorrow. In fact, this was rather fun. A nice break from tough shots.


Nope, the raytrace definitely looks better!


Nope, sorry dudes ... as much as I like Iray, I have to admit that some of the old Generation 4 skinmaps just don't look that good in it. They actually do look better in a rayrace. So I went back and too another shot at this, as a raytrace --


 -- okay, so back to square one, and we'll just raytace this character, who's wearing the ATLAS skinmap. It just much better, even though it's not trying to be photoreal. Now, I was looking around on forums and so on last night, to see if other people have the same problems, and/or if anyone is still using the Generation 4 figures -- and it turns out, people are. The truth is, we all spent so much money between 2009 and 2016, buying Generation 4 assets, we're disinclined to retire them, (though I imagine DAZ would dearly love us to bin the lot and start again; and then do it again, in two years' time! Yeeeeah). And I followed a tip, and found this:


Okay, it's twenty bucks, but if this would perform as it promises, and bring the old Generation 4 skinmaps up to Iray standard -- well, now. I have to admit, I'm sorely tempted. Because when you compare the old tech with the new ... well, one of the things the old DAZ renders never had benefit of was SSS, or subsurface scattering, that "velvet" appearance of skin, which one gets automatically in Iray, and which I understand Poser was doing, with its built-in Firefly engine, as long ago as 2008. In fact, way back when, Poser aficionados used to criticise Studio powerfully, for 3Delight's inability to provide SSS. (Not that the full pro version of 3Delight wouldn't have offered it, mind you; there was a time the pro version of the render engine cost upwards of $1,300 -- then along come LuxRender: cat among the pigeons, all change!) So, I'm wondering, should I get this? 

Before  spend twenty bucks on something that's going to be essentially invisible (especially when it works well!), I'll have a fiddle around with the skinmaps and see if I can wrangle some magic; but I have a strong intuition I'll be buying the Iray Converter for Generation 4 ... probably when Dave and  get back from our week on the Limestone Coast. Truth is, if I buy the converter now, I'll hardly have a chance to play with it for 2-3 weeks. So ... patience, grasshopper!

Last thing for now ... this is nice --

-- and in a stroke, it demonstrates what I was saying a moment ago about the "velvet" quality you expect of skinmaps where SSS is available. Hmmm.  

Atmospherics, and old faces returning


It's been quite an interesting day, render-wise ... many questions answered, and many more added to the list of questions still to be answered. But first: the Hyborian Age pinup boy is back, via a .dsb file -- albeit looking a little bit different than he did in the raytraces. The SAV Atlas skinmap doesn't render the same, though it does look very good; and I had to switch out the hair. The old renders use the Hermes hair, but although I was able to get it configured for Iray in terms of colour and lustre, I couldn't get the fit right. It looked like ... a coconut. Seriously. So I went back to a style that's almost "no style," so it looks good on anything, anywhere: Neftis's old My Rockstar Hair. It still works; but it looks better in darker tones. This guy used to be blond, but he's going to be raven dark from here on. Still --


This actually looks very, very nice indeed. According to the documentation, SAV's Atlas is also supposed to fit the Genesis figure, but the file path to install it in Win 7 is now obsolete, and I honestly can't find any compatible file path for Genesis. Soooo, this is just for Michael 4, at least for the moment. Also --


I've got about two thirds of an idea about how to get atmospherics to work in Iray. I'm not there yet (this one, above, isn't perfect), but I think I know where 'm going with this. More experiments are in order, while I see if I can get this working properly. This is DM's old Circular shrine, which is a nice standing set, but I can't seem to get it properly configured for Iray. I've adjusted everything, but the surfaces still have a tendency to be glossy, even with gloss, reflection and even refraction turned off. So ...


I wanted to render again, with a character (this is Dae for Genesis 8, wearing the Landis hair, and The Huntsman costume for Genesis 3, which fits G8 well), so I took the opportunity to re-do all surfaces with shaders. These are a few of the Construction shaders from the Mech4D pack (from DAZ). It's not absolutely perfect, but  it's pretty darned good. I could paint it, to take care of the slight deficiencies, but ... nah. It's very lovely as it is. And --


I rendered this at 3000 pixels high, so you can cut into it and still get a really good image ... you can get close enough to get a good look at the figure, costume and hair. In fact, let's get even closer:


More atmospheric experiments tomorrow. I have a couple of ideas that just might work. It's not a million miles away from the tricks I used to get up to in Studio 3 and 3Delight to make fog and mist! In fact, I'm dying to see if I can get this to work. Also, I'll be trying some "shader mixer" stuff, and I'd love to see if I can get the Hyborian Warrior dude (he needs a name) and Leon coherently into the same shot, in Iray. If not, then we'll play with some raytraces. Haven't done that in a couple of weeks. This is fun!


Friday, March 5, 2021

Hey, see who's back -- and in Iray!


Now, here's a face you ought to know, if you've been with me for any length of time ... but it's the first time he's rendered really well in something other than 3Delight ... and it turns out, Iray just loves him, whereas he was tough to work with in LuxRender. I designed this character way back in 2012, when I got a new desktop PC that would (ha!) actually let me a) turn on shadows, and b) raytrace, without crashing to the desktop! Back in the day, here was the best raytrace I could ever achieve -- and it's "Leon," of course, in a scene from the future story of Abraxas (which got abandoned when my Mom became so ill, I had no time for anything else but caring, and then I became ill  myself ... fast forward years and years, and I'm only just beginning to recover) ...


Oh, this is going to be fun, seeing what I can do with this character now -- and maybe, just maybe, I can get back into Abraxas? It's a good story, if I can just DO IT. Anyway, here's what was involved in bringing the character back, in Iray:
  • Go back into an old project file in Studio 3, on the old computer;
  • Select Leon/Michael 4, and --
  • Save as ... Character Preset (it's a .dsb file format).
  • Save to a jump drive and import to the new computer.
  • Load a new M4 figure and select it;
  • Go File - Merge --
  • Click on the .dsb file...
And voila. Leon appears, just waiting for his skinmap (Michael 4 default, not even the HR skinmap -- Stoney wears the HR skinmap; remember Stoney?!) and hair (Midnight Prince, set to black) and eyes (the Tony Stark dark brown, from The Eyes Have It collection for M4 and V4).

Now, with that lot done, set up the Iray lights ... and the magic of the generation 4 figures (pre-Genesis) is that they're soooo low poly, you can get a 2000 x 2400 render, with the Iray settings cranked up high, in about ten minutes! Then, pop it into Photoshop for some effects to give it the look of a studio photo done to promote a new film, and -- done. And following that theme along, just to see how fine the Iray render is, let's really do a movie promo still. Monochrome:


Right now I'm thinking, "Ooooh, what did I miss, what new movie's coming out soon?" But the magic is in the details, so we'll zip back into colour and have a closer look at this:


Now, to get that level of realism on the hands, I used Aged for M4, from the Morphs ++ pack, and pulled the slider over to 100%. You actually see bones and veins in Iray, which is amazing ... because Iray loves to ignore displacement, bump and even normal maps. Meaning, I can't render vascularity on M4 in Iray ... yet. There has to be a way, but I might end up touching down on the DAZ Forums for enlightenment. I bought some really good vascular maps for M4, and they work brilliantly in a raytrace; but in Iray they disappear. (Have a look at the last image in this post: that's a raytrace with the vascularity turned on.) How to fix this? Dunno. Yet. Put that one on the Must Do list, along with dForce -- and also rendering "godrays" in Iray, when, technically, Iray won't/can't do atmospherics. I found a tutorial, and as soon as I have a free afternoon, I'll be following the cookbook method and seeing if I can get atmospherics going. This is the effect we're looking for --

NOT my render: see link below

--and it turns out, there's two or three ways to "fudge" it. We shall see. For now, I'm going back to another old project file in Studio 3 and seeing if I can resurrect another character I used to like a lot. It's this guy here --


I've gone through the process to get the .dsb character preset file, merged this onto M4 (no problem so far), and am just trying to get the hair and skinmap to look good in Iray. He's wearing the Atlas skinmap, from SAV, and the Hermes hair; and neither of them performs the same in Iray as they do in 3Delight (and presumably Poser). So I need to configure everything ... two hours later, I'm 75% of the way and out of time, LOL. Back to this tomorrow. For now, I have to work, so -- here we go.