Wednesday, August 31, 2011

CG art ... spirit of place


It's a safe bet you didn't expect to see me again before September, but I'm sneaking in with a matter of hours to spare, at least on this side of the dateline. August was a very, very hard month for me, on many fronts -- work and health being the two big issues. But I'm verrrrry close to out of that particular wood, and am dying to get back to some artwork.

As I said in my previous post, I've been shopping for all kinds of items while things went berserk. Hairdos, costumes, skinmaps, sets, props, brushes, all manner of goodies...

I had expected to be able to render a new set today, but when I unpacked it I discovered that it was short of a baker's dozen of its textures. Ten diffuse maps and some bump maps were missing, so it literally refuses to render and look decent. I've dropped a line to the designer, and with any luck I'll get the missing files through soon, and then you'll see something very interesting.

In the meantime -- here's Michael 4 wearing his new shirt, new pants, new boots! The pants are great, and tomorrow I'll be showing off some renders which will display them to their best. Today's renders are now "quick" as such, but "abbreviated." I wanted to do at least half a dozen, but time ran out. I'll write the post about the new togs tomorrow -- tell you what they are, where they're from, where to get 'em.

So I call this theme "spirit of place," and if you have a look at The Winged Avenger, which I uploaded a couple of weeks ago -- it's the same set, but here's where it gets interesting. It's 5000 years later. The winged avenger ... archangel, perhaps? Dragonslayer, maybe? Then along come a pair of archeology students who are also a little bit "fey," as they call it -- they have the gift of the second sight. They can feel the "spirit of place" of this ancient location.

And there's something going on here.

Now, I'm not saying it'll be the end of the world as we know it, but --

That archangel isn't far away, and he's hanging around for a reason! Most humans would never be aware of him (and his quarry), but these two are part Irish, part gypsy, and they're psychic. The avenger shows his beautiful face, and they'll see him.

Anyone for a threesome?!

More soon...

Jade, August 31

Sunday, August 28, 2011

Book cover art again ... soooo pretty, this one!


Somebody said the other day, "There used to be this great digital artist, went by the pen name -- or would it be 'brush name?' -- of Jade. Whatever happened to her?"

And someone else said, "I don't know ... she vanished. I think she might have died. Well, either that or she gave up the painting and got a goat farm in New Zealand, and she lives halfway up a mountainside right now, catching up on her sleep."

Hmmm. Chance, as the British say, would be a fine thing! No such luck, fellow travelers. August has simply been a blizzard of work, added to which, I haven't been well a lot of the time! Art? Yep, there's been TONS of it. All of the commercial variety, nothing creative ... nothing worth uploading, till this piece, which I did the other day.

A while ago I created a new character, using the Jerome skinmap and the Yannis Rasta dreadlocks, and I'd just gotten done rendering him when I thought, "I know who you are!" I hadn't set out to create Rogan Dahl from The Lords of Harbendane, but that's pretty much what happened accidentally. In the last month, I've been repackaging numerous books from our list, and it was just too great a temptation ... I had to do a new cover for Harbendane while I was there.

This is the third cover this book has had, and it's definitely the best. Here it is with its text objects pasted up:


Now, that's pretty! LGBT and m/m books need quite delicate cover art, because it's entirely possible Aunt Maud might be looking, and we don't want to give her a seizure. But on the other hand the art needs to be representational of the content of the story. Harbendane is a love story as well as a huge epic fantasy taking place in the northern valleys, and the bleaker lands not far south of the arctic circle. I think this piece does the job nicely.

These are two Michael 4s, obviously. Yannis Rastra Dreads and Jerome skinmap on Rogan (face and body morphs my me) while Tristan is wearing the Aether hair and the Mario skinmap. Rogan is wearing the Lockwood pants and the AS Narkilir shirt (all textures changed), and Tristan is wearing the Lockwood shirt and the Cold Life pants (all textures changed). In the background is a digital painting I did a couple of years ago for the original cover. The sky, mountains and foreground are literally cut out of three different photos, and painted together. This was done looooong before I had Photoshop, so the work was done in Micrografx. The foreground comprises the Rodi Design baby fir trees (from Content Paradise), and a bit of overpainting in Photoshop using Ron's Magical Snow brushes (from DAZ). Then the whole shebang was color saturated for extra impact, and shipped into Serif X3 for the text objects to be added.

So sorry to have been absent for eons! I'm almost at the end of the avalanche of work, and in the last couple of weeks I've bought loads of 3D models ... new skinmaps, hair, sets, props, Photoshop brushes ... that I haven't even unpacked yet. I'm dying to get to the end of the overwork, so I can get back to some art -- art for its own same. Ars gratia artis, pardon the Latin.

So, like the man said in the movie, I'll be back! Soon.

Jade, August 28

Tuesday, August 16, 2011

The Winged Avenger ... and the comic story I promised last week!


I'm, uh, back, to quote Sam. I didn't actually die sometime during the last week, though there were times when I seriously considered seeking out high places and jumping off. Work. Gak.

Anyway, somehow I survived, and here I am! Just one image today, for reasons of time -- and also, this one is as much painting as render. It actually took just as long to paint this as to set up the 3D work. I call it "Avenging Angel." Those are the Icarus Wings, and the sun staff from the Sun Edge set, and DM's circular shrine, and odds and ends of props. That's Michael 4 wearing a face and body morphs designed by me, plus various bits from Powerage's Supreme Armor, and the loincloth from The Wood God, with all the textures changed. Neat! (I uploaded it at full 1:1 size in case you want to see the details...)

If you have a long memory, you might recall that I promised a story to accompany the CG comic art pieces from my last post -- about a week ago! (Ye gods, where did the week go?) Asian guy, katana, evocative textures and smoke and lighting. A story had popped into my mind, and those images evolved from it. And here it is:

The story is a tale of magic, madness, science fiction and fantasy (and if I had the time, good golly, I'd write this one). The character you saw in the art in the last post is a ronin, in a world gone askew, about 15 years from now. His name is Chen. He was the first human being born in the 21st century, and he grew up "off the grid," under the radar ... the child of a woman who was the last of a great warrior house, and who died defending him from shadowy enemies when he was still just 14 years old.

Alone on the street at that age, he survived on his wits and the skills learned from his mother ... and he's different. Maybe the male line of this family have always been different, or maybe it was because he grew up in a place where radiation levels were insanely high due to the laboratory experiments of the old scientist, Roban who was his mother's only friend through the years when those shadowy enemies were hunting for Chen.

Now, the scientist is very, very old -- and is he insane? His experiments into starship engines have mutated him physically as well as changing his brain, how it works, how he thinks -- he never had proper funding or oversight; his research has always been done in the basement of a great deserted skyscraper which is said to be haunted -- in fact, it's not haunted, but strange specters do appear there as a result of the dimensional forces at work in the experiments. But the shadows hunting Chan are still there, and there's no more Roban can do to protect Chen, save to give him a device which was developed out of the experimentation...

But Roban warns Chen never to use it unless his very life is in jeopardy, because the results can not be fully predicted, and it can't be tested without using it. Chen is skeptical, but he takes the device when he leaves the lab, and sets out on his superbike to leave the city -- find somewhere else where he can be safe, live some semblance of a normal life. He's known for years, he should get out and stay out, but he's lived all his life here. Only the three big fights he's had, and survived, in the last five days, have convinced him to go. His enemies are getting closer -- and he doesn't even know why they're hunting him.

He doesn't get far. The shadows are right behind him, and they hunt like a wolfpack. They corner him on a bridge, and the fight is terrible ... he holds them off but there are too many, and when he finds himself out in the girders, a hundred meters over the stormy river waters, Chen realizes his only chance of any kind of survival is to use the device.

And that, ladies and gentlemen, is where the fun really starts...!

Told you it was a comic -- but what a comic. Basically, what you have here is a whopping great prologue. The device has to cause mayhem, the shadows are never far away, Chen is hunted, someone helps him, he meets another ronin warrior, there's a love story on the side ... Roban's work turns out to be less madness than genius ... starship/dimensional engine? Whoa.

I need to see if I can hammer out the rest of this story, don't I?!

Jade, 16 August

Sunday, August 7, 2011

CG comic art concepts ... oooooh, now that's interesting!


Long time, no post here ... sorry! Work didn't just go ballistic, it went mega-supernova, and that, on a weekend! It's going to be 2-3 days before I have time to even think about art for me, and posting here for the pleasure of posting here, but --

I do want to get these pieces posted. You see, I had an idea for a graphic novel ... as usual, I had a flash of a story concept, I saw a blaze of artwork, graphics, characterization. Not that I'm likely to have time to do the art, write/illustrate the graphic novel, y'understand! So I did some concept art featuring the character who popped into my mind, and I'd hoped to have the opportunity, today, to tell you the framework of the story...

Alas, that part of it will have to wait till next time! Actually, it's quite a good story, so join me tomorrow (or maybe the next day), and I'll, uh, tell you a story!

Jade, 7 August

Wednesday, August 3, 2011

Alien skies and barbarian horsemen...


Flying through in a heck of a hurry and touching base as I go, here's the barbarian horseman under the ringed planet -- actually, a revamp of an old, old project. I was looking through some ancient renders (September 2009), and thinking, "Hmmm, well, that was a good idea, but it needed more skill to make it work properly.

So here's the revamp! This is actually the reason I started the blog: as a visual diary to chart my wanderings from "golly, I just got the software, and see what I discovered today!" to "hey guys, take a squizz, this isn't half bad --!"

This is a medium easy, medium complex shot. You need Michael 4 and the Millennium Horse, plus the Aether hair set to dark brown on him, and the CWRW Palomino skinmap on the horse. Then, the Horse Tack on the horse, and the Leon tights and boots on the guy. Michael 4 is wearing the GA Matthias skinmap and goatee beard. I brought in an obj of a bit of ground which I made in Bryce a year ago, plus some young fir trees, by Rodi Designs. I slapped a nice rocky texture on the bit of ground, and a lumpy, bumpy displacement map to ruck it all up like real ground... the rest is all painting. I have four lights set, nice and bright with hard shadows, to simulate daylight.

The background started life as a bucket fill in a nice shade of blue. Switch to white and paint in the clouds using Mystikel's Clouds, which is an .abr brush set yo can get from Renderosity. Now, create a new layer and drag it under the clouds ... paint the ringed planet into this layer, in white on a background the same shade of blue as the layer with the clouds. Then -- you guessed. Make the cloud layer go selectively opaque by playing with your merge modes on that layer. Nice effect. That gets the background into shape, and this is used in DAZ Studio as a simple backdrop. After the render you ship the piece back into Photoshop or GIMP and paint in the birds and the grasses in the foot of the shot.

The process is exactly the same as I outlined in the Vulcan tutorial, and the same process was used to derive the Poseidon project. It's really neat when something works easily, and works well.

If I were a white rabbit, I'd have a pocket watch in my hand right now and I'd be tut-tutting about being late! Gotta go, guys, but I hope to be back tomorrow because I have a really cool idea...

Jade, 3 August

Monday, August 1, 2011

CG Art: Vulcan ... and how to do it!


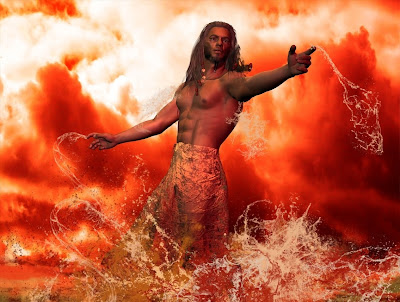
Thanks to the folks who commented and emailed about the Poseidon image from a couple of days ago -- and here, below, is the long post you guys asked for, telling "how to" ... that is, how to go from an idea to the finished painting you see above.

First comes the idea, and you need to have a "snapshot" in your mind's eye. A lot of people actually start sketching at this point, but it's not necessary if you've "seen" the finished image in your imagination, especially if you reckon you can coordinate all the elements to make this go. If you foresee problems, go ahead and sketch! Otherwise jump right in.

I wanted a backdrop that looked like clouds of smoke and steam in a volcano crater, so I started with stormy sky and sized this to what I wanted. The images of Vulcan and Poseidon are 1200 x 900. You can work at any size you like. Small images don't give you enough wiggle room, and large ones can give your computer a hernia, so -- you only need to work out your comfort zone, and you're home. The sky shot I used for the basic background in this piece was taken a few weeks ago, when a bad weather front was coming in. Cropped out of the bottom of the shot were trees and roofs and a jungle gym!(Always have a camera with you, and always be on the lookout for opportunities to grab skies, seas, textures...)


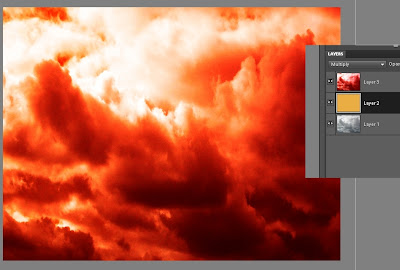
So use your stormy sky as your first layer. or bottom layer, in your Photoshop or GIMP project. Adjust the contras and brightness -- you want it quite contrasty. Then...

Create another layer and bucket fill in to what is going to be a tone halfway between the shadows and highlights of the background you want to to wind up with. In this case, a gold layer will do just fine, since I'm working between reds and dark browns.

Copy the sky into a third layer and colorize it to a fiery red. This is your top layer...

Now, play with the merge modes on the top and middle layers till it looks great. Only you know the effect that's in your mind's eye, but by playing with the color fades and burns and opacities, you'll create 100 effects, and trust me, you'll know what you want when you see it! Now --

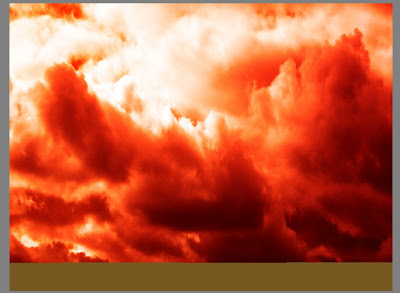
Flatten the image to one layer, and paste to new canvas.


(TIP: Return to old canvas, undo flatten and save the old project as a separate file with all the layers still available. If you do this, you can always return to this stage and rework it if you need to. You're trying to preserve as much of the work as you can at every stage, in case something goes wrong later and you need to go back and paint something again.)

Switch to the NEW canvas to work on from here on. Save OLD project as "Vulcan_0" and save NEW project as "Vulcan_01"

In your new canvas, you have the combo of the stormy sky, the colorized sky and the flat gold layer sandwiched between them. This is the combo create by playing with the merge modes, and then saving the best result as one image.


Create a new layer on top of the combo, and paint in the surface of the pool of molten metal as a strip of "median color" to suit the project. This is gold for molten metal. It's just painted with a 200 pixel square brush set on "normal" at 100% opacity. It doesn't look like a crucible, but it will soon!

Create a third layer and now start painting. Use wave brushes to paint in seething lava in base and medium tones. These are the .abr brush sets you can buy -- waves, splashes, water effects, steam, fog, fire, anything like this would give you useful effects. In this one, I used Elements of Nature - Waves (from Renderosity), and Ron's Splashes and Ron's Hydro Explosion (from DAZ).

Paint in three tones, basically: dark, medium and light. Paint till you don't see much of anything of the original gold layer that represented the surface of the molten metal.


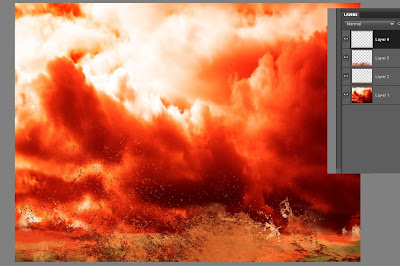
Create as many new layers as you need to control the brushed on affects. You could do one for dark, one for medium and one for the highlights. Or you can combine dark and medium (as I did here), and then do an extra layer for the highlights.

(You can get a lot more mileage out of the .abr brushes in Photoshop than you can in GIMP, because Photoshop allows you to change the angle of the brush ad infinitum. However, Photoshop costs a packet and GIMP is free, so you might prefer to just be clever with the brushes and resources you have at your disposal. I didn't get Photoshop Elements 9 myself till early July, 2011, when GIMP just stopped working for reasons unknown. I would load up a brush, try to paint a stroke with it, and get a crash to the desktop instead. So Dave hunted and kept on hunting till he found PSE9 froma licensed reseller -- for US$60, which is about A$55 right now. I put down the credit card gladly!)

Know when to stop -- your artist's eye will tell you when you've gone far enough! Stop before it turns into a mess, and...

Same as before, flatten this image to one layer and save it. Call it Background.jpg --


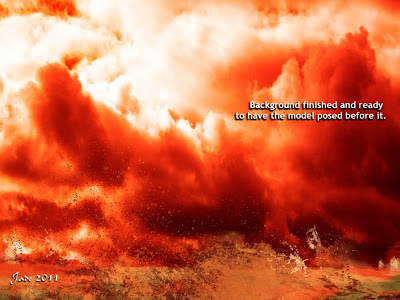
Paste this into a new canvas and save the project as as "Vulcan_02.' Make sure you save the _01 version before you flatten the image, so you can go back and re-work as needed in any layer.

Now you have your background finished, so it's time to switch over to working on the figure!

Set the stage size in DAZ Studio (or Poser etc., whatever you use) to the exact same size as your canvas size from the Photoshop of GIMP project...

Import Michael 4. Work with a plain white background for him at this stage, because there's a few things to do before you bring in the background you just painted, and the simpler the on-screen image is right now, the better...


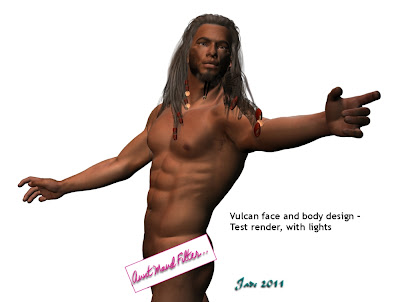
Add skinmap. I'm using the Jackson skinmap.

Design a face or use a third party morph. This face is one of my own face morph designs, which you create using the Morphs++ for Michael 4 package. (Buy this from DAZ, install it, and it pops up automatically. The world of creativity is now at your fingertips!)

Design a body morph or use a third party morph. This one is designed by me -- again, done using the Morphs++ pack.

Save the DAZ (etc.) project often! You have a lot of work invested in this now, and you wouldn't believe the aggravation of losing the whole thing because the PC barfed on a save or a render!!

Add a hairdo to suit your character. This one is the Yannis Rasta dreads set to black, and I've been in there and changed the textures on the coins and ribbons. You do this in the Surfaces pane in DAZ ... sorry, I can't help much with Poser because I've never used it! But in DAZ the Surfaces tab is your best bud. Get to know it, and enjoy the freedom to create like you never knew before...!


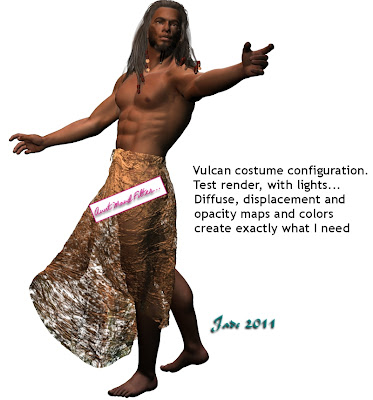
Add a costume. This is the Euros overskirt, from Renderosity. Lots of textures are provided with the model, but with the best will in the world (and not a syllable said against the designer) none of them will suit a project like this. I turned them all OFF as soon as the model was imported. The costume automatically "parents" to the Michael 4 figure, and with colors and textures OFF it reverts to a big lump of white plastic. Now --

Configure the costume -- pose it at the very least. You'll need to work with the "fit" and "movement" morphs provided by the model designer, and swing, bend, twist, pull the costume, till it's doing what you want it to do. Right so far, but it's still white plastic! So...

Add a diffuse map, a texture map, an opacity map, diffuse color, gloss color, to the model. This is not the place to talk about how to use these textures ... this tutorial would go on for days! But elsewhere on the blog I've talked at great length about how to do this. Have a look down the list of tutorials -- you'll soon find what you need! Basically, a diffuse map slaps a digital image of something onto a model. Fire or water or sky, or whatever you like. Then, a displacement map is a pure monochrome image that uses dead black and pure white to decide which bits of the model get pushed up or down. This image uses a digital photo of a fire as the diffuse map, and a monochrome image of scarred metal as the displacement map. There's one more map -- the opacity map. This makes parts of the model disappear altogether. For this image, I used a monochrome image of scummy water as the opacity map! The diffuse and ambient colors are set to white, there's a good bit of gloss on the costume, and the gloss color is set to orange. These colors (diffuse, ambient
and specular, meaning, what color something shines when it glosses up) are set separately from the visible texture map, the displacement map and the opacity map. Combined with the maps, they give you infinite creative control. You can turn a model into leather or silk, at whim...

Now you're ready to pose the figure. Go for it! Get every knuckle joint right where you want it. Flare his nostrils, give him a scowl, whatever you like. Render as you go, make sure everything is looking good. Save it!!

Time to set up the lights now.

The lights need to be tuned according to the color(s) in the background, and you also need to be aware of the direction light is falling from in the background. The light direction will tell you which way shadows need to fall to be convincing. Lighting is a whole 'nother subject, but basically it comes down to the brightness of the light, the direction of the light, the color of it, and whether it casts a shadow (and how hard or soft the shadow is). It's impossible for anyone to tell you how to do this!! Like learning to swim or ride a bike, you have to do it till you can. Have fun with the process -- enjoy.

When the lights look great, it's time to import Background.jpg into DAZ Studio as the, uh, background.

Do a test-render, make sure your lights match the artwork ... do a raytraced one, see if raytracing makes a positive difference. Sometimes the raytraced image is a dimension over the deep shadow map -- sometimes not. Your artist's eye will tell you which to use.

Save the best render (and save the whole project. You're heading back into Photoshop or GIMP now, but you could be back in DAZ to make tweaks later, and if you do need to do this, you'll be so glad you saved the project right now).


Import this best render into Photoshop as the new base, or bottom layer...

Make a new layer to paint in/on. Use the color picker to borrow colors from the existing painting -- don't try to guess them. What you're paint in now is going to be ON TOP of the character, and so long as it blends perfectly with what's BENEATH him, it's going to look convincing.

In this stage of the image, I'm painting molten metal, and I'm using an .abr brush set called Ron's Hydro Explosion (available from DAZ). You could do worse than watch some video footage of volcanoes seething, or of molten steel in a foundry crucible. Spent a minute or two on YouTube!

Make a new layer whenever you depart from the current kind of brushwork, and always when you're trying something experimental. It's easy to just delete a layer when something didn't work out.

Paint till you're happy with the result, and then flatten the image and save it as a JPEG, ready to share with your friends. You can go on and do more: you can tweak and push and pull the contrast, brightness, shadows, hues, but if you set up your lights properly in DAZ Studio (or whatever) you shouldn't need to. However, a lot of people find it easier to "get close" in the 3D program and then "fix it" in Photoshop. This one is your call. (You might need to do some painting on the figure to get rid of "buckles" in the 3D body caused by posing Michael 4, but if you pose the figure carefully, this might not happen. Be sensitive to the fact his shoulders and elbows can look really weird in some poses. A bit of painting can really help the realism of the finished work.)

So you'll need...

The idea (!)
a sky picture
.abr brushes for water, waves, splashes etc.
Michael 4
skinmap
hair
costume
diffuse, displacement and opacity maps (make your own!)
your artist's eye, plus your 3D model workshop and either Photoshop or GIMP.

And here's where you need to be when finished:


...this took about an hour, plus the amount of time to write this tutorial, obviously. It might take you longer if you're learning the software and process, but you know how familiarity with the work makes everything faster. Enjoy the process -- in all seriousness, if you really love messing about with art, what's not to enjoy?!

Hope this helps!

Jade, 2 August

The colors of winter ... Aussie style


It's photography today, guys ... but hey, there's a line where photography becomes an art form, and what's more 3D than the real world?! Seriously, I'm snowed under with work, and if I want to touch base here today (which I do) it has to be photography. Hey, I was a working photographer for eons before I got into the CG art -- ten years ago, I'd have said this was my art form!

All the shots in today's post were captured on a two-hour ramble in Belair National Park, which is one of the most beautiful places in the world. They date from the middle of winter -- looks are deceiving! The stark-nekkid deciduous trees tell the truth of the time ... but at the same time berries are ripe, everything is flowering, birds are nesting. It was a glorious day (and yes, before anyone says anything, I know -- we're spoiled rotten here, climate-wise. Some of us are also smart enough to know it).

So here, have some more -- incidentally, they're uploaded at 1000 pixels wide, and some are so cute, like the candy-pink parrot nesting in the dead tree, and the young koala...


With a bit of luck I'll be back tomorrow with ART ... also I was just asked to go back to the Poseidon Rising project from yesterday and explain at greater length how you get those effects. So what I think I'll do is this: start a similar project, but instead of ripping through it and not even keeping the "underlayers," I'll save each stage and show you what's involved in making it go. Cross fingers, and I might be able to do this tomorrow. If not, the next day...!

Jade 1 August