Tuesday, May 31, 2011

Digitally painting skin tones ... and a lovely book cover


Massive apologies for disappearing on you for a couple of days ... remember that Kreeping Krudd I mentioned last week? It seems to have turned into one of the many viruses from hell. It's the kind of virus that gives you a gut full of knives, the shivers at the same time as sweating, and when you actually can force a breath to the bottom of your lungs, it hurts, and you cough, which makes your back feel like you've been in the rack! Such fun ... and it's still romping through my system. So thanks for bearing with me while I get this together.

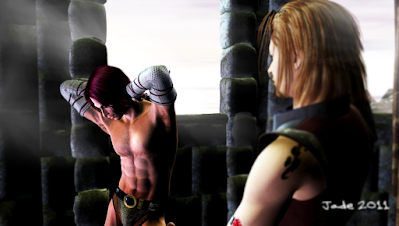
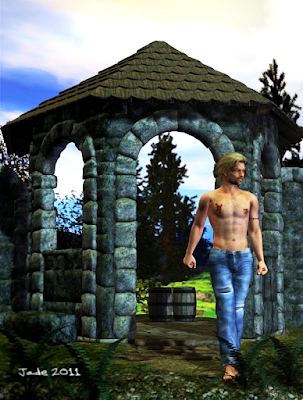
It's taken me about three days to finish the cover for An East Wind Blowing, which is Mel Keegan's vintage gay romance about two gorgeous warriors back in the days (the Fifth Century) when the Angles and Saxons were raiding up the coastline of England. So here you have Ronan, with the red curly hair, and Bryn with the dark smouldery looks. The book has just been donated by a member of MK's maliling list -- donated to be chopped out of its bindings and OCR'd, because it was published about 15 years ago (and written about 23 years ago!) and no electronic copy every existed, at least here. GMP Publishers Ltd. would have rendered it to a data file when the paperback was published, but that's a looooong time ago.

This makes the last of the classic Keegans to be released under the DreamCraft banner, and we'll be doing the ebook in June. So if a Celtic v. Angle Raiders gay romance with bags of panic and sizzling bits sounds interesting, you know what to look out for! It's going to Kindle, Barnes & Noble, iBooks, what have you, so you can't miss it.

Also, the last time I touched base here I promised to do a post about painting skin tones, and here it is...

NOTE: all images and guides are uploaded at 1:1 size, so you'll want to click to view (and probably save) them at full size. I'll go through the instructions at greater length, with more detail, in the text too, because (!) Google can't read images, and folks might be trying to find this via Mother Google. So, here we go:


Why would you paint skin tones in any case, especially on a render? There's a bunch of reasons. One is that a lot of renders can come out looking "plastic," and some painting on them makes them look "less fake." Also, all skin maps (for Michael 4, or Victoria 4.2, or any of the many 3D models) are not created equal. Some have their great points and their downsides too, such as veins in the temples which you don't want, or red patches, or uneven skin tones. Also, some skinmaps (especially for Michael 4) can start to show their imperfections in extreme closeup, though they look fine in longshot.

Now, it's very very true that it's the imperfections in human skin tones that make them look real, and you don't want to keep on painting and painting till you wind up with something that looks like you painted features on a hard boiled egg!! But on the other end of the scale you can also get a skinmap that's got a bit of "color flash," or else there are just too many imperfections. You can have an "Italian sausage" effect! This can also happen in photos of real live human beings, and a bit of airbrushing will make people look very much better.

You can also use these same techniques to paint out (or in!) dark circles under the eyes, baggy eyes, red veins, blue veins, wrinkles...!


Here is a "before" shot, and even in this reduced form you can see the irregular skintones. At full size, this is really "troubled" skin, and if this guy were an actor, he'd be wearing a lot of makeup. And in many ways, makeup and airbrushing on photos/renders is very similar.

(I hate to tell you this, but in the days of yore, a Very Long Time Ago, I qualified as a makeup artist. True! I remember a brontosaurus coming right up to the salon windows and looking in, and we used to fight of the veloceraptors to get back to where the cars were parked...)


And here is the "after" shot, in which the skintones have been evened out. You could do this on the set with makeup, or you can do it after the fact on the images.

It's also well worth mentioning here that you can also do this exact same airbrush worn directly on the JPEG images which make up the skinmap, so that the next time you apply the "skinface" file, Michael 4 will come up looking as if he has nice skin (or a nice makeup job). Just be sure you don't overwrite the original file, because you might want it back ... and when you come to apply the newly-painted skinmap to the Michael 4 doll, you apply it via the Surfaces tab, by navigating to the folder where you saved the repainted "skinface" image. NOTE: if you do this, also be very sure you don't paint right down to the bottom edge of the JPEG, because then, when you apply it, you're going to see a "tide mark" where the "skinneck" image begins!! But if you keep your airbrushing well inside the periphery zones, you'll be fine.


Part of the real trick of painting skin tones successfully is in being extremely observant. Notice that natural human skin changes color through scores of subtle tones, about every half-inch across the face. One of the things that makes women look "made up", and which gets glamour the bad rep of beig "fake" is that makeup comes out of the bottle in one single color, and goes on over every square centimeter from hairline to collar bone, and it never changes color or tone. This might be fine, if you were painting a glam skinmap for the Victoria 4.2 doll, but for Michael 4, the skinmap wants to look like natural name skin, so it's a bit more difficult.

So, what you want to do is to sample the colors many, many times, using the color picker, and keep on changing the color you're airbrushing. So long as you remember to paint in many thin layers rather than trying to hose on one thick layer, the accumulation of color will look surprisingly good...

When selecting the color to airbrush with, use the "area select" tool, not the "point select" too. This should let you click on the color picker (looks like an eye-dropper) and then pull out a rubber box or circle (we used to call it a marquee) around a certain area. The tool will then give you the average color of the tones inside the box, and when you start to paint, you'll be hitting that average and making both ends of the scale come into the same color "zone."


So, having taken your average color pick, the next thing you want to do is configure the airbrush tool. This is the part I can't walk you through, not for love or money, because every interface is different! Best I can do is tell you what parameters you need to think about, and then you'll need to find them in your program.

Airbrushes work with a few tools which are common across the whole marketplace, and also right into physical airbrushes too. Brush SHAPE is the first. Stick with round. In all seriousness, a round brush is the easiest to work with here. Brush FEATHER is very important. Stick with 100%, as this blends the edges of the brush "stroke" perfectly into the background. Brush SIZE is just as critical, but I can't give you a number here, because this changes with every painting job. It stands to reason that if you're painting on a 300dpi image that's the size of a table top, you'll be working with a big brush, and if you're painting a small image, it'll have to be a heck of a lot smaller! Try to pick something that would correspond to about a centimeter, a bit less than a half inch, on the human face. Next, the MERGE MODE of the brush is important. Leave it set at Normal. It'll do all kinds of weird and wonderful things that are great for special effects, but you just want Normal here. (Mind you, the rest are a lot of fun to play with.) Lastly -- brush PRESSURE is the most important thing of all. The airbrush is one of very few artistic tools where you have to even think about how much paint you're pushing onto an image! Obviously, the higher pressures mean a lot more paint going through the brush; lower pressures make for thinner coats of paint -- you can control several thinner coats a heck of a lot more easily than you can control one thick coat, and as the coats build up, several thin layers look much more realistic than one thick one.

Below is a screen cap of what the tools look like in the interface of Micrografx Picture Publiser. I have no idea what it'll look like in your program, but the tools will be there. Any good paint program has to have them. If you don't have them, you probably need to get into a "proper" software to do this work -- and it doesn't have to cost a ton of money.


Now, there's another range of painting tools that you can look at, but I'm not going to go into them in any depth here, because only folks who're using either Photoshop or its open source, free cousin, GIMP, can use these tools. Paint.net, Micrografx and even the top of the line Corel Painter, will not give you access to these tools. They are, of course, .abr brush sets of (!) skin tones.

What they are basically, is close-up swatches of the details of human skin, such as pores, wrinkles and what have you. And you can get very, very creative with these tools, using them as subtle, subtle overlays after you've gotten the smooth-out painting finished. But if you're not using Photoshop or GIMP, you're sunk, so let's not even go there. (God knows, if I'd paid $699 for Corel Painter, and somebody rambled on about painting in the pores with .abr brushes, which are out of my ballpark, I'd be, um, a bit cross.)


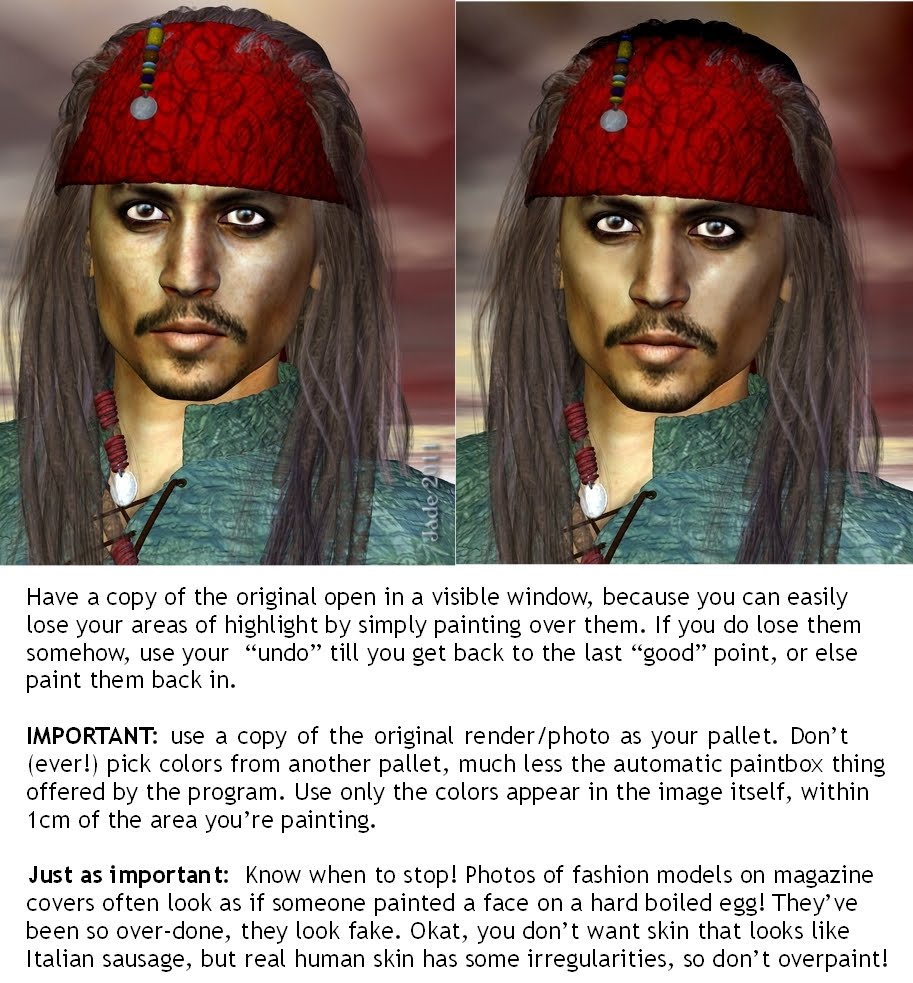
Color control across the whole image is vital. The best way to manage this is to have a copy of the original image open in a second, visible window. This means you can use it as a pallet, set up your colors from the original and then commence to paint on the in-progress work. Also, having the original open too means you can keep an eye on your zones of highlight and shade. It's very easy to homogenize the whole thing into flatness! Take care ... and if you do lose your highlights, use your "undo" tool to get back to the last "good" point. Or else, set the airbrush up from the original, and paint the highlights right back in!

Don't be tempted to use the "smear brush tool." Seriously. You're not finger painting her, and the smear brush tool just pushes existing colors around on the canvas. This is not what you want. Unless you're very clever with the smear brush, and use it sparingly, it'll jump out of the finished work like a sign saying, "Hey, look at me, I've been painted!"

Lastly ... in all seriousness, know when to stop! You don't want a finished image that looks like you painted a face on a hard boiled egg! You might get away with it if you're painting on Victoria 4.2, due to people's expectation that women will be plastered up in so much makeup, their own skin doesn't show through, and everyone's knowledge that makeup comes out of a single-color bottle. But for guys, well, this is ar from the effect you want. The Michael 4 doll is very, very natural. Some of the skinmaps are a bit "flat," and others might need a bit of airbrushing, but for the most part you'll be trying to keep that natural appearance of the "real" guy.

So there you go -- Painting Skin Tones 101. Have fun!

Jade, 1 June

Sunday, May 29, 2011

Dreadlocks -- we have dreadlocks!


As you can see, I found the dreadlocks that complete the character ... the Dread Pirate Yannis. I know his cousin -- Jack something, or something Sparrow. Right.

Note to self: the dreadlocks are filed under "Props," not under "Hair" or "Figures" in the DAZ file list. That's why I couldn't find them yesterday -- I was looking under "Hair," which is where most of the hairdos are, and failing that, under "Figures," where the rest tend to land!

Seriously, you need a photographic memory to keep track of all your models. When you've been doing this for a long, long time you get hundreds and hundreds of bits and pieces, odds and sods. There's things I've forgotten I had, and other things I know I have, but can't find, because I've forgotten what they're called!

A great idea would be to go through the whole library and make up something that looks like the Sears catalog! The only problem is, it would take a fortnight to do it... Umm.

In the portrait, the first render in this post, I uploaded it at 1:1 size, so you can really enjoy it. The skin tones are mostly hand-painted in this one. I haven't yet found the way to jiggle the shaders in DAZ to get nice results. I'll find it eventually, but as a stop-gap, it's so easy to hand-paint skin tones, and this is the quickest, easiest fix! (The bordering was painted with the Tribal borders and edges set of .abr brushes, in GIMP; the actual face work, which is delicate and demanding, was done in Micrografx, but I'm sure you can do this in whatever your program is, be it Paint.Net, or GIMP, Corel, and so forth.)

A couple of times I've been asked if I'd post something about painting skin tones ... faces, limbs, whatever is needed, and this would probably be a good opportunity to do that. In fact, this is what I'll do tomorrow, so join me then!

To my American visitors, have a great Memorial Day weekend! To Aussies and Kiwis on this page -- stay warm if you can. Especially in Canberra. I just saw the weather forecast for your neck of the woods ... -4C overnight. Brrrrr!

Jade, 29 May

Saturday, May 28, 2011

CG Pirates ... there should be a 'Captain' in there somewhere...


The Dread Pirate Yannis ... and if you're a bit careful with the lighting and angle, he does indeed remind you of someone you know!

The skinmap and morph combination are called Yannis -- and it's a rare treat. Very, very seldom do I use a face morph "off the peg," or from another designer, but this one is inspired! And it comes with more options than you can shake a pistol at. Ive only played around with some of them this afternoon, because -- well, as much as I'd like to muck about playing pirates happily for hours, I had, and still have, work to do!

The skinmap comes in a number of basic options: nice and clean and paler skinned; or tanned and dirty; with tattoos on or off. Having said that, there are also beard options and scalp options -- and options for the teeth! Not to mention the eyes, and the "guy-liner" eye makeup, which is also known as kohl, people, and guys have been wearing it for about five thousand years, east of Suez.

The hair I've used on Cap'n Yannis (and I'll just bet his first nae is Jack), is the Spartakos hair from the said design shop -- StudioArtVartanian. I also bought the full-on Rasta dreadlock hairdo with the bandanna, and I did install it, but I was hunting high and low for it among my DAZ folders, and can't yet find it. I think I might have copied something in the wrong place -- my fault, folks. But since I was running out of time, I reverted to the Spartakos hair, which is a very nice solution.

The costume here is a mix of Lockwood and Journeyer Scout; the buildings in the background are just a few of the Tortuga props from Renderosity (I think it's ADS Tortuga), and the sky/ocean backdrop is a Bryce render I did a long, long time ago.

The sheer range of options you get with Yannis makes this a very, very attractive character. There's even a young version and an old version. This is the "old" version, though "old" is a relative term! It's going to be fun putting on the dreadlocks, when I work out what the heck I did with them in the installation ... and it'll also be fun trying other hair and costumes.

The only tiny grumble I could find -- and it's not actually even a grumble, just an observation! -- is that the full tan-and-dirt skinmap, which actually looks the best from a distance, gets a little bit "noisy" in extreme closeup -- noise, as in colour breakup, or color flash, as we used to call it way back when. I should think this can be eradicated with the use of lights and some adjustments in the surfaces tab -- also, it's well worth mentioning that I work in DAZ, and Yannis was designed and intended for Poser (most of the really great stuff is), so it's only to be expected that some adjustments will need to be made. I simply need to work out what they are, and then remember to write it down, so that I can still figure ot what I'm doing next month!

The big difference, at least to me, in the way Poser and DAZ work is in the way they handle textures, surfaces, shaders. DAZ is quite a bit different, and you can get big departures from what you expect, when using models and materials which were designed for, and intended to be used in, Poser. But if you're clever with what you're doing, you can still end up with very similar results ... and I'll be honest here. The price of DAZ is right. I mean, like, free. Poser costs a packet -- and if I were going anywhere beyond DAZ, it would be into Cararra!

And this is well worth seeing at 1:1 size:


Now, let me see if I can find out where I put those damned dreadlocks...

Jade, May 28

Friday, May 27, 2011

Hey, I was right -- red dawn light for Fortunes of War


The post title tells all ... always go with your instincts, I guess. As much as I like blues and purples, sometimes the project just begs for reds and golds. Fortunes of War needed this, so I went back in, today, and swapped out the background. But I decided not to do the overpainting in gold -- it looked a it like overkill. So here we are:


And I'd call this one ready to go. The other thing that surprised me about this one was that Robin's green eyes were not coming up green on my laptop ... they do on the desktop quad which does the art, but then I transfer the renders to my laptop for uploading, because -- as you probably know! -- the desktop "art machine" is now quarantines away from the Internet in the interests of its health. (Incidentally, it's working: I drive it hard and it never hiccups now. No problems. Nada. And it's running on Vista service pack nuthin', with all my dear old programs, going back as far as 2002, running perfectly. Big grin here.) However, my laptop (which is Dell Inspiron) displays colors very differently, and Robin's green eyes looked silver-gray, which was odd. So I changed the color of them for these renders too.

Will be back later today with something good, because I just bought a new skinmap and face morph at Renderosity, and this one is going to be a treat:


Golly, that reminds me of someone... sea turtles, mate. Not guilty, guys. I didn't do the face morph or the skinmap, I just paid about ten bucks, in Australian money, and hit "download." I shall run the installers later on today, in a break between jobs, and we shall see what we shall see!

Jade, 28 May

Thursday, May 26, 2011

3D actors on the virtual movie set -- take two!


As promised ... here's the scene they were setting up to shoot the time the photographers caught them for an impromptu session on location. You know it had to be something like this! And here's one of the publicity 8x10s:


This would be the big scene where the arrangement is struck between the barbarians and the colonel of the cavalry contingent ... the big guy brought in, captured, thinks he's not long for this world, and walks out of there with a liaison that will divert the tide of battle.

Makes you wish you had the time to write all this stuff, doesn't it? One thing I like so much about artwork is the immediacy of it. It can cut through a hundred thousand words of plot and get to the drama like an arrow.

These are some nice renders -- quite pleased with the lighting and texturing, some of which was hand painted. And this is well worth looking at, at close to 1:1 size:


I quite like the scenario of two charismatic actors on location, making a massive fantasy movie, and I'll bet there's a novel in there somewhere!

Jade, 26 May

Wednesday, May 25, 2011

Grounded! (Love that planetarium...)


Just touching base today ... am so busy, and not in very good health, which makes time fly away like a flock of little birds! But I was looking back on one of the posts I did last week -- Starman. And I thought, "the man who fell to earth," and ... hmmm. Like Thor, like the guy in the cape -- superhero falls to earth and gets marooned in Timbuktu.

So here's our hero, stuck on earth -- flannel shirt and all! Heads out into the night and gazes at the sky, wondering how to get himself home, beyond the stars. It's a nice old, classic-SF idea. I'm sure it must have been written a good half dozen times. (Speaking of classic SF, I just discovered that oceans of Golden Age SF has hit the public domain. I stumbled into a site called Feedbooks --nice store, and a huge out-of-copyright section -- http://www.feedbooks.com/publicdomain -- which is pretty amazing, since some of the big names of 20th Century SF are starting to show up there, as well as the cast-iron classics of writers like Robert E. Howard, Edgar Rice Burroughs and so forth. Well worth a look, if you like to read...)

What's a bit interesting about these renders is the sky. I placed the whole scene inside the planetarium, so that every time you move the camera, the sky changes as it would, natually. Beats the heck out of just using a backdrop!

Jade, 25 May

Tuesday, May 24, 2011

Michael 4 and Michael 3 ... not what you'd call siblings!


As promised, I ran the experiment ... and learned a lot, not least of which was, don't make assumptions! Suuuure, you can swap skinmaps between Michael 4 and Victoria 4.2, and make a real mess, and have a lot of fun with primitive humor (which was the force driving these renders), so I'd assumed that you'd be able to slap the M4 skinmap on Michael 3, and though it wouldn't fit, it'd be good for a laugh. Right? Actually, wrong.

The truth is, there doesn't seem to be any retrocompatibility whatsoever! While you can trade skinmaps between male and female models which share the same generation geometry, but go back a generation to M3, and you're right out of luck.

Well,no great loss, really. Having had a muck about with the M3 model today, I can honestly say, I'm somewhat glad I didn't get into this kind of artwork a few years ago, because M3 is about as realistic as a tailor's dummy. I'd have been quite disappointed with the results, rather than being inspired to learn!

So there you are -- all questions answered about Michael 3 and his compatibility (or lack thereof) with Michael 4. As the post title says, they're not exactly siblings.

Jade, 24 May

Monday, May 23, 2011

Lights, camera act ... hang on, I know that guy!


Remember the post yesterday, with the contemporary dude in the ripped jeans, set into a fantasy background ... your imagination fires up, spinning reasons, coming up with stories?

Here's what shot through my mind! Uh -- it's a movie set. And here's the co-star. You recognize one of my own characters from long ago? Leon! Turns out, he's an actor -- I guess Abaxas was probably the movie they were making.

There, you see? There was a plausible explanation after all, for how come a contemporary guy in battered denims was standing in a set from Middle Earth!

And the next thing in my mind is to put them into costume, and stage the scene they're filming...

That, and loading up the Michael 3 model, and seeing what happens when you drop a Michael 4 skinmap onto it. I promise to do this, guys -- hand on the heart. Today has been a bit of a rush, too much to do to even think about art, but tomorrow is another proposition. With a little bit of luck, I can get to it in the afternoon.

Jade, 23 May

Sunday, May 22, 2011

Mix and match 3D props -- something old, something new...


Nothing too brilliant today -- just CG doodling, I suppose. The Kreeping Krudd is going around here, and everyone has it. Self, Dave, Mel Keegan -- sinus headache, sore throat, general exhaustion. Call it a head cold, if you will. I think "Kreeping Krudd" better describes it!

So I was just messing about with artwork for its own sake, because I can't get my brain to focus on anything more complex, and I wound up wandering through lists of props. Now, here's a set of renders to whet your imagination.

It's a fantasy setting -- that's a real sword and sorcery type set (it's DM's Elven Shed, which you've seen once or twice lately, because it's new), plus a backdrop I did in Bryce about a year ago ... plus assorted props from here and there, and then -- aha. Michael 4, wearing a pair of ripped denims that puts this character out of place, out of time. Those jeans are yelling "modern day," while the set is yelling "Robert E. Howard" or "Michael Moorcock."

And your imagination immediately tries to spin rational explanations for how come this contemporary dude with the distinct look of Sean Bean is in this fantasy world! Actually, it's the Remendado skinmap dropped right onto Michael 4 ... literally right out of the box, without any pushing and pulling from me, just with the tattoo options turned on. I always liked the Remendado skinmap, because it reminds be so much of "Beano." This is one of the first skinmaps I ever invested in, and then --

The hair is the Aether hair I got very, very recently ... something old, something new. Want more? Those ripped jeans are actually a Michael 3 costume, but they fit Michael 4 extremely well, with just a little bit of work. The vest is from the M4 Veranil costume set, which I've had for better than six months, but the brocade texture applied to is is worked up from a texture set I got only about two weeks ago.

I was asked a while ago, will Michael 3 costumes fit Michael 4? The answer is, sorta-kinda. You do have to do a lot of work here and there to make them fit, and some costumes, no amount of work will make them fit. For instance, those ripped jeans are part of a costume set by Billy T, and I didn't actually buy it for the jeans (which, it turns out, fit just fine), but for the terrific leather jacket which is the other half of the costume. And I've just about given up on trying to get it to fit on Michael 4. Soooo...

I did actually download the installer for Michael 3 a long time ago, and I do actually have a number of hairstyles and clothing props for M3. I might just experiment with the M3 model, see what happens. Now, everything I know about him says he's not as posable as M4, but it would be interesting. Alas, I can't give you a magic formula for making M3 costumes and hair fit M4, but if you muck about with the morphs provided -- and if the particular model has enough morphs to muck about with! -- you can have a lot of fun seeing what's doable.

Another question was, "Do you know if M3 skinmaps can be applied to M4?" Short answer: yes, you can slap any skinmap on anybody -- and I know this because a couple of times I'd slapped a Michael 4 skinmap onto Victoria 4.2 by mistake. The controls do work: wham! The skinmap lands on the model. The results are something else again. It's just plain weird, how an M4 skinmap fits V4 -- or doesn't. But it stands to reason that M3 and M4 should be closer in dimensions, because they're both the same gender, after all! In reality? I haven't the foggiest idea, guys, but I do have the Michael 4 installer squirrelled away somewhere. Why don't I run it, and see what happens?! I'll get right back to you...

Jade, 22 May

Saturday, May 21, 2011

Glam in the temple by the lake ... and Neftis to the rescue!


A little glamour in the temple by the lake ... what they used to call "art photography," which usually meant getting gullible young women to take their clothes off. But this time, I have a reason (in case one needed a reason -- which you don't, in any case, but --).

Neftis just came to the rescue, plugging a very large gap in the hairdo department. They just released this new do, which I saw when I was over at DAZ looking for props to do a commission piece (which involves Victoria 4.5 dressed in leather and brandishing a whip -- and of course I had to buy the prop and costume). While I was there at DAZ I had a quick look around to see what's new, as I often do. And lo and behold ... a proper slick-back hairstyle with the option of a ponytail. A real Duncan McLeod -- at last!

This is a fantastic addition to the range of hairdos -- I was just apologising to a client a few weeks ago, that this exact hairstyle was not available (Hi, SL!), and then here comes Neftis to the rescue with the exact style we'd wanted, and couldn't have till this came along. Neat.

Since it was on its product launch, it was also selling at a hefty discount, so of course I had to get it along with the Indiana Jones whip ... the leather lingerie, I got at Renderosity, which can be a heck of a lot raunchier than DAZ!

So here we have a test-drive of Neftis's new hairdo -- which fits Victoria as well as the Michael 4 model. I like it a lot. Michael 4 is wearing the Jagger skinmap with the tattoos turned on, and a face and body morph designed by me (the character I call Kai). The set is a beauty, called Temple of the Shadows, which I got in a sale a long time ago ... I think it came from Content Paradise, which is Smith Micro's 3D model store, but I couldn't swear to that -- it's been so long.

There's noooo post work on these renders. None at all. These are just as she comes, because I'm on the run! Dinner is in about three minutes, and we have a thunderstorm breaking at the same time so I ought to be getting things turned off.

To that end, must run!

Jade, 21 May

Thursday, May 19, 2011

Michael 4 heads for the high seas


The fantasy ship model is one of a whole set of 3D models a bought a long time ago, to feature in the Abraxas project -- that web comic I was planning at one point ... the model has remained shelved ever since. I would love to get back to the Abraxas story, but it takes longer than you think to render up a dozen or so panels per day! There's a whale of a lot of work to be done before I can return to the story and tell it for its own sake, but I do intend to get back to it, when I have the chance. Maybe I'll produce it as an illustrated narrative ... that would be quicker than trying to do a comic, which is, I have to admit, next to impoissble.

In the meantime, I finally, finally, broke the model out of storage and got down to playing with it! It's actually quite a nice model indeed, though I would like to have seen more rigging on it. If you've ever been anywhere near a real, genuine sailing vessel, you'll know that the amount of rigging on them is phenomenal. This vessel is officially billed as the "elven trading ship," and there's an element of fantasy ... if it were a real ship, it would take magic to hold it together, with this little rigging on it! On the good side, though, there's some nice wood textures, nice detailing -- and I particularly like the fact the ship's interiors, below decks, are modelled. You can actually take a character down into the cabins! Must do that next time.

How much of these renders is 3D, how much is painting? A bit of both. I did the water as an .obj...


The sky in the first one is a backdrop, but in the second shot, with the galaxy rising on the horizon, the ship, ocean and all, have been placed inside the planetarium! All else ... the spindift, sea mist, bow wave, whitecaps, all were painted in GIMP using .abr brushes, and some sea birds finished off the shots.

Then I wondered -- okay, you've got the ocean and the ship inside the sky dome, let's see how close to the deck we can get, and why not add a Michael 4 character into the scene, for some character? So...


Michael 4, in full costume, with custom lights, on the deck of the ship, on an OBJ ocean, inside the planetarium. Complicated?! Noooooo, what gave you that idea?! The fact that the background is a sky dome really adds to the shots. Notice that when the camera moves, the sky moves too, which is so neat.

The last shot was finished with overpainting, and this is worth seeing in closeup. Here's an outtake at 1:1 size:


The effect is really pretty, and by changing the diffuse maps on the sky dome, and changing the lighting, you can make it look like the ship is sailing through day, night, storms, balmy weather, whatever you want. I must take the character below decks next...!

Jade, 19 May