Sunday, September 29, 2019

Touching base: we're back ... "only" photos here. Art tomorrow!


The last note I wrote here, Dave and I were packed and running out the door for five days in the Grampians, based in Halls Gap. To quote Samwise, we're back ... I still have to go through the photos I took with both cameras, but I've sorted the stuff I did with my new phone and blogged a short version of where we went, what we did. This has been a great opportunity to put the phone through its paces, see what it will do -- also what it won't. I've been pleasantly surprised.

If you like trip pictures from amazing places, here's the post ... and I ought to be back tomorrow with art. For now ... mountains, waterfalls, stormy skies, amazing vistas. The weather didn't cooperate this time, but we had loads of fun. Home again, home again, and back to work tomorrow, LOL.

I have images swirling around my brain, am full of ideas -- and I got a couple of emails from DAZ tech support, which have some actual value, even though they don't answer, or solve, anything. Hmm. I'll get my oars back in the water tomorrow.

Saturday, September 21, 2019

An Iray G8 pinup boy (you're welcome), and Michael 4 gets new boots!


A Genesis 8 pinup boy, in Iray ... you're welcome. And this is where my system seems to max out: it's a simple enough image, but it doesn't matter how long I leave it to render, this is the maximum amount of resolution it will do. Anyway -- who's complaining?! This is a new face, but he's wearing the Zander skinmap and the Landis hair. I rather like this face, so we'll come back to it in some dramatic context, rather than doing the fashion magazine shoot with him.

Also today -- Michael 4 gets a new pair of boots, and I spend about two hours figuring out how to get an old, old scene into Iray and configure it. Now, the render took no time at all. Minutes as a raytrace, and less than an hour in Iray, to come up with this:


And that's a very complex scene with four buildings, two figures, trees, the works. That's not a backdrop, I actually put the other buildings back there. And this, in under an hour, because they're lower-poly models. Hmm. Fascinating, innit? The trick is to get the figures and whatnot to render well --


It ain't easy to get the Generation 4 figures to render well in Iray, but there are tips and tricks you can use, even before you start investing great wads of cash in converters (not to mention putting the computer back into the workshop, because it won't connect to the internet anymore; and Studio 4.11 doesn't seem to like me just merging folders and calling it an installation. Rats). In fact, I'm fairly pleased with the way these render up. No, a Generation 4 figure is never going to look as real or convincing as Genesis 8 (duh), but ... four hours to render one guy striking a pose. One hour to render a whole complex scene. We can still have a lot of fun with scenes, just the way we used to, if I can do this right!

The new boots are Xurge's cavalier boots, and they look good on M4. I dirtied them up a bit; and I could wish the leather was more "sagged" at the ankle, creased or whatnot. For example, reference the footwear in this still from BBC's The Musketeers --


Now, that's the way boots are supposed to look, and wear! The problem is, I've never seen a pair of boots for M4 or Genesis that have the sag and wear patterns. They're all pretty much like Xurge's boots ... but for $4 in a sale, who's going to complain? Not me. Go to DAZ and search on "boots for Genesis 8," and check out the range. It's narrow, and nothing there is, really, any more impressive than Xurge's boots. The main difference is, the ones you see in the DAZ store are lashed up with Iray shaders. I rendered the boots, above, with the original Xurge diffuse maps, and they actually look good.

Off to bed now! Don't know if I'll get the chance to post tomorrow: I'll be busy getting ready for a major road trip. Dave and I are heading to Grampians NP for five days. So if I don't post tomorrow, it'll be next weekend before I'm back. Don't worry: it's just a short vacation. Like the man said in the movie --

I'll be back. 😎

Friday, September 20, 2019

Old props and sets, new shaders and surfaces. And check this out --


This is where it gets really, really interesting! That's Michael 4, rendered in Iray ... and I've figured out how to get decent results:


When you first set up the character, more often than not it loads with incompatible surface mapping. Basically, it shines as if it was cast in colored glass! But it only takes a few minutes to go around and apply the "Uber shader" to every separate "UV island" in the figure and hair, and then dial down the gloss. Then, Iray can make sense of the render, and the results are actually extremely nice. That's Michael 4 wearing the Marco skinmap and the Alexander head morph, the Mon Chevalier hair, and the Journeyer Scout pants with the texture switched out.

The set is a whole 'nother story. DM's Circular Shrine (from Renderosity) won't load into Studio 4 for love or money, so I went back into Studio 3, exported it to an OBJ, and imported that into Studio 4 and spent about half an hour applying shaders, where I couldn't save the original diffuse maps (I think I managed to save about two ... the rest are just so Iray-incompatible, the set simply looks better with some really good shaders applied.

Now, it gets interesting. Here is the standing set, but the time I was done with the shaders:


That's pretty good. So, how about we drive the camera in there and add a characer? Here we go:


And yes, that's M4 wearing the Xurge costume you saw yesterday ... and yes, the metal parts have been fixed with a metallic shader. Yesterday, Studio 4.11 refused to recognize two file paths for various stashes of content. Today, it played nice and I could get hold of the shaders. Go figure. I didn't do anything different today; the program just decided to work, out of the blue. The render is pretty nice. I lit it with IBL lighting -- using this --


-- which I painted up from an old image, and it worked a treat. So far so good. I just did the character render at small size for the sake of speed; it's nothing special, just an experiment to see how the shaders worked out; and the final experiment was still to come. Could I save the file, since Studio understands its file paths now? And the answer is --


--forget it. The second you hit "save," Studio loses any content it previously loaded -- with one exception. You notice it saved and reloaded the OBJ properly! The circular shrine set came in as a simple white plastic OBJ, and it saved cleanly. Well, now. There's food for thought.

So right now, I can work with Michael 4 characters, but whatever I'm going to do, it has to be done fast and be fairly simple, because the file can't be saved. This is actually what deters me from taking the next step at this juncture:

Catalog image. See this. 
There is actually a script you can install into Studio, which does the work for you: makes the Generation 4 characters render properly without the messing about. The problem is, it's A$30, and with the best will in the world, I can't save a file! Also, right now, I can't get the computer online in order to install this properly, using the automatic, online Install Manager. Studio also isn't recognizing anything I install manually; something's not right somewhere ... but I am finding answers one by one. I don't say I'll figure out how to save a file properly, because this is the problem that beat tech support, who gave up on the issue after three months of trying. It must be something to do with the vagaries of my own specific PC?? Well, end of next year we'll try this again with a new one. Chances are, everything will "come good" without me sweating over it. And that's the time to be buying the Iray Converter for Generation 4 ... which I adds layers and layers of functionality. Something to look forward to!

Thursday, September 19, 2019

One door opens, another closes ... G8 and M4 gladiators


Did you hear the sound of screaming from somewhere approximately due south of wherever you are, at about four o'clock this afternoon? That would have been me. Boy, did I learn a few things today ... and I'm not very happy with what I learned! For six months now, I've been chafing about not being able to load the old third party content into Studio 4, so that it can be rendered with Iray -- if you've been following this blog, you've heard me groaning! So --

I finally, finally figured it out. I got the old third party content to load into Studio 4.11!!! And then I discovered the other side to this situation. Sure, you can load the old content, but it's "mutually exclusive." The moment I loaded the old stuff, I lost all the new content! All the Genesis figures, sets, costumes, shaders, became inaccessible. Studio 4.11 behaved like it had a bunch of screws loose, telling me the "files do not exist." Well, from it's perspective at the time, they didn't ... because I'd changed the file path along which it accessed content: so now it was getting hold of the old and third party stuff, and here's the rub. It couldn't get a grip on two parallel file paths to use at one time. Just one. So --

You can either have the old and third party content or the new Genesis stuff. Well, while I had access to the old stuff I ran the experiment:


That's a Xurge costume, with Michael 4 wearing it, and SAV's Spartacus hair, loaded into Studio 4.11 and rendered in Iray. The problem is that (as Xurge warns!) their stuff is "not tested in DAZ Studio," so they don't guarantee how it'll render, especially in Iray. What you see here, above, is 30% painting. The metal parts all rendered as flat, ugly gray plastic -- pretty awful. Ack.

So I thought, "Why not apply a nice metallic shader, as you did when you rendered this costume in Iray before," like this --


-- yes, that was done with shaders, and Iray loved it. BUT that figure-n-costume was imported into Studio 4.11 as an OBJ, so Studio was delighted to work with shaders. After you've change the file path so it can actually load your old third party stuff, Studio is stuck on a different rail and can't find your shaders; you see the "file does not exist" dialog. As I said, mutually exclusive. You can either have the brilliant shaders in Iray and not the third party content, or you can load the third party content and Iray will render a lot of it looking like flat gray plastic! Ooooh, botheration. Or words to that effect,

Is there a work-around? I don't know. All I can tell you is, I sure as heck didn't find one today. After three hours of fiddling with it, I changed the file path back to the usual one, to get my Genesis gear and shaders back, so as to get some sense out of Iray; then I set the gladiator to render, and went for dinner. Harrumph. Four hours later, and it was still not fully rendered, but I have no more time, so we'll have to call it done at this level of integrity.

To speed it up, I did all the plants in the foreground separately, as a deep shadow map render in Studio 3 (less than a minute), with the gladiator Iray render stripped in as a backdrop, LOL. That probably took two hours off the render time, and I still ended up painting a lot, especially on the hair. The Landis hair looks rather plastic, don't you think? I need to experiment with this some more -- not yet getting the results I would have expected from it: it's an expensive prop.

We still can't get the desktop online, so am settling down to work with what I have for the time being. There's loads to work with, we're not short of models, costumes, wigs and whatnot. And if I'm really going to get busy with the old sets, shipped out to OBJ, to make it possible to whack shaders onto them and bring them up like new -- well, fair enough. Time to get busy!

Also, I'll continue to search for a work-around to the problem. You never know.

Wednesday, September 18, 2019

Exercises in frustration -- at Master Elrond's house


I would love to tell you I found a way to render a Genesis 8 figure standing in a big, complex, high-poly-count set ... but you know that would be a terrible fib! And no, I haven't bought a new computer since Monday. I wish ...!  No, no --

What I'm playing with here is the Nature's Room standing set, which really feels like a house at Rivendell ... that kind of indoor/outdoor design; you remember ...


As you drive the virtual camera around inside the Nature's Room closed set, you get from a courtyard to a bedchamber to a dining area, a yard, a pool, a fabulously gnarly tree. There's a trick to lighting this set that I have't (yet) discovered: actual lights (photometric included) don't work in here, so I lit this with various IBL images, environment maps, which worked. I can render angles on the set fairly well, but as for standing a Genesis 8 figure in it...? ROFLMAO. Sooo...

You're looking at the top image, thinking, "I recognize that figure from months ago, and he's in the set. Isn't he?" Actually, no he isn't. I rendered the camera angle without the character --


-- and then dropped it into a new project as a backdrop and floated the figure in midair over it. Set a light to represent the daylight from the window ... rendered that for about two hours, and hand-painted the shadows, and adjusted the figure's color, gamma and contrast to make it look like he's part of the background! It almost works. Not 100%, but close enough to still be a nice picture.

What I can do (and will do, tomorrow) is put a low poly figure into this set. We'll see what we can do with a Michael 4 character, see if we can get a decent render in a couple of hours.

We were watching one of the Hobbit movies the other night, and I've caught the elvish bug again. What wouldn't I give to be able to get into all this --

Catalog image. See this.

Catalog image. See this.

...but it looks like I do have serious computer problems with my desktop. No connectivity. Nada. I can't get it online, not even with advice from the shop that built it for me. Which means I'm halfway hamstrung with installing new content, which really, seriously has to be installed by the online Install Manager if it's going to work properly. I (so far) haven't managed to get a manual install to work at all ... I do have a ticket open with tech support that might, and I say might, resolve this ... don't hold your breath. I negotiated with tech support for over four months to see if I could solve the file-save problems. No joy, and in the end they just quit. So just opening a ticket with them doesn't automatically mean that 1) there is an answer to your problem, and 2) they will find it for you. But we can hope.

The other thing is -- Trystan here is a Michael 4 skinmap; and that's either an Iray or Reality render. Don't give up on good old Michael 4 just yet. You have to work damned hard to get good results with the older figures, but it can be done. My big problem is, I just can't save a file containing the older figures, so anything I do is strictly "on the fly," one-shot, from idea to finished render. (That being the issue that tech support couldn't resolve, and gave up on. Rats.)

So: let's do something brilliant with a Michael 4 character tomorrow, and see if we can get some more angles into/onto the Rivendell set to render in a decent time!

Monday, September 16, 2019

Moonlight, swordsman -- the Genesis figure in place of Michael 4. Whoo!


Only one image today, because it's been rendering all day! As promised yesterday, let's repeat the process and see about the starlight, or moonlight, Iray project, but using a Genesis 8 character rather than the old Michael 4. The beauty of the Michael 4 figure is that it renders so fast -- this would have taken about 45 minutes. Then again, you wouldn't have a figure that rendered with this kind of integrity. Flip back to yesterday's moonlight shot and compare. Sure, that's a heck of a nice render too, but this one is a knockout. Moonlight, starlight ... got it.

For those of you who're rinkering with Iray right now, and ready to give up (I know, it's a bear) ... the trick is, it's done half with an environment lighting (ie., an image used for IBL lighting) and half with a single spotlight. And this seems to work every time, so -- happy, happy.

More tomorrow, I guess. There just isn't any more time today to do anything ... this was a looong render. Well worth it, though, right? Right.

What I used here...

Genesis 8 male
Michael 8 skinmap
Custom body morph
Custom face morph
Elan hair for G8
Legendary Swords prop
Ivy props from the Reparation set
Pedestal and planter from the Mirador set
Backdrop, blurred to be out of focus
One very blue IBL environment image
One orange (!) spotlight
DOF and big virtual aperture on the camera, to match the backdrop blur

Shake and bake. Set that to cook and come back in six hours. One becomes very adept at thumb twiddling. My kingdom for a faster computer! Anyway -- good results are their own reward. I like this. I also like the character ... will use him again soon!

And so to bed ... yawn.

Sunday, September 15, 2019

Sunlight, moonlight -- and a pirate, in Iray


Natural sunlight ... and pretty darned convincing ... I even remembered to have the character squint a little, which he would in these lighting conditions. I'm very impressed with the Michael 8 skinmap -- I rarely if ever use the M8 face of body morph, but the skinmap itself is wonderful. This face and body you see here --


-- is a dial-up / dial-down of so many different features to create a new face and form. I'm glad I got the G8 head and body morphs; they make it so easy to create new characters. There's only one light on this scene, representing the sun; the rest of the scene was lit with IBL lighting to "fill in" the environment. It works well. The magic is in the details:


So, having got the hang of conjuring sunlight in Iray, let's test the theory with a completely different scene and see if it works every time! Try this -- a (very cute) pirate:


And this lighting trick -- the balance between a single distant light and a specially chosen IBL environment light -- does work every time. The character is interesting: mix and match. This is what happens when you apply the Kingston skinmap and Rex face morphs to the G8 base!


And you have to admit, that's extremely ... appealing. A bit of set, a couple of props ... a shader on the shirt; Varun hair styled differently from the previous project. Very nice indeed!

So, okay ... that's sunlight. How about starlight, or moonlight? I don't have it completely worked out yet, but early experiments are promising. I used Michael 4 for this, because I wanted quicker renders. The lower-poly figure renders in a quarter the time:


I think I'd buy that as starlight or moonlight, and this was done completely in Iray, rather than just rendering the scene as it comes, then creating starlight in Photoshop. Sure, you can also do it that way, but I'd love to know how to do it "properly" before I start to cut corners. Neat. I resurfaced Merlin's Katana with new shaders, and that's a backrop rather than a bit of set. This image rendered in about 45 minutes, as against six hours for the guy sitting in the field, and 150 minutes for the pirate. You might remember the figure and pose from a couple of other renders across the years ... the original 2010 picture, and the Lux Render version from something like 2015. Now, what about if we put a Genesis 8 figure into that project?? Hmmm!

One more image for today; just a bit of creative doodling:


Couldn't resist! "Then something happened that the ring did not intend..." It's based on a photo taken at Hindmarsh Falls a couple of years ago. The stream was running, deep in the chasm, and Dave and I did a couple of "ring" images as a chuckle. I promptly forgot about them, and only found them this morning while I was clearing flash cards, setting up for the Grampians trip we're about to take (leaving this time next week). Just had to do this...

Alas, computer problems again: I've lost my connectivity on the desktop, 100%. So I can't buy anything new from DAZ until I somehow (how???) get the computer back online. It might end up going back to the workshop. Until then, I'll just be working with the new things I've bought since May or so, and also working through the dragon's hoard of old 3D assets that I bought back in 2013 and couldn't install for want of harddrive space. The new shaders resurface the old models beautifully. Can't even think about tackling the computer till we get back from this trip, so I don't expect to be back online with my desktop till October. Rats. 😮

Friday, September 13, 2019

Something magickal for Friday 13th, with a full moon...


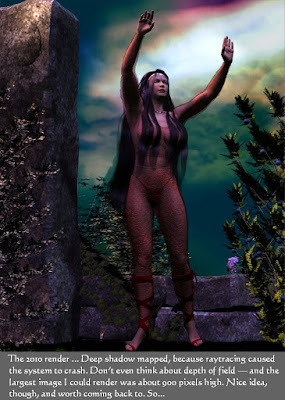
Behind the scenes, I'm working on the update of my gallery, which is seven years out of date. Going through the old files, I'm coming across a number of idea from as far back as 2010 ... great ideas which couldn't be done properly back in the day for any number of reasons. The main two were the shortcomings of the hardware (the computer would crash if I tried to raytrace), and the sheer lack of expertise. I started in on 3D art in September, 2009 (yes, it's been ten years, all but about a week since I turned on DAZ Studio for the first time and said, "Woooooow...).

One of the projects that really deserved to be redone is this one -- Stormlight. The original is only about 880 pixels high, that being the maximum I could render, and the best I could do was deep shadow mapping, and don't even think about turning on depth of field --


It's a heck of a nice idea, though, and coming back to it today -- Friday 13th, with a full moon! -- seemed quirkily apropos. I was lucky enough to find the original project file, right down to the background sky image, which had been painted in GIMP! Everything needed to be redone, and was. The final result ...


Nice! This one is a 1200 x 1800 raytrace. I set three lights, turned on depth of field and set the virtual aperture to f/15. The original backdrop was much too low-rez and small to serve, but I saved the color set and used it to rebalance the new render. I also redid the transparency mapping on the costume ... so easy to do this in Studio 3! Speaking of which --

This whole project was done in Studio 3. I did try to open this in Studio 4.11, but it dumped most of the props, and I just couldn't be bothered going through the process of exporting to OBJ, then importing that, and going fifteen rounds with the transparency mapping to get the shrubs to look right. Another time, maybe, but -- not today. So much easier to run back to Studio 3, where everything was quick and simple ... until it came to the rendering itself, of course. Studio 4.11 would have done this raytrace in about ten minutes. LOL, in the old program, it took about half an hour. I can live with that.

What you have here is good old Victoria 4.2, wearing the Celestial Hair, and a costume so old, I can't even remember what it's called. I designed the face and body form, and did all the surfaces on the costume. The props are PNature bushes, and the big slabs of rock from DM's Instances. For the life of me, I can't recall if the props were from the DAZ store or Renderosity. I used to buy loads of stuff from Renderosity, when installing it into Studio was dead simple. Now, getting third party content into Studio 4.11 is such a crapshoot, I'm a bit leery. Note to self: get this problem solved!

Happy Friday 13th! (Any Space: 1999 fans out there? You gotta know what day this is. According to the show, the Moon was blasted out of Earth orbit twenty years ago today. Don't we wish the technology had happened that way! Right now, we're watching From the Earth to the Moon on dvd, and I'm reminded of the way we all believed, before 1970, that by 2000 there'd be cities in space and a colony on Mars. Whooo! Never happened, but it might. Today's literary science fiction is full of stories of Martian colonization. Makes you wonder, and cross your fingers, dunnit?


Thursday, September 12, 2019

A little spring romance, anyone? It's spring down under!


I treated myself to a nifty set of props a couple of nights ago. Merlin is one of my favorite content providers, because his stuff is so different, and so well done -- and at the same time, priced where I can afford it, and it's render-able with the PC I have right now. So --


The flowers look so convincing, how could you resist? The model is CC Foster, for Genesis 8 ... which can sometimes work, and can at other times be a bear to work with. When it works, the results are very good indeed -- though I've adjusted the gamma and balance on this render to put some tone into his skin, which tends to render up very pale indeed, in anything remotely similar to natural daylight. Still, take a long look at Foster if you're looking for a very useful Genesis 8 guy:

Catalog image. See this.
I ought to use this character, or parts of him, more. Hmm. Expect to see elements, and versions, in the very near future! In the 'spring romance render, he's wearing the Landis hair, which I got last week along with the Varun hair, but this is the first chance I've had to play with it:

Catalog image. See this.
Good news and not-so-good news with the Landis hair. It looks fantastic, but after six hours of render time I still had to paint a little here and there to get around a lot of unresolved pixels. It's high, high poly, and with a slow(er) system, it could be rendering for the rest of your life. But if you don't mind painting on it a little bit, it does look great in the final product.

The props are what make this shot, honestly. Otherwise you just have another Genesis 8 with its kit off. Cheers to Merlin for crafting a really fantastic set of wild flowers -- I find myself wondering if they might just work in Terragen, too! Can't see why not -- Flinx's trees work in Terragen, so... 

I only used a few of the wild flower props to create the 'Spring Romance' picture, and these will be showing up in sets and scenes everywhere. Lovely! I did a CU shot on the cow parsley, which rendered for about two hours to get to this point, at 600x900 size:


Now, that is nice. It's also a full-on 3D rendered shot, no a backdrop -- everything in here is from Merlin's auto-load (ie., load the whole thing with one click), but you do have to set up the lighting; the lights packaged with the auto-load scene make it look like a raytrace. 

I'm thrilled to bits with the results, dying to work more with these props. They're on sale as I type this, and they're not expensive to begin with. If you're interested in this kind of thing, take a look --

Catalog image. See this
Images springing to mind everywhere, right? Now, the challenge will be to see what's doable with a system that's not exactly on the cutting edge of desktop PC tech today! Speaking of which --

I've been wanting to check out the dForce dynamic fabric function of Studio 4.11, so I went over to YouTube and had a look at the tutorials. Phhht. Ahem. Not on this computer, sorry, guys. Anything dForce is going to have to wait till Christmas 2020, when I can run it. Right now, it would just be a time-waster and (another) source of endless frustration. So, for fifteen months, we'll stick to the old morphing costumes and hair, and let the rest slide on by. 😜

More soon!

Wednesday, September 11, 2019

Take two ... I survived! ... and I like the way this renders up...


Genesis 8, wearing Michael 8's skinmap and a tweaked, adjusted face. The Crimson Seas coat and the Varun Hair. Depth of field is turned on and very effective; and I do like the way this renders up. The GP Character eyes are set to a kind of hazel --


-- and they catch the lights quite well. It's only when you start to play around with expressions that you realize the face is not what you'd call classical, or perfect; which I think makes it seem all the more realistic. Though I could wish there had been a way to work with the Rex skinmap! Next time.

In fact, I could wish there was something along the lines of a Hispanic skinmap for Genesis 8, or Michael 8, without having to drop a ton of money. There is one, a whole character, Diego 8 --

Catalog Image. See this...
-- but that's going to set me back about A$65. Right now I'm looking around for a nice olive skinned map, like Italian or Greek, something not as glaringly white as so many of the Michael 8 skinmaps seem to be. I have about seven skinmaps for M8 or G8, and all but two are positively Nordic. There's this one, Sanjay, which is Subcontinent --

Catalog image. See this ...

-- but again, you're looking at AU$65, because it's a whole character which is a lot more than I might have wanted to pay for a skinmap. You're kind of hoping for something closer to $20.

Anyway, when I feel a lot better than I do right now, I think I'll have a look around at the DAZ/Iray content at Renderosity, and just pray that the designers have the installation pathway worked out, so that Studio 4.11 can find the files. The Poser pathways won't work. Xurge uses those. They work in Studio 3, like a charm, but Studio 4.11 is a whole 'nother animal. Rats.

Okay -- now, tea and pills.

Tuesday, September 10, 2019

Creepy cloisters -- and a new Genesis 8 hero. Neat!


That's pretty good -- it took a lot of wrangling, but at least you can see where the work was invested! I'm actually very happy with this, and I'll be setting up this character to render again later. This one rendered long into the night, and when I got up this morning, it was done --


First, I started with a commercial backdrop which I could never have rendered in a year of trying with this computer. It's from the artist "Sveva," whom you'll find at Renderosity. I wanted something to get me into this quickly, with good results, a way to test the water before I start to invest tons of time in backgrounds. Good choice, here, it turns out. But Sveva's art was the wrong shape, so I kept the width I wanted and introduced a flat black "margin" at the bottom, adding about a third to its height. Then, I added the floor to run up to meet the backdrop ... slapped a battered-concrete shader onto it. Then, add the bench, and a stone shader on that ...

 If you reckon we're going a bit "shader happy" here -- uh huh. You have to, to get old (low-poly-count) props to look good in Iray. When they render wearing their own original (3DLight) maps, they often look nothing short of awful. Sooo ... when it came to the lantern, I redid the whole thing: frosted glass and cast iron. The result is rather good. Very happy with that part of the image.

The Genesis character gave me some problems, largely because I'd wanted to use the Rex character, who has the look of a Jamaican pirate. Unfortunately, the lighting in this scene is so low, the deliciously swarthy Rex rendered up so dark, you could barely even see him. So I swapped out the skinmap for something that would render in these lighting conditions, changed the face a tiney bit (rats: I do like the Rex face. We'll come back to him, and this costume, later ...)

The costume is a mix and match: coat an boots from Crimson Seas for Genesis 3, and the pants and belt from Badlands Gladiator for Genesis 8. The hair is Varun, set to brown rather than black; and I changed the eyes to a brown shade from the GP Character Eyes set.

Okay, now mess about with Iray lights. I have two on this, a distant (photometric) light, and a point light sitting inside the lamp. I also used the backdrop as the IBL environment light, set to about 0.5, I think, just to lift the picture a bit. Ready to render ... and several hours later I staggered through from the bedroom (am still soooo sick: throat, sinus and lung virus: pure torture) and figured it was "cooked"enough to go back to work on it. So --

Back into Photoshop to have the light rays added in, and some extra highlights and shadows around the bench, and the lamp-glow on the figure (which wouldn't render; hmmm). Also, a bit of digital grading in the character's face, to make it stand out a little more. With that done, I put the painted image back into Studio 3 (!) to add the foreground ivy -- which no amount of jiggery-pokery will make viable in Iray. The foreground ivy here is just a raytrace in Studio 3, which at least recognizes its old maps!

With that done, back into Photoshop for some "marginal shadows" which lead the eye into the picture and blot out a tiny bit of demarcation from the existing backdrop and the new floor.

Interestingly, the lamp had to be done as an OBJ import: nothing I can do with this set of props will make Studio 4 "see" any of them. Fortunately, the export out of Studio 3 to OBJ is dead easy, then it takes all of about five minutes to resurface whatever prop with appropriate shaders. No biggie.

Okay ... let's call this one a success. Complex image, very pleasing. If I can stay alive long enough (this virus has me on my knees. No joke or exaggeration), I'll do something with this guy this afternoon, and we'll have another look at him later today.

On the other hand, I might fall face down and come up for air on Friday! We'll see. Bear with me, guys!