Showing posts with label Collada. Show all posts

Sunday, February 26, 2012

More cute guys, starships and Photoshop recomposition


click to see all images at large size, 1000+ pixels...

As promised ... there's a lot more to upload! And a couple of the images here today are the product of a new line of experimentation. Yesterday, I mentioned an idea mooted by a guy on one of the forums I've been looking at for info on how one can squeeze the most out of the 3DLight render engine (which is integral to DAZ Studio), or else get Poser to play nice. Or both. Preferably both. His suggestion was, to get more response out of an image ... if it had five lights, why not render it five times and do a recomposition of all five images, adjusting them to get the most out of them? I thought, what a good idea.

So, the first of the images, today, was done this way. I didn't render the image five times .. rather, I shipped it into five layers in a Photoshop project and made a dark one, a light one, a red one, a blue one, a green one ... and then played around with the merge/blend modes and the transparencies on each image, until  certain luminosity started to come up. The kind of luminosity you see in much more complex renders than can be managed by the DAZ render engine, which can't do the sub-surface scattering, for on thing.

So I went back into one of yesterday's renders, and reprocessed the whole thing. Well, well! Compare these -- and you'll have to see them at large size to appreciate the "response" which has come up in the skintones:


This, just done today (click to see it at close to 1:1 size. And this...


...which is the original, as posted yesterday -- no recomposition. 

Well, well. I'm not saying it's something you'd do all the time, because it's an extra fiddle which takes about 20 minutes. This provides an alternative to setting 16 dim colored lights, as I did on the Rhapsody in Green render yesterday ... that also is a fiddle, and it takes the same amount of time. 16 lights, 16 shadows, to properly light just one character. Ye gods, I'm trying to imaging raytracing that with a slower computer. I know, I know, I'm spoiled rotten with the Mighty Thor, may blessings be upon it.

I spent a while playing around, trying to find some way to make DAZ Studio generate a Collada file that can be read by anything at all, including its own sister programs, Carrara and Bryce. No joy. All I get is error messages galore. The Collada files I'm making don't seem to be compatible with anything. And Carrara is supposed to be able to open a DAZ file (on the .daz file tag), but all I get there is an error message too, so ... scratch that plan. Hmmm. Next: bite the bullet and install Poser Pro 2010 to my boot drive --

Speaking of which, in an attempt to get around the problem of not being able to get the Michael  and Victoria base models into Poser when it's running off a drive which isn't the boot drive, I spent a few minutes at Content Paradise, which is the model store of the company which issues Poser, SmithMicro. And  was absolutely bloody dumbfounded. Not in a good way. I was looking for FIGURES to plug into Poser, to get around the absence of M4 and V4....

Content Paradise is stuffed to busting with figures. 95% female. There are about four male characters, all for M4 (which rather defeats the object!), and this tiny handful of male characters are either ugly or weird. 

Now, what do you make of that?! Like I said ... dumbfounded. So it's M4 or bust, and I'll install Poser to my boot drive and keep my fingers crossed!

The SF shot -- second from top -- was done in Bryce. The starship is one of a pack of .OBP file format spaceships I got a little while ago, and the ringed planet --? Made that myself. The shot is lit with one light and a "cheat light" to create some fill-in and beat the too-dense shadows, to get an attractive image; the render was done at large size, and the subtle starfield hand-painted in Photoshop. This becomes the starship Gilgamesh ... and I used this on the book cover I just painted, for More Than Human. More about this shortly.

More odds and ends of CG doodling:


Here, I'm playing with lights and textures, basically looking at the interplay of the bounced light off ONE light source that's waaaaay out there and cranked to huge brightness. Actually, to get this much light from a single "source" that's a zillion miles away, I created three or four distant lights on the same coordinates. They're pretending to be the same light, but to get this much illumination, it took several of them. The experiment? I'm trying to get a realistic area of shade on an otherwise brightly sunny day. Like, a backstreet in the shadows at ten in the morning. And I reckon it worked.

And I think I can get back to you inside of February, because this is a leap year. Handy, that.

Jade, February 27

Saturday, February 25, 2012

Romance and fantasy ... render blues and experiments galore


click to see all images at large size,1000+ pixels

First, a huge "thank you" to the folks who have supported the relaunch of the NARC series this month. I guess the piece above will strike a chord ... I call it Rhapsody in Green, and if you know your Deaths Head, you'll know where this one came from! I've wanted to do something like this for ages, but it's a bit more complex than I had the time for, because the emerald green Jarrat with the wings wasn't done with lights, or with Photoshop twiddling. I got in there and created a whole new skinmap for the fantasy image that came right out of Stone's vivid imagination. (Interested? I've pasted in the links in the right-side column ... just scroll down, you'll find them. Five liveried book jackets.)


...and in the past few days I've been working up the characters for a new project ... basically, it's a cover I have to paint, and the truth is, I had no idea, none whatsoever, of what was going to be on it. When in doubt, I doodle in 3D, and as a rule something nice comes out of it. This time, something very nice indeed happened along. What you have here is young Jason Erickson, and Dirk Vanderhoven, of the starship Gilgamesh, which is arriving back at the domed space city in orbit in the Saturn system, and blundering into so much trouble, you'll have to read the book to find out what happens next! I'll keep you posted, let you know when the book comes out ... More Than Human, and due next month.

Last thing for today, a neat Bryce landscape:


I actually called this "Hillside at sunset," but looking at it as its pasted to the page here, it ought to be called Hillside at Dawn ... those are not sunset colors, but they do look like dawn. I guess we're looking east right here.

There's loads and loads more to upload ... I've been so busy on the laptop in the last few days, I've just kept hitting the button to keep the desktop pushing renders along. The laptop, you ask? Why the laptop? Because that's the one with the internet connection. The desktop, known locally as Thor, doesn't have a modem, and ain't going to be getting one. There's a mile and a half of complete security in knowing that the machine is utterly immune to updates and viruses.

Speaking of updates: I ran the Collada experiment, to see if I could get a DAZ character or scene into Poser, and the answer is, "You can, and you can't." You can export a figure as a Collada file, but when Poser imports it, it leaves behind every single preset. Meaning, I export Leon or Jarrat or Stone, and Poser imports the Michael 4 doll boy, standing in the zero pose, the T-pose. And he's not reposable, because a Collada object isn't rigged with morph points, or targets. So I tried exporting a character as an OBJ ... sure, you can do this, and Poser imports it just fine -- face and body morphs, costumes (no rigging, obviously) ... and not one single texture on it anywhere. Plain white plastic. Now, you'd have to go in and put about 200 maps back into place just to get to the point of being able to call one figure done. It would take hours. Not going to happen.

So, next, I looked at the realities of getting the Michael 4 base figure to load in Poser --

It won't, if Poser is running on anything except the boot drive. My Poser Pro 2010 is running on my internal 2TB harddrive, not the boot drive, because I don't have 20GB to spare there for Poser and a tonne of content. Big, big programs are on the boot drive, and it's about 66% full. Time to start conserving swap disk space. (You can run the M4 installer, but it bongs at you with error messages every time it doesn't read a filepath starting in a C.)

So I'm out of luck there too. Next? Will have to install the program itself on my boot drive .. not, repeat NOT the content. Just the base figures, so they'll load up. Then, when I want to do a render in Poser I'll load up the costumes and props I want to use ... render them up, and then remove all the transient content to keep my boot drive viable! This is the next step, and we'll see how this works.

By the by, I spent some time doing about 20 test renders using every possible setting and combo of settings in the Render Settings section of DAZ. Result? With the exception of two of the pixel filters (Gaussian and Box, which give blurred renders, as you'd expect), every other render is utterly identical. So, at this point I don't think there's much more I can squeeze out of the 3DLight render engine...

In fact, I was interested/frustrated/piqued enough to spend a half hour on one of the DAZ forums, over tea, and it turns out that I'm far from the only person struggling to get exceptional results from 3DLight. Some folks are rendering their scenes in Vue, using the DAZ models. At this, my radar turned on, because we also have Vue Esprit. Now, would Vue import a DAZ Collada properly, where Poser won't?!

One guy on the forum had a technique I never tried before: say you have five lights on a scene. Render them separately, come up with five images and composite them later. Now, there's an idea. This is a trick I must give a try. Most users on the forum were chewing over the fact that high-quality renders take soooo long; and the render engines from DAZ are some of the slowest. (For instance, days, plural, to render volumetrics in DAZ. That's news to me ... I didn't even know DAZ had the capacity to handle volumetrics! Or are they talking about Bryce? If so -- nuff said. As soon as I turn on volumetrics, the universe implodes.)

Bottom line: everything is about compromise, and nothing's ever going to be perfect.

The experiments continue! For istance ... here, below, is the traditional DAZ render of today's leader art, Rhapsody in Green. There's four lights on this, and it's pretty much what you expect from DAZ. Compare this with the top one ... there are 16 lights on the top one: red, blue, yellow, green, purple, white and (!) black, all in various degrees of brightness, and all with shadows. Compare the luminosity in the skin tones. Sixteen dim colored lights bring you close to what you see in Poser renders. Black light. Hmmm.


Jade, February 26

Wednesday, February 22, 2012

No, your eyes don't deceive you. Brad Pitt. Not guilty!


click to see all the images at large size, 1000+ pixels... 

Not guilty! I didn't put Brad Pitt through Poser's Face Room ... but someone did. And the results are very good indeed. The designer is H3D, and you can get this character from Renderosity -- he was on sale the other day, and I couldn't resist. The face works very well from almost every angle ... cheers to H3D for this one! In fact, the character is retailed as Bart, not Brad, so if you're over at Renderosity looking for him, remember to search under "Bart for M4," of course M4, or Michael 4, being the base model.

So the next thing was to plunk Brad, uh, Bart, into a scene with characters of mine, and the next thing I couldn't resist was this: 


That's my own Leon on the right -- one of my favorites from among a lot of characters I've created over the last several years. My characters are created in DAZ Studio and saved as "preset" files. They're not compatible with Poser, which is the only downside to them. But having said that ... Poser will import and open a Collada file. Uh huh. Thais means I should be able to do the scene set up, right down to the textures and lights, in DAZ, save it to the Collada format, then open that in Poser, and render it up in the Firefly engine. Now, there's a thought to conjure with! This would also save me having to reinstall about 30 GBs worth of 3D models and props ... hundreds of installers to run, and what have you. That's not a job I've been looking forward to. But if you have this "3D Bridge" between DAZ and Poser, via Collada, then you just do your stuff in the familiar old program, and render the living daylights out of it with the Firefly engine. Hmm. Wouldn't that be nice!

(Incidentally, if you're wondering how I got the shirt on Brad, I mean Bart: it's the Lockwood shirt ... go into the Surfaces tab and make the collar and laces transparent; then add a brocade transparency map; and use the same map as the displacement map, jiggling the settings till you get what you want. Add a diffuse map to create the overall color and toning for the fabric itself, and you're done. I made the brocade map myself ... I just photographed a chair, believe it or not, and then dropped the image into grayscale and flattened the contrast waaaay down.)

This week has been a blizzard of work -- so thick, I haven't even had time to install Studio 4 Pro ... which, as I blogged the other day, they are now giving way ... which is the whole reason I'm revisiting Studio 4, in the hopes that the pro version will be several dimensions smarter and smoother than the basic version (which sucked).

But I did manage the wrangle the time to get Bryce 7.1.0.109 installed, and ...


Yes!! It works!! Not only does it work far better without falling over six ways ever ten minutes, but I'm also able to open up a bunch of content that I bought a while back. The content only ever made the old Bryce 7 Pro crash, or else it would open the files and "bong" at me with a message, "Object missing." This time around, the files load very nicely indeed.

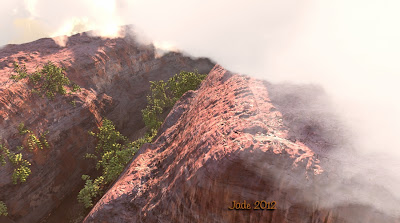
The top two landscapes are all me: in fact, it's the same landscape, with the mist/fog turned ON in the top one, and turned OFF in the bottom one. The mist-off one has the look of a renaissance painting, but I really like the misty one. When you're working in Bryce, you work most of the time with the atmospherics turned off, because as soon as you turn 'em on, it takes a couple of minutes to get a preview -- in other words, so that you can see if the tweak you just made worked out, or made a mess. So you're done with just about everything before you turn the mist on ... and I knew by that time, I wanted two renders, because they're two very different pictures.

The third landscape here ... I'm reluctant to even sign it, but I have signed it because it took 7.5 hours to render, even on the fastest machine you can get in these parts (rendering on four processors threaded as eight). I call it "Canyon, after David Brinnen," because this shot is based very closely on one of the scenes from a pack of David Brinnen landscape materials (which wouldn't open in the old Bryce, but open nicely in the upgrade). I want to stress, this isn't really my work, as such ... although I did drive the camera around, change a few things, and worked my computer hard all night to render the shot...

Now, I know how to do the terrain, the materials on the terrain, and the foliage. But what Mr. Brinnen is doing with the lights, to get this daylight effect, is a complete mystery to me so far. I have literally no idea how to get this quality of light out of Bryce. But I'll reverse engineer this, I swear it, and find out! This is the whole point of buying a pack of scenes, like this one: you take them apart and learn. This is what they're packed and retailed for.

Next: I'm looking at the Bart (ha!) skinmap -- which is a lovely skinmap -- and I'm wondering how Neil Travers would look wearing it. For months, I've been somewhat stymied, because I can't get any skinmap right on Neil. If you have a long memory, you might recall that the last skinmap I tried on him was the SAV Eros one. It was extremely realistic but it really changed his face too much. He looked uber-real, but very different, and I wan't happy with the result. Since then, I haven't had the chance to return to Travers, and I also haven't bought many skinmaps lately, because I have a pretty good library of them. But they'll all quite tan, swarthy, and in the Hellgate books Neil Travers is described as being "pale," as many spacers are. He needs a very fair skinmap -- but at the same it has to be very different from the skin used for Captain R.J. Stone, because (and this is on of the things that makes life hard!) if you notice, Travers and Stoney answer to very much the same physical description. The way they're described, they could be first cousins, yet they're very different men. If you know your NARCs and Hellgates, you know what I mean. If you don't, you might want to click here and find out a little...

So -- Bryce is on and working like a charm. Next is to give Studio 4 Pro a workout and see if it delivers the goods; and to try out the, uh, Brad (!) skinmap on Neil. Experiments in Poser are continuing, but I admit, I've been so strapped for time in the last few days, I've barely had a chance to touch it. On the other hand, Dave has done a couple of renders in Vue that blow you away ... I just can't get him to post them. Grrrr.

Jade, 22 February