Showing posts with label obj materials. Show all posts
Thursday, August 29, 2019
Old sets and new models -- neat results!
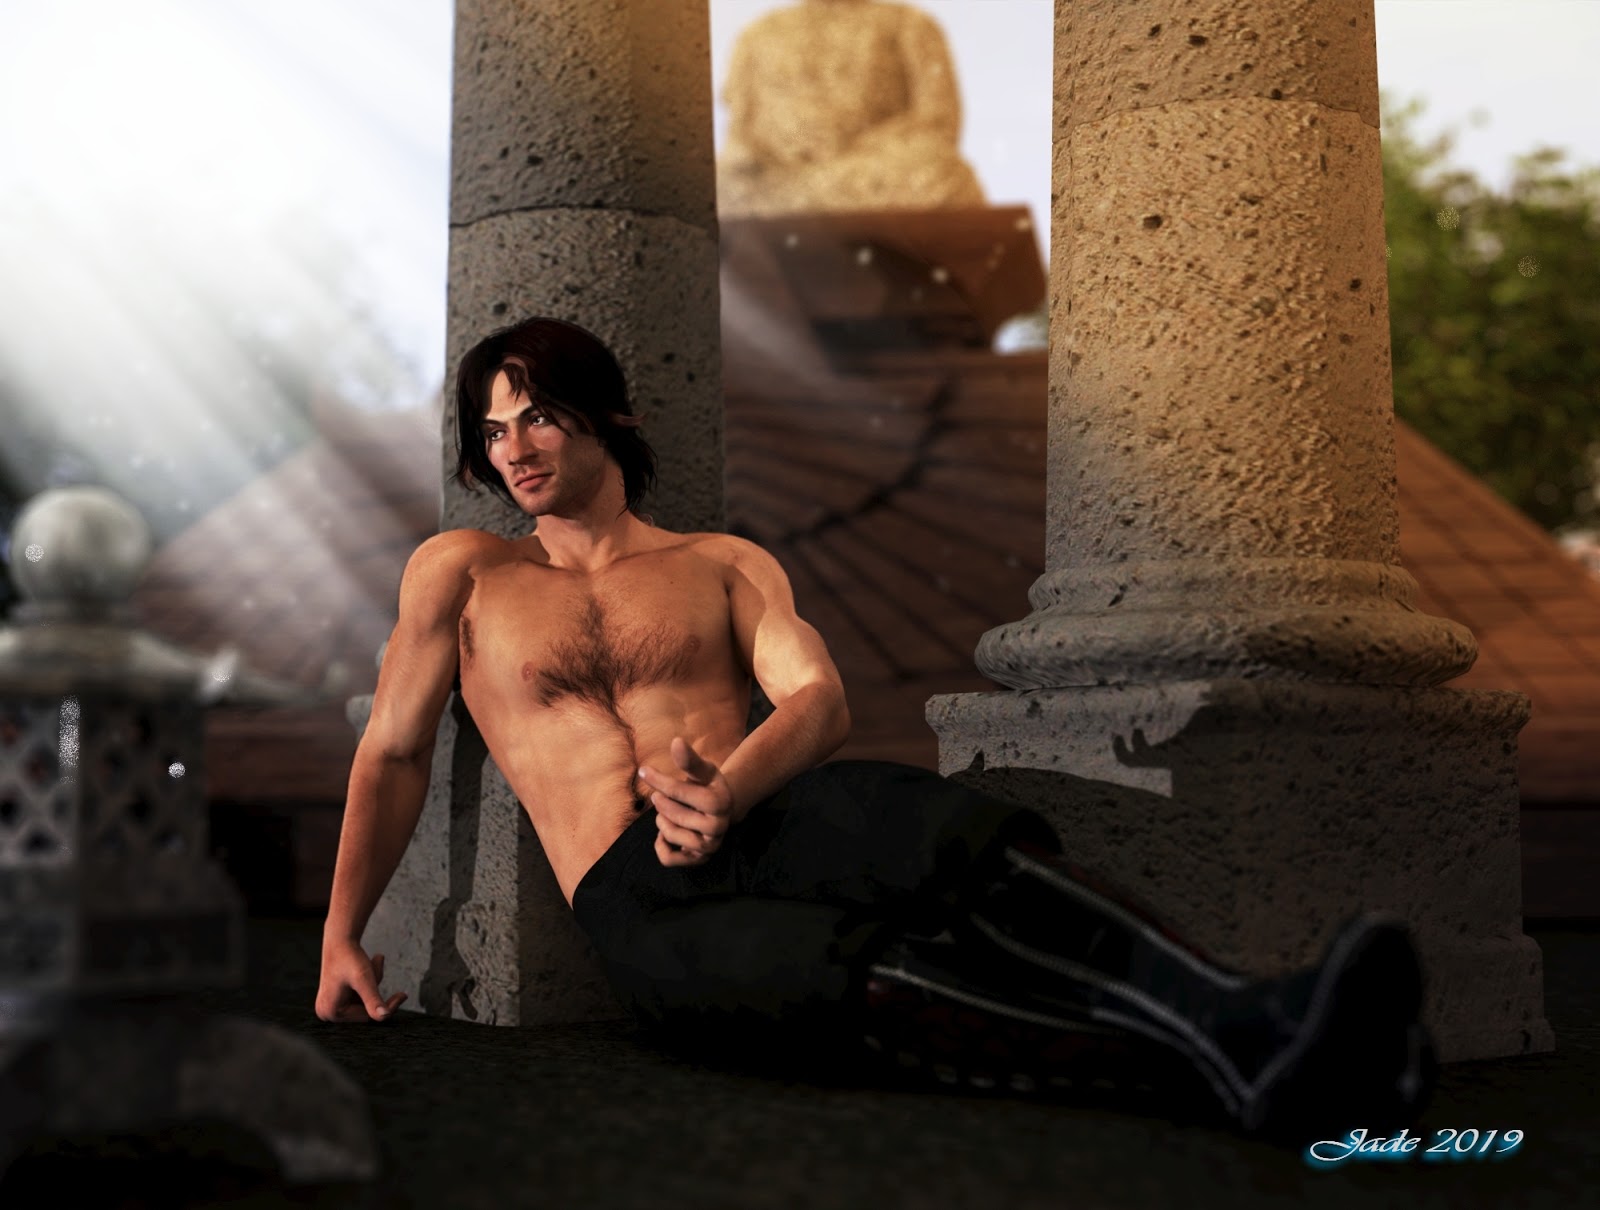
A new skinmap for Genesis 8: 'Matias' was on sale the other day, and since I didn't have an Asian map or morph for Genesis yet ... a small shopping spree This one renders up very nicely indeed ... and, interestingly, this guy is wearing a Genesis 2 pair of jeans, which fit well, and Genesis 2 shoes, which didn't fit at all. I think I've mentioned before that Genesis "whatever" costumes are a bit of a crap shoot on Genesis 8 ... but you can get lucky with them. So --
The next thing is, once you have a nice, high-poly figure to feed into your eons-old PC which doesn't have enough brains to give itself a headache ... whatchya going to do with the figure to end up with an interesting scene, rather than just another character study, where the figure is standing in front of a big, blurry background! I've done a lot of those, because that's what my hardware will handle; and since I've been having such a hard time with the old, low-poly content which does render easier (I haven't been able to save it to a project file in Studio 4.11), I haven't worked as much as I should have with the old sets. BUT --
Recent experiments are showing very promising results:
That's Michael 4, wearing the Adventuring leathers from Xurge 3D and the midnight prince hair, the Chase face and body morph and the Alexander skinmap ... rendered in Iray. And I know, it's not supposed to be possible to do this, much less to get good result, like...
So ... how? It's complicated, but not difficult, and it gives me a way to get around the desperate need to access my low-poly models from eons ago, while Studio 4.11 won't play nice, so that I can still get quicker renders. For comparison --
The Matias G8 figure, sitting in a low-poly set, was still a five hour render -- I left it cooking when I went to bed. But this fantasy piece with M4 in the same set took one hour.
Also, you have the additional bonus that using this work-around you can also get 3D assets which can't be installed into Studio 4, into Studio 4, so they can be still rendered in Iray. The trick of it is that you do need to have Studio 3 on and running! Assemble and pose everything in Studio 3, then export it to an OBJ, and have Studio 3's exporter "collect textures." Import the OBJ into Studio 4 ... it arrives as a piece of shiny white plastic. Now, you'll need to spend half an hour putting all the textures back onto it ... even then, every surface must be configured with three or four tweaks on every "UV zone" on the prop, or costume or whatever. Without these tweaks, the object comes up shining like a mirror. The tools are all there in the Surfaces pane. It took me a long time time to stumble over them, but you see for yourself, they're there!
Having rendered M4 and the set -- DM's The Gate -- in Iray, and liking the results, I thought, "Hmm, I wonder if I can get Genesis 8 to render properly if he's sitting in a low-poly set??? The last time I tried to have a Genesis 8 figure actually doing something rather than standing there like a catalog model ... well, after about about ten hours of rendering I wound up with picture full of grain. I realized there's a strict, and rather meager limit to what I can render on this older PC. But -- a low-poly set, now? Okay, let's give it a shot.
Result ... rather nice. And it rendered!!! Yay. So this opens up various vistas of opportunity, enough to keep my busy for the next sixteen months before I can afford to shell out about $2500 for a system that'll give me the freedom to play with Genesis and sets and shaders.
(Incidentally, if anyone wants detailed instructions about how to get old stuff, or third party stuff, into Studio 4.11 and configured for Iray, drop me a line. I don't want to bore the general visitor with that stuff, but if you need it, I'd be glad to do a special post.)
Tuesday, July 16, 2019
New character, old set ... new leathers, too!
An existing set, built in Sudio 3 for another scene a few months ago ... a new Genesis 8 character. This is "Foster," or "CC Foster," from the DAZ marketplace ... off the peg; I still don't have the face morphs, so we're using them pretty much as they come. I wanted something clearly different from Rex and Dae, and this one is very nice indeed. I'm delighted with the way he renders in closeup, too:
I've uploaded the portrait at 1200x1800 to give a good look at the eyes -- I switched out the model's own eyes for the GP Character Eyes, which are both ultra-realistic, and also go a long way toward curing the "brilliant white sclera" trouble you can get. (Then again, this is also lit with IBL lighting, which also part-way cures that problem...)
And we had a bunch of fun with shaders -- believe it or not, this is just a pair of jeans, but I applied one of the "Pd Soft Leader" shaders by "parrotdolphin" from DeviantArt, and the effect is great, turns them into leathers, not a mile away from something you'd see on The Musketeers:
That looks like a whole new costume, but it's not. Soooo nice to be able to do this! In fact, I was inspired to buy a set of rock and stone shaders from Renderosity, when I realized I was in big trouble with the set. Studio 4.11 won't load it properly (what a shock there), so I went back to Studio 3 and exported it as an OBJ, imported this into Studio 4.11 ...
Now, up to about three weeks ago, an OBJ used to load complete with its textures, ready to render, right? Then something happened, and wham! Now, though Studio 4.11 will load an OBJ, an will collect the textures (or materials), it refuses to apply them. You'd have to spend hours fiddling the original textures/materials into place. You could do that. If you did, the raytrace would look like this:
...and yes, that rock looks a heck of a lot better than what I ended up with in the Iray render of the exact same set. Because Iray does't even "see" the old textures -- those same columns rendered bright blue and shiny (WTF??), so I basically whacked a shader onto them:
...the only halfway applicable shaderI had was concrete, but at least it worked. Not what I wanted, but at least we got a render. I'd wanted to see what Iray could make of Michael 4 in the same set, and had to slog though the shader battle before I could get even halfway there. So --
Left: Iray. Right: Raytrace. Worth looking at full-size. There's things you prefer about the raytrace, things you prefer about the Iray. I know, I know. M4 is never going to render up brilliantly in Iray -- duh. Shader issues again. The first thing you notice is, the venous map has dropped out. And nothing I could do with persuade it to work, so -- what can you do? Unless someone makes an Iray venous map for M4 ... like that's going to happen!
Soooo I wound up going to Renderosity and buying rock and stone shaders, which we'll play with tomorrow. (In fact, I'm trying to save a fortune's worth of "assets," which are stuck in Studio 3, because Iray only works properly with these shaders, and Reality is so slow, I'd be rendering the same picture for a week!)
Tomorrow we'll see how the rock and stone renders up. This will be interesting. We'll see what we can do with Foster, too. I like the character a lot.
Labels:
characters,
Genesis,
IRay,
Michael 4,
OBJ,
obj materials,
Raytracing,
shaders,
textures
Sunday, June 28, 2015
Lux, Bryce, DAZ and Photoshop shake hands and come out rendering!
![]() |
| LuxRender: Li -- a character you've seen before... |
![]() |
| Bryce 7 Pro: shrine at dawn |
![]() |
| DAZ Studio foreground, Bryce background: The Barbarian Queen, The Forgotten Temple |
![]() |
| LuxRender: ornaments on a shelf by candlelight |
![]() |
| Nan Hai Pu Tuo Temple at Sellicks Beach, SA Photo by Dave |
Yes, I'm in a mood for the Oriental, and when I was choosing the art for today's post, how could I go past the selection above?
You've actually see Li before -- a couple of times -- here, and here. (Does The Dragon and His Boy ring any bells??) But you've never seen Li in LuxRender before, and ... well, what a difference --
The photorealism of LuxRender is just amazing ... and I'm still running Reality 2, while version 4.2 has just come out. You guessed, I still need to get the computer upgrade, so I can't install one more thing at this time. But I recently had an newsletter from the Spanish company behind Reality, which is the bridge between DAZ Studio and Lux, and have decided to hold off on getting the new versions, because they're promising us a version of Reality, soon, that'll be seven times faster than what we're using now. Ye gods! A seven-hour render would be done in an hour, or a day-long render would be done in three-and-a-bit. Wow. Now, what's worth waiting for...
The integrity of a Lux image is tickling the point where you're asking yourself, "Is that a photo? Dang, it can't be art, can it? Still --
Lux or no Lux, there's a heck of a lot of painting goes into these images, to make them sing. Three of the four you see above are majorly painted ... the fourth is the "ornaments on a shelf," which is in fact just about the raw render. That one is actually lit by that candle flame! In Reality, you can choose an object and transform it into a light. I selected the candle flame, obviously, and used it to light the whole scene. It's so realistic as a photo, you could almost refuse to believe it's a render, so --
-- check it out, guys. There's the same Buddha prop, with a stone material set on it rather than a metal. The foreground in this picture was rendered in DAZ Studio 3, using a Bryce image of a forest, mountains and sky as the backdrop; and as is often the case, the magic is in the details:
You would not believe how much painting goes on at this level! Or then again, maybe you would. If you've had a go at this stuff yourself, you'll know exactly what I mean. It can be a bit a annoying, actually, when people assume that just because you use 3D stuff, the computer does everything. Aarrghh! Half the time, I even create the textures and materials before I apply them to the OBJ objects that're going to be rendered. Come back tomorrow to get the best version the PC can give you -- and then the work begins!
More soon. Haven't even scratched the surface of the work that's been done since I was posting regularly. Speaking of which ... I need to post regularly, don't I?!
Labels:
Bryce 7 Pro,
characters,
DAZ,
digital painting,
lighting,
LuxRender,
obj materials,
Photoshop,
props,
Reality,
textures
Tuesday, January 17, 2012
Trees, elves, daylight and playing god in the vitual world
click to see at large size (they're compressed for quick download)
The quest for Bryce 7 Pro daylight appears to have been rewarded! I won't claim that these renders will appear fully photo-realistic on close examination (especially not the second one, featuring the really neat tree in the foreground -- more about that later) ... but at quick glance, your eye is just about fooled, because (hee hee!) that's a pretty good representation of daylight.
What's the trick? Well ... I was hunting through the Atmospheres pane of the Skylab (that really is what it's called), and I saw something called Basic Daylight. Now, everything in the Skylab is a preset ... you can get alien planet skies, midnight storms, storybook mornings, whatever you want, basically ... anything except for real, genuine, normal, ordinary, garden variety daylight. So when I saw something called Basic Daylight, I had to take it for a spin...
Hmm. Not too bad -- at least, it gives you a place to start. What you do is, load up the Basic Daylight sky, and then get real busy: change the sun position (by dragging an icon on a virtual globe), and then ... gird your loins and get into the actual sun/moon controls, and literally "play god" and tell the sun how bright to shine, and what color! Me like. A lot.
And speaking of playing god ... something about "Only Zeus can render a tree" (with all due apologies to Joyce Kilmer; who is no relation to Val. I think). I know, I know, it was make a tree. But, sheesh, you'd need to be zapping lightning bolt around (or maybe your name better be James Cameron!) to render proper trees properly...
This one you see here --? I, me, myself, actually made this tree in a program called Carrara, which is DAZ Studio's bigger, brighter brother. They're up to Carrara 8 Pro now, so they're giving away Carrara 6 -- it was packed on the disk in the back of their promo book, which I bought via Amazon about two years ago. Frankly, I never even bothered to install it on my old computer. It would have been a world of grief. But with the new machine, I loaded it up the other day and Dave, who has some acquaintance with it, showed me around ... showed me the tree lab.
Aha, says I ... I shall play god big time, and make a tree! The upside: the perogram makes it quite easy to get some very good results with tree making. The downside --
Dang. This tree, which looks about 500% more realistic than your average 3D tree, has over 650,000 polygons!! I exported it out of Carrara, got it into Bryce, set it to render (and not even on the top settings, either), and even with a super-fast computer, Bryce was going to take thirty HOURS to render it at a large size. So I rendered the picture at half-size, about 750 pixels wide. That took about three hours, and it's all on account of the polygon count.
Well, shoot. Now you know the reason why 3D trees usually look pretty poor! They're made simple, of necessity, because anything more complex would take the rest of your life to render, or crash the computer, and probably both! Unless your name is James Cameron, and you're rendering on about 50 processors ... or you happen to be Zeus, and you have access to every processor in the known universe.
Not being either one of them, I'll tread carefully when it comes to making trees! But daylight is doable, and I just stumbled into how another part of Bryce's materials lab works. You can sometimes scale your materials to fit the object you're slapping them onto. Not all the time, but sometimes. And that's so handy.
Speaking of daylight ... before anyone asks, the sun rays in today's figure work were not done inside DAZ studio. They were painted on in Photoshop, in post work. In fact, they could have been done in DAZ, but I didn't have time or inclination. To have these render as part of the scene, you'd paint them in Photoshop, save them to a black and white image, and load up that image as an opacity (transparency) map, which would be applied to a primitive, a plane, which you make in DAZ by clicking "create primitive." You'd jiggle the plane into position, so that the rays were in the right place, and render. But there was quite a lot of other post work to be done on these shots anyway, so I thought, why bother?
Here's the detail from the second one:
...and as nice as this is, I knooooow what it would look like, if it were rendered in a proper render engine. I'm drooling over the Firefly engine, which is built right into Poser. Meh. Whimper.
Notice the background in the figure shots?! The view outside the window. Yep, it's the Bryce landscape (or a piece out of it), which you see today, with full daylight over the craggy skyline with the canyons in the background. I just cut a swatch out to fit the render size of the figure shots, and adjusted the gamma and contrast waaaay up to simulate the brightness of "outside" which your eye would expect, when the virtual camera is getting a correct exposure on a figure in the dimness inside. Neat.
The cute little sparrow is a prop I bought from Content Paradise a year or more ago. The costume is the vest from The Hunter, and I wish I could remember what the bottom half of the costume started life as! I changed out every texture and map, and I've totally forgotten what the original prop was, sorry. Likewise with the skinmap. That's one of my own face morphs, and I have 100% forgotten what the skin is. But the hair is the Akaste Hair prop, that much I can recall. (Makes note to self: get brain examined.)
Jade, 18 January
***Posted by MK because the internet just ... ain't there. No connection.
Labels:
backgrounds,
birds,
Bryce 7 Pro,
costumes,
elves,
fantasy,
landscapes,
lighting,
obj materials,
Photoshop,
render settings,
skins,
transparencies,
trees
Friday, January 13, 2012
Fantasy and SF in Bryce and DAZ -- plots, and all!
click to see at large size -- images are compressed, so they shouldn't take too long to download.
It worked! It worked! Am doing laps of the room without quite touching the floor. The second of these renders is The Sword in the Stone ... it was done in Bryce, and -- heee hee! -- this was the image that was in my mind when I started up the program. Nothing happened by accident -- I know exactly what I did. In other words, I was driving Bryce 7 Pro, it wasn't taking me for a ride. The penny is starting to drop rapidly now, and it's actually a bit thrilling!
The sword is the High Fantasy prop from DAZ, a Viking sword. The big stone is the "Big Brick" from H3D's "Lost" standing set. These were imported into Bryce as OBJ objects, whacked into position, and so forth. Now, I did change out every texture on the sword for Bryce pro textures, and it's well worth having a look at it, at large size (I uploaded this at about 1250 pixels wide, something like that, so you can really see it). The grasses in the foreground are Bryce OBP objects. Loads and loads of them to create some nice, rank grasses before the plane stretches away to the hills at the edge of the heath, and then the mountainous structures lost in the mist, way beyond. The rock was retextured with a digital image of a piece of mossy sandstone, and then when it landed in Bryce I whacked one of Bryce's bump maps onto it and cranked the settings way up.
All the mist was generated in Bryce; the birds were painted on in Photoshop, using Ron's Birds. Now ... if I told you the one render was good enough, that would be a lie. In fact, it took four renders to get every element of the picture "right," and some of them were mutually exclusive. For instance, to get detail into the hilt of the sword, the blade washed out, and to get nice toning on the mountains, the foreground went a bit weird. (I might be doing something wrong in the render settings ... dunno yet. Am still learning, right?) So what I did was, get all four renders into different layers of Photoshop, and systematically erase everything I didn't want, keeping only what I did want, so that all the best bits showed up in the one frame ... flatten the image (drop if to a single layer) and save it, quick!
Is there a story behind this image? Well, half a story. Imagine ... you're taking a vacation somewhere off the beaten track -- the Orkney or Shetland islands. An unseasonable storm comes through and floods the lowlands, there's lots of washaway damage, the landscape gets rearranged a bit. It dries out, and you take a hike and find ... this. The sword in the stone. But here's the rub: it's the Odinsword. Enter the archaeologists, one of whom is a martinet who doesn't believe in anything he can't catalog; the other is a (secret?) pagan, who knows just what she's looking at here. She tries to save the sword from being boxed and shipped off to a museum basement -- it comes to a shouting match in the local pub, which makes it onto Twitter, and someone from the Norway pagan group sees the Tweet. The sword ... goes missing. The police arrive, to accuse the archaeologist of stealing it. And ... so on. What a novel this would make!
The other image, I call The Conjurer ... not a magician, or a sorcerer -- a stage magician. Showman. Or maybe something along the lines of the character of Drake Stone, in The Sorcerer's Apprentice -- he actually is a magician, but he makes a fortune on the stage. (There's also a lovely old book by Paul Gallico, The Man who was Magic, which has the same sort of central character -- he's a real magician, competing with stage magicians (and boy, do they get mad when he can do "tricks" they can't). I read this when I was about 14, and have never forgotten it. Don't have a copy, sad to say. Never owned it, in fact; it was a library book.
There's half a story that goes with this picture too. Try this on for size:
It's way in the future, when civilization has crashed due to climatic change and pollution. Mankind survives in pockets of "grunge resistant" strains of homo sapiens, some of whom have mutated due to the pollution. The physically deformed are hounded, hunted, destroyed. Those whose mutation is not visible can "pass" for human, and get by. This guy, here, can do magic, and he earns his living in a traveling medicine show, as a conjurer ... till someone, somehow, realizes what he is. Then he's captured and dragged off to the laboratory of a bunch of mental giants (genius is their mutation!) who are trying to figure out how the "special" ones work. The lab is in the decayed and crumbling ruins of an old, old city, where survivors camp out in shanties built of the rubble. The last computers are here -- super-computers, since this is long in the future. There are way too many people for the resources, and one of the super-geniuses has been charged with fixing the problem. This is why he's researching the "magic" of the special mutants ... because the alternative is something that was suggested by various SF writers back in the 1960s: people have their consciousness "uploaded" to a whole world inside the massive computer systems; then their bodies can be recycled. They haven't been exterminated, because they now live in a fantastic, perfect world. The only problem is, the system of upload hasn't yet been perfected -- it's not working properly. Test subjects are just dying. So, can magic come to the rescue --? Does our hero make it out of the lab alive? Do people get uploaded -- are they still alive in there? Can they be downloaded into perfect android bodies, that don't need food and water, later --?? Again, what a novel this would make.
Those experiments I mentioned yesterday ... seeing how far the DAZ render engine can be pushed: no joy. I maxed everything out, and the software fell over consistently. Throttled it back to what it would tolerate, and there's no visible difference in the render quality. Meanwhile, I've been looking at the render quality one can get out of Octane, and drooling. Problem: DAZ Studio exports a Collada (.dae) file that it can't even read back into Carrara or Bryce, which are from the same company! So, expecting Octane to open the same file is an improbable fantasy.
So... I looked at Poser Pro 2012. The Firefly render engine. Mmm hmm. Uh huhh. Heading that way. Definitely heading that way. Damn, but the Firefly engine generates some fantastic renders ... and I'll just bet the shaders work properly in Poser, too (which they don't, in DAZ). Now, I also read the reviews, as I always do, and the current version of Pro 2012 is a little bit buggy and crash prone. So -- wait six months, and watch out for a sale!
And now -- back to work. Duty calls, and so forth...
Jade, 14 January
***Posted by MK because the internet is AWOL. Intermittent crap.
Labels:
Bryce 7 Pro,
displacement mapping,
fantasy,
OBJ,
obj materials,
Photoshop,
Poser,
props,
Raytracing,
render settings,
SF,
surfaces,
textures
Thursday, January 12, 2012
The Wood Goddess ... and having a ball in Bryce


click to see at full size -- 1000 pixels wide ... but I had the presence of mind to zap these guys with a bit of file compression, so they''ll download faster.
The main picture today is called The Wood Goddess ... do you remember the Spirit of Winter I uploaded for Christmas -- the one with the ice wings? I guess this would be the female equivalent. In fact, it's the antlers from the Wood God costume (they're actually attached to a goshalmighty hood, but you can easily make the hood go transparent and leave the antlers behind), and the Yaana skinmap, and the Celestial Hair. The element I like least about this image is the hair, because no matter how you render it, it looks plasticky, and the only thing you can do is paint over it in Photoshop later. I didn't have a whole lot of time to paint on this, but I did enough, I think, to "get away with this"... here's the detail shot:

The thing I like most about the shot is the way the snow came out -- that was done with a terrain created in Bryce and imported into DAZ Studio 3 as an OBJ, and then mapped to hell and back. The backdrop works well ... a digital shot which was adjusted into night colors, then had the moon zapped on with an .abr brush and the stars hand painted ... which was just the start of the fun. There are about 12 layers of additions and effects in Photoshop, to get the image to look like this. The original render was ... glaringly bright and "plastic." You wouldn't have been impressed. The final result? Me like. Muchly.
The second image is a Bryce project, which represents an experiment: this is the first time I ever imported an OBJ and used a real 3D model in a Bryce shot, rather than using Bryce's own trees. Remember the other day, I was grumbling about Bryce's trees not looking very realistic? These little spruce trees are the Rhodi-Design props, which I think I got from Content Paradise (which is SmithMicro's store). There are also some fantastic new trees appearing on the market now -- so I can't have been the only one grumbling about the ticky-tacky appearance of so many 3 trees! These are on my wishlist at DAZ:
I'm having a ball with Bryce, now that I have the processor power to run it properly. Today's landscape, I call "Craggy Skyline" ... ooooh, I wish I could tell you that was one of my textures on the terrain (the ground), but it would be a horrible fib. It's one of David Brinnen's materials, which were shipped as Pro Materials with Bryce 7 Pro. This is such a complex material, it took only a tiny bit of post work in Photoshop to make it pass muster at any size. But I did configure that sky myself ... and the next thing I'm going to experiment with is what they call "volumetrics," which is a way to make devastatingly realistic cloouds...
It's just possible I started to learn Bryce backwards. You actually can figure out a lot if you play with abstracts first ... shapes and colors and textures. Like this:

Well ... I guess I probably did what everyone else does: jump in headfirst and start with landscapes! In fact, playing with mapping and so forth first would make it easier to learn the tricks. The problem is, it's nowhere near as interesting -- and who starts up Bryce with the idea of doodling with abstract shapes?! You want misty mountains and fjords and stormy skies, and all that good stuff. You tend to make a huge mess for the longest time, and then eventually the penny starts to drop.
There's an image rendering in the background right now, which I hope to show you tomorrow. Even on my new system, it's going to be a looooooong render, but it should be worth it. The original render settings called for a "maximum ray depth" of 12 ... which would have resulted in a 15 hour render! Hmmm. Revert to the defaults, and it comes back to a 2-3 hour render. I can live with that. And when it's done, I have another experiment to run --
Get into the advanced render settings in DAZ, and see how far the render engine can be driven. The default settings are low, and I never had the ability to go past these. In the last few days, Dave and I have been looking at every render engine from Lux to Reality to Octane ... but the problem is compatibility. Getting DAZ to shake hands properly with anything is a major issue. As much as I love DAZ Studio, I'm facing the very real possibility (probability) of being compelled to change up to one of the more industry standard programs, in order to get access to the render engines. If you're interested, have a look at Luxology, which is a cool grand. Don't even think about AutoDesk's Maya ... it's five grand. Oomph.
Will let you know how the experiments work out ...!
Jade, 13 January (yep, it's a Friday)
***Posted by MK because the internet is AWOL. Intermittent crap.
Labels:
backgrounds,
Bryce 7 Pro,
digital painting,
fantasy,
OBJ,
obj materials,
Photoshop,
render settings,
skins,
trees
Tuesday, November 2, 2010
How to use maps in DAZ Studio 3

Today it's all about surfaces, and the textures you can slap onto 'em, and how you get these effects. I've been chatting with a visitor about this, and it's actually pretty interesting, so let's recruit Michael 4 and have him model for us!
In honor of Halloween, just past, we've cast him in the part of a Goth. That's the Elven Prince hair set to ebony, and the Lockwood costume. The skinmap is Albane ... an albino. Eventually, as our hero looked less and less like a Goth, I changed out the eyes for rich green ones, but at the outset he's an albino goth, red eyes and all:
So those are the textures right out of the box, just as they load. It's not bad, but it's ... ordinary. Nothing wrong with it, but it's ho-hum. A bit boring. So let's just DUMP all the textures and start over:
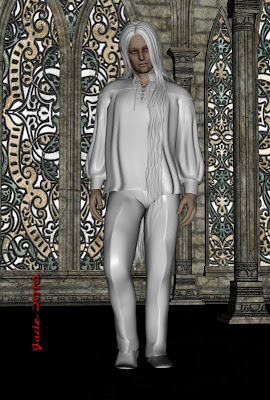
What you want to do is go into the Surfaces tab, select each of the items one at a time. Click in the field under DIFFUSE , and you open the dialog. Look up in the top left hand corner of the big list that opens. See None? Click it. One by one, you make the textures go away, and you wind up with virgin white plastic. So far, so good.What you just did was to turn OFF the diffuse maps, and this instantly tells you what a diffuse map is, and what it does. They're the maps that put the fabrics or visible textures onto objects. Turn 'em off, and you see the objects for what they are.
Just playing here, try adding silly things back onto the nekkid objects. Right where you clicked "none" to turn off the diffuse maps, you can also click "browse," and choose new textures. You'll be doing this a lot, so play around with this, get used to it with something silly:
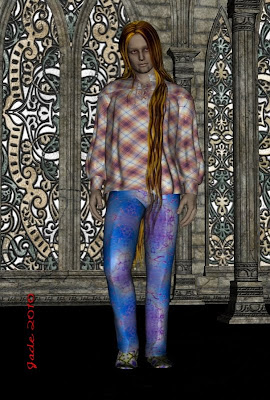
The guy now looks like a small explosion in a garment factory! But by doing this, you really get a grasp on what the diffuse maps are. You might be wondering where all the textures come from. I made all the textures which are used in these renders. Just make them yourself, using parts of photos, or webpage backgrounds, which you can download free in loads of places. You know how to make seamless textures from tiles ... same thing here.So now let's put some decent textures on the model and get to work:
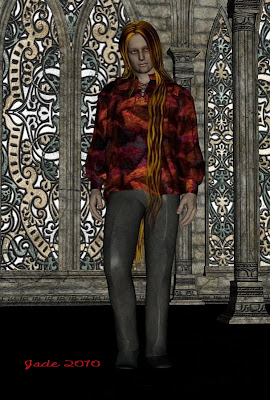
This is better: a tie-dye fabric texture on the shirt and leather on the pants. If you look at this full-size through, it still looks plastic. Not enough has been done with it to stop the plain object underneath from showing through. So, what else can you do with this, to make it look more real? This is where your maps come in!First, let's get rid of the background and lights, to make the renders go faster -- we'll put them back in at the end. NOTE: from here on down, they're just test renders -- fast and flat, to see the results...
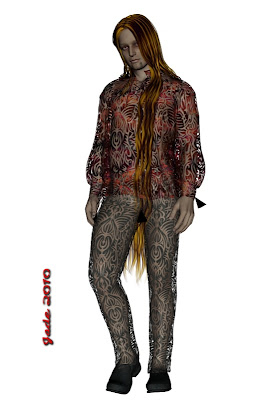
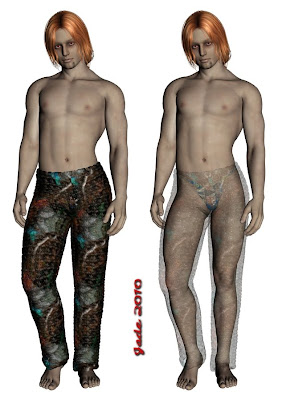
So right here I've added one extra map ... the OPACITY map. This is just a black and white image (pure black, pure white -- in the days of yore we used to call this zip-a-tone). The white stays, the black goes transparent. You add this map in the Basic surfaces tab. See the dialog there? Click in it, and browse for your displacement map. Where do you get these maps? Honestly -- make your own! Get a black felt-tip pen and draw a pattern on white paper. Scan it in, save it, an then set it as the opacity map. You can also get clever with GIMP or Serif, or whatever you use, but the end result is the same: a pure b/w image saved as a JPG and applied to an object. The black parts go transparent.Notice, you can also play around with the percentage of opacity. This is how you can turn leather into silk. In fact --
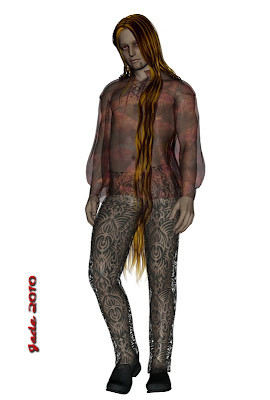
What I did here was take the opacity map OFF the shirt model, and just lower the percentage of opacity. The more you pull the slider, the more transparent it gets. Nice! So --
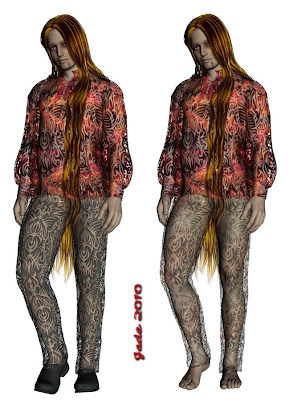
Basically, play with the controls and make the costume fade in and fade out, till you figure out how it works. While you're doing this you'll start to notice that the opacity map creates a great pattern through the fabric, but it can wind up looking exactly like a pattern printed on the fabric, which isn't the effect you want. This is because it's just a 2D effect applied to the 3D object. Now, you want to make the fabric look as if it's transparent in 3D...
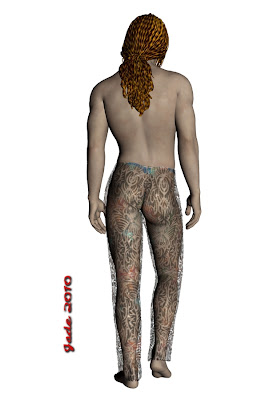
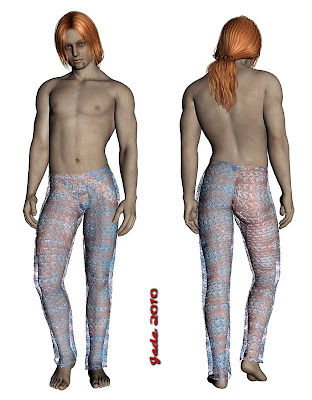
You'll probably have to click on the image to see the effect, but ... we're getting there now. What I've done for this render is get rid of the old diffuse map on the pants, because it was just leather and it's one flat color. I put on a map with some swirls of color so it's much more interesting, and then I gave the poor man a little something to wear under the costume, because it's rapidly vanishing. Then, the important part.To get a 3D effect using a 2D map, you have to apply a DISPLACEMENT map. As the name suggests, the map "displaces" the surface of the object. And here's the trick: apply the same map you used as the OPACITY map -- set it as the displacement map too, and don't forget to crank the slider up to 200% to really see the change.
Now, here's where it gets interesting -- and fun:
Click on this to see it full size and see the effect. By playing around with the displacement maps you can create the effect of texture in fabric. What I've done here is take the opacity map OFF the pants, and then apply a DISPLACEMENT map to look like fabric texture. Also, notice that your displacement map controls have positive and negative values which you can jiggle. You can make the pants foof up or get tighter ... and if you then decrease the opacity to make them transparent, you get foofie harem pants made of gossamer silk. Now we're cooking!So now you can set the diffuse map to decide the color, det the opacity map to decide the pattern of the opacity, juggle the percentage of the opacity to decide how transparent something is ... set the displacement map to get a lovely 3D effect, and jiggle the positive and negative values to set the degree of foofiness. What's next? Because it's still looking "flat" here. Well...
Now it's time to pay some attention to the surface values. You have three basic colors you can set: DIFFUSE, GLOSSINESS and AMBIENT. Technically, "ambient" is the color something is when it's in the dark. Now, strictly speaking that's dumb, because things in the dark are only ever black, right? But in the wonderful world of 3D art, "ambient" means the color something is before a light shines on it. A...ha. Glossiness speaks for itself: when you shine a light on something, how glossy does it get, and what color does it gloss up?You get to set not only the color you want it to gloss up, but also the degree of glossiness. Here's what they don't tell you: 100% is NO GLOSS, and 0% is shining like a searchlight! Makes sense, doesn't it? Not.
While you're thinking about gloss, you should also think about REFLECTIVITY. The two things are not the same, though they're similar. Reflectivity adds an amazing effect to floors, walls, surfaces, widows ... fabrics. Things like silk and organza have loads of reflectivity, so don't forget to set this, while you're working with the gloss. Also, see below -- lighting models. When you set the lightning model to metallic, reflectivity really starts to work for you.
Next thing you need to be aware of is how the surfaces interact when they lie on top of each other. When you're working with garments, the shirt is probably over the pants, or the skirt is over the tights. By the time you've got loads of different maps and surface values stacked onto both the shirt and the pants, sometimes you don't get the effect you expect, or think you should get:
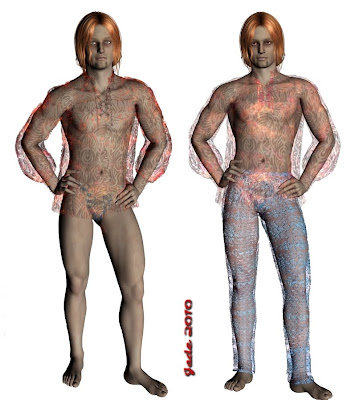
I can't give you a clear reason for why the surfaces interact the way they do. It might be down to the shortcomings of the render engine! I'm still using the 3DLight engine, which is free and ships with DAZ Studio 3, because I don't have the money to buy myself a candy apple at this point in time. I drool over the Octane render engine, and Reality etc, but those require a 64 bit system, which I also don't have. So like most people, I'm making do. And if you are too, you need to be aware that surfaces can and do interact a bit strangely when they're all loaded with values and maps and then overalaid.What can you do about it? You can jiggle the settings -- mainly the opacity settings. Work with one garment at a time. Turn them on and off till you get something close to the effect you wanted.
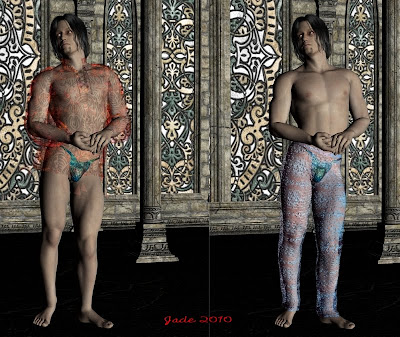
Then, when it's all coming right, turn on the costume ... turn on the backround ... set the lights, pose the figure, and you're alllmost ready to render up the final shots, which in fact I started with, waaaay above! But first --One more thing you can do in the surfaces tab. If you decide to leave the costume off, you often find that in the final render Michael 4 will render with white blotches or streaks on his skin. This is very annoying, and it happens on many, many skinmaps, up to and including the elite ones, which cost a packet. The solution is to be found in the surfaces tab. You want to go into the LIGHTING MODEL, and turn it not to "skin" but to "matte." This will fix the problem:
Now, let's return to the full-quality render ... takes time, but --
There's only one thing I did to the costume for the display renders at the top of this post, that I haven't talked about here ... except for just touching on it in the last paragraph. It's the LIGHTING MODEL. You'll need to find this, in order to fix skinmap problems, and once you have found it, you can also apply lighting model effects to fabrics or anything else. This looks almost like the shirt is made of metal:
...and the trick is to set the lighting model to (!) metallic, and then crank the REFLECTIVITY up full blast -- then shine some lights on it.
That's all of it, nothing kept secret. It's a heck of a lot of fun to play with -- it'll take a little while to learn it, but as soon as the penny drops, it's actually easy. Trust me on this -- I puzzled all this out for myself earlier this year!
Jade, 3 November
***Posted by MK: my connection is intermittent, too slow for this. Seriously, guys, I've got dialup speeds. How are you expected to do anything these days, at 1990 dialup speeds?!!!
Labels:
costumes,
displacement mapping,
lighting,
obj materials,
skins,
surfaces,
textures,
transparencies,
tutorials
Monday, September 13, 2010
Newly Hatched Ice Dragon, guest post by dave
Didja ever wonder where dragons come from? Are they hatched from eggs or born live? Or do they spring out of pixels, processors, and programs in a 'puter?
Hmmmmmm. Well, no matter as I happen to have a picture of an ice dragon hatching from an egg. So now you know: They hatch from eggs. Proof:

Please click to embiggen the picture, you'll be happy!
But how did this start? It first started with me playing around in Bryce 7 Pro. I was learning the terrain sculpting tools and came up with the main "egg" and also the "top" of the "egg" overturned to the side. The material used is actually a sea ice material with some coloration changes to make it look cracky.
After that I went over to DAZ and made a cool looking Ice Dragon whilst applying various add-ons, textures, bump maps, etc to get what I wanted. I also went WAAAAY overboard on the bump mapping of the skin, horns, teeth, etc as I knew the dragon would be used in a long shot in Bryce and that Bryce has a tendency to "soften" the DAZ textures.
Here is a close up of the dragon in DAZ. Compare it to the dragon in the finished picture and you'll see why I had the bump mapping in DAZ turned up to "bloody-well high, mate!" as I knew it would soften with distance in Bryce. As always, please click to embiggen.

How's abouts them blueish sparkley things around her body, wings, egg interior and egg top? They were easy. Each one is actually a squashed sphere with a texture applied. No lights were needed and it makes for a very cool effect.
I'm going to show you a screen capture of the Bryce workspace showing the meshes for everything. You'll note that there is a squashed sphere on each wing, one large squashed sphere in the middle of the egg, and a smaller one of the egg top that's been tossed aside. Click to embiggen, of course.

The blobs on the far left and the far right are the other two eggs in the picture. I did those as object instead of terrains. Since they aren't hatched there was no reason to sculpt them, right? You may have also noticed the two yellow lights in the middle. The lower one lights up the egg interior along with the dragon body, and the other lights up the head from below. The light falloff is logarithmic so it's not "fakey" bright and the top one has a very low intensity as I only wanted it on her head. The size of the light mesh has NOTHING to do with the light itself, it just makes it easier to find in the jumble of meshes.
We'll now move to a left side view. You'll see just how far back the unhatched eggs are and you may also make note of the 2 light positions to illuminate the egg interior and the dragon properly. Make the picture larger with a click.

Notice the top red line that is just below the dragon? That's a layer of thin clouds. Go look at the very first picture and you'll notice some thin clouds just above the fog. Now you know what the red line is. It's a flat plane with a thin cloudscape applied to it. Oh, the low fog is an atmospheric effect so there's no mesh to see for it.
The top view is interesting as you'll see two things. The unhatched eggs aren't in the shot cus they are soooooooo far back. I made them huge and placed them waaaay back for two reasons. One is that the haze atmospherics will be more visible and the other is so the "eggy" textures look right. Small sized ones placed just behind the main egg DO NOT give the illusion of depth. Trust me, I tried.
The other thing to notice is that the terrain texture appears flat from above since you are viewing the terrain as a mesh. Valuable little tidbit to keep in mind, that is. Don't forget to click the pic.

I'm going to give you a cool shot of the back of the Ice Dragon rendered in DAZ. Why? Because I think the tiger strips look sooooooo cool! I think it looks neat at full size. Do I need to tell you how to bring the pitcher up to full size? No, didn't think so.

The last bit of nuts n blots for you: I made the scene on my old, decrepit P4 with 2 gigs of ram and a crappy video card. It was rendered on a modern quad core with 4 gigs built in ram, 4 gigs external ram, and a 1 gig video card. It still took 7 hours to render! Why? The sea ice texture used for the eggs is very complex (so's the blue sparkley stuff) and we cranked the rendering options sky high. However, if I had it set for total, top-of-the-line rendering it would have taken DAYS on the quad core. Just another example of software ALWAYS being light-years ahead of hardware. Well, at least affordable hardware.
Bye for now, time to go make some planets.
cheers,
dave
http://alaskandavedownunder.blogspot.com/
Hmmmmmm. Well, no matter as I happen to have a picture of an ice dragon hatching from an egg. So now you know: They hatch from eggs. Proof:

Please click to embiggen the picture, you'll be happy!
But how did this start? It first started with me playing around in Bryce 7 Pro. I was learning the terrain sculpting tools and came up with the main "egg" and also the "top" of the "egg" overturned to the side. The material used is actually a sea ice material with some coloration changes to make it look cracky.
After that I went over to DAZ and made a cool looking Ice Dragon whilst applying various add-ons, textures, bump maps, etc to get what I wanted. I also went WAAAAY overboard on the bump mapping of the skin, horns, teeth, etc as I knew the dragon would be used in a long shot in Bryce and that Bryce has a tendency to "soften" the DAZ textures.
Here is a close up of the dragon in DAZ. Compare it to the dragon in the finished picture and you'll see why I had the bump mapping in DAZ turned up to "bloody-well high, mate!" as I knew it would soften with distance in Bryce. As always, please click to embiggen.

How's abouts them blueish sparkley things around her body, wings, egg interior and egg top? They were easy. Each one is actually a squashed sphere with a texture applied. No lights were needed and it makes for a very cool effect.
I'm going to show you a screen capture of the Bryce workspace showing the meshes for everything. You'll note that there is a squashed sphere on each wing, one large squashed sphere in the middle of the egg, and a smaller one of the egg top that's been tossed aside. Click to embiggen, of course.

The blobs on the far left and the far right are the other two eggs in the picture. I did those as object instead of terrains. Since they aren't hatched there was no reason to sculpt them, right? You may have also noticed the two yellow lights in the middle. The lower one lights up the egg interior along with the dragon body, and the other lights up the head from below. The light falloff is logarithmic so it's not "fakey" bright and the top one has a very low intensity as I only wanted it on her head. The size of the light mesh has NOTHING to do with the light itself, it just makes it easier to find in the jumble of meshes.
We'll now move to a left side view. You'll see just how far back the unhatched eggs are and you may also make note of the 2 light positions to illuminate the egg interior and the dragon properly. Make the picture larger with a click.

Notice the top red line that is just below the dragon? That's a layer of thin clouds. Go look at the very first picture and you'll notice some thin clouds just above the fog. Now you know what the red line is. It's a flat plane with a thin cloudscape applied to it. Oh, the low fog is an atmospheric effect so there's no mesh to see for it.
The top view is interesting as you'll see two things. The unhatched eggs aren't in the shot cus they are soooooooo far back. I made them huge and placed them waaaay back for two reasons. One is that the haze atmospherics will be more visible and the other is so the "eggy" textures look right. Small sized ones placed just behind the main egg DO NOT give the illusion of depth. Trust me, I tried.
The other thing to notice is that the terrain texture appears flat from above since you are viewing the terrain as a mesh. Valuable little tidbit to keep in mind, that is. Don't forget to click the pic.

I'm going to give you a cool shot of the back of the Ice Dragon rendered in DAZ. Why? Because I think the tiger strips look sooooooo cool! I think it looks neat at full size. Do I need to tell you how to bring the pitcher up to full size? No, didn't think so.

The last bit of nuts n blots for you: I made the scene on my old, decrepit P4 with 2 gigs of ram and a crappy video card. It was rendered on a modern quad core with 4 gigs built in ram, 4 gigs external ram, and a 1 gig video card. It still took 7 hours to render! Why? The sea ice texture used for the eggs is very complex (so's the blue sparkley stuff) and we cranked the rendering options sky high. However, if I had it set for total, top-of-the-line rendering it would have taken DAYS on the quad core. Just another example of software ALWAYS being light-years ahead of hardware. Well, at least affordable hardware.
Bye for now, time to go make some planets.
cheers,
dave
http://alaskandavedownunder.blogspot.com/
Subscribe to:
Posts (Atom)