Showing posts with label lights. Show all posts

Thursday, July 4, 2019

Step into my parlor ... and the best images from our Cape Jervis 'getaway'


Hmm. Not bad ... I left this rendering for a couple of hours after I went to bed last night, and it's fairly creditable. That's most of the Dae character face (you can dial it up and down), and the Dae skinmap with one of the warpaint options; a different hair prop ... a shader on the pants, a pose. Add a couple of low-poly props, IBL lighting and a single spotlight to give it at least some shadow ... chuck in a backdrop. Render for two hours, then ship it into Photoshop and overpaint it to make it more interesting, because it's a very simple render which was basically designed to run a bunch of tests...

First, I wanted to figure out how to stop the G8 eyes shining like a pair of flashlights! The sclera -- that is, the white of the eye -- is inclined to be incredibly white and bright. Now, the tip is always, "go into the surfaces pane and add a little color, like a chromatic gray, to the base, or diffuse color." Uh huh. Well, that didn't work. I wound up setting the diffuse color to black ... and every other color associated with the eyes; and setting gloss and reflection to zero ... and still the sclera looked like it was illuminated from within. Goa'uld. I wondered if it was something to do with the specific eye maps on this model, so I bought a set of Genesis 8 eyes and tried those, to see if any difference would appear in the renders when a new range of settings was applied along with the new maps. Nope. I tried everything under the sun, and still ended up putting this into Photoshop and blatting some color onto the eyeballs:


That's just Genesis 8 Male, just it comes, with one light plus IBL lighting, and the sclera is shocking. It's a bit better for being painted, but it's still not right. So I set this aside and went back to playing with every element in the scene. And from what I've seen so far, it comes down to this: do not point a light directly at his face. If you do, the sclera glares, no matter how dim you make that light. This can't be right, but this is the result I'm getting to date, even with eye shaders purchased separately. Hmm. Well, not pointing a light right at him did get us natural-looking eyes in the top shot, which I call "Step into my Parlor." The experiment continues!

I also re-rendered an older image, to see how Iray would handle it:


That was something like a 100 minute render ... very nice indeed. This was also the first image I've tried rendering at 1200x1800 size in Iray. Have been working at 600x900 for the sake of speed ... I don't have a crash-hot video card, remember. This, however, is terrific. I'll see how the other one renders ... The Horse and his Boy, where the hunky hero is standing with the black horse. With any luck, it also will be very lovely, but rendering Michael 4 in IRay can be something of a crap shoot. Cross fingers.

Last art for today: a wallpaper at 1980 x 1020, which should suit a lot of monitors, and is easy to convert:


This looks good, with all the system icons stacked on the left to leave the eye candy free. You're welcome! More wallpapers to come.

Lastly, a half a dozen of the most astonishing shots from the short 'getaway' Dave and I took at Cape Jervis and Deep Creek, last Monday-Tuesday. I took about a thousand shots, but these are just perfect! Back in a day or two with more art ... as soon as this splitting headache goes away...


Friday, January 4, 2019

Working with texture, color and light

Displacement map, bump map, reflection, refraction and gloss
values all set on ... well, everything.
Displacement, bump mapping and reflection are striking in this one...
DOF is turned off to make to make textures visible. 


In the last few days, I find myself fascinated by the textures of things, by the quality of light, the way distance -- actually, the density of particles in the atmosphere, but that strips the romance right out of it, doesn't it? -- strips detail, resolution and color from a vista.

So, working in CG, I find myself playing endlessly with the balance between displacement map values, bump mapping, reflection, refraction, the strength, color and direction of lights, the "drop off" of light over distance. (I learned the theory of all this via the 3D Studio Max Bible, incidentally, years and years ago. No, I never used "Max." It was out of my price bracket,  not to mention that my hardware wouldn't run it! But you could get the third-party manual for a song on eBay or something, and although 90% of the book was devoted to hand-holding exercises, teaching students how to drive the interface, the last 10% of the 700pp large-format book was invested in the theory of texture, light and ... all. So you had 70pp of in-depth, high-density information, the whole theory of the CG art form. This was all I needed. Actually, I always considered it a bit of a waste, printing a massive book teaching students how to drive an interface, because in a year's time the company will bring out the next version of the software ... they'll change the interface so radically, little you learned from a by-the-numbers book will do you a shred of good. On the other hand, master the theory ...! So, uh, I did. And it's infinitely applicable to DAZ, Poser, Bryce, whatever you can afford.)

Fascinated by light, texture and what have you, I couldn't resist painting in Photoshop too:

Digital watercolor: summer hills

Color gradients: none of this is in the source photo.
In fact the photo is a waste of storage space...

Digital watercolor: Near Yankalilla

Color and texture: again, none of this is in the source photo.
Lighting conditions on the day were ghastly. So ... painting!
As often happens, the very day that you're in the right place to get a perfectly framed photo, the sky is dull, but not dull enough to be dramatic. Just enough to make a digital camera record a picture that's so drab, it's just about black and white, so flat and boring, your mouse is hovering over the DELETE button. I tend to delete loads of pictures, and in the past the source photos for digital paintings like these would have been ditched... 

But I always loved the vibrancy and texture of watercolors, and lately -- bored out of my gourd (being disabled for a couple of years has impacted heavily on me) -- I've begun to play with things I never had time to consider before. Now, if I had to work on art board, with brushes and paint, this would never happen ... have you seen the price of art materials these days?! The boards are about $30 each. And since I haven't done this in around thirty years, I'll make a dozen messes before I get back to paintings I'm proud of. Uh -- not this year. Maybe later, if/when I ever find my way back to the cash, AND the pain in my hands and spine subsides to a level where I can actually do the work. In the meantime --

Yes, I work digitally. Everything happens in the computer. These paintings frequently start life as truly garbage snapshots ... full of foreground litter and background microwave relay towers! They're reduced to line sketches, then worked up to digital paintings in a process taking several hours each, and involving loads of, uh, painting, as well as many, many digital processes. But the whole job takes a fraction the time of a real, physical painting, and of course it costs nothing... 

Both those things are important when you don't have a lot of cash, and you're carrying a bundle of physical problems as well as the major disability that'll keep you comprehensively crippled for another year. It's all about the pleasure of being creative and winding up with a lovely picture; not this daft, ongoing game of "My materials are the best in the world, what are you using?" Dang, I hate that. It's like the "My car's faster than your car" game. Ack.

More soon.  

Saturday, June 16, 2012

Return of the Invisible Artist


click to see all images at large size...

You might have wondered what happened to me about three weeks ago ...did Jade get hit by a truck? Did an alien spaceship land on the house? Did some industry tycoon decide she was the only person to manage his company's space program, and offer her an annual salary in seven figures, if only she'd relocate to the secret rocket complex and play a vital role in putting Man on Mars ...?

Nothing so mundane. 

Swine 'flu. I kid you not. Near death experience. Two weeks of wondering if I was going to shuffle off this mortal coil altogether, and then another week of tottering around, trying to get back up on my feet. You have no idea. You don't want  to have any idea! Suffice to say, I didn't actually die ... and I'm posting a couple of pieces as I try to remember, "What's my name? Who am I? What was I doing?!"

The top piece is a new render of an old idea: Martin, in trouble, at the very beginning of the Abraxas story. I actually did this before I got sick -- it's been sitting in Photoshop, waiting to have about ten minutes' worth of  post work done to finish it! So today, for the first time in a loooong time, I was able to find enough brain cells to do the work, get them into harness, crack a whip over them, yell "Mush!!" ... and have them all pull in the same direction for long enough to get this done. Last week, it would have been like a scene from a Chuck Jones cartoon. 

The second piece -- the boy in the garden -- is all new. Twice, while I've been sick, Renderosity has had sales, and some pieces were just too delicious not to be bought. Almost everything in this picture is new...

The set is brand new today, from DM: Sweet Serenity. It's a very nice "corner of a courtyard" set ... you get a wall with ivy geranium climbers, a birdbath, a couple of potted plants. I switched out the grassy ground prop for a hard floor ... basically, it's just a flat plane with a nice tile texture added; then, add gloss and reflection, and a bump map to ruck it all up, rather than having it be like a mirror. That's Michael 4, of course ... but he has a new hairdo. This one is the Garry Hair by a designer called SWAM Art. I never played with toys from this designer before ... nice. The jeans are new too -- if you think you haven't seen them before, you're right. This is the Skinny Jeans from Sickle Yield. The only things you've seen, in this picture, are the vest, which is the M4 Veranil vest with everything changed to my own textures and transparencies and so on, and the skinmap ... and the bad news is, I've totally forgotten which it is. One of the deep suntan maps. 

The lights are at a low angle to simulate evening ... there's only two spotlights on this scene. Have a look at it at full size ... I'm quite pleased with the way the shadows fall. This is "only" a raytrace ... I've been way too sick to even think about trying to control LuxRender, but this would be quite a nice little piece to render up in Lux. In fact, it's a very simple shot -- about my speed, today! Hey, I'm here, and I'm doing something at last, instead of sitting on the couch with a blankie, a cup of tea and a vacant expression, with the cough drops and nasal spray, tissues and ibuprofen within reach!

More soon -- my head is full of ideas, not just for artwork, but for stories also. I'm sloooowly but surely making the decision to write. I've been an editor for many years, and an illustrator for almost as long. Maybe it's time I got the finger out and started writing all those stories that go scooting through my mind as I do the artwork!

Jade, June 16

Friday, May 25, 2012

CG illustration, calendar boys, fantasy plots, and a rhapsody in Lux Render!


click to see all images at large size (mostly 1:1)

As you can see, CG illustration is on my mind -- these are actually images designed around Chapter Two and Three of Abraxas: Leon has gotten the kid, Martin, back home, and in the evening he and his old friend Roald enjoy a quiet hour in the gardens, talking over the past -- and the future. What's to become of the kid, and in fact, does Martin have a halfway decent idea, though he went the wrong way about realizing it? The story is actually about the conflict between the 'old warhorse' and the conscientious objector ... the natural warrior and the person who is not a born soldier, but isn't a coward, and needs to go out and prove this. I still think it's a very strong story ... and it's yielding some rich, evocative illustrations --

These were rendered BIG, because I've lately discovered that (hee hee hee!) I have the ability to render at 1600 wide and more. I've gone up as far as 2400 so far, with no crashes of the software or computer. And I loooove having the big images. So everything I'm sharing with you lately is at full desktop/pinup size. These pieces, today, are well worth seeing at large size, but I know a lot of visitors won't give me that extra click or to, so -- at the bottom of this post I'm going to paste in the "detail" crops, just for fun.

At last -- al last! -- I got the painting finished on the LuxRender version of the Hyborian Age Calendar Boy ... and here he is:


You have GOT to see this one full-sized! It's like walking into the studio and meeting the model who posed for the painting! Lux does amazing things with the skin tones -- and I also had a lot more luck this time with getting it to handle a darker complexion without going muddy...


Notes for the technically minded:
This is just about the first time I've coaxed LuxRender to handle the darker skin tones well, and to do this, I used an odd kind of mix between the 'biased' and 'unbiased' lighting setup. What's the diff? Well, raytracing uses resolutely 'biased' rendering, meaning, you set up a boatload of artificial light to create artificial (or contrived) results that, if you get really, really good at this, can be made to mimic proper daylight, moonlight or whatever. LuxRender is an 'unbiased' renderer, so you can feel free to set one light, call it SUN, make it really bright and a long way away ... set it to render, come back tomorrow, and you can get a startlingly photographic, real-world daylight result. It's not all that difficult to get good daylight results that way. So far, though, I'm having a much tougher time getting Lux to simulate (or duplicate) very soft lighting, such as firelight, candlelight, torchlight. This ain't so easy. So ... hmmm. Now, one of the ground rules in Lux is to stay the hell away from distant lights, which Lux recognizes as suns. O...kay. So in the last few dozens of renders, I've been using exclusively spotlights and point lights. And it turns out, you can ship a scene out of DAZ Studio that was set up with spots and points, and you can fiddle happily, and endlessly, in Lux's own window (not the Reality bridge -- Lux itself), changing the strength and color of spots and points while the render is in progress. Wahoo.

The results are ... well, you're looking at 'em! The Hyborian Age Calendar Boy is such a hybrid -- a biased light set rendered in an unbiased renderer. Ye gods. Does it work? Yep. And it really does look like lamplight. Compare the LuxRender image with the previous raytrace -- these are very close to the raw renders, of course, before they took a trip through Photoshop:


Please, please, see the above at full size: LuxRender on the right, raytrace on the left. The raytrace is by 3DLight, done in DAZ Studio 3. This scene, complete with spots and point lights, was shipped into Reality, and thence to Lux. Nice!

And now, those "detail" crops I promised. And yes, I do intend to post the Photoshop tutorial on retouching and overpainting. All the images you see today are heavily overpainted. One or two are experimental. These, below, are from a scene in Abraxas that comes along well after the point where it was discontinued on account of being tagged as porn. And that is something I'll never agree with. It wasn't even spicy enough to be called 'erotic romance.' There was nothing 'hot' in it up to page 62, which was the last on-line -- just some adult concepts which were logical, rational, salutary, cautionary. In fact, the story would have been just plain dumb without them -- the developing plot of a tale about a young conscientious objector out to to prove he's not a coward won't "go" if he blunders along, oblivious to danger and doing "brave" things because he has no idea he's in mortal peril! To make the story mean anything, Martin needs to know he's in real danger, and do his stuff anyway, and the only way to learn this is to walk into danger, have a close call, a narrow squeak, survive, and grow. In the first chapter of Abraxas, he runs into a real villain ... remember Yussan? Uh huh.

On that note, here are Leon and Roald (Martin's guardian, if you recall), in the courtyard, talking over the days of their service in the militia, and trying to hash out if Martin has half a plan after all:


Stay tuned for more on this, because I'm starting to get bitten by the inspiration bug. Again. In its next incarnation, Abraxas won't be a comic, but it's going to be richly illustrated, because I'm having a ball with this, and I'd forgotten how much I love these characters and this story!

Jade, May 25

Saturday, October 2, 2010

Water effects in DAZ Studio 3


Reflections in a 3D lagoon ... somewhere in the Greek Islands ... and you can feel the warmth of the water ... ahhh. Call the airline, book the tickets, we're out of here.

But the question is, how do you make this find of water in DAZ Studio 3, without recourse to Bryce or Vue etc.? Is it a model you can buy? Well, there probably is a model, but you don't need one, so save your pennies for something you do need - cuz I'm going to tell all. Bear with me, and in twenty minutes you'll be doing this too!


All images in this post have been uploaded at 100% size, 1:1 with the size at which they were created. All instructions are on the images,but I'm going to repeat them in the text here, so that Google can find them. Google's dear little bots can't read text which is buried inside images.

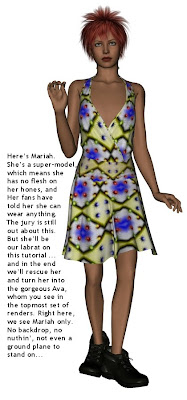
So: Here, above, is Mariah. She’s a super-model,which means she has no flesh on her bones, and her fans have told her she can wear anything. The jury is still out about this. But she’ll be our labrat on this tutorial ... and in the end we’ll rescue her and turn her into the gorgeous Ava, whom you see in the topmost set of renders. Right here, we see Mariah only. No backdrop, no nuthin’, not even a ground plane to stand on...


So the first thing to create is the surface of the water. Create a primitive ... open your CREATE dropdown. Choose PRIMITIVE, and then click PLANE. That's it. When the plane loads, it'll appear underfoot and it'll be black till you shine a light on it. So you probably want to create a light overhead and point it down, so you can see what you're doing. This plane is going to become the surface of your water. Right so far.


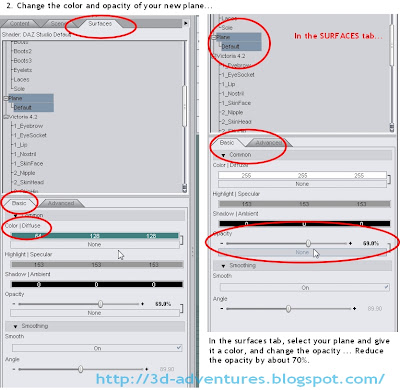
The next thing you want to do is to change the surface parameters of your water plane, and you do this in the SURFACES tab. Select the plane, and then, in the BASIC tab, drop the opacity to about 70%, and also set a nice bluey-green color. Then, you want to be able to see the effect of this, so -- grab the plane and swing it through 90%, park it dead in front of Mariah, so you can see what you've done so far. Cool:


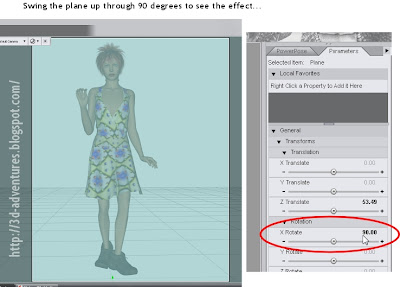
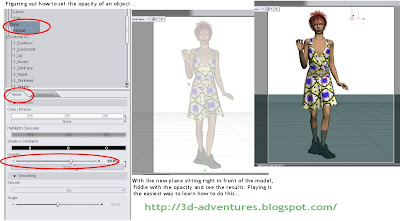
Figuring out how to work with opacities and colors is a question of playing with the surface till the penny drops. Go ahead and play! When you're done, swing the water plan back flat, about ankle high, and leave it at around 70% opacity, and that nice green color you started with. Right:


The next thing to do is to change the surface characteristics, because water ripples and reflects. You do this by applying a displacement map to the plane, and by cranking the reflectivity up to 100%. You do this in the surfaces tab again, like this:


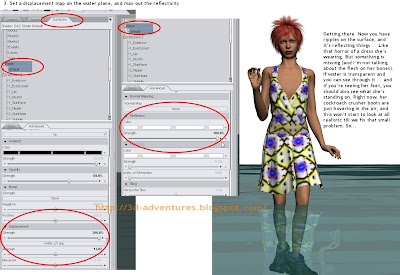
(If you don't know what a displacement map is, click here, and read some other tutorials of mine on the blog right here. I actually hand-painted the displacement map for this water in about three minutes flat. Trust me -- there is nothing to it, and the last thing you want to do is pay money for this kind of thing!)

We're getting there. Now you have ripples on the surface, and it’s reflecting things ... like that horror of a dress she’s wearing. But something is missing (and I’m not talking about the flesh on her bones). If water is transparent and you can see through it ... and if you’re seeing her feet, you should also see what she’s standing on. Right now, her cockroach crusher boots are just hovering in the air, and this won’t start to look at all realistic till we fix that small problem. So...


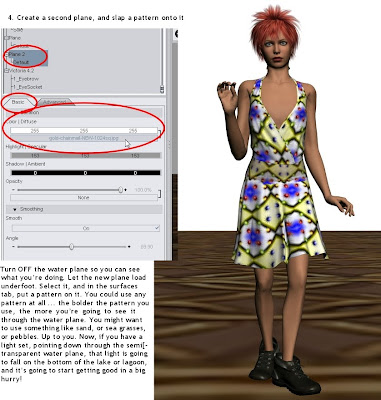
Turn OFF the water plane so you can see what you’re doing. Create a second plane. Let the new plane load underfoot. Select it, and in the surfaces tab, put a texture on it by applying a jpg image to it. You could use any pattern at all ... the bolder the pattern you use, the more you’re going to see it through the water plane. You might want to use something like sand, or sea grasses, or pebbles. Up to you. Now, if you have a light set, pointing down through the semi-transparent water plane, that light is going to fall on the bottom of the lake or lagoon, and it’s going to start getting good in a big hurry!


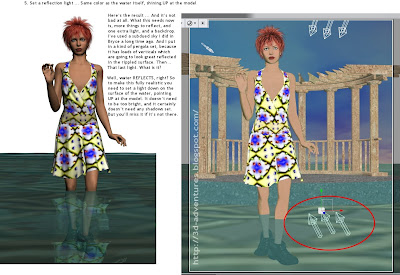
Here’s the result ... and it’s not bad at all. What this needs now is, more things to reflect, and one extra light, and a backdrop. I’ve used a subdued sky I did in Bryce a long time ago. You could also use a photo of the real sky. And I put in a kind of pergola set, because it has loads of verticals which are going to look great reflected in the rippled surface. Then ... that last light. What is it?

Well, water REFLECTS, right? So to make this fully realistic you need to set a light down on the surface of the water, pointing UP at the model. It doesn’t need to be too bright, and it certainly doesn’t need any shadows set. But you’ll miss it if it’s not there...


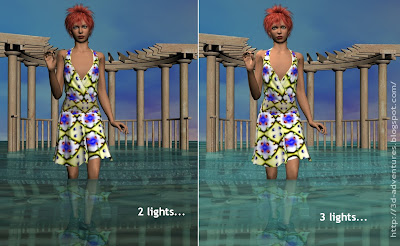
And that really is just about it. Now, you can fiddle with the Victoria 4, because Mariah is messing up what could be a very nice shoot:


And there you are! Water, water everywhere, and not a model to load. Gotta like that!

Jade, 2 October

***Posted by MK: my connection is intermittent, too slow for this. Seriously, guys, I've got dialup speeds. How are you expected to do anything these days, at 1990 dialup speeds?!!!