Showing posts with label alpha channel. Show all posts

Sunday, May 12, 2019

Sci-Fi detective, spaceships in the mountains, and (!) green screen compositing


Loads of experiments going on today. Above: our Sci-Fi hero ... looks like a detective to me, on the streets of a futuristic city, on the job, investigating -- well, fill in the blank and you have the story! Same character you saw last time, but in this one I've turned a swatch of the cityscape into night, added the car and reset the lights. Am rather pleased with that hair, too: hand painted. After a long, long time, am just starting to get halfway good at painting hair! Got a long way to go, still, but am starting to show progress.

Now ... these, below, were reasonably quick experiments, to see what could be (gasp!) rendered in Bryce 7 Pro. Yes, you read that correctly.  But don't get your hopes up ... nope, I didn't have a revelation and suddenly figure out how to make Bryce behave like a cross between Terragen and Vue! I cheated. Totally. These backdrops you see here are photos --


-- and I hear at least some of you saying, "Hang on a minute, you can't set a backdrop in Bryce!" Well, actually, you can't but ... you can. It doesn't work every time, and you have to be phenomenally careful with it, but the trick is this: create a 2D vertical plane; slap a photo on it as the material (!); set the Z coordinate to send it waaay into the distant background; resize it BIG; set the light (sun) shining right on it to make it nice and bright. Adjust the specularity if you need to. Now you can stand anything you want in front of it, and shazam! That's a backdrop in Bryce. Yep, it's a cheat -- 😜-- but it works. (Those are photos from our recent Grampians trip. They were handy, so I grabbed them to use for these tests.) However...

I was thinking to myself, "I'm doing this bass-ackwards. There has to be an easier way." And there actually is. Digital matte compositing. Hunh. You know, green screen stuff. Like this:


Okay, now that shot is getting good, by anyone's standards, and it was done in about twenty minutes flat, using Bryce 7 Pro (the spacecraft), and Terragen (the gas giant) and Photoshop (for the compositing work. Here's the basic images:


That's a Bryce render, took four or five minutes ... with the "sky" set to green so that the color picker in Photoshop would see the makeshift alpha channel. No problem so far. I rendered it at 2:1 size, about 3600 pixels wide, to get an image that was fine enough to achieve a cutout, after the green had been made to vanish, that didn't suffer from "the jaggies." Easy. Plus...


Okay, my computer rendered this, but no way can I sign off on it and tell you it's my work, because in fact it's one of the pre-set files in a pack of Terragen "examples" you can download from the company (Planetside Software, in the UK), ostensibly to get you started. You're supposed to reverse-engineer the project file, take it to pieces, and suddenly you know how it was done. Right? Hahahahaha! 😵 Well, good luck with that! I've had a go, and ... buggered if I can see how it was done, LOL. Never mind, I'll have another look later, maybe the penny will drop.

In the meantime, putting the two images together in Photoshop was just too easy, and the result ... please to have a squiz at that one, at large size. It's pretty darned good, and it's the first time I ever did the green screen trick! Ooooh, this opens up vistas of possibility!

Back soon. Soooo many ideas buzzing around in my head!

Monday, August 17, 2015

Hiding out in the Giant's Cave ... sneaking a peek at Michael 6 ... and more

LuxRender plus DAZ Studio and Photoshop:
Hiding out in the Giant's Cave ... at Morialta!
An old snapshot, taken in 2006 and quite low-rez, provides
the perfect backdrop for the render.
First, raytrace some stone walls and vines on the left.
Second, LuxRender the figure alone, using the same lighting set
as was created for the cave raytrace...
Here's the raytrace test for the shot, which was used as a
map/guide for hand-painting the shadows...
Comparison of LuxRender and the raytrace. Why bother with
an overnight render ...?! You be the judge!
Hiding Out in the Giant's Cave is an idea that sprang to mind just a few days ago, and instantly I had a flash vision of what I wanted to use in the background. Winter of 2006, Dave and I went for a hike at Morialta Falls, and climbed up to the cave, which is set high in a cliff wall overlooking the gorge. The view is spectacular. Though the cameras way back then were low-rez by comparison with today's cameras, the pictures are striking. The weather can be awful at Morialta -- at least at the time of the year when the waterfall will be running. (This is Australia ... you want water in the falls? Then, it's been, or is, raining. Duh.) I remember, on this day in '06 it was drizzling half the time, and cold -- but very beautiful.

Anyway, there was your perfect white-sky backdrop, to which I added some rocks and vines at left, raytraced to complete the illusion of a cave mouth. The rocks are actually Nike Image's The Path, rotated through 90 degrees, and with a lot of heavy bump mapping. Easy to make the cave, and fast to raytrace --

But I hit a snag instantly. I couldn't get the props to load in Studio 4, which is my way of getting onto the Reality bridge across to LuxRender. And I didn't have a lot of time to fight with this, so I thought, "stuff it, render the figure separately, using the same lights, and put the whole thing together in Photoshop."

Which is what you see here. Picture #4 has the figure only. The alpha channel is turned ON in Reality, and -- come back tomorrow for a 3k-samples-per-pixel render. It's a lovely render, and the job of putting it all together was actually pretty simple. Just some touch-up work on the figure, where the mesh showed as a lot of triangles and pyramids (!), and then sky color, clouds, mist, birds, vines and so forth, which isn't a long job at all, using Photoshop brushes.

Am very pleased with the finished picture. You've seen this model before:

Also a Lux render, "the fugitive," from May 11, 2012
...it's the Atlas skinmap by SAV (from Renderosity), though the character face/body is one of mine -- and the above Lux render was the second time this guy had been revamped. Here's the original raytrace, also from May three years ago:


...and that's just about as far as you can drive a raytrace, with  a bunch of painting to make the most of highlights and so on. It's not bad at all ... but still, you can see why LuxRender is such a lure.

Speaking of things which are alluring ... I couldn't resist having a long, hard look at Michael 6, whis is, of course, the second generation Genesis male base figure.

This is what A$50 or so will get you these days:


...and of course, having put down the plastic for the new generation base figure, that's where you start shopping. Now, you want wigs, skin maps, costumes and morphs. So, might as well buy a bundle (link) that has the base figure and several of the above, for "only" about A$175...


And having committed to this upgrade, you're going to want the "mesh smoother morphs," which make the body ultimately malleable (link), able to be posed in any contortion, without the mesh buckling, which was always the problem with poor old Michael 4:


...and for an extra A$40 or so, the line between art/fantasy and reality really is blurring.

So, now you might as well go the whole hog, since you're in over two hundred bucks already, and also get the high-def, high-rez, hand-sculpted add-ons to Michael 6 (link), and be done with it:


...and this one, here ... darned if I can tell this 3D model from the real deal. So your shopping list is going to be the Michael 6 Pro Bundle, which gives you the base model plus a few wigs, a couple of skin maps, some poses and costumes; plus the Ultimate Natural for Michael 6 Body, to get the absolutely perfect body mesh; plus the Michael 6 HD Add-On --

And now you can start shopping for skin maps, toupees, costumes and so forth. As an educated guess, when I upgrade to Genesis 2, I'll need to drop about a grand, Aussie, to get my oars back in the water. Eep. Worth it? Oh, yeah ... when I have the bucks. Check this out:


...and there really is no answer to that! So, yes, of course I'll be going here.

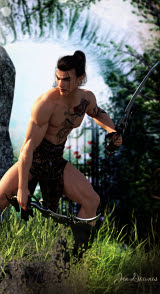
Left: a render appearing over at DeviantArt ... Michael 5 (the precursor to 6) as poster-boy, pinup-boy. The artist has sadly only uploaded two renders, and nothing in years. But it's amazing what's being done with the Genesis figures, even without resorting to the top-end render engines. Have a look at this one, for example! Now, there's pretty. (And if I were a model working in the, uh, artistic category, I'd be starting to get worried, 'cause the stuff that's being done in that zone, with cutting-edge 3D models and the top-flight render engines, is rendering the human element obsolete! Interestingly, the "digital escort, or companion, idea is being toyed with -- pardon the pun -- right now. There's a story at Strange Horizons which is well worth a read: Kenneth: A User's Manual, by Sam J. Miller. Whoa.)

So, yes, of course I'll be upgrading . It's just a question of getting my hands on the cash and at the same time, having nothing pressing to do with it at the time! Right now, if I had a spare grand, well, upgrading software wouldn't be even close to the top of my agenda!

For the moment, I'm just going to chug along, doing what I'm doing -- which is actually having a lot of fun!