Showing posts with label OBJ. Show all posts

Sunday, February 21, 2021

Moonbeams and flutterflies ... this was fun!


This is the old Garden of Galahad set, which actually works quite well in Iray without any pushing and pulling on the surfaces and textures (it's odd; some things work fine, others barely work at all). That's Flink's Tree #6 (from Renderosity) on the left, imported as a simple OBJ; and the old GlowMoon prop, which works like magic in 3Delight, but doesn't work so well in Iray, so I painted it in Photoshop, after the fact. To get this effect, I parked a spotlight, very, very powerful, in direct line-of-sight with the moon, and turned on raytraced shadows. It worked! And also --

That's the right hand of Georgia for Genesis 8 Female, with nail polish switched out for (!) a car paint shader. I have two lights set, and loads of power in the Photometrics. The background is a photo I took many years ago at Mount Lofty Botanic Gardens, and the butterfly is lifted out of a 2D photo. The lens flare was added later in Photoshop, using Ron's Bokeh Brushes, from the DAZ Marketplace. This was fun!

And speaking of Georgia for G8 Female ... that's the Shaded Haven set, same lights, I just added the character and switched the shaders on the fabrics, to get a new dress. I really, really need to buy some wardrobe props for the females to wear. This took about fifteen minutes, because I rendered it BIG. In fact, at 3000 pixels wide, I was able to go in and crop a whole different picture out of the middle of it, which gives you a good look at the model and the shaders on the dress:

More soon, as work permits. I have a zillion experiments to run. Rendering happily!

Wednesday, February 17, 2021

A grab-bag of goodies


Old OBJ models and new shaders ... it's an adventure in Iray, with results that can be astonishing ... or not so good. Depends on a lot of random factors. The question is always on my mind, "What can we do with the old generation four models, since almost everything I have was designed for Michael 4, and while the new Genesis stuff is terrific, I just don't have another three or four thousand dollars to spend on renewing everything in the 3D cupboard! So what do we have here? Well --

This, above, is Iray's rendering of the Jagger skinmap for M4; he's wearing Neftis's Ricardi hair and Sickle Yield's track pants; but I resurfaced the trackies with Iray shaders, so they look pretty good. The results here are not so very different from the Genesis figures -- with one exception. M4 ain't as posable: wait till you start to bend the limbs, and you'll soon see that they don't bend realistically; they just sort of fold, and tend to crease, which Genesis limbs usually don't.This effect is very, very noticeable with Victoria 4, also --


Now, this is Victori 4, wearing the HR Donna skinmap, and one of the Neftis wigs ... it's actually more of a test of the costume, which is one of Powerage's old fantasy sets, the Fantasy Cult costume. It depends on metals and transparency maps, and it was never designed for Iray! But it turns out the transparency maps worked wonderfully in Iray ... the metals? Nope. So I resurfaced all the metals with a gold shader from Mech4D's immense pack of shaders, and the result is actually very nice...


The crystals are a prop from an old fantasy collection, Magic Containers, which I think came from Renderosity about the time Noah was launching his ark. Obviously, it was never going to work well in Iray, but I used a volumetric diamond shader from Mech4D's collection (from DAZ), and the result is very nice. I can use this prop, and many others ... we're happy!

The Elven Merchant Ship was from Renderosity too; and I'm not enormously fond of this prop, which is why I've never used it much. It was made using textures rather than materials, so the surfacing on it is disappointing; and no templates were provided, so one can't go in and paint a material. Soooo ... I put it into silhouette by placing the key light almost behind it, and did some overpainting in Photoshop, which increased the realism. Cool.

On that render, the water was the big, big challenge. I don't own a "water prop" (yet) for Iray, and of course it's totally different trying to work with surfaces in Iray than in 3Delight. This is an Iray render, so ... what the heck was I going to do? Well, displacement maps DO -- NOT -- WORK in Iray. Or, if they do, I haven't found the trick, and I don't think anyone else has. Normally mapping works, but it won't get you where you need to go, if you start out with a created primitive (plane) and try deforming it into a choppy surface with a displacement map. No joy there. Harrumph. So (he he he) I used an old OBJ I made in, and exported from, Bryce 7 Pro, about eight years ago. Mmm. The "water" is actually a terrain, onto which I slapped one of Mech4D's volumetric water shaders. Even then, it took one heck of a lot of work with all kinds of maps to break up the surface and make it less than a mirror. There's a trick to this, which I have yet to learn ... but this is quite nice, so I'll post it and make notes to myself about figuring this out!


And lastly for today, after all that pushing and pulling with old models, I wanted something that would make life a bit easier (especially since it's over 100 degrees in this neck of the woods, and almost too hot to even think, much less wrestle with problems). So this is a set called Shady Haven, from DAZ, already configured for Iray. I have an environment light and one spotlight set, and this render, at very high resolution, took about fifteen minutes. Next, I'm going to see what happens to the render times we we stand a couple of Genesis figures in the set. So --


Let's have a closer look at how Iray handles the Jagger skinmap on the Michael 4 geometry ... and then I'm going to get a cool drink and relax in front of a fan. Yes, the a/c has been blasting away since before dawn, but it's just too hot. One thing that's definitely on my agenda: a new monitor. I'm still using an LG monitor from 2010, and it runs so hot, it feels like you're sitting in front of a heater! Not what you want, in this weather.

Friday, September 20, 2019

Old props and sets, new shaders and surfaces. And check this out --


This is where it gets really, really interesting! That's Michael 4, rendered in Iray ... and I've figured out how to get decent results:


When you first set up the character, more often than not it loads with incompatible surface mapping. Basically, it shines as if it was cast in colored glass! But it only takes a few minutes to go around and apply the "Uber shader" to every separate "UV island" in the figure and hair, and then dial down the gloss. Then, Iray can make sense of the render, and the results are actually extremely nice. That's Michael 4 wearing the Marco skinmap and the Alexander head morph, the Mon Chevalier hair, and the Journeyer Scout pants with the texture switched out.

The set is a whole 'nother story. DM's Circular Shrine (from Renderosity) won't load into Studio 4 for love or money, so I went back into Studio 3, exported it to an OBJ, and imported that into Studio 4 and spent about half an hour applying shaders, where I couldn't save the original diffuse maps (I think I managed to save about two ... the rest are just so Iray-incompatible, the set simply looks better with some really good shaders applied.

Now, it gets interesting. Here is the standing set, but the time I was done with the shaders:


That's pretty good. So, how about we drive the camera in there and add a characer? Here we go:


And yes, that's M4 wearing the Xurge costume you saw yesterday ... and yes, the metal parts have been fixed with a metallic shader. Yesterday, Studio 4.11 refused to recognize two file paths for various stashes of content. Today, it played nice and I could get hold of the shaders. Go figure. I didn't do anything different today; the program just decided to work, out of the blue. The render is pretty nice. I lit it with IBL lighting -- using this --


-- which I painted up from an old image, and it worked a treat. So far so good. I just did the character render at small size for the sake of speed; it's nothing special, just an experiment to see how the shaders worked out; and the final experiment was still to come. Could I save the file, since Studio understands its file paths now? And the answer is --


--forget it. The second you hit "save," Studio loses any content it previously loaded -- with one exception. You notice it saved and reloaded the OBJ properly! The circular shrine set came in as a simple white plastic OBJ, and it saved cleanly. Well, now. There's food for thought.

So right now, I can work with Michael 4 characters, but whatever I'm going to do, it has to be done fast and be fairly simple, because the file can't be saved. This is actually what deters me from taking the next step at this juncture:

Catalog image. See this. 
There is actually a script you can install into Studio, which does the work for you: makes the Generation 4 characters render properly without the messing about. The problem is, it's A$30, and with the best will in the world, I can't save a file! Also, right now, I can't get the computer online in order to install this properly, using the automatic, online Install Manager. Studio also isn't recognizing anything I install manually; something's not right somewhere ... but I am finding answers one by one. I don't say I'll figure out how to save a file properly, because this is the problem that beat tech support, who gave up on the issue after three months of trying. It must be something to do with the vagaries of my own specific PC?? Well, end of next year we'll try this again with a new one. Chances are, everything will "come good" without me sweating over it. And that's the time to be buying the Iray Converter for Generation 4 ... which I adds layers and layers of functionality. Something to look forward to!

Thursday, September 19, 2019

One door opens, another closes ... G8 and M4 gladiators


Did you hear the sound of screaming from somewhere approximately due south of wherever you are, at about four o'clock this afternoon? That would have been me. Boy, did I learn a few things today ... and I'm not very happy with what I learned! For six months now, I've been chafing about not being able to load the old third party content into Studio 4, so that it can be rendered with Iray -- if you've been following this blog, you've heard me groaning! So --

I finally, finally figured it out. I got the old third party content to load into Studio 4.11!!! And then I discovered the other side to this situation. Sure, you can load the old content, but it's "mutually exclusive." The moment I loaded the old stuff, I lost all the new content! All the Genesis figures, sets, costumes, shaders, became inaccessible. Studio 4.11 behaved like it had a bunch of screws loose, telling me the "files do not exist." Well, from it's perspective at the time, they didn't ... because I'd changed the file path along which it accessed content: so now it was getting hold of the old and third party stuff, and here's the rub. It couldn't get a grip on two parallel file paths to use at one time. Just one. So --

You can either have the old and third party content or the new Genesis stuff. Well, while I had access to the old stuff I ran the experiment:


That's a Xurge costume, with Michael 4 wearing it, and SAV's Spartacus hair, loaded into Studio 4.11 and rendered in Iray. The problem is that (as Xurge warns!) their stuff is "not tested in DAZ Studio," so they don't guarantee how it'll render, especially in Iray. What you see here, above, is 30% painting. The metal parts all rendered as flat, ugly gray plastic -- pretty awful. Ack.

So I thought, "Why not apply a nice metallic shader, as you did when you rendered this costume in Iray before," like this --


-- yes, that was done with shaders, and Iray loved it. BUT that figure-n-costume was imported into Studio 4.11 as an OBJ, so Studio was delighted to work with shaders. After you've change the file path so it can actually load your old third party stuff, Studio is stuck on a different rail and can't find your shaders; you see the "file does not exist" dialog. As I said, mutually exclusive. You can either have the brilliant shaders in Iray and not the third party content, or you can load the third party content and Iray will render a lot of it looking like flat gray plastic! Ooooh, botheration. Or words to that effect,

Is there a work-around? I don't know. All I can tell you is, I sure as heck didn't find one today. After three hours of fiddling with it, I changed the file path back to the usual one, to get my Genesis gear and shaders back, so as to get some sense out of Iray; then I set the gladiator to render, and went for dinner. Harrumph. Four hours later, and it was still not fully rendered, but I have no more time, so we'll have to call it done at this level of integrity.

To speed it up, I did all the plants in the foreground separately, as a deep shadow map render in Studio 3 (less than a minute), with the gladiator Iray render stripped in as a backdrop, LOL. That probably took two hours off the render time, and I still ended up painting a lot, especially on the hair. The Landis hair looks rather plastic, don't you think? I need to experiment with this some more -- not yet getting the results I would have expected from it: it's an expensive prop.

We still can't get the desktop online, so am settling down to work with what I have for the time being. There's loads to work with, we're not short of models, costumes, wigs and whatnot. And if I'm really going to get busy with the old sets, shipped out to OBJ, to make it possible to whack shaders onto them and bring them up like new -- well, fair enough. Time to get busy!

Also, I'll continue to search for a work-around to the problem. You never know.

Tuesday, September 10, 2019

Creepy cloisters -- and a new Genesis 8 hero. Neat!


That's pretty good -- it took a lot of wrangling, but at least you can see where the work was invested! I'm actually very happy with this, and I'll be setting up this character to render again later. This one rendered long into the night, and when I got up this morning, it was done --


First, I started with a commercial backdrop which I could never have rendered in a year of trying with this computer. It's from the artist "Sveva," whom you'll find at Renderosity. I wanted something to get me into this quickly, with good results, a way to test the water before I start to invest tons of time in backgrounds. Good choice, here, it turns out. But Sveva's art was the wrong shape, so I kept the width I wanted and introduced a flat black "margin" at the bottom, adding about a third to its height. Then, I added the floor to run up to meet the backdrop ... slapped a battered-concrete shader onto it. Then, add the bench, and a stone shader on that ...

 If you reckon we're going a bit "shader happy" here -- uh huh. You have to, to get old (low-poly-count) props to look good in Iray. When they render wearing their own original (3DLight) maps, they often look nothing short of awful. Sooo ... when it came to the lantern, I redid the whole thing: frosted glass and cast iron. The result is rather good. Very happy with that part of the image.

The Genesis character gave me some problems, largely because I'd wanted to use the Rex character, who has the look of a Jamaican pirate. Unfortunately, the lighting in this scene is so low, the deliciously swarthy Rex rendered up so dark, you could barely even see him. So I swapped out the skinmap for something that would render in these lighting conditions, changed the face a tiney bit (rats: I do like the Rex face. We'll come back to him, and this costume, later ...)

The costume is a mix and match: coat an boots from Crimson Seas for Genesis 3, and the pants and belt from Badlands Gladiator for Genesis 8. The hair is Varun, set to brown rather than black; and I changed the eyes to a brown shade from the GP Character Eyes set.

Okay, now mess about with Iray lights. I have two on this, a distant (photometric) light, and a point light sitting inside the lamp. I also used the backdrop as the IBL environment light, set to about 0.5, I think, just to lift the picture a bit. Ready to render ... and several hours later I staggered through from the bedroom (am still soooo sick: throat, sinus and lung virus: pure torture) and figured it was "cooked"enough to go back to work on it. So --

Back into Photoshop to have the light rays added in, and some extra highlights and shadows around the bench, and the lamp-glow on the figure (which wouldn't render; hmmm). Also, a bit of digital grading in the character's face, to make it stand out a little more. With that done, I put the painted image back into Studio 3 (!) to add the foreground ivy -- which no amount of jiggery-pokery will make viable in Iray. The foreground ivy here is just a raytrace in Studio 3, which at least recognizes its old maps!

With that done, back into Photoshop for some "marginal shadows" which lead the eye into the picture and blot out a tiny bit of demarcation from the existing backdrop and the new floor.

Interestingly, the lamp had to be done as an OBJ import: nothing I can do with this set of props will make Studio 4 "see" any of them. Fortunately, the export out of Studio 3 to OBJ is dead easy, then it takes all of about five minutes to resurface whatever prop with appropriate shaders. No biggie.

Okay ... let's call this one a success. Complex image, very pleasing. If I can stay alive long enough (this virus has me on my knees. No joke or exaggeration), I'll do something with this guy this afternoon, and we'll have another look at him later today.

On the other hand, I might fall face down and come up for air on Friday! We'll see. Bear with me, guys!

Sunday, September 1, 2019

Alien pyramids, and a delicious enemy


Our neighborhood Goa'ould again ... nicely done by Iray. Still playing Stargate, because I ran the experiment, put the Pyrago alien pyramids into Iray to see how they render:


That's a sky I rendered in Terragen a while ago -- back in June, in fact. The sky is what makes this picture --


-- and it's the perfect backdrop for the old set. I only imported one of the elements, the pyramid itself, to test it out, because it's something of a pain wriggling the whole thing into Iray. Studio 4.11 won't let you install this stuff (or, if it will, I ain't found the way yet, and I've tried everything I can think of), so you have to import the OBJs directly ... then spend the next hour configuring them before you can start to play around with the lights. Not quick. But the end result is pretty darned impressive. So, tomorrow I'll play with the Palladio set, which is ancient Greek.

I'll leave you with this:

 
I'm kind of waiting for his eyes to glow. Shall pat myself on the back for this one: nice character!

Anyway -- tomorrow, Palladio, and another of the Xurge costumes I bought last week. Let's install this one into Studio 3 (soooo easy to install things into Studio 3, one of the reasons I love it)...


...and we'll see what we shall see! I have one or two M4 characters who would wear this...!

Thursday, August 29, 2019

Old sets and new models -- neat results!


A new skinmap for Genesis 8: 'Matias' was on sale the other day, and since I didn't have an Asian map or morph for Genesis yet ... a small shopping spree This one renders up very nicely indeed ... and, interestingly, this guy is wearing a Genesis 2 pair of jeans, which fit well, and Genesis 2 shoes, which didn't fit at all. I think I've mentioned before that Genesis "whatever" costumes are a bit of a crap shoot on Genesis 8 ... but you can get lucky with them. So --


The next thing is, once you have a nice, high-poly figure to feed into your eons-old PC which doesn't have enough brains to give itself a headache ... whatchya going to do with the figure to end up with an interesting scene, rather than just another character study, where the figure is standing in front of a big, blurry background! I've done a lot of those, because that's what my hardware will handle; and since I've been having such a hard time with the old, low-poly content which does render easier (I haven't been able to save it to a project file in Studio 4.11), I haven't worked as much as I should have with the old sets. BUT --

Recent experiments are showing very promising results:


That's Michael 4, wearing the Adventuring leathers from Xurge 3D and the midnight prince hair, the Chase face and body morph and the Alexander skinmap ... rendered in Iray. And I know, it's not supposed to be possible to do this, much less to get good result, like...


So ... how? It's complicated, but not difficult, and it gives me a way to get around the desperate need to access my low-poly models from eons ago, while Studio 4.11 won't play nice, so that I can still get quicker renders. For comparison --

The Matias G8 figure, sitting in a low-poly set, was still a five hour render -- I left it cooking when I went to bed. But this fantasy piece with M4 in the same set took one hour.

Also, you have the additional bonus that using this work-around you can also get 3D assets which can't be installed into Studio 4, into Studio 4, so they can be still rendered in Iray. The trick of it is that you do need to have Studio 3 on and running! Assemble and pose everything in Studio 3, then export it to an OBJ, and have Studio 3's exporter "collect textures." Import the OBJ into Studio 4 ... it arrives as a piece of shiny white plastic. Now, you'll need to spend half an hour putting all the textures back onto it ... even then, every surface must be configured with three or four tweaks on every "UV zone" on the prop, or costume or whatever. Without these tweaks, the object comes up shining like a mirror. The tools are all there in the Surfaces pane. It took me a long time time to stumble over them, but you see for yourself, they're there!

Having rendered M4 and the set -- DM's The Gate -- in Iray, and liking the results, I thought, "Hmm, I wonder if I can get Genesis 8 to render properly if he's sitting in a low-poly set??? The last time I tried to have a Genesis 8 figure actually doing something rather than standing there like a catalog model ... well, after about about ten hours of rendering I wound up with picture full of grain. I realized there's a strict, and rather meager limit to what I can render on this older PC. But -- a low-poly set, now? Okay, let's give it a shot.

Result ... rather nice. And it rendered!!! Yay. So this opens up various vistas of opportunity, enough to keep my busy for the next sixteen months before I can afford to shell out about $2500 for a system that'll give me the freedom to play with Genesis and sets and shaders.

(Incidentally, if anyone wants detailed instructions about how to get old stuff, or third party stuff, into Studio 4.11 and configured for Iray, drop me a line. I don't want to bore the general visitor with that stuff, but if you need it, I'd be glad to do a special post.)

Wednesday, August 28, 2019

Xurge 3D costume in Iray ... wow! But -- how?!


Doing a small dance around the desk, because -- I found where DAZ have hidden the diffuse map controls. You'd never guess it in a zillion years, but I stumbled over it while looking for something else entirely, LOL And it's not without its problems, because when you plunk a diffuse map onto an OBJ, it's glossy as a mirror -- every surface has to be configured ten ways to get it to render properly. It takes quite a long time to get a good result out of it, but if you can just sweat through the process, you get this result, above ...

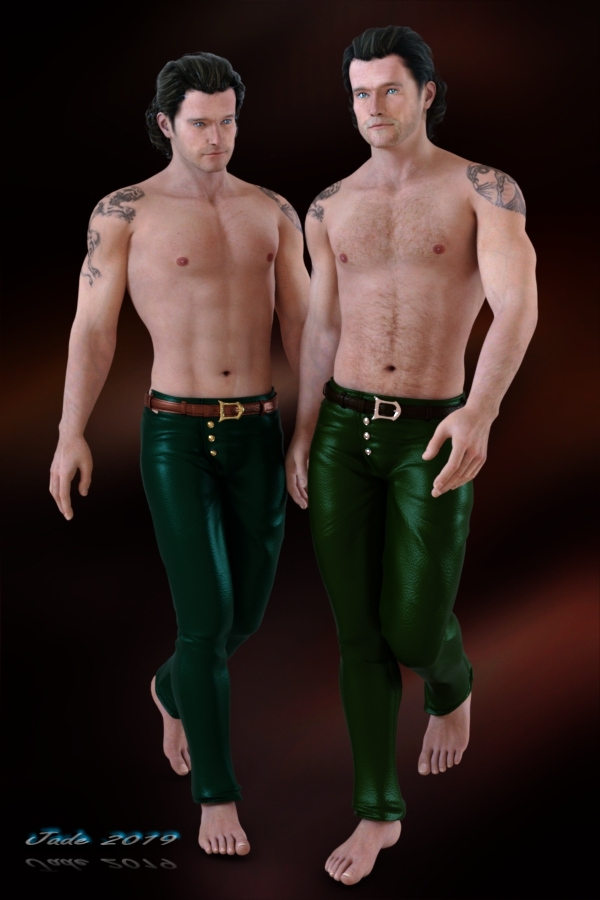
Now, that's the Xurge 3D Adventuring Leathers on Michael 4 ... but Xurge 3D costumes will not, no way, no how, install into Studio 4.x, and of course, if you want to render them in Iray, they have to be shipped into Studio 4 somehow. Why are we so dead keen to render this in Iray? Well, now:


Take a squizz at that, at full size, and your question will be answered! I have enormous problems rendering the high-poly figures. Genesis 8 + hair +costume, and my video card is so far maxed out, put a fancy shader on a costume and it chokes ... I paint for half an hour in Photoshop to finish the picture. Meanwhile, the lower-poly figures render up very nicely, and FAST ... Michael 4 renders in Iray in one hour. Yes, one hour ... not five.

The thing is, to get a lot of the existing M4 content in Iray, the only way is to export M4 with the hair and costume out of Studio 3 as an OBJ, then import it into Studio 4, apply all the materials and textures ... takes a looong time to get to the point of being ready to render. So --

You could use shaders to re-skin the costume on the OBJ --?? I looked into this, and the result is not quite what you were hoping for:


Sure, you're done in one tenth of the time, but, but, but ... there just isn't any substitute for the original diffuse maps, is there?! So, OBJ export/import is the way to go.

Not that the system doesn't come complete with its own suite of problems. Basically, you can't export any of your own characters (the exporter ignores the Morphs++ adaptions), so you're stuck with stock, off the peg characters ... also off the peg expressions and poses! Yep, the OBJ exporter also ignores all your posing! So you can't just do anything with M4 and his fantastic cossies, and send them to Iray. You're limited in what you can do. But even so --

Mix and match head/body morphs and skinmaps helps to create some very nice characters. This one, here, was done by mixing the morphs from the Chase character with the skinmap from the Alexander character... and (sorry guys) that skinmap is no longer in the DAZ store.

This is Chase, with its original skinmap:

catalog image from DAZ. Search on: Chase for M4
I never had much use for this face morph, because it didn't render up so nicely in the simple old 3Delight render engine, which was all I had at the time. But when I added the Alexander skinmap to it, it came to life. And I can't show you a catalog image, or give you a link for Alexander, because it's gone. Too bad, that, because it was a fantastic skinmap. Ah, well.

Anyway -- this is the basic plan: custom design an M4 figure (alas using all off the peg poses, morphs and what have you). Export to OBJ, import to Studio 4 ... apply the original maps (for reasons which became apparent above!) and plunk it into Iray for just one hour. Low poly figures and sets, see? Zoom! Render complete, with vast improvements over the raytrace. This will keep me happy till I get my new computer (Christmas 2020), and can send my old favorites to Reality again!

One last thing for today --

Happy New Camera. Uh, phone. 
Uh, well, whatever it is --


Yep ... new phone with a 16MB  camera, plus a bokeh lens. It's the UmiDigi A5 Pro. You wouldn't believe these were taken with a phone, but they are. Am pleasantly astonished ... and will be using the phone as a camera when Dave and I head back to the Grampians in a month's time!

Speaking of Dave: Happy Birthday to my One and Only today!! 💕😀

Sunday, August 25, 2019

New leathers for Michael 4 -- nice!


I got back to Xurge 3D, as intended, and got those extra costumes for Michael 4. This is the Adventuring Leathers -- it renders up beautifully. All I had to do was add a bump map; a displacement map is supplied with the costume, but it's in the TGA format, which DAZ  refuses to read. It's too late tonight, and I'm too tired, to track it down and convert it (to the JPG that DAZ is looking for), so I just slapped a generic leather bump map on all the leather, and so forth. This is a very good costume indeed!

Also, I left this one rendering overnight, last night:


Well, I guess there are some things I just can't render ... the satin shader is one of them. After five hours of render time, it was still nowhere near "cooked," so I painted it in Photoshop to get rid of 247,993 unresolved pixels. Ack. Don't expect to see this shader too often before the end of 2020, when I get a computer that's 5x more powerful than this one is ... too much work, painting.

And really, seriously, there's stuff you just can not render with the older computers --


This is the Starcarrier set, which I used for the hangar bay in the NARC images. It looks pretty decent at this size, but it you look at it full size, you'll see that it really isn't anywhere close to "cooked," and this little image was a four hour render! Can't wait for Christmas 2020, and a new computer!

Anyway, we can certainly have a lot of fun along the way ... I actually like the raytraces. They have the feel of artwork. They also take a matter of a few minutes to render, LOL. Anyway -- next thing is, I want to put the Adventuring Leathers into Iray, via a OBJ export/import to get the costume out of Studio 3, and see how it looks with a set of Iray shaders, in Studio 4. I just wish I could find a way to make Studio 4 add a simple diffuse map! Or install 3D assets from third parties -- but it won't; and I tore the directory structures apart till I found out why.

If you've ever tried installing third party content to DAZ Studio 4.x, you'll know it's a terrific crapshoot. Why do some things work, and some don't??? Because some 3D assets have "data" files, .dsf files, which make Studio 4.x recognize what they are ... and some don't. Without those .dsf files, saved to the \data folder, you're sunk. Nothing is going to work. Uh huh. So ... OBJ export and import is the way to share files across the great divide ... and then whack shaders onto everything, because ... if there is a way to make Studio 4.11 add a simple diffuse map, I can't find it! How weird is that?

Saturday, August 24, 2019

Nights in red satin ... and a vampire hunter!


Actually, the images didn't connect themselves in my mind till I'd finished rendering them! Nights in red satin ... okay. Genesis 8 looking sultry and gorgeous. Now, add this one:


Yes, our old friend Leon, standing in a new set I just acquired today (DM's Absolute Sanctum, I think it's called). Now, what's he doing in a place like this, at this time of night? Tracking down a vampire? Right -- hence, the Van Helsing coat, no doubt! Now, just imaging that the guy in the red satin is the vampire ... and let your imagination spin away on that topic!

The set itself is very nice and was on sale at Renderosity:


Lots more experiments today. Couple of days ago, I discovered that the M4 Head Morphs++ do not carry over into an exported OBJ, in the event that you want to send your version of Michael 4 to DAZ Studio 4 as an OBJ -- wearing a costume that can't be installed into Studio 4, for instance. Then I wondered if the commercially created head morphs will carry through the conversion to OBJ, and it turns out --


-- they do. This is the Chase for M4 character, skinmap, face and body morph. On the left is the character as built from scratch in Studio 4, from the M4 model, Chase skin maps and morps, and Mario's Hair by Neftis, wearing the AS Narquilir costume. On the right is an OBJ created in Studio 3 from the Chase head and body morphs, and imported into Studio 4. You can't actually tell the difference between them. To make a fair comparison, I re-did every texture with Iray shaders --

And here's the neat thing. The M4 figure is low-poly count. Means it renders fast. I told Iray this image could cook for two hours, if it wanted to, and it was done in about twenty minutes. Aha. And if you're careful with the old figures, with lighting and so on, you can still get credible results:


That's actually not too bad. The coat was done with a leather shader, but the M4 maps (and the Midnight Prince hair) are just the original maps from many years ago. Low poly figure, high poly set ... two hours in Iray -- as opposed to four hours for the satin shirt guy ... and after that amount of time the satin still hadn't rendered fully, so I put the picture into Photoshop and painted it to get rid of the acres of unresolved pixels! No more time to leave it rendering...

I'll set up another one and let it render while I nick off to bed (yawn: it's half after midnight), and we'll see what five hours will do for it. This satin shader is sumptuous, fabulous, but it takes a whale of a lot of processor power. Ouch!

One last thing for today -- wallpaper, 1900 x 1080. Enjoy!