Showing posts with label fonts. Show all posts

Wednesday, April 10, 2019

Virus 7, Jade 0 ... also, Spaceman Joe, and Screamin' SF -- again!


Okay, I was in the mood for art, but I was also in the mood for humor, because I just fought off a virus that ... well, a couple of times I honestly entertained the words "emergency room." But I didn't have the energy to pick up the phone. Bleck. 😵 So this is a great place to come back to creativity, and just about the last intelligent thing I said was,

"Let's put this guy on the cover of Screamin' Science Fiction, and see what he's like with a raygun in his hand! Turns out, he's pretty darned good!

I do love Screamin'. It gives me a chance to cut loose and be silly. Is this the fourth one I've done? LOL ... enjoy. And yes, this is the same character as "Desperado," and the barbarian, though you'd be forgiven for not realizing it. Here's the proof -- and I've uploaded it at some colossal size so that you can scroll all over it and compare, if you like:

(Sorry about the probable download time on this: it's 1800 high x 4800 wide -- which is great for folks who want to scroll all over it and see the details.)

The other thing I really love about this kind of project is the opportunity to play with layout, fonts, text ... and be seriously silly. The "font art" is all done in Serif Page Plus, of course. I do love Page lLus ... speaking of which, it's become a "legacy program" now ... the Serif company went as far as version X9 and then set PP aside to develop their new one, Affinity.

Uh huh. Affinity looks like it's going to be out there in another dimension. I'd be looking for Affinity Publisher, if course ... there's also Affinity Painter (but I already have Krita), Affinity Photo (but I run Photoshop Elements 9, which does everything I want or need), and so forth. Also, Affinity is still in the beta stage, so ... it's not even ready yet. But yes, I'll be keeping an eye on that ... for the future. It belongs in the same pile as DAZ Studio 4.9.whatever, and IRay, and tons of new models, and Genesis figures, skinmaps -- on and on and on. Not yet: too many bills to clear yet, before I throw wads of cash at what is, now, merely a hobby.

Okay! Aas versatile as he is, we're done with this character for now, I promise. I'm going to return to some of the others and produce some images that have been swimming in my mind since we were in Halls Gap. Back tomorrow, I hope. If not, the next day at latest.

Friday, February 15, 2019

Magic, pen and ink wash, and a segue into monochrome


Working with textures, surfaces, lights and shadow, around a wild variety of props that go together to suggest a story ... and of the whole lot (I call the picture "Dark Magic"), the element that pleases me the most is this:


Every texture you see on the mask is me, replacing the original materials shipped with the model with my own metal textures, and bump maps. That is so realistic, I'm thrilled to bits with the result! Ancient Greek, or a relic from Mycenae, or perhaps even Atlantic (whoo!) ... and then I thought, "Hang on, that's a vignette, fading out to black. We can do this:


The font looks like the letters were hammered out of gold. It's done with 2D bump mapping and 3D lights applied to the lettering (in Serif Page Plus X3). That's cool too!

Then I wanted a change. What I wanted was an ink sketch, but specifically a vignette, So...


Your eye actually convinces you it can see how the inks were laid down over a pen and ink sketch. It works! I knew it would, but there's nothing like running the experiment.

Lastly for today, an exercise in black and white "photography" --


What this needs is more surface detail in the walls (but no bump maps were supplied with the set, and by this time late in the afternoon I was waaay too tired to get stuck in and make them. Might do that tomorrow, if I can be bothered), and a bit of surface detail on the car -- like, road muck, perhaps. Again, I was too tired to do it today. Maybe tomorrow.

If you're interested to see it in color:

Sunday, December 23, 2018

Happy Holidays ... and Peace on Earth


The "card" says it all ... Happy Holidays, folks. Merry "Whatever You're Celebrating," and Happy 2019 to all!

(If anyone is interested: I found a free stock shot of Stonehenge, at the moment when the sun crosses the horizon on the solstice of winter. Into Photoshop; make the canvas size about 2.5x the width of the original photo. Some creative painting to create a smooth fade-to-dark at the top; two Photoshop brushes: the biggest. brightest Christmas star (a bokeh light) right on the sunrise, and snow falling softly. Then, into Serif for typographic art: the font is Glastonbury Wide, in gold color, with 3D emboss and effects set, 3D lights on ... and I adjusted the lights to illuminate the golden message with the sunrise.)

Wednesday, January 23, 2013

As Samwise was heard to say, I'm back!


I haven't actually died and/or been abducted by aliens, but I have to confess, there were times when it seemed like it was happening ... and times when it could have been preferable to what was actually going on! If you've been following this blog at all, you'll might recall how Dave and I started to move house in November. We managed the move, with the final date when every last matchstick and bottle cap had to be out of the old house as of January 10, and in the last two weeks we've 1) recovered, 2) healed up of most of the myriads of physical injuries you always do yourself during this kind of work (it's an unwritten law), and 3) unpacked.

A promise I made to myself: I will not indulge myself in artwork till the last box is unpacked!

Wellll ... there's about two left. Near enough's good enough.

[Edit: links have been deleted here, because The Bookshelf has been gone for years and years now]

And along came a challenge I couldn't resist. Kit Moss, of the Our Story Historical Fiction pages at the GLBT Bookshelf wiki, asked me if I could do something as rich and evocative as the pieces I did previously to head off the Fireside with Lichen Craig section of the same site. The Fireside art featured a, well, a fireside with chairs, candles, clock, decanter and books galore (see the art here), and it was probably somewhat easier than you might have imagined, because it didn't involve figures. Figure work almost always entails either costuming or props or both, to set said figures into a context -- historical, fantasy, SF, what have you. Kit Moss asked me for a historical setting, preferably the Crusades era, the Roaring Twenties, Ancient Rome, that kind of thing --

And I blush to confess, I don't actually own the costumes or props to wrangle those. 3D models aren't all that expensive, but when you're fleshing out a whole 3D universe inside your computer, and you have to purchase everything from a coffee mug to a space-going aircraft carrier ... it gets expensive due to the sheer volume of stuff you're buying. Somewhere, you gotta draw a line or you'll lay down enough money to buy a new car! So I wound up with a lot of SF and fantasy props and costumes, because they lend themselves so well to the kind of art I like to do for my own amusement (and also for the NARC and Hellgate art, which I love doing -- the SF worlds of Mel Keegan. You know. Of course you do.). But I never did get around to buying much in a historical vein, because I don't do very much work in that context...

Sooo, how was I going to wrangle a historical setting, with figures?

Aha! Inspiration struck. Unclad figures against a backdrop. I started looking at landscapes and images from Rome and Greece, but the problem is, those buildings are all in ruins today. Using a modern day image of a Roman or Greek site would give us an image of a couple of gorgeous, nekkid lads canoodling while on vacation, somewhere in Europe in the summer of 2012! Then I thought, how about using something like a Roman classical mosaic, and Photoshop it into ninth dimension for effect?

It was a good idea, and would have worked; but not nearly as well as starting with a classical painting and zapping it into the ninth dimension, though Photoshop!

The sound you can hear is probably an artist by the name of Thomas Couture spinning in his grave, because the work I've just done is highly derivative, and without Thomas Couture's background, it would just be a couple of gorgeous young dudes standing in front of a big green screen.

So, who's this Couture guy? Over to Wikipedia for this:

 Thomas Couture (21 December 1815 – 30 March 1879) was an influential French history painter and teacher. Couture taught such later luminaries of the art world as Édouard Manet, Henri Fantin-Latour, John La Farge,[1] Pierre Puvis de Chavannes, Karel Javůrek, and J-N Sylvestre.

He was born at Senlis, Oise, France. At age 11, Thomas Couture's family moved to Paris where he would study at the industrial arts school (École des Arts et Métiers) and later at the École des Beaux-Arts. He failed the prestigious Prix de Rome competition at the École six times, but he felt the problem was with the École, not himself. Couture finally did win the prize in 1837.

In 1840, he began exhibiting historical and genre pictures at the Paris Salon, earning several medals for his works, in particular for his 1847 masterpiece, Romans in the Decadence of the Empire. Shortly after this success, Couture opened an independent atelier meant to challenge the École des Beaux-Arts by turning out the best new history painters.

Couture's innovative technique gained much attention, and he received Government and Church commissions for murals during the late 1840s through the 1850s. However, he never completed the first two commissions, while the third met with mixed criticism. Upset by the unfavorable reception of his murals, in 1860 he left Paris, for a time returning to his hometown of Senlis, where he continued to teach young artists who came to him. In 1867 he thumbed his nose at the academic establishment by publishing a book on his own ideas and working methods called "Méthode et entretiens d'atelier" (Method and workshop interviews). It was also translated to "Conversations on Art Methods" in 1879, the year he died.

Asked by a publisher to write an autobiography, Couture responded "Biography is the exaltation of personality—and personality is the scourge of our time." He died at Villiers-le-Bel, Val-d'Oise, and was interred in Père Lachaise Cemetery, Paris. 


The "Romans of the Decadence" painting is the one he's famous for, and rightly so. It's amazing. It's so amazing, one almost hesitated to mess with it. Almost. Well, it was painted over 160 years ago, and Thomas died over 130 years ago, so it's well and truly "out of copyright," and the only sin I could commit (and y'all know me far better than that!) would be failing to give due credit for the base work on which the derivative art was built.

So here you go:


There it is, in entirety, and in its original colors, before I took it into Photoshop and began to do heinous things to it. The background I wanted for the new iconic render was dark, mysterious, perhaps a little ominous, rather "pregnant with every potential," including terrible danger. It had to say all of this through the means of color, shadow, contrast, and the way those three qualities can bias the eye to seeing things, and inspiring emotions. 

So, step one was to get rid of almost all the native color of the piece, and at the same time render it down to something much more like a drawing than an oil painting:


Then, with this achieved, I could repaint great swathes of it with "false color," reds, golds, purples, which lead the eye to and fro, and generate an emotional reaction --


-- especially when the background was shipped into DAZ Studio and used as the backdrop for the figures:


The figures are color toned to look like they're part of the scene, and many of the shadows on both them and the background were hand painted after the render, to agree. I also hand painted the hair on the blond guy; and those face and body morphs were crafted specifically for this piece. I stood a column right behind them, so there's one piece of architecture in the foreground, with right-falling shadows, which helps to male background and foreground "merge" convincingly.

The last thing to do was the text object overlays. The sharp-eyed will notice that I painted down a swathe of the background with a matte, something like a drop shadow, to make the title stand out. The font, incidentally, is Vivaldi, around 40 point ( I love the capitals:); and the composition work involving text was not done in Photoshop, but in Serif. I'm still using Page Plus X3, because it does everything I need to do; they tell me Serif X6 is out now, but I feel no compulsion to rush away and get it. So here's the final composition:


Then, resize it to the 700-wide format that's most useful on the website where it'll be appearing, and it was done. The result is so attractive -- it has a depth that I find irresistible -- and the assignment was a lot of fun. Thanks to Kit Moss for giving me the chance to do this!

What's next for me? For a start, get those last few boxes unpacked! Write the next segment of Abraxas, which has been haunting me since November --

I was asked, did I retitle Abraxas? It changed from The Forgotten Songs to The Lost Songs -- and I've just changed it back. Yes, I did retitle it, but frankly, I've come right back around to thinking that "Forgotten" works better than "Lost." So, yes, it was retitled; then switched right back again. Sorry about that. It seemed like a good idea at the time.

Also, I need to get back to Manga Studio, which I'd only just opened up when the necessity to shove my whole life into boxes arose. And during the "dead zone" of December, I began thinking about art and stories, and I'm dying to look at art that's developed in layers -- each layer rendered in DAZ-Reality-Lux, and then everything assembled in Photoshop. I can "see" some astonishing images in my mind's eye. Now, let's see if I can figure out how to winkle them out of there!

More soon. Soon.

Jade, January 24, 2013

Monday, September 24, 2012

Movie poster ... NARC. Happy 3rd Birthday to this blog!


click to see all images at large size;
wallpapers are 1600 pixels wide

NARC: The Movie. Imagine! Jarrat and Stone and company, the brainchildren of Mel Keegan, in blazing color, on the big screen. In 3D. Whoa. Well, it would cost about $150m and take over a thousand designers and artists to make it happen; then, being a movie in which the romantic thread is ga, it would more than more than likely go over like a lead balloon at the mainstream box office ... but we can dream. So here was the idea:

Design the poster, as if NARC were a major motion picture. 

The first thing I did was have a close look at the posters for the Iron Man movies, and from these I took inspiration in the form of the dynamic. Not the design, but the spirit. This made two or three poster designs jump into my imagination, and I deliberately went with the one that is the LEAST like the Iron Man poster designs, so no one was going to be able to say, "Oh, you just copied." I didn't copy nuthin', and I'm very, very pleased with the final result.

The poster was assembled in Photoshop -- at 4800 pixels high, which gave me plenty of wiggle room for painting. The first step was to assemble a set of big, high-rez renders which would be used to compose the whole image. Where to start? Characters!

The four main heroes were rendered separately: 


Jarrat and Stone, Cronin and Ramos, were rendered at 2500 pixels high, which, for a portrait is big ... big enough to make it possible to paint human hair realistically, which I knew I'd have to do for Jarrat and Ramos, both of whom have hair that's luxurious, a little wild. Turned out, even Stone's hair needed some painting. Only Gil Cronin gave me no chore in this area. Thanks, Gil. 

They were raytraced, not rendered in Lux, for a good reason. LuxRender does fantastic justice to skin tones, but it really, really shows up the shortcomings of 3D hair. (The designers need to get on the stick and work out how to do hair that will look good in the top-end render engines.) In Lux, alas, Jarrat and Ramos would have rendered quite poorly on account of their hair, so I'd have had to paint the hair from scratch. Well ... I could do that, but it would have doubled the time spent on the project ... and the truth is, I'm also still getting the feel of my new mouse pen/tablet. I'm not quite ready to paint that much hair from scratch, though I can touch up existing hair for a composite image like the poster. Last reason for raytracing, not rendering in Lux: each of these renders would have been about a day long, and I'd have run out of time. This project was designed as the Third Anniversary Special for this blog, so it was time sensitive ... if I'd thought of it two weeks ago --!!


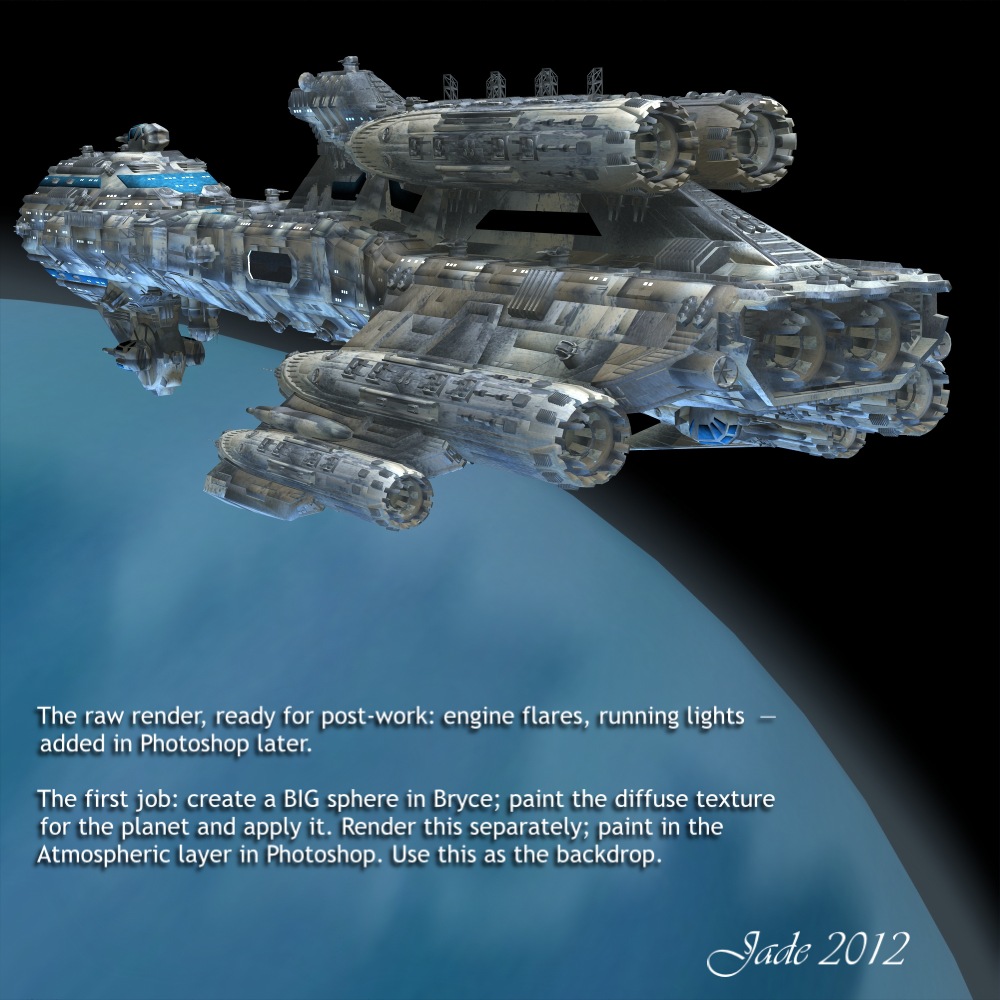
The next major element to be rendered was actually the planet! Working wholly in DAZ Studio, you're a bit hamstrung by what you can do with primitives -- ie, spheres. DAZ's spheres don't enlarge very well. When they get very big (or you get very close to them), you start to see straight lines around the edges, because these primitives are actually made up is gazillions of planes. So I went into Bryce, made a biiiigggg sphere and exported it as an OBJ. Then, I wanted to paint a diffuse map to make the planet beautifully blue ... I was thinking, Aurora, from Aphelion. To do this, I took a photo of the sky on a blue-sky day with white clouds, and in Photoshop put a heavy motion blur on it. Done -- how easy was that? The picture was saved at 2000 square, applied to the sphere in DAZ Studio, and rendered ... the render was passed back into Photoshop to that the atmospheric haze on the edge of the planet could be painted in. Save this ... pass it back into DAZ Studio and use it as a backdrop. Now --

Time to work on the ship! I know, I know ... this is not the NARC-Athena as described in the books. To built that, I need to be working in a 3D modeling program. They have learning curves like the north face of the Eiger ... in the last few years, I've either been working flat out, or sick, or (frequently) both, so I haven't had the time or the braincells to learn a new program and actually build the NARC-Athena. So --

This is actually something called the Allied Fleets Frigate, which costs about $30 from Renderosity. It's a lovely model, and you can do a lot with it. Here, I've fractionally changed the dynamic by stretching it in one axis ... and I've changed 100% of the textures on it, to get a whole new look. It was then lit from two angles. One -- the sun angle, to match the light falling on the planet (several glaring spotlights, far outside the frame), and two -- blue light reflected up off the planet. 

The ship was rendered at 3000 pixels square, and then shipped into Photoshop to have the engine flares added, and the red beacon lights marking high points on the hull, for aircraft avoidance. These were done with .abr brushes -- specifically, Ron's Bokeh Lights.

One element remained to be rendered. Yep -- the NARC riot armor...


Now, as I was saying a moment ago, I never did climb the learning curve to master a 3D modeling program and build the NARC armor as it's described in the books. But I was able to cobble together something very like the armor -- certainly good enough to do the trick, till I can make the real thing! What you see here is jigsaw puzzled together from two different body suits; two suits of SF style armor; a "survival" suit; and an SF style costume for M4. With he exception of the helmet, I'd just about defy the folks who designed the originals to tell the bits and pieces apart...

The trick was to dump every single surface map off every single bit, so the whole suit turned into featureless white plastic, and then start again, and build it back up so everything matched. Obviously, I made everything black, glossy and reflective. I made everything very smooth, and used a reflection map -- something I don't normally do -- to get uniform, consistent reflections, across the whole suit. I used the map because (duh!) I rendered the suit alone, and there's nothing else standing in the frame for those surfaces to reflect. Then ... lights. I did red, blue and gold lights to pick out the armor in dramatic colors; then this was rendered at 3000 pixels high.

In the books, the armor is made of kevlex-titanium alloy. The pieces are "smart" ... you put them on piece by piece starting with the boots, and they "smart seal" around your joints. It's incredibly heavy, but when you put the shoulder pack on, which contains the power source, the anti-gravity turns on, and you can set the apparent mass of the whole suit anywhere you want it ... say, 250 kilos, to hold you down while an explosion goes through, or 20kg, to allow you to literally jump over a house. Soooo cool. The biggest difference you see between this armor and the "hardsuits" as described in the books is the helmet. This is not the NARC helmet.  But it's a heck of a nice helmet, and it'll do! (In fact, it's one of the two helmet designs that come packed with the Sedition Soldier for M4 kit.)

Now all the pieces were assembled, and it was time to start putting them together. The first thing I did was use a lot of compressed, low-rez cut-outs to get a "sketch" going ... basically, to make sure the design I had in mind was actually going to work. And it did. So, now I imported each of the high-rez elements into a new Photoshop project that was created at 4800 pixels high. Cut out each of the picture elements, and start painting on them...


Each of the characters was painted -- skin tones, eyelashes, hair, shadows. This was where I really, really got to play with my early-birthday-present. The Wacom Bamboo mouse/tablet is a dream. This was also a great project for me to start getting in some serious practise with it ... it's very much like drawing with a fine pen, and I love the way it "shakes hands" with Photoshop. 

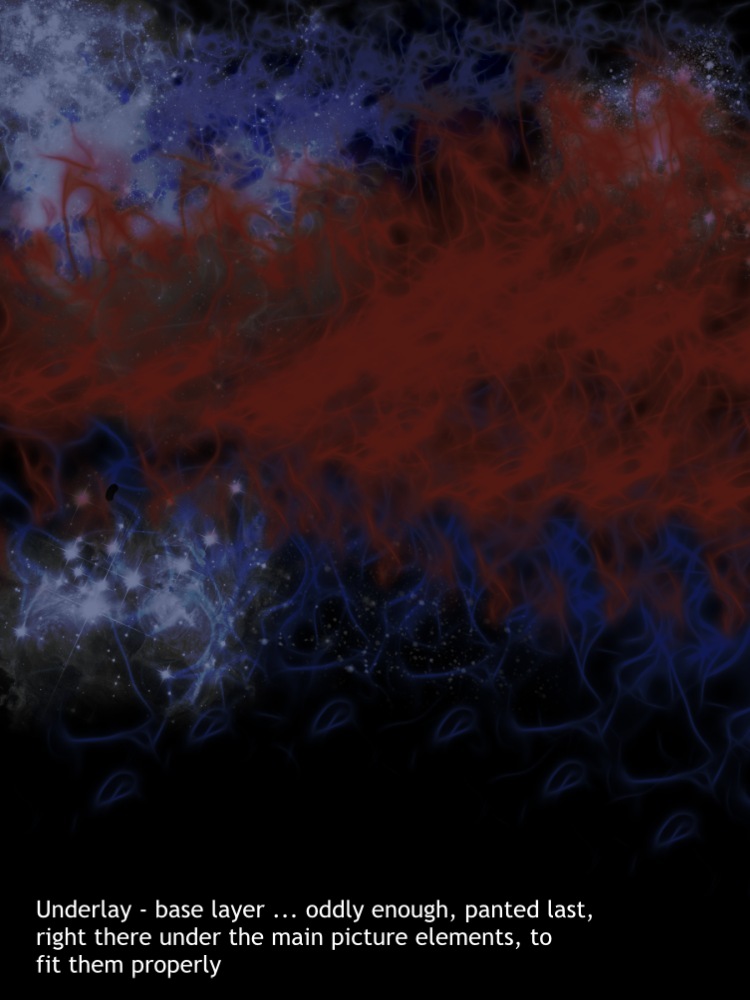
Usually, you'll hear me saying, "start at the bottom and work up," when you're building a complex piece of art, but it turns out that there are times when you'll paint the bottom layer last -- and this was one of them. I'd bucket-filled the base layer to flat black, to let me work on the individual elements; then, with them all done, it was time to fill in the background with dramatic stuff, to make the image consistently interesting across the whole frame:


...this layer was painted right there, under the major elements, so there was no guesswork about where something ought to be, or how bright, or what color. To do this, you're painting on a 4800 high canvas, with your brush size set to 2500 pixels. It's huge ... and I am soooo glad that I got some extra RAM a few weeks ago. I'm working on 16GB of RAM now (with four processors threaded to work as eight). The lag time in the painting process, from brush stroke to "done," was usually unnoticeable; only big blending strokes, using the smudge tool, had a visible, measurable lag. No problem. Slower computers will show a longer lab, but her, just be patient. This background was done in five layers: black underlay; blue "flux" effect; red "flux" effect; bright white starfields; flat blue matte overlay adjusted to juuuuust the right merge mode and opacity to give you this result. The flux effects and starfields are .abr brushes -- find them at Renderosity.

The logos were done in Serif Page Plus ... I'm still using X3, though I believe X5 is out. I'll upgrade when the newer versions do something that I can't do, and need to do. These logos were done in Bolts SF font at something like 100 point. In Serif, I did the big logo green, with gold highlights added with several 3D lights, matted on a black rectangle. Copy to clipboard; paste right into Photoshop. Get rid of black rectangle ... duplicate layer. Make a drop shadow by modifying the lower of the two (adjust lightness to black, apply heavy Gaussian blur), and jog the top layer up and right a bit. Lastly, I "walked the color" of the logo through every shade in the spectrum to find out what worked best. It was going to be green, gold or red, and it turns out, red works best.

The final effects were done in Photoshop: lens flare; a shimmer dancing off the movie logo; major lens flare falling right over the logo; and a diffuse black border under the logo but on top of everything else. Done!

WALLPAPERS
These crops from the final image are 1600 pixels wide. They'll suit almost all monitors. I have them set on a 22" flatscreen and a 15" laptop, and they look ... amazing. Enjoy!


With this project, I'm marking the third birthday of this blog! I uploaded Post #1 on September 25, 2009, which was about five weeks after I started up DAZ Studio 3 for the first time. For post work, I used Micrographx Picture Publisher until I upgraded to Windows 7 and a 64 bit system, which won't run MPP. Three years later, I still Use DAZ Studio 3, (because I -- can -- not -- stand Studio 4), plus LuxRender; plus Photoshop Elements, plus Bryce 7 Pro, plus Serif Page Plus X3. I do have Poser Pro 2010, but don't use it ... too cumbersome, and the Firefly Render Engine doesn't produce work which is one bit superior to LuxRender. I also have Cararra, in which I'll one day -- I swear! -- do the 3D modeling part. All I need is time and health. (On the desk next door, Dave has Vue Esprite with a load of plugins, and he's doing marvellous work. I need to learn that. One day...)

So  it's Happy Third Anniversary!

Next: Abraxas, in a couple of days.

Jade, September 25 ... 2012

Wednesday, December 21, 2011

Shadow and Flame ... at last!


A source of huge pleasure just dropped into my lap: at last (at last!!) the chance to paint the cover for Mel Keegan's new one, Shadow and Flame. I've been waiting to get the final draft of this one for about four months (or six...) and it dropped into my email box this morning. I "saw" the cover instantly, and the art just fell together. This took about two hours flat, including the underpainting, overpainting, creating the textures for the costumes, organizing the lights, raytracing, the whole lot. When it works, it works. Inspiration, and all that.

Here's the cover complete with the text objects:


Click on either of these to see them at full size -- I've uploaded them at 600x900, so you can see the details, because it's actually well worth a look. The whole thing was painted "bottom up." I started with a firm idea of the colors I wanted to see in the finished thing: I wanted an indigo night sky that was still light on the horizon, but with the stars out. So you set up your Photoshop canvas at the right size ... select the two colors, and do the graduated fill. Then paint the stars in a new layer. Then paint the tents in another layer,   complete with flags. Then add the fire, with flames and smoke. Flatten the image, save it, import it into DAZ Studio as a backdrop to the characters. Here it is:


The caravanserai doesn't have to be very detailed, because you're only going to see a hint of it in the background -- but it does add to the overall texture of the work. The sky is the important bit, because it's going to be seen clearly...

The final posing, lighting and texture work was raytraced (took about a half hour), and then the result was shipped back into Photoshop to have the dents and buckles in the 3D models painted out. (My kingdom for the ability to work with the Genesis model...) Then a new layer was added, and the overpainting was done to add highlights and features to the sky and the foot of the frame. Then this was exported into Serif Page Plus to have the text objects added.

Oh -- answering a question I fielded a little while ago. Someone said, "I've looked everywhere, and I can't find the tools in Photoshop Elements to get those text effects." Well (sorry), this is because the work you see here wasn't done in Photoshop Elements 9. I have no doubt that if one paid $700 or some over the top price for the full-on version of Photoshop, the tools would be there! However, who can afford that? The text objects I do are always done in Serif Page Plus ... and I'm still on version X3, which does everything I need plus about 300% more than I need! X5 is the current version, and if/when I ever need to upgrade, I'll upgrade. Can't say I'm in any hurry, as I have far more tools than I could ever use in X3.

The title of the book you see here was done by setting up the font, adding boldface, adding an outline, setting a color fill for the font, then another color for the outline; then setting an outer bevel on the whole thing, before configuring 3x 3D lights with ambient, specular and diffuse values, and jiggling the position of the lights to get just the right effect. Took about ten minutes to get it juuuuust right.

Incidentally, the book will be out in January, when we have a small raft of new titles going into distribution (One of them is The Road of Birds, which you might have seen in yesterday's post). We don't want to release anything at this time of the year, because the way new books go cascading through the vendors' pages (places like Kindle and All Romance eBooks), blink and you'll miss them ... and at this point in the year, most people are not even looking, much less not blinking! January 10 is our target date to have a number of new titles out.

This one was a lot of fun ... and I'll be back, with a Christmas card -- as soon as I figure out what in the world to paint this year!

Jade, 22 December


Monday, July 18, 2011

Book covers ... challenge accepted!


Book covers again, but in fact if you take the font objects off them, the works themselves are very nice pieces!

And what do they look like, when the text objects are overlaid? Take a squiz:


People often overlook the importance of the text objects, but the fact is, they can be almost artistic in themselves. There's so much you can do with fonts and font effects.

Looking at these pieces makes me go back to a discussion I read online a long time ago. It went along these lines: "If the guy, or guys, have their clothes on and are not actually in a clinch, how do you know it's a gay or m/m story?" There's no easy answer to that one, unless the image is also loaded with "gay signals" ... you know, like the blue kerchief in the right hip pocket, nudge nudge, wink, wink. Which tends to be more separatist than inclusive these days, yes? Or is it just me?

Anyway, we're making up all the epub versions of ebooks from waaaay across the years, and it's a great opportunity to indulge in suites of new art, and to touch up some images which were done eons ago.

Sorry for being brief. Must go and lie down for a while, and try to get warm. It's midwinter and coooooold, even when you're not sick. When you're sick to boot, it's a bit dire!

Jade, 18 July

Wednesday, December 16, 2009

A little romance -- Yaoi style (plus fonts, and how to tie them in knots with Serif!)

Finally --! The dancer and the gypsy get it together ... looks like they've patched up their differences, and maybe the gorgeous little tyke will come home, now he's had his "fifteen minutes of fame" in the spotlights! I love happy endings.

And of course I rendered the MA-15+ version of this -- but I wasn't going to upload it to this blog, which is a "general audience" blog. However, I also consider well-behaved vignette artwork like this to be "general," because it's high time the world at large recognized the rights of gay couples to be couples, and be married, and ... okay, Jade, off the soapbox.

But if you're "of age" and would like the adult version -- consider yourself warned, and click here. It's not R-rated, just ... well, in DAZ Studio 3 you can, um, "lose the costumes" by clicking an icon that looks like an eye. Eye open = they have their pants on. Eye closed, uh, no, um, costume. I stand by my art: it's a *very* beautiful image, but it's also one step further than I want to go on this general blog. Enjoy!

How do you get this shot? Well, it's exactly the same backdrop and characters as the shot you saw yesterday:

Go back to the original post if you want to reference it at 1000 pixels high. The lights, everything -- the same. The only difference is the pose and the expression on the gypsy's face.

There's four ways to do poses. You can do the whole thing yourself ... which is fun, but it takes a while to learn and you can get some hysterically funny results. You can literally twist a guy's head around backwards! You can also buy sets of poses -- but they tend to be a bit "cardboard," and you see this especially when you put two characters together. Something will always need to be adjusted -- which gives you the third way: start off with a stock pose and adjust it to get what you want. Which gives you the fourth way: when you have the pose you want, you can save it and trot it out later as a "pre-set," which saves you loads of time.

I have to say I *love* this lighting set. It's the rich blue-greens, and what they do to the olive skintones and the tribal tattoos. These colors, I could look at forever.

The other thing I wanted to talk about is how to tie font in knots with Serif. Okay, everybody knows about buying fonts (you can also get some fantastic ones free. Try this: http://www.1001freefonts.com/ -- the site is fantastic, and you can get anything you'd want to do artwork.)

But what about if you wanted to take a font and rip it up, or tie it up, to get a signature like this:

You cannot buy the font out of which I used the J for Jade. That was made up by yours truly, in about two minutes flat, and if this interests you strangely, stay with me for a few minutes and I'll tell you how!

In Serif X3 or X4 (actually, as far back as version 10, but very few people are still using that) you get really clever with letters. Here's how you do it:

First, forget about your text frames. They're for writers and publishers. When you're doing art, all you want is the Text Flyout -- way over on the left, in your toolbox looks like a Capital A with a down-pointing carrot beside it. Take the default setting, which creates plain text in a box you can size and stretch. It also defaults to Times Roman, so this is probably the first thing you want to change. You must have something in mind that you want to create, so pick a font that at least gives you a start -- serif or sans serif, meaning with or without the little ticks that differentiate Times and Palatino from Arial and Optima.

Okay, type a letter into your box and drag it out to at least 40 or 50 point, so it's big enough to work with. Now, select it ... and RIGHT click on it. A dialog pops open, and the magic is about to happen. See at the bottom there, convert to curves...


Click the curves option ... and the magic is about to happen. This is the next thing you see: ...and you're about to discover a whole new toybox, because every one of those little squares is a "control node" which you can catch with your mouse and pull or push. You can also click between the nodes and pull or push, and create a nice convex or concave effect ... and if you double-click you can create a new node any place you want it.

Then, you can stretch and squeeze the letter to get the exact dimensions you want; then get into the same bitmap fills, drop shadows, bevel and emboss, 3D light effects and such, that I was talking about yesterday, apropos of borders.

So there you go: Serif for artists. I know it's marketed as a DTP package, but there's more in it for artists than for writers and publishers. I love Serif, Irfanview, Micrographx and DAZ -- and here's the trick: put them all together, legal versions, and you're under a hundred bucks!

Mind you ... getting into DAZ 3D you also have to think about buying models, and I guess I ought to talk more about that. I'll aim at this for tomorrow.

Jade, 17 December