Showing posts with label Bryce 7 Pro. Show all posts

Saturday, August 10, 2024

Watching old artwork "pop!" in Photoshop. Nice!


The Barbarian was rendered original in Lux (which doesn't even exist anymore); the drowned city, the house by the sea, and the spacecraft were done in Bryce 7 Pro (!); Mr. Lace Shirt and the grieving warrior are raytraces. I've just spent a fascinating hour or so, running them through Photoshop. Nice! It's amazing to see the old work "pop" when it's given the proper treatment, which is why I keep posting selections of the old stuff. Second Life. The truth is, 12 and 14 years ago, I didn't do justice to the old renders. Many of them -- ten years old and more now -- are still delicious images even today. 


Having said all that, my fingers are itching to start Studio again, and get back into rendering. I haven't done this in waaaay over two years, and I'm trusting to "muscle memory" to get me going again, because I'm racking my brains for the details, and, um, it's been so long, I'm hazy, lol.


I did need to generate some book covers a few weeks ago, and I had intended to do a lot of the work in DAZ and Iray, but the way things worked out, time-wise, I ended up doing the whole thing in Photoshop. The author was delighted with the result, and now it's over to the publisher to decide which of these (if any) will jacket the book when it's published in a year or two...


See? I can still do this, lol, I haven't forgotten how! I just have gone somewhat hazy on the finer points of working with Iray, and figuring out how to get Studio to raytrace ... because I really, really, want to PAINT. Here's the thing of it: start out with a raytrace, and you can paint to your heart's content and end up with something beautiful. Start with an Iray render, and you really can't: it's like painting over a photo, and when you add digital painting to a photo, it looks soooo fake. You don't get "hybrid art," you get a bit of a mess, actually. So ... I want to paint, which means I need to be raytracing.


Luckily, the raytrace texture sets have been supplied for the props I've bought in the last six or so years, with the exception of the Iray shaders, which are (duh) Iray specific. But the thing is, I used to make my own texture sets (call them shaders) for the raytrace engine, and it was a lot of fun. So -- yes. It's just a question of getting the time away from a blizzard of work. I'm working on it.

More soon. I have some news, which I'm not yet at liberty to share, but it should be fine to share it next week. Hope to be back here sooner than that, because I'm aching to get back to art.

Thursday, December 3, 2020

The Hulk has landed!

Eventually, the day had to arrive. HAPPY NEW COMPUTER! It's been a year since I turned off my old sesktop before I fried it; I haven't even tried to do art in that time -- therefore, the old machine still works, and will stay right here it is. And the new machine, designated "Hulk" on the LAN, is here some weeks early (thank you, Dave!) ...


It's humongous. Also whisper quiet and running cold even i the hot weather since summer began. Look at the size of the main cooling fan; there are two more in there. Whooooo!!! 😁😁😁 Dave hooked it up for me (saves my back and knees the hurt of climbing around under the desk; and I appreciate this muchly) ... and I took over, to install software. It's my Christmas present, of course. Happy, happy, joy, joy!

For those who are into the hardware side of things, here are its specs:

  • AMD Ryzen 9 3900XT, 
  • 12 cores threaded as 24; 4.7Gh; 70MB cache. 
  • B450 Tomahawk motherboard (MAX AM4); 
  • 16GB of RAM (Thermaltake ToughRam Z-ONE RGB, DDR4 3200Hz, CL16 Memory). 
  • Hard drives: SSD, Samsung 970 EVO 1GB boot + 2GB internal. 
  • GPU: the MSI GeForce RTX 2070 Super Ventus GP OC Edition, 8BG, with another dedicated cooling fan (Thermaltake Pure 140mm). 
  • Bluetooth 5.0 (NIC Herald).
  • Power source: Thermaltake -- Suppressor F31, with its own big cooling fan. 
  • 8 USB ports, half of them USB3, one USB C, plus ethernet, 4x speaker-line outs etc.,
  • Win10 64. 
  • "Water cooling ready;" and we can double the capacity of the GPU and RAM, if needed

Sooo, the first thing was to "migrate" from one machine to the other...


A couple of days saw me slogging through the job of installing miles of software.Word 2016, Affinity Publisher, Affinity Photo, Krita and Irfanview were all quickly on, though I needed to import about 750 fonts, plus 4,500 brushes to the photo and paint programs, from my old system. Turned out to be easy. Next came Amberlight (on and tested) ... then, when everything was set, I got into the big stuff, for which The Hulk was built (by IT Warehouse at Marion).

First bit of bad news along this road: Bryce 7 Pro is a 32 bit program only, so it will not run on The Hulk. End of statement there; and all the more reason to keep the old computer on and working (it's a Windows 7 machine, 32 bit, and though Bryce stresses it, it will run okay).

DAZ Studio was an all-day install job, to get the new version (4.14) plus enough "assets" to get my oars back in the water. Done. Then, start up DAZ and ... urk. Talk about a learning curve! The interface has changed significantly from the 4.11 I was accustomed to; and I've simply forgotten a lot. I have to relearn some things I used to do automatically. Also, Studio is simply not cooperating in one or two ways, though I'm sure there's either a solution or a work-around. I'll get there; I;m just not quite there yet! 

I also have to manually install many hundreds of third-party assets, from Renderosity and various other 3D marketplaces. That will be a loooong job, so I'll do it a bit at a time. Not a problem, just a chore.

First bit of fabulous news: the unbeatable "file save error" I was getting on the old system right throughout 2018 and 2019 has not, repeat not, recurred in Studio 4.14 under Win10. I can now build a project, save it, reopen it, and have everything right where it should be.

The downside? I can't seem to get raytracing to work! This is terminally weird, and I'll be working on the issue. It's way beyond odd. But that's my problem, and I'm on it, albeit slowly.  

Can't wait to see how this system handles the workflow. I'm hoping that what took three hours last year will take twenty minutes now. At the moment, everything is working fine, and the system is dazzlingly fast; I just have to climb halfway up the learning curve before I have pictures to upload here; and I'm thinking that I might blog my progress in Studio 4.14,  just as I blogged my baby steps, 11 years ago, in Studio 3! Stay tuned, and bear with me. At the same time as all of this, I'm editing a novel, and while it's not actually difficult, it just guzzles time. Eats up your day and pushes art to the sideline. Done by Christmas, though, and then ... art!!  

Tuesday, November 12, 2019

Touching base ... have been soooo ill!


Forgive me if I'm reposting some eye candy from long ago -- some of it eight years ago! I've been ill. Very. Anybody out there ever had gastro? The real, genuine version ...? Uh huh. Few times in the last week, I thought it would be easier and kinder just to roll over and die quietly! Anyway...


One doesn't get to make the decision in these cases, so there really was nothing for it but to lie there feeling like the living dead, and eventually get well! I suppose I'll live after all. So --


-- just reposting some images that haven't been seen in months and years. Easy to forget them! And I'll be posting fresh pictures as early as tomorrow. Ooooh, the images I have dancing in my mind's eye right now. Just need the time (and energy) to render and paint. Stay tuned ... and sorry for disappearing on you for ten days.

Monday, November 4, 2019

Sports car in Iray ... and luck with a great skinmap for M4 in Iray, too!


Iray ... a quick Bryce 7 Pro sky used as a backdrop ... sports car ... Michael 8 ... nice! This is far from the first car I've rendered, but it is the first time I've done a car in Iray, and -- I like it. I didn't even have to switch out the materials: the original materials as supplied with the model rendered just fine. It's called the f612 Italian Sports Car, from the DAZ marketplace -- I bough it about eight or nine years ago, and it's still available. Here you go:

Catalog image. See this.
It's low-poly enough that even my old system was able to render the car and set in an hour, and when I added the Michael 8 figure, plus hair (Shavonne) and costume (Cool Style) and a shader on the shirt, and a chrome shader on the wheel rims, I went to 90 minutes. The car still only $12.95. and -- thumbs up on this.

I can't remember the fantasy novel I'm trying to think of right now, but the name of Lackey comes to mind, and part of the blurb was, 'There are elves out there, and they drive too fast.' It was some urban fantasy, tall elves in our world. So you have got to know what I'm thinking right now. Ahem! Stay tuned.

Also -- at last! -- a little luck in the hunt for Michael 4 skinmaps that don't look 'dead' in Iray:


That's the Jagger skinmap, which you usually see on Kevin Jarrat (in the NARC renders ... one of my all-time favorite characters -- him and his other half, Stoney, nudge, wink, and cheers to Mel Keegan as the creator of same). You also see this skinmap on the Vampire Amadeus ... so I really, seriously, put it to the test in Iray the other day. I slapped it onto an old character of mine, 'The Conjurer,' and gave it an hour in Iray. Thank gods, here's a third skinmap that looks terrific in Iray. The other two are Ferendir and Atlas; virtually everything else I've tested to date will render, obviously, but the results is disappointing, especially when you're trying to render the old Generation 4 figures half the time, because Genesis 8 is so high-poly, your computer is having a hernia, LOL! Sooo...

Here's the old Conjurer character in Iray, wearing Jagger. very nice result ... I used the "hairy" and "bearded" options, which is different from Jarrat and Amadeus, who're smoothies. I like this, so now I have a pale (Ferendir), a swarthy (Atlas) and a medium (Jagger) skinmap for Michael 4, all Iray-friendly. This, we can work with.

One thing that bemuses me, though, is the way one face morph can change utterly as it's processed in a different render engine. Here, above you see my Conjurer (actually, he has a 'stage name' -- Cassandro; I guess in this render we're seeing him at home, not on-stage). That's the exact same face morph, I didn't do anything to it. But here's the same face, in LuxRender, back in 2012:


And here's the same face in 3Delight about ten months ago:


You may need to see "Snake Charmer" here at larger size to see the face clearly. I'm still shaking my head, that one face can come up looking so different as it passes back and forth between Iray, LuxRender and 3Delight. Go figure.

Anyway, we are now officially having fun, and Michael 4 has his oars back in the water, for Iray! It's taken me eight months to answer enough questions to know what I'm doing, and can do, with this computer; and we're now also officially on the count-down to The New Computer, in about a year from now. It'll either be my birthday pressie or Christmas, and since those dates are only 51 days apart, there's not a lot of difference. 😃 (Yes, I just had a birthday. Yesterday, in fact -- one of the reasons I didn't post yesterday: was out gallivanting.)

More soon!

Monday, June 17, 2019

Mister Versatility himself -- and a boat! Terragen, Iray, and more...


It's always tempting to see the 3D characters as actors, and if they're actors, they can walk out of one movie and right into another. Hmmm. So --


Yesterday's Conan is today's undercover cop, roughing it in some slum zone, busting the kind of people who sell firearms out of the trunk of a car. Neat! (Just a raytrace, set up to look like a flash photography shot. A closed set, and somene just popped a flash in the dimness. Very effective. Also, am very pleased with the bump mapping on those hands: they look realistically battered, as any adult's hands usually are! Garbage as set dressing is also interesting ... a wheelie bin, an abandoned chair and an old pallet! It was fun overdriving the bump and displacement maps on everything. Very pleased with the floor...)

Say, this is a still from a movie that hasn't been made -- which leads me back to remembering the b&w 8x10 movie stills we used to collect back in the days of yore:


It actually looks very good in monochrome. I might see what Iray can do with this tomorrow --

Speaking of which, I did feed yesterday's Conan into Iray, and came up with this:


The best thing about this render is that floor! IRay also did a great job on the Anubis statue and the ax blade ... but every bump and displacement map dropped out, and nothing, repeat nothing I could do, in this project, would get them back --


That's just the basic diffuse maps on everything; and adding whatever shaders were supplied along with DAZ Studio 4.10 didn't work or help ... and I do not intend to spend several hundred dollars on shaders, and work all day to get a single picture ... not when the shaders are free with Reality 4.0, and they're configures with a single click. Aarrggh. I blew a couple of hours on forums, following a Google search: "bump maps not working in IRay." Uh huh. So I'm not the only one to have this problem? And it turns out that overdriving the bump values is not the solution after all: I tried it on this guy, here, and it didn't work. Back to the drawing board. The forums, incidentally, were (to quote Jack Sparrow, enormously not helpful. Ten people made suggestions which didn't seem to work, then the thread petered out ... in 2016. Every single time, the bottom line with IRay seems to come back to buying shaders, which may or may not even exist (they don't for Michael 4), and if they do, they cost a packet! Ack.

Mind you, this is a fairly good render; it's not quite photographic, because (duh) no shaders are available for M4, and even if they were, I don't have them. But this picture is still trying very hard to be a photograph, which made me wonder...


Yep, a movie still from a film that doesn't actually exist! Nice one.

Also -- soooo pleased with this picture, in Terragen:

Elven Boat at sunset, in Terragen

In that past, I've rendered this boat prop a couple of times in Bryce 7 Pro, and never been very thrilled with the results. It just looked ... flat. Here's the best I was every able to squeeze out of the Bryce engine, with this model and its maps:

Same model, in Bryce 7 Pro. Hmm. 
You'll see what I mean if you take a look, full-size: flat as the proverbial bikkie. Bryce images so often look like tabletop dioramas. So imagine my pleasant surprise when the Elven Boat prop began to render in Terragen, and I saw this coming up...


...whoa! Check out the texture in the wood, and the reflections of the lantern in the water. Now, that is impressive. This is the first time I've rendered something man-made in Terragen, and only the second time I've rendered an OBJ. The other one was a tree, a few days ago. This could get exciting! 😀

Anyway, that's been my day, art-wise. And so to bed, before I go to sleep here and my face hits the keyboard. More soon!

Sunday, June 9, 2019

Ronin, Xeno, and a lot more!


Been busy ... fiddling with IRay, trying to get it to play nice. Sorta halfway there, although we're not seeing the glorious skin tones that are definitely possible:


Right now, what I can squeeze out of IRay using Michael 4 is like ... "raytacing on steroids." These are seriously nice renders. They're not photographic by any means, but very nice renders. Have been reading on forums and tutorials, and (most old hands at this say) it comes down to needing to buy all the maps and shaders in the world to get those glorious skin tones. And here's the stumbling block: there are no shaders available for Michael 4. They only entered the repertoire with Genesis. The old figure is pretty much abandoned as per specialist shaders, which means that coaxing photographic results out of IRay with Michael 4 is probably not possible. I can maybe improve on this a bit, but to get astonishing results, we'll need to look elsewhere.

Try this for size, for a start:


I did this in 2015, in Reality/LuxRender. In Reality, it's just a few clicks to configure it, and you can re-re-readjust the lighting on the fly during the render. This was done with Reality 2.0. The current version is 4.3; and I got this result in about two hours flat, including posting the model:


To my eyes, this looks better than the IRay render of the same character (same skin map, same lights, same everything). The Lux Render is actually tickling the line of being photographic ... and the software is 100x easier to use than IRay. Soooo...

Just waiting to get the bugs ironed out. Waiting for tech support, but they only write/reply once per week, and this is taking forever. *Sigh* Anyway, at least I've learned the Studio 4 interface backwards and sideways while trying to coax a decent render into being!

And in the course of mucking about, I found some extremely rudimentary morphs that allow you to at least make Genesis look like an adult rather than Peter Pan:


It still looks like a cartoon of a human, but at least it's not an adolescent body form now. What really is creepy is, if you "hide" the costume so as to see the torso, there isn't a detail on the skinmap. No freckles or hair chest, sure, I can see the sense of that. But the Genesis doll has no nipples, which looks ... creepy. You can put body builder muscles on this guy, and he has no nipples. You don't realize how odd it looks till you see it. I guess mammals are as mammals do! 😮 Alas, to do much more with Genesis, you have to chuck a lot of money at characters, toupees and costumes. Right now, I don't have the cash, it's as simple as that! You'll have to bear with me while things chug along as fast as they can. Blame the dentist, LOL.

Also -- something very exciting is happening:


Yes!!!! There is a new Mel Keegan book on the way! This is fabulous news, and it's been a thrill designing the cover. I did most of it in Bryce 7 Pro, working with an old image from years ago, which was re-edited to take out the ocean, move the mountains and so on, so that the background started life like this, kinda like a Chris Foss book cover from the days of yore:


...before it went into Serif to have the byline added, then into DAZ Studio 3 to have the character rendered, then into Photoshop to be painted, then back into Serif to have the title overlaid. There might be some nips and tucks or tweaks to be done to it later -- I have all the files, it can be adjusted at whim -- but the author is delighted with this design. And so am I!

That's all from me for today. More soon ... still experimenting at full throttle!

Saturday, June 1, 2019

Strange allies, IBL lighting, and open dialogs


Staying with yesterday's theme and recruiting two new characters (well, you'd have seen them before if you were looking at this blog 4 - 8 years ago!), here's "Strange Allies." The idea is, absolute opposites team up and go finish out the adventure. This actually works really well ... the Big Green Guy is built on The Freak, which is something like DAZ's "Hulk," except he wasn't green in the original model --

Changing to skin tone (color) of your character to any color you like is actually easy. Go into the surfaces tab and select everything except the eye textures. Set an appropriate diffuse color and you're done. Leave the eyes alone, but do go back in and make the lips and nipples a slightly darker and/or different shade. Since the rest of this guy is so green, I went bluer for the lips and nipples. Neat.

The main thing I've been playing with today, with various and hilarious degrees of success, is IBL lighting. That's Image Based Lighting, and I've never honestly understood it before. Then I stumbled over a couple of things. First, the best tutorial in this weird art that I have ever seen: he not only walks you through an interface to show you how it works, but explains the theory ... which was grand for me, because he was demonstrating in DAZ 4.10, and I wanted to use it in Bryce 7 Pro! So --

Bryce 7 Pro IBL Lighting experiment #1
As the caption says, that's not a fabulous image by a long shot, but for me it's a milestone: first time I have ever managed to do IBL lighting, and have it work, and ... I was in control of it rather than being taken for a ride! Whoo!

Rather than launch into lengthy (potentially boring) explanations here, for those of you who're artists, I'm going to pass you to the video:

That's the best ever ... now I know what the heck is going on! Also, I stumbled over a great archive of fantastic HDR photos -- free, thank gods -- which are used for IB: lighting. If you're an artist, and trying to get your head around this: sIBL Archive is where you need to be. It's an astonishing suite of images that give you every kind of lighting imaginable.

For the Bryce experiment, above, I used a shot of a desert highway with a bright, big blue sky. This is going to be interesting, because DAZ Studio 4.10, Bryce 7 Pro and even Terragen all use IBL lighting. If I can once get my head into this space, we can expect some seriously lovely images.

Speaking of 4.10 ... the dialog is open with DAZ Tech support, but it's taking a looong time. It's six days now, since I put in the ticket, and I'm only one small step closer to being able to load any of the new figures. Tech support works nine to five, Mon to Fri ... so you can only bounce messages back and forth 2-3 times a week. It could take a month to get Studio working properly. 😢

Having said that ... thank gods I still have Studio 3! I am playing in 4.10 to learn the chaotic, micro-miniaturized interface, but to actually do any work, I revert to the old standby. Right now, the only advantage to 4.10 for me, personally, is that its render time for raytraces is four minutes against 45+ minutes! But to balance that out, almost inevitably some of the content of the Studio 3 file I open in 4.10 doesn't load ... and though it is dead easy to load the missing content as OBJ files, these files seem to do something to the mapping on the characters, making Michael 4's skin go ... bonkers. So if a character "leaves his hair behind," he's going to be bald, and like it!

Ack. Anyway ... we soldier on.

Wednesday, May 29, 2019

Adventures in IRay, Terragen, Bryce and ...!


Yes, you're right: that's trusty old Michael 4 -- "The Man in the Hat," as you might know him from a fair number of renders on this blog! The difference? It's an IRay render. Turns out, IRay is actually built into DAZ Studio these days, which is neat. Also neat is that is does 80% of the textural work automatically ... however, the last 20% is stuffs up royally, and unless I'm missing something major, there aren't any controls in DAZ Studio 4 to fine-tune IRay: you need to drop US$50 and get IRay Studio, a plug-in. Well ... if I'm going to drop A$75, I'll probably opt for Reality, which is an interface I known and trust from past experience. IRay is fast, sure: the render, above, took about 50 minutes with a lot of stuff running in the background. It'd have been faster if I committed the whole computer to the render. But the new Reality is supposed to be up to 20x faster than the version I was using years ago, so it's a safe bet, these two, IRay and Reality, are comparable. So --

First, today's new art:


Terragen: that took about half an hour. It's pretty simple, but quite effective. I need to jog my own memory on Terragen ... haven't done it in a month or two, and am starting to forget! I know I need to wrap my head around procedural terrains, then get into working with objects. Like trees and plants. Just a few experiments to see how long renders take, involving trees. If it pans out to a render taking three days and tying up the whole computer to get an image with a tree -- forget it. Won't know till I try, right? And ...


Bryce 7 Pro, and a rather nice abstract. No way will Bryce give me realistic landscapes, but by golly, you can make it render some very nice arty-tarty images. I like this kind of thing a lot. Must do more.

And then, I decided to put a couple of recent images through the IRay process to see what it can make of them. Here we go:


Now it's starting to get interesting ... though I have no control whatsoever over what IRay is doing at this point. This is "click and go" stuff. And IRay is making a mess of a lot of the textures: it was Photoshop to the rescue" to fix this picture, after it refused to "see" or "apply" the diffuse maps on the plants on the foreground. They were white plastic, when rendered -- so weird. Anyway, Photoshop fixed that and saved the picture. For comparison --

Left: IRay. Right: Raytrace
That's worth a look at large size. The other challenge about the IRay render of this was that Studio 4 couldn't find the sword of the tree ... I had to import those as OBJs. Which is easy, I guess, so -- no real problem. Just a few minutes' extra work. Quite impressed with the quality of the basic IRay render, though I also see the art value in the old fashioned raytrace. (Incidentally, that on the right is the raytrace from Studio 3. Interestingly, the deep shadow map image choice seems to have been deleted from the 3DLight engine built into Studio 4.10 -- with good reason. Its raytrace feature is FAST. I mean, lightning fast. Cool.)

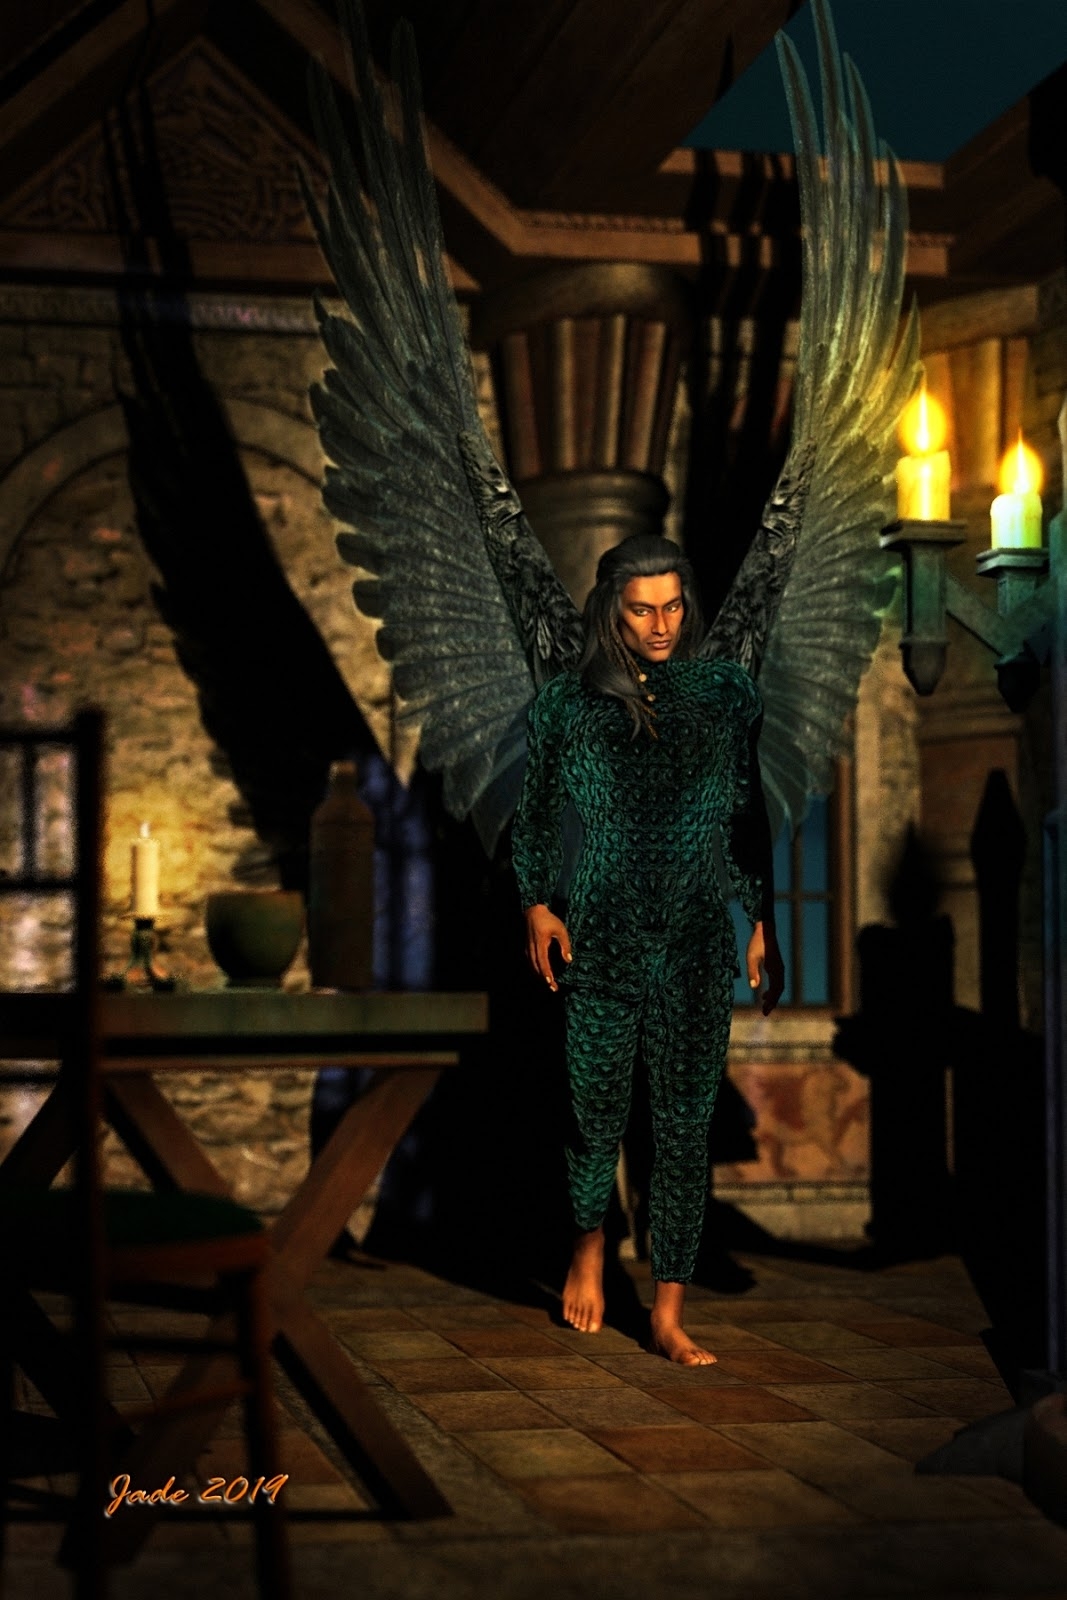
Here's the recent "Jack," sent to IRay:


Not bad. Far from brilliant, because, as I said, I have zero control over the render engine: this is just "click and go," and Iray is utterly ignoring a lot of the mapping. The venous map on the Michael 4 has dropped out; it made a mess of the texture on the shirt (Photoshop to the rescue again), and I think the skin tones are washed out. It was an adventure getting this picture into Studio 4, in order to send it to IRay...


Problem 1: when Studio 4 opened the Studio 3 file, it left the hair behind! I did a test render to make sure it was worth going on, and when it was, I imported the hairdo as an OBJ. That's dead easy; but the next test render showed that Problem 2, adding an OBJ to the scene made the skin tones go utterly bananas in the raytrace. So I sent it to IRay and crossed fingers, and ... Problem 3, sure, IRay renders the skin fine with the OBJ-hair in place, but it makes a complete muck-up of the shirt. I gritted my teeth, finished out the render, put it in Photoshop and repaired it, to save it. Hmm.

Next thing I must learn is how to control the surfaces on IRay -- or make the decision: do I drop A$75 for IRay Studio, or for Reality? Because without one or the other, you'll get these problems all the time.

Before you get excited about the quality of the renders today -- hang on. First, these are auto-generated by the plugin, and they are NOT high-rez images. This one, below -- not my work: a catalog image from the DAZ store -- is a high-def image:


It's chalk and cheese. First, obviously, that's a Genesis 3 figure, whereas all I have to work with at the moment is Michael 4, because I am still waiting for help from Tech Support at DAZ. Right now, I cannot add content to Studio 4 ... any content at all. So all I'm doing is posing stuff in Studio 3, then opening it in Studio 4, giving it a tweak where possible (it seems not much is doable, when you're trying to interface with IRay without having the IRay Studio plugin), and then clicking "go." Sooo...

Suffice to say, there's a lot to learn, and/or a lot to buy. But I've made a start, and if Tech Support can get the SQL problem worked out, we'll be a step closer to having oars in water. At least I'll be able to work with a figure comparable to the one you see above. Till then, I can certainly get into the numbers and see if I can figure out how to configure a high-def render, rather than a "click and go" automatic one. And there are more problems beyond this --

Spent some fascinating (not!) hours on the forums, where people are screaming blue murder about not being able to install third party content into Studio 4. Hunh. About 70% of everything I have is third party, and if DAZ 4.10 won't load it ... well, we'll see. Maybe I can find a way.

The adventure continues...!