Showing posts with label firelight. Show all posts

Thursday, February 4, 2021

Old props, new surfaces, and lighting fires in Iray


Spending a cold, wet day installing old, old props and working with Iray shaders and surfaces to bring them up to spec for rendering as we understand it today. This, above, is DM's old Fantasy Musings, which goes back to about 2012, and is actually still available. The product notes say, "The entire content of this package has been optimized for Poser 6 and above. Not tested in Daz Studio. Some materials will need adjustment." And of course, when this was uploaded, Dannie and Maforno were talking about the 3Delight render engine, not Iray! The truth is, to get it working in Iray took some considerable time, but it was worth it. It renders up nicely. And of course --


--even if you were inclined to stick to poser (I bought Poser Pro 9 and never really got into it; I didn't have any space whatsoever on my C:\ drive to install the figures and props, and Poser wouldn't load content from any other drive, so I was sunk!) ... well, if you were inclined to stick to Poser, the aforementioned Poser 6 is long, long out of date. Ahem. Anyway...


This, above, is the old Dinokonda, which I used to love rendering ... in 3Delight. I just gave it a shot in Iray, and honestly, you had to cringe, LOL. So I spent an hour with the texture maps and redid everything; I still can't get quite the response from Iray that I keep hoping for, but it's not bad. What I'm still trying to work out is gloss and reflection. Right now, it seems to be a kind of "all or nothing" scenario: if the Glossy Layered Weight controls are there, bonza. You can do it. If they're not there -- you're up the creek. I'm sure I'll find a way to do this eventually, but for now I'm pretty happy with this; It's looking almost as good as it did in 3Delight -- not quite. There's room for improvement, and the next time I'm in the mood, I'll keep on experimenting, see if I can get closer to the old work:


More soon ... now I must get some actual "work" done! It's writing and editing stuff, of course ... but it won't do itself. I'll leave you with a closer look at the part of the picture I'm most pleased with -- the flames. I managed to turn the props into light-emitting fire -- gotta like this Ciao for now...


Friday, August 7, 2015

Visit a Gypsy camp in LuxRender, Bryce and DAZ ... and Smith Micro said to me --

LuxRender: Leon and Roald at the Gypsy camp.
(click to see all images at pinup size)
DAZ Studio raytrace painted in Photoshop:
Roald at the fireside
DAZ Studio raytrace in four "laminated" layers:
Meet Iphigenia ... at the Gypsy camp (Abraxas, Chapter 10)
Bryce 7 Pro: the ruined cenotaph beyond Esketh
Bryce 7 Pro: atmospherics and dawn light:
the foothills on the way into the Blue Mountains

Viewers/readers with somewhat long memories will know what they're looking at right here! Yep. I've been delving into The Forgotten Songs again, since the plot notes, which were lost for upwards of a year and a half (!) turned up unexpectedly. And --

Wow. Going back into Abraxas with the resources of LuxRender and Bryce 7 Pro puts a whole new spin on this stuff. Check out this closeup out at full size, guys (it's 1000 pixels wide), even if you don't click to see the leader shot at full size:


Now, that's LuxRender for you, and I'm impressed. It's 90% of the way to a photograph ... like a still from a movie that doesn't exist. 


-- the render is high-rez enough for the venous map in the hand to show. I usually slap on a venous map, but you often don't see it. The map is a bump map (or displacement map, if you want to go that far) which raises the patterns of the veins in torso, hands, arms, so forth, for an added layer of realism. It's great to see this tiny detail in a render; like the wrinkles in the knuckles, too.

The third render for today -- where you meet Iphigenia (you've actually seen her before ... yep, that's Iphigenia in the underground with Leon, in the intense heat and humidity; ergo, a lotta skin, which is pretty typical of fantasy! (Have you noticed how, in movies, guys are dressed from neck to ankles while gals are flitting around in teeny little costumes? Either he's dying of heat stroke in those clothes, or she's freezing! Anyway, that's Hollywood for you, right?) Where was I? Ah yes --

The third render for today, the big scene at the Gypsy camp with all three characters, is a composite shot. It's actually FOUR renders laminated/layered together, starting with an old Bryce skyscape as the bottom layer, and ending up with the foreground vegetation rendered separately:


You start out with a Bryce sky and use his as the backdrop for a dead-simple background image rendered in DAZ Studio (hint: this can be low-rez; not even raytraced -- doesn't need to be). The shot was done at 3000 x 2000 pixels, shipped into Photoshop, blurred, painted, color balanced etc. Then it was shipped back into DAZ Studio to be used as the background for the middle-ground subjects: two Michael 4s and a Victoria 4, with character morphs, wigs, skin maps and costumes, plus a gypsy wagon (the proper name for which is vardo, incidentally...) and the campfire. Only three lights were set and the scene was raytraced ...which took about seven HOURS, just to render this middle ground. The render was sent to Photoshop to be tweaked and painted; then it was shipped back into DAZ Studio, where it was used as the backdrop for the foreground trees, bushes and grasses. So you had a four-layer render, plus --


-- quite a bit of Photoshop painting with those special brushes, after the fact, to get the teeny little details in. Why would you do the image this way? Because it allowed me to do the whole shot in something like nine hours, including painting. If I'd set out to raytrace the entire scene, all of a piece, it'd have been a 20 or 30 hour render.

Maybe it's just me; do I not have the patience to spend 30 hours on an old fashioned raytrace?! Does anybody have the patience these days? Right now, if we invest that kind of time in something, we expect a LuxRender or Octane image (ie., a photographic result) at the end. Beacause ... wellll, with the best will in the world, if you compare a closeup of the three-character raytrace --

(please view full-size ... it's 1600 pixels wide)
-- with the LuxRender fidelity ... no contest. The raytrace is like storybook art. There's nothing wrong with it. But the stuff coming out of Lux and Octane is generations beyond.

Not long ago, raytracing was the be-all and end-all of 3D rendering on any "civilian" desktop; and when I started this blog, I couldn't even raytrace! If I tried, my Lenovo PC crashed right back to the desktop. Kaboom! Now, just a few years later, we look at a raytrace and wish for more! So --

Just for the fun of it, I tried an experiment, to see just how much one can squeeze out of a DAZ Studio 3 raytrace and some Photoshop painting:


In fact, it's not bad at all, what with the colored point lights, depth of field, and then a whole lot of Photoshop work in post. As artwork goes, it's actually pretty darned nice. But, being human, we're never satisfied, and what we want now is a photo, not a painting! So --

Imagine my joy to get the latest Smith Micro newsletter, entitled "The Future of Poser." Long story short: Poser Pro 11, probably due next year, will have a render engine very like Lux or Octane built in, in addition to the highly-respected Firefly render engine. Built in!! Yowzer. Guess where I'll very probably be going in 2016! The only thing that would keep me from going there would be ... oh, if DAZ Studio 5 came out with a decent interface leaving behind the Donald Duck interface we see in Studio 4, and then the new Reality/LuxRender version is indeed 7x faster, as promised. Then, yep, I'd stay with DAZ and Lux. But you gotta admit, the lure of Poser Pro with a built-in unbiased render engine and the much-vaunted Firefly engine ... it's soooo tempting. Like cherry cheesecake.

Thursday, February 21, 2013

Playing with fire


click to see all images at large size ... top image is wallpaper size

"The Fire Juggler" is almost entirely a painting. Not much is left of the 3D render that forms the foundation of the project. Please do see it at large size ... you can really appreciate the painting if you can see the details. The inspiration comes from several directions, and I got to thinking, "What about a fantasy world where magic really works, and people with these skills are so commonplace that if you can conjure fire and juggle with it, you might just be able to earn yourself a living performing in the marketplace. What an idea! Imagine that you have a caravan of performers moving from place to place, town to town, full of exotic skills that are almost ignored, because so many people can do this kind of thing. So I couldn't resist this image.

The landscape is another crack at Bryce which turned into a hybrid. The background is all Bryce, up to the tall grasses. The foreground is all DAZ Studio, because the routine of importing and positioning little plants in Bryce is more than patience can cope with! Here's the bit where Bryce turns into DAZ:


...but I will admit, the result is very nice. Cool flowers -- from one of the Environment props sets. Must do more like this. I know I keep grumbling about the end product not being a photo-realistic landscape, but if you appreciate it as art, it still has a lot going for it. 

Right now, I have a render percolating in Lux ... the hardest thing about this is jogging my memory! I had LuxRender just about "nutted out" before we moved house, and now I can't remember the first thing about it. I knew I should have written it down!

For the artistically inclined: Michael 4 was posed with a lot of point lights -- no spotlights, just point lights. One in each palm to create the glow off the fire, and a couple of others here and there to give a bit of depth -- for instance, the blue light off his left shoulder, which gives the impression of blue backlighting from the marketplace. The raytrace and the deep shadow map render were enormously different, and each had a lot to recommend it; so I did one of each, at 3000 pixels wide, and shipped both into Photoshop. Then each of them was duplicated, and all the layers recombined at different merge/blend settings. When the color and tone were right, painting started ... highlights, shadows, hair, eyes, eyebrows, mouth, skintones ... not to mention the fire! The flames were done with .abr brushes: blat on the fire, then copy the layer twice ... walk the color into a deep tone and a highlight tone in subsequent layers, and apply a different merge/blend mode to each. The background was blocked in from a digital sketch based on a shot of a renaissance fair in Hungary! Michael 4 is wearing the Akasta hair, but you'd never know it, because 80% of what you're seeing here was hand-painted. M4 is wearing the SAV Eros skinmap, but that's one of my face/body morphs. In fact, you've seen it before, but it was wearing a different skinmap -- and what a difference it makes, when you change out a skinmap! The last time you saw this face, it belonged to John, from Umbriel. The other thing I changed for M4 was the bump mapping on the torso. You see realistic veins. This bump map was hand painted for a project a long time ago (to be honest, I can't even remember what it was!), and I keep going back to it, when I want to get the effect of a guy who's been working hard.  

Glad to say, I had a lot of fun with this one .. it's sitting right on the line where "rendered" meets "painted," and it was painted this way because getting a really good render was going to be the job from hell. The lights were low ... the raytrace was too dark, the deep shadow map was too grainy, and each test render (where you fiddle with the lights yet again) was a twenty minute wait! In the end I thought, "Nuts to this, it's going to be a painting." Nice!

Jade, February 21, 2013 

Wednesday, December 2, 2009

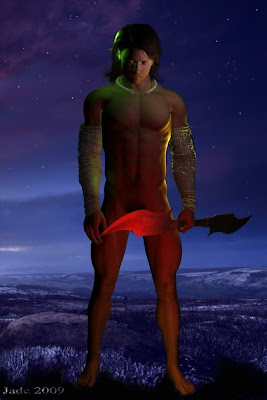
Celtic Warrior: pure art -- and yes, they went to battle dressed *exactly* like this!

Back by popular demand ... the same model as yesterday, in a different setting. The pose is virtually the same,but the setting has changed. In fact, this post, today, is about backgrounds. We talked about the model yesterday.

The background on this one is actually a digital composite. The background is a high-rez scan of a photograph of high moorland (could be one of Sara's pictures of the UK, or Mel's images of Alaska ... I can't tell with this one. There's places in Alaska that look identical to this when there's a layer of snow; there's places in the north of the UK that look just like this. Anyway -- thanks for the photo, guys ... if you can even recognize it, since I got done with it. The scan was done at 600dpi and then resized to 2x3 dimensions, and then cut up!

What I did to get the background was this: cut the picture at the skyline. Keep the hills, ditch the boring, boring overcast sky. Take the sky off another picture. Paste them together. Turn the gamma down to almost 0. Flatten the contrast ... makes it look light night, right? Turn up the blue to help the effect, Now, these are both daytime photos, so the next thing you want in the shot is stars. set the airbrush at 100% pressure, 4 pixels wide, and white ... start zapping in stars ... do some blue, some red, some gray. Make some 2 pixels for realism and variety.

Save the composite background and import it into DAZ behind the model. Leave the lights the same as yesterday -- makes it look like he's standing in firelight -- the fire is just off-camera, slightly to his left. Render the whole thing...

Get it back into the paint program and paint dark, dark blue around his feet to make it look like he's standing in shadows. In fact, the model is just hovering weightlessly over the background photo! You have to connect his feet to the ground to give the pic a sense of gravity and reality.

And save it!

Friday, November 20, 2009

Beauty

I've done a lot of tough stuff and spectacular stuff lately, and I wanted to do something different ... something gentle and beautiful. If this picture tells a story, it's a love story. You might never believe this, but it's the same face as God of War ... just a different expression and different lighting! (They say the camera never lies ... fact is, it never tells the truth these days!)

The most difficult thing about this picture was the lights ... and that was just a question of setting up two distant lights, one dark bronze, one peach pink, and then rotating the model around till the shadows on the side of the face were just right -- and also the highlight in the eyes.

Just plain beautiful. Tells a love story in one frame, doesn't it? This image is screaming to have a story written for it! Talk about inspiration ... makes me wish I was a writer...

Jade, 21 November

Saturday, October 10, 2009

A little romance at Christmas

After I posted the Christmas Angel art, I was asked, "Why don't you do a series of "gay Christmas cards" and publish them at Zazzle. So...

Give me a reason why not! here's one of 'em. I'll do three or four, publish them (to Zazzle, no less), and put the links on the blog here.

This one was a challenge. You have a real background, two digital models, and firelight. O...kay. Now, DAZ's Michael 4 is a fantastic model, but when you import two of him into the same scene, they come in as bald twins wearing spandex boxers. Your mission, should you decide to accept it (and you better had ... this is where it all starts!) is to make them look very different, and get them posed realistically -- together, no less; and then take a very limited wardrobe of clothing that's available for Michael 4 and make that look different ; then set up three or four lights to simulate the lighting conditions in the photographic background.

So, here you have two Michaels re-re-redesigned; firelight was simulated using an orange light, a yellow light and a white light, and the result is ... really nice. I call this little piece, "'Twas the Night Before Christmas."

Please do check out my portfolio:

EDIT: the only art gallery is now gone, bring replaced with the 2023 galley, new throughout


Jade, 11 October