


 The Amazon Princess in DAZ Studio 3 ... with every single texture, from the floor to the staff, hand-made by, uh, me, this morning! Go ahead, click on the pic and see it at full size -- I uploaded it at 600x900, so you can see the details.
The question is, how d'you do it? Well, the first thing you want to think about is the pattern, or texture -- the visible texture. And this is going to be a JPEG wrapped around a 3D object, as I said yesterday:
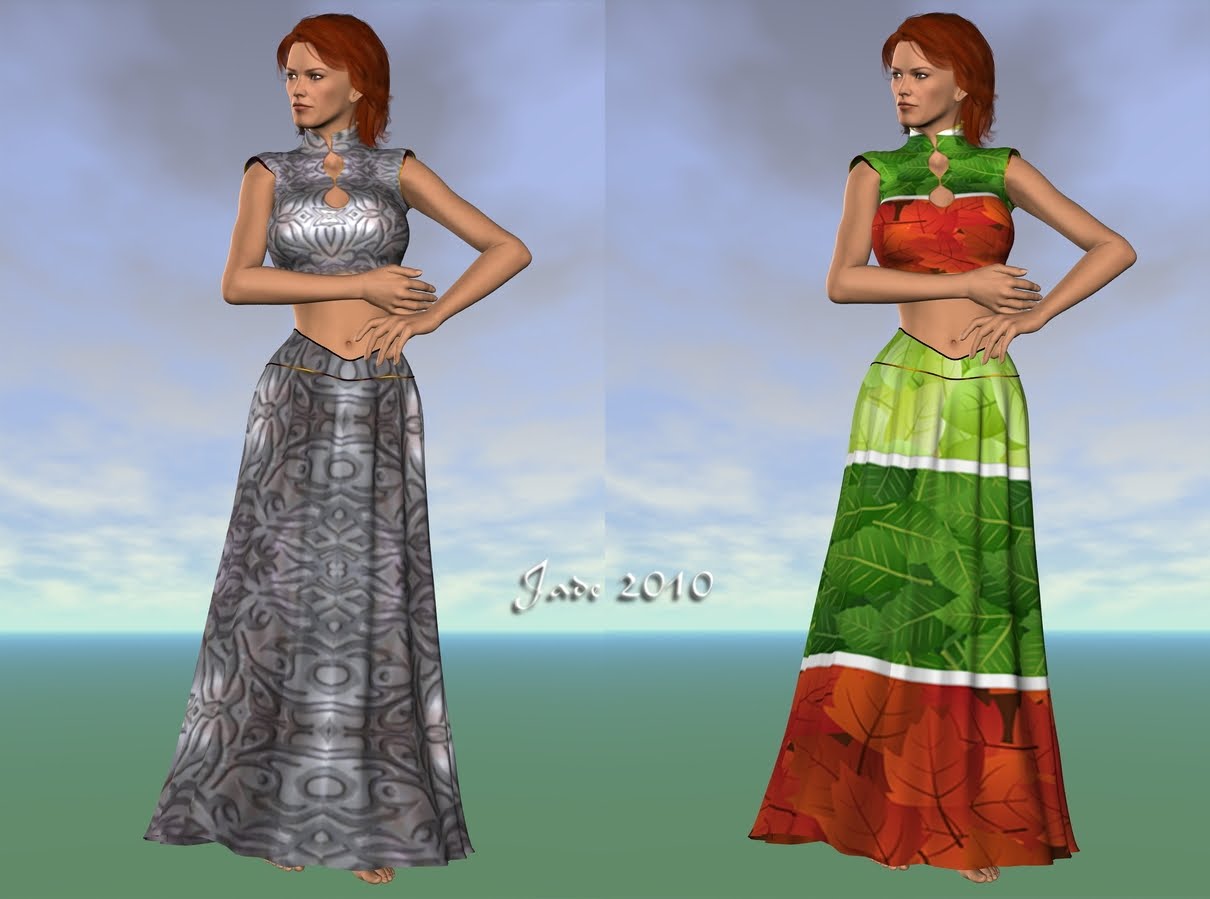
 All the fabrics above were done with ONE pattern. Notice, it appears once in the first image, and about 10,000 times in the last image. How BIG the original pattern looks when it's applied to the fabric depends on how many times it appears in the JPEG texture map...
For the purpose of this post, I wanted to start from absolute scratch, create something by hand, from nothing. So I made the above in Serif ... it's just a square with a texture fill and some whirly objects with colors and lights added. It could have been anything, something dreamy and subtle ... but I wanted something LOUD, so it would be easy to pick the pattern...
So, you start with a combo of just about anything, and the tile (above) becomes the seamless pattern, like this:
 So far, so good. Now, if you paste the combo tile (above) directly onto the 3D object ... which in this case is a skirt ... it just wraps around, and because it's BIG (1000 x 1000 square) you can see every individual little detail from the original design...
But if you took this tile and made it waaaay smaller, and used something like GIMP to tile it into a background where it appeared in a square 5x5 times, you get the second effect ... and at 10x10 times, you get the third effect, and at 20x20 times ... the last effect, where the pattern has vanished and become a texture in the fabric. Just save your tile at incrementally smaller sizes and have GIMP use it as a pattern to tile the background. Keep going till you get what you want ... save it right there, because you can use this, well, forever, and because it's a seamless pattern, it fits ANY 3D model. Whack it onto anything at all, it'll fit.
The easiest way to get more mileage out of the same pattern is to swap the colors. In these two, below -- on the left, it's the same old pattern from above, which has been greeeeeeened up and resaved, and reapplied, and looks very different. On the right ... it's the same texture (a kind of thorny tile which was made into a seamless texture, as above), and then the whole pattern was color-swapped into two different and equally nice fabrics.
 Now, sometimes you want a BIG pattern so that you can actually see said pattern on the dress. To do this, just make the texture ... big. It wraps around, and in case you're wondering if it fits in back ... check it out. It does.
 Not only that, but when patterns get big, they actually hold their, uh, pattern, as you can see in the two below. You could have used either one of these as tiny little tiles and had GIMP repeat them 20x20 on the same texture, and you'd have come up with a fabric with a herringbone or hounds tooth kind of pattern. In these below, the original design appears ONCE, just as in the very first image of all, way above:
 So, there you are ... start with nothing in a DTP or art program, and end up with fabulous fabrics -- welllll, maybe. They look like fabrics from a distance, but if you get in close you see that the patterns (which, being fair, are only JPEGs slapped on a 3D object that, itself, has a finish like smooth plastic) look as if they've been printed into plastic.
And what you're dying to achieve is this:


Chainmail bikini. Right. Well, I can't imagine any woman in the real world every wearing any such thing, but it's a grand old fantasy tradition, so, what the heck?!
Go ahead, click on the above images -- they open up at full size, so you can see the whole deal. See the texture ... not just printed into the fabric like an iron-on on a teeshirt!! Looks like the bikinis are actually MADE of chainmail, in copper, and silver, and gold.
Now, the copper and silver and gold are (obviously) visible JPEGs that you apply in DAZ, just the same as the textures in the skirt and top, way above. But if you just put the JPEG on the 3D model of the bikini top, it looks like a fabric (or even plastic) screen-printed with the pattern. Hmm. You wanted some way to make it look like the very material of the model was made of iron links.
To do that, you'd have to actually rip up the surface of the 3D model ... and luckily there's a way to do it. Even more luckily, it's dead easy! It's called a displacement map.
So what the heck is a displacement map anyway?
Now, you've probably heard about bump maps, but I don't mess about with bump maps much. Why? Because bump maps create the illusion that a surface has a tangible texture. It's be like looking at the surface of cracked old leather, and seeing the grain and cracks and roughness, but when you slide your hand over it, you feel smoooooooth vinyl.
A displacement map, on the other hand, actually does "deform" the surface of the object it's applied to. And there's a "eureka!" moment for you. Now, the only questions are, where do you GET displacement maps, and how do you apply them?
You can buy them ... but I wouldn't, because they're too easy to make. Seriously. Save your bucks to buy the actual OBJs, the 3D models, which it takes a hell of a lot of skill to make. Making displacement maps takes almost no skill at all...
All you need is a bit of "theory," and you'll groan, "Is that all they are?" Yep, that's all they are
A displacement map is a monochrome (grayscale or zipatone) image. And these two colors tell the program how to deform the surface you apply the image to. All the black areas in the image (also known as the "map") get pushed in. The blacker they are, the further they get pushed in, to a max of "pure black." Grays get pushed in less and less as they get paler. All the white areas in the image get pulled out of the surface, to a max of "pure white." Grays get pulled out more and more as they get whiter
So, if you have a grayscale image with 100 shades of gray between dead black and pure white, stands to reason you'll have a steady gradient of ups and downs in your surface texture. If you have a zipatone image -- 2 colors, black and white, only -- also stands to reason you'll have hard, sharp edges and lots of "relief" in the surface.
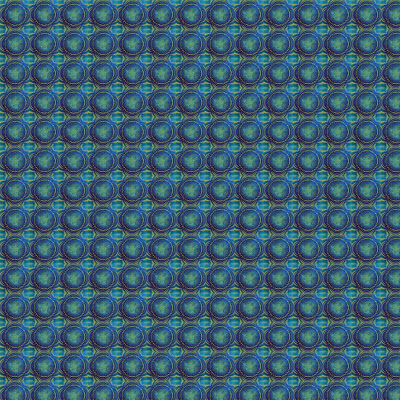
Here's what a displacement map actually looks like -- but you won't see this in your 3D picture:
 This is the displacement map that put the visible, feelable texture into the blue-and-gold patterned bikini on the bikini babe yesterday:
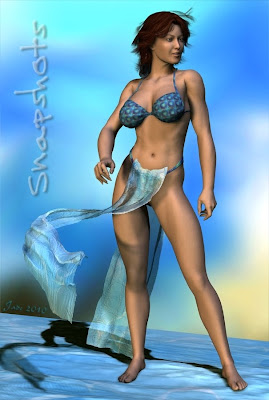
Click to see it full-size ... and see, the actual surface of the model has been pulled and pushed into the same shape as the pattern printed on the fabric. This was done by applying the displacement map you see right here.
So, after you've got your visible pattern--
-- you need the exact-same thing only as a displacement map.
Well, the displacement map IS the same thing, except for being B&W. So get into your imaging program and at the very least switch to grayscale ... but if you want big differences in the surfaces you're applying it to, reduce the number of colors to 256, or even to 2. If you use 2, you'll get big changes. 2 is best for chainmail and patterns beaten out of sheet metal etc.
So, when you've gotten your visible pattern, use IT to make the displacement map! And they can both start life as a photo. Want chainmail? Then find a good quality image, crop out a tile, make up the seamless texture, and then figure out how many times it needs to repeat in the texture map. The more often it repeats, the smaller the links of mail will look, when applied. Use Gimp etc. to make the texture map. Then use the texture map to make the displacement map in b&w.
So, now you have your texture map AND your displacement map. How do you apply them?
It's all in the Surfaces tab. Explore it. Look out for how and where you can set these maps. Click on the name of a JPEG used as a map -- a menu pops up. Click Browse ... and set your own texture and displacement maps.
I don't have time today to go into the absolute details of the Surfaces tab in DAZ Studio 3, but I'll be doing that tomorrow...
So, go all the way back to the Amazon Princess. Here's what I did:
Load Victoria 4.2...
Add the high-rez "all naural" skinmap as supplied with Victoria.
Design the face and bod (sorry guys ... you can't buy this model ... I designed it myself).
Add Rock Star hair, by Neftis, set to auburn.
Add the AK Lilian bikini. (Any cossie would do, but this has the wrap doodad too.)
Add a bit of floor for her to stand on. (I made this OBJ in Bryce 5.5.)
Add a texture to the OBJ floor.
Add an image as a backdrop (I airbrushed this one as a separate JPEG.)
Arrange the pose however you want...
Create the staff as a primitive (cylinder) and scale to fit your needs...
Add a brownish texture to the staff --
Add a displacement map that looks crinkly like wood.
Add a gold texture to the bikini (I used sandstone: it's perfect
Add a 2-color displacement map to the bikini for beaten metal or chainmail.
Add a deep gold texture to the bikini-wrap...
Add a displacement map to it...
Set the opacity to about 40% to make it look like silk.
Set up three lights -- left, right and top. Adjust till just right.
Turn on deep shadow maps on L and R lights, not top.
Decide on the wind direction ...
Tweak the hair and silk wrap into shape.
Render.
Adjust the percentage of the displacement maps till just right.
Re-render ... and call it good.
And that's it. Seriously.
Join me tomorrow, and I'll explore the Surfaces tab with you! (We'll also recruit Michael 4 to model for us, and see how some of these fantastic textures look on him...)
Jade, April 26


