


 |

NOTE: all images were uploaded at FULL SIZE so you can see every detail. Click on the display images to enlarge.
Let's create a texture first. We're going to start absolutely from scratch:
 Make a tile ... use a big of a digital image, or get into your paint program and actually, uh, paint something! This one was painted in Gimp, using various brushes. incidentally, the brushes are free, and so is Gimp! If you're interested in brushes, try these: [snip! Dead links removed. Sorry] There's oodles of free Gimp brushes out there, and they're a load of fun. You'll enjoy playing.
So, you have your tile, however you got there! Then the tile becomes the seamless pattern:

 And this seamless patern is what's going to be imported into Gimp or Photoshop, or whatever you use. Pull it in from your patterns menu, and the program will automatically tile it. Then you save the pattern it's made for you ... and this is your texture map.
Remember! The more times the one little seamless pattern (made out of your tile) appears in your texture map, the SMALLER it will be when applied to the 3D model:
 The 1970's Psychedelic on the left is the exact same pattern as on the right ... but the texture map made from it shows the pattern about ten times more often. So juggle the size of the pattern till you get exactly what you want. Now...
Apply the pattern to the 3D object!
This is what you're trying to achieve (they're not even rendered: just captured off the workspace):
 On the left there is the 3D model of the shirt and pants. What I've done is to strip out the default textures applied by the designer. These are the textures that load along with the models. If you delete them, by changing the settings to "none," you see eactly what's really there: white plastic. And now it's ready for you to slay YOUR textures onto it! This is what I've done in the shot on the right.
It's the same pattern as above, on the shirt -- you're just seeing it ONCE, rather than repeating multiple times. And on the pants, a different texture, making what looks like a nice ensemble of body shirt and stretch slacks. So far, so good.
And the question you're asking is, "When is she going to shut up and tell me how to do this?! So let's get to the nitty gritty. If you've been following these posts, you know that it's something to do with the Surfaces tab in DAZ 3D. (Poser users ... sorry, can't help you. I don't use Poser. I have a fair acquaintance with 3D Studio Max, which is where I learned the theory behind all this, but my version of Max won't run on Vista, and it's waaaay to expensive to upgrade it, so I'm on DAZ Studio 3 plus Bryce 5.5, and, frankly, loving it. If/when I change away from these two, it'll be to "trade up" to their biggie, Cararra.)
So, first ... find the surfaces tab:
 It's probably been hiding there in plain sight. It ought to be a tab sitting beside CONTENT and SCENE on the left side of your screen, being ignored. Not there? No problem. Go VIEW > TABS and select Surfaces. It'll probably teleport in as an island, but you can drag it over and dock it, if you like. Or leave it as an island!
Now, when you open up the surfaces tab, it can be a bit unnerving -- and click this to see it FULL SIZE. (This post sponsored by the Optometrist's Association.)
 Notice, you have BASIC and ADVANCED tabs at the bottom there? You want to be in the BASIC tab at first. So (follor the red swooshes), you're in Surfaces Tab ... Basic Tab. A list of everything loaded into the scene pops up. Handy, that. So, select the shirt or the pants, or whatever you want to change. Then, look down at where it says COMMON > Color Diffuse ... then a bunch of numbers, and the word NONE.
Forget the numbers. They're the same ones you can set if you want to change the color of objects on a webpage. You don't need them. But, the word NONE refers to a JPEG texture map which has been set as the default.
Now, on this model here, I turned them all off to start with (the white plastic outfit, above) ... which is why you're seeing NONE. If you're loading another model, it might easily have a default texture map set, in which case, where it says NONE here, it could say, "Shirt_Blue01.jpg" ... aha. Penny drops. They're only JPG images
So, obviously, all you need to do here is to change the name of the file given, or the NONE, to the name of the file you want. So -- click on the NONE or the filename. And a menu pops up:
 It gives you a long list of all the texture maps the program already knows about, which are not what you want. It also says BROWSE at the top. Click this ... keep clicking till you're in our onw textures folder, and double-click the one you want.
It will set itself automatically ... and now you can start playing with textures:
 Now, changing ot the textures turns out to be dead easy. In the left-side shot here, I've got the same shirt but I've changed it for a kind of nice oatmeal texture map. The only problem is, the pants still look plastic. In the shot on the right I added something ... now the pants look like they're made of fabric. And this was easy to do, by adding a displacement map.
I talked about what displacement maps are, and how to make your own, in yesterday's installment of this saga. But I promised to come back today and tell how to apply them. Again, you do this in the Surfacex tab ... but now you have to click on the ADVANCED tab, because the controls for the displacement map settings are buried there...

Again, follow the red swooshes. You're in Surfaces > Advanced. Now, scroll down till you see the word DISPLACEMENT ... it's about halfway down. And it's the same as with the texture maps. You'll either see NONE or a file name, and they're only JPEGs. The trick is to switch out the NONE or the filename for the designer's default, for the one you want to use.
Click on the filename or the word NONE, and again, you get a menu. Click BROWSE, as above, and keep clicking till you find your own map. Double click it to apply it.
IMPORTANT: there's a slider bar to big pulled over from 0% to 200%. If you forget to pull the slider over, nothing will show in your render. Try it at 100% and wiggle it around from there till you get what you want ... and you're in for a nice treat!
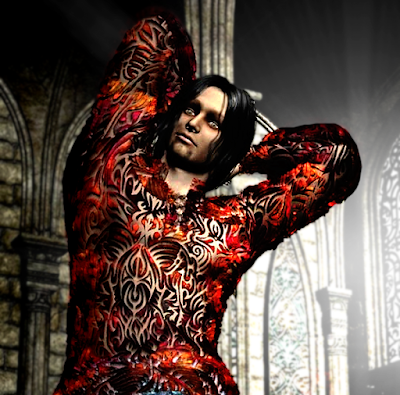
The image on the left has texture map but no displacement map ... looks like a shirt made out of plastic, right? The image on the right...

...has a displacement map, and when you look at these pictures full size, the tactile pattern in the surface of that fabric invites your fingers! That's so nice.
So, what do you use for your displacement map? Go back to yesterday's post for a few minutes ... all was revealed there, with instructions for making them!
And here's something good: you don't have to use the same displacement map with the same texture map. You can switch them out, mix and match, for great effects:

 See those at full size and see what you can do.
 And you're on your way. That's all you need to know, so -- have fun! Come back soon, because I'll be looking at how to make complex textures to fit costumes and objects. But for now, continuous, seamless textures are easy and they work on just about everything. Enjoy!
Jade, 27 April


