


click to see all images at large size...
The other day I was surfing around, looking at the work of folks who're working in Vue, specifically. Their landscapes are awe-inspiring, and Bryce just isn't in the same category. Don't get me wrong -- I do love Bryce, but the results it gives are much better suited to SF work than scenes of, well, Earth. Now, Dave has Vue 10 installed on his computer, but he's strapped for time right now, and not able to do very much with it. Meanwhile, I have the super-powerful system, but it doesn't have Vue, it has Bryce. I got to wondering how much it costs to get a license to run Vue 10 on a second computer, so I can have a bash myself --
You wouldn't believe how hard it is to winkle the info out of the E-on Software site! They have something called the "floating license" system, for networked computers, and it's more expensive to buy the network license than it is to buy a whole 'nother copy of Vue! I don't think they actually allow for two people on the same desk working in tandem, doing stuff that doesn't involve networking, or network rendering, and what have you.
Short version: if I want to give Vue a go on the powerful system, I'll have to buy a whole new copy -- and I probably will. Eventually. But at risk of sounding like Aragorn, that day is not today. Today (actually yesterday, but who's counting?) I thought, "Fair enough, let's see how far you can drive good ol' DAZ Studio 3 with a landscape."
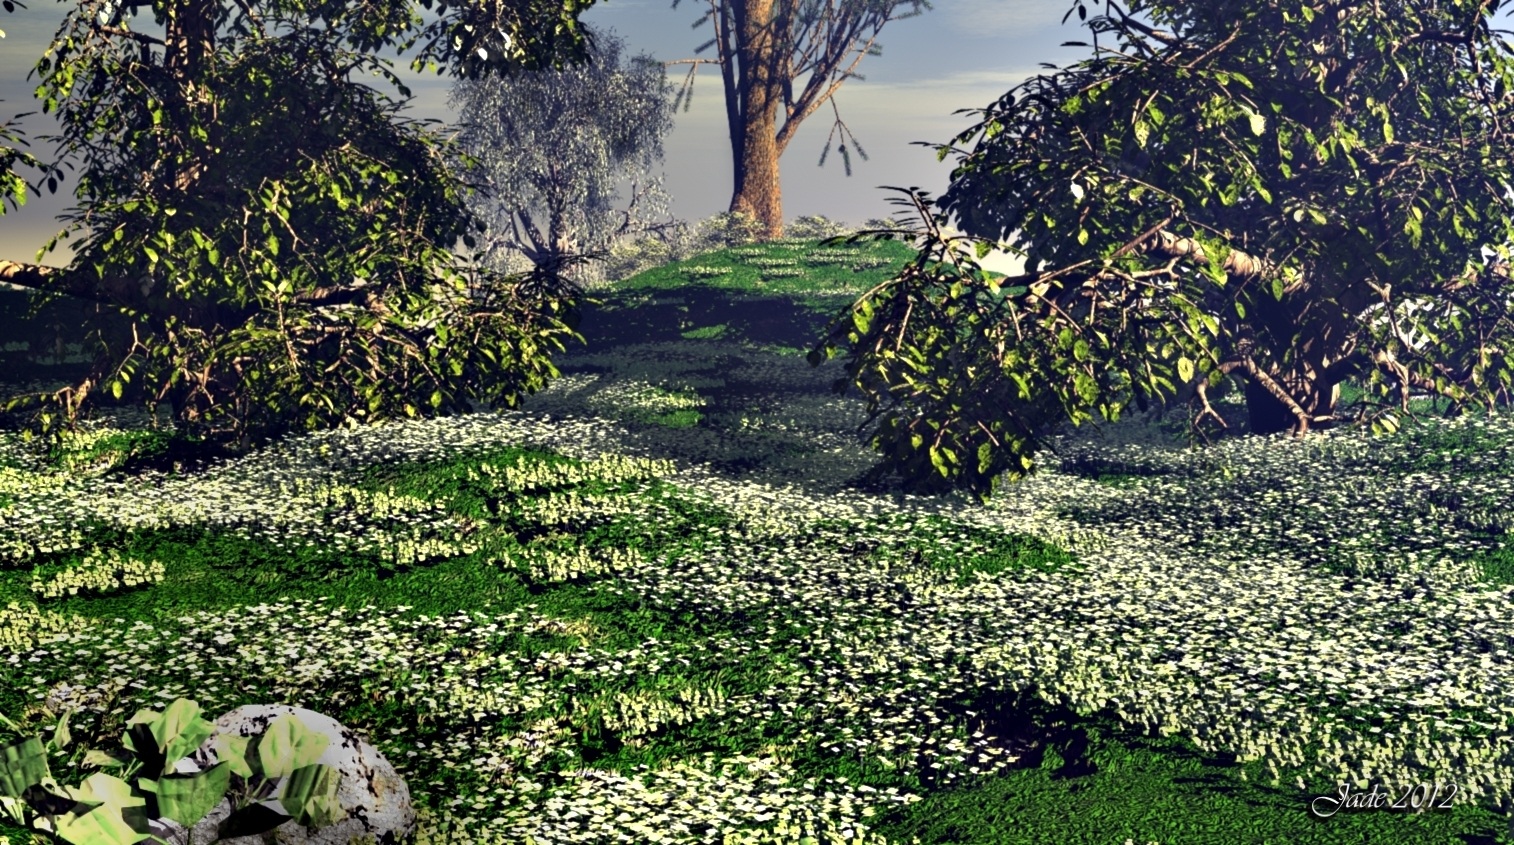
And you're looking at it. I call it "Before the Storm." Originally, I wanted to make a pure render -- no painting over the image at all. But this soon turned out to be implausible, because the render came up with so many "artifacts" due to overdriven displacement mapping, which is the only way to squeeze this kind of result out of DAZ's very simple method of handling objects. Oh...kay, well, if we're going to be painting, then let's get in there and paint everything else, too. A pound gets you a penny, many of the Vue images I'm looking at from artists around the globe are spritzed up in Photoshop too.
You're seeing three terrain objects: the foreground hill, and the mountain at the right, which is actually two nested terrains with different mapping on both (diffuse, bump and displacement) to get this effect. I added the best of the dead trees from the Gnarly Trees pack, and then imported loads of Flinx's Weeds -- but a lot of the foreground ground cover was actually done by bringing in several dozen shrubs, making them very small and burying 90% of them in the ground. The result is instant ground cover that's very realistic without having to paint anything. The shrubs I used are from PNature (from Renderosity). The two birches on the skyline at left are two iterations of the silver birch from Merlin's Trees pack. The Gnarly Tree has overdriven displacement mapping, to get this effect. No displacement map is supplied with the objects, to I set the bump map as the displacement map too, and pushed it to the max the model will take before it literally comes apart.
What makes this render "pop" is the lighting. I only have four lights on it: the sun, which is grey-blue (storm light) and way high, with shadows set; two spotlights on the mountain because the terrain is sooooo far away in order to look realistic; and the fourth spotlight is right above the tree, and set to be golden yellow ... it casts shadows from the branches and gives a lovely illusion of a single patch of sunlight -- sun between the lowering clouds -- as the storm comes in.
The sky was done from a digital image I captured during rough weather on the Limestone Coast, this time last year. The picture was darkened, contrast was tweaked, everything color saturated, and then resized so that the bottom third was blank, which pushed the interesting part of the sky up, making it appear above the line of the hill here. Brighter clouds and mist were painted over in Photoshop, and one of the things that worked really well was a scarlet cast painted into the sky and given a "saturation" merge mode: the cast doesn't even show in the sky, but the red hits the tree, makes it look like angry evening sun -- a violent sunset just beginning right behind the virtual camera -- on the branches.
The other thing that adds oodles of realism to the mountain is that I put in an atmospheric plane between us and it. You make a primitive, swing it through -90 degrees so it's standing up like a wall, tell it to be blue-green-gray and about 30% opaque, and hit "render." Cool. An atmospheric plane makes anything behind it paler and less contrasty, so the sky image had to be waaaay dark, and very contrasty, to overcome this. But the result is very good, and it's a dead simple technique that gives you the "mountains blued by distance" effect.
The Millennium Horse is wearing the dappled gray texture from the CWRW Pro Textures pack; I fiddled with the morphs to make him look like something a little like an Arabian ... and since I was painting everything in sight, I hand-painted his mane and tail as well, to give a good impression of a fair breeze blowing ahead of the storm.
Some grasses, plants and flowers were painted in, and then the birds in the sky, which give a sense of distance and perspective. Mist in the foreground, and ... done!
And if I do say so myself, that's not bad at all. This is about as far as you can push DAZ, landscape wise; and I'll be honest, I still struggle with Bryce 7 Pro. It's hit and miss, even now. Here is my best to date:
...and that also is pretty neat. But just stop, take a deep breath, and have a look at this:

Uh huh. Vue Esprit, plus the plugin modules for Botanics, painting in populations of plants and so on, atmospherics, and ... hmmm. Embrace the concept.
Jade, February 13


