


 Here's a dramatic shot -- and the drama is created on two levels. First, it's the interactivity. Jarrat and Stone are back in this shot ... two of my favorite characters from any book or show or movie. I can't resist these characters, never could.
(If you're tuning in late, and you're partial to cutting-edge sci-fi, and a paramilitary, mystery-thriller, adventure series, where the heroes are, uh, hot for each other, this is what you're missing: Mel Keegan's NARC. Fair warning: it's not suitable for kiddies ... but I do believe we're all grown up on this blog, so ...! Seriously, the NARC books are a total delight for us big kids!)
So, your drama works on two levels here. First -- interactivity: Stoney just got back from flying a mission, he's still in the flight suit, and he's either hurt or he's had the scare of his life. And then there's Jarrat ... worried out of his skull for his partner. And you'd expect this, when you remember that these characters became empathically linked together in the first book.
The drama in the picture is created by very careful posing of the characters. (Both of the characters started life as Michael 4. They were created separately according to the detailed descriptions in the books ... and this is the big fun of the DAZ 3D. You get to design your own characters, right down to the color of their eyes and the shape of their lips.)
The character poses are one of the two key things. The other one is the lighting. Specifically, it's the shadows, and the pools of light on the floor and wall of what looks like a utility room ... you take it for a pilots' ready room, or suiting room...
So, how was this done?! Well, yesterday I talked about casting simple shadows ... one light, one model to cast the shadow, one model to have the shadow cast onto:
This is actually Part Two of the same subject -- casting shadows! -- so you might want to go back to the previous post and start there. Or, if you already saw that, then let's drive on!
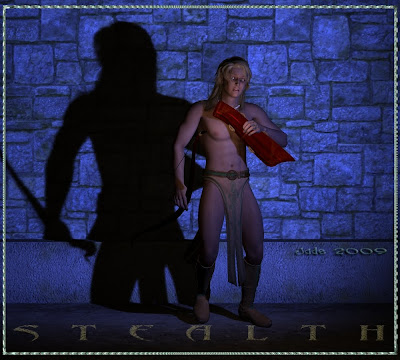
This shot has much more complex shadows than the image of the Yaoi elven archer sneaking through the castle courtyard. There's three models (Jarrat + Stone + the background), and to get this effect you use six lights! Here's how...

The first thing you need to do is just get an idea for the shot, and then (!) line up the obects in the scene. You have the wall, and a model in front of it, then another model infront of it, then the spotlight which is going to be casting the shadow.
Remember, spotlights are the only kinds of lights that cast the big, dramatic direct shadows, like a flashlight or torch... distant lights do cast shadows, but those shadows look like this:

Those shadows are great too ... in fact, if that's the effect you're after, set it up like this and stop right there! But there's not a lot of drama in the shot. The real, finished one looks like a scene out of a movie. This one looks like two guys standing in front of a drywall. Which is fine, too, if that's the effect you wanted.
Remember, also: lights will only cast shadows ON OBJECTS. Not on the backdrop, if the backdrop is just an image...
Last thing to remember: to get models to cast shadows, you have to turn ON the cast shadows control. If you forget to set this in the light's parameters, no matter what you do with your lights, you won't get shadows.
Okay so far. We have LIGHT --> MODEL #1 --> MODEL #2 --> WALL, all set up in a line so that the spotlight will hit the wall after the hits them, and cast the shadow; also, the light hits the first guy first, and casts his shadow on the second guy.
You might want to set the light to a color, to make the shot more interesting. With the ordinary white light(s), it's still a bit flat:

This version still only has two lights set -- and they're both white -- but I did put a texture into the wall, a kind of stucco. In this render you can clearly see the two shadows -- the soft one cast by the distant light and the hard one cast by the spotlight. Also, the angle of how the shadow falls shows you where the spotlight is!
But to me the shot still looked too flat, so I turned the distant light way down ... made the spotlight green, then added four "point lights" to cast pools of light on the wall and floor. This makes you think there are little angled ceiling lights overhead ... and the green lights makes you think of a locker room, or a ready room, where the light's very dim so the pilot's night vision comes up, ready to fly the mission. That's exactly the effect that was needed!
You might be asking, why do you need the distant light, if you have the spotlight? Well, the distant light -- being white -- adds "natural color" to the characters where the spotlight doesn't hit them ... ie., in the shadow areas. The distant light stands in for your ambient light. Without this, all you have is the green light, and the whole shot goes into pools of green and black ... which is very dramatic, but it doesn't make a good picture.
There's no real "rule" about this work. It's art, after all, and it's your picture. You have to get in and play, change everything, colors of things, the angle of the shadows, color of the lights, how the characters are interacting, expressions on their faces.
DAZ makes it possible to do literally anything, and I gotta tell you, I am loving this!
There's actually more about shadows ... there's one huge part of this I haven't even mentioned yet (hint: the DIFFUSE parameter), but this post is already longer than the entire Lord of the Rings trilogy, put together, so -- tomorrow.
PROJECT UPDATE: Part One of my tutorial series is nearly done. This one is for the just-starting-out, don't know my specular from my elbow, beginner. It's like 3D Painting With Numbers ... trust me: we'll have you making a glorious shot in the first tutorial. I'm doing it as a PDF, just a "bite size" document to download and work through, and you'll be well on your way. Then I'll tackle the next one! Look for this in a couple of days...
Other Jarrat and Stone images:
http://3d-adventures.blogspot.com/2009/12/3d-gay-heroes-jarrat-and-stone-looking.html
http://3d-adventures.blogspot.com/2009/12/gay-heroes-in-3d.html
http://3d-adventures.blogspot.com/2009/12/3d-character-creation-art-meets-reality.html
http://3d-adventures.blogspot.com/2009/11/ultimate-cult-heroes-get-new-3d-faces.html
And more to come in the New Year! I'm working on new versions of all the "old" art, and will revamp the webpages. Might even do new covers for the paperbacks eventually ... especially when the #6 comes out. Might do a new edition for the whole lot!
And here's a PS on this post, because I knoooooow you're wondering his this scene ends:

Jade, 27 December


