


click to see all images at large size
As promised -- a feature on retouching in Photoshop. All images have been uploaded at large size -- they're usually at 1:1 size, so you'll be able to see the details.
Retouching images in Photoshop is a skill that's essential, if you want to take your pictures to the next level. The difference between a good render and a fantastic finished image can be startling -- and before you read on, I invite you to compare the above two images. There's a world of difference, though they were both raytraced with the same lights and textures. Everything else happened in Photoshop, in "post work."
I'm working in Photoshop Elements 9. I know version 10 is out now, but 9 gives me everything I need, and I'll stick with it until Adobe makes a huge difference in the program -- a difference that's worth shelling out another large price! I'm assuming the version 10 interface is pretty much the same, so anyone using 9 and 10 should be able to follow me here without problems.
Going into a major retouching project, you'll have rendered your scene (or framed the best-possible photograph), and it'll be pretty good ... but you'll be thinking it's missing something. If you're delighted with it as-is, you're not going to be thinking about retouching, so we'll assume that, here, you want to take a good image and make it great.
This feature is not about painting as such, because we're starting with an existing image, not a blank canvas. If we were going to 'paint' in Photoshop, we'd be starting with one or more sketches and building up the work from nothing. In retouching, we are actually painting, but everything we're adding is to bring out the details, and make more of the existing features of the painting.
Here is where your artist's eye is critical. Can you look at an image (in this case, a 3D render, but you could also be starting with a digital photograph, or a scan) and see where things need to be adjusted, amplified, diminished? These "tweaks" you'll be making are the retouching process. Like...


...in these detail crops, it's easy to see what I've been doing. I'm adding highlights and shadows to almost everything, because even in a good raytraced render, the fabric, hair and some of the skin tones looked "flat." In fact, it's often a lot easier to retouch the image, bring it to life, in Photoshop rather than fiddling with the surfaces and lights in your 3D program. Why do I say that? Because of the render time. Each minor tweak in the settings will take a while to render up in test, before you know if you achieved the result you wanted, or it you have to go back and try again (and again, and again...). Three or four hours later, you can still be there, fiddling. Post work in Photoshop can be quick by comparison, and the results ... see for yourself: look at the lustre on the skin, hair and fingernails, not to mention the fabric, and the shadows under the shirt collar, where it lies across his chest, and the shadow under the hair, where it lies on his forehead.
Obviously, these are illusions. They're effects painted over the "flat" image to bring it to life, and the only question we're asking, and hopefully answering, today is -- HOW?!
In Photoshop, you'll open, or paste in, the original image, and it'll sit in the bottom "layer" of your project. The project is going to wind up like thick stack of sheets of transparent plastic, like the old "animation cells" used by companies like Disney in the days before everything in the world went digital. If you shuffle all the layers into the one pile and look at them from the top, you see the cumulative effects of everything that's been added in, one teeny bit (or layer) at a time.
So the first thing you need to wrap your head around is working in layers:

Over on the right side of your screen is a pane in which you can see the layers stacking up as you create them. In the menu ribbon across the top of the workspace there's a LAYERS drop-down menu; and New Layer is one of the choices. The first thing you get to do when you create a new layer is to give it a NAME. If you don't name the layers, they default to Layer 1, Layer 2, and so forth ... which is dandy, if you're only going to end up with maybe four or six layers. But for this project, today, I wound up about about 25, and you can be soooo lost and confused, if you haven't named the layers! If you don't name them as soon as they're created, don't sweat: you can right click on a layer and name, or rename it later on.
Four things you need to know about layers.
First: they stack from the bottom up, and the uppermost layers are, in a visual sense, sitting on top of the bottom ones, so whatever you paint into them looks like it's on top of the content of lower layers. This is fantastic for painting mist over trees over hills over sky, for instance. Let's say you painted in a range of hills ... trees in the next layer ... mist in the next layer. Then you went to the bottom of the painting and painted in the sky under the hills, and then clouds on top of the sky, in a layer between the sky and the hills. Aha! You can drag the layers up and down to change their order. You're going to love that feature.
Second: layers have a blend, or merge characteristic:

...and what this means is, you can apply effects to just the layer you're working in, and that layer will change the way the lower layers appear, because of how it, itself, is changed. Let's say you had an area of the painting that was "flat" -- as I had in this image. You wanted to bring out the bright areas and maybe add something that looked like a sheen or glow on various surfaces. You'd do it like this:

In Photoshop, you create a new layer on top of the "flat" picture, and then you paint in a brighter color, where where you want the highlights to appear ... here's the trick: use your color picker to sample the brightest existing pixel in the part of picture you want to liven up (such as the leaves on that plant); then use your color pallet to brighten this way up, close to a pure white. Now, set the size of your brush, and its hardness, and its opacity, to settings appropriate for your piece. Hose on a LOT of virtual paint over the areas where you want the highlights to appear brighter. It looks like you're making a huge mess, but you're not. Trust me. When you've painted over the appropriate parts of the image, go to your Layers pane and set the blend/merge mode to OVERLAY. See how the effects pops up? Is it too pronounced? Could be. So --here we come to the third thing you need to know about layers:
Third: layers have an opacity setting, from 0% to 100%. Using this, you can adjust the "strength" of whatever you've added to the image, to get juuuust the right amount of brightening or darkening. If you're brightening the highlights, the blend/merge mode to use is Overlay. If you're darkening the shadows, the mode to use is usually MULTIPLY, then jiggle the opacity of the layer to get it just right. And --
Fourth: you can also apply filter effects to a single layer, not to the image as a whole. This is great to use for soft, diffuse shadows:

In the original render, the clock looks so flat, it could be a picture painted right onto the wall. So I went in and created three layers on top of the image. One was for highlights; the second was for hard shadows; the third was for soft, diffuse shadows. To paint the highlights, follow the instructions above. To create the hard shadows, it's just the reverse: sample the darkest existing pixel, use your pallet to darken it to close to black. Set the size, hardness and opacity of your brush to exactly what you need for your specific piece, and stroke the shadow in where you think it belongs. Use your eraser tool and your smudge tool to clean it up till you get the illusion of the dark shadow right under the clock. Set the blend/merge mode to MULTIPLY and jiggle the opacity of the layer till it looks good.
The soft, diffuse shadow? Paint in a separate layer; use a lower opacity on the brush to get a softer darkening effect and go through the layer adjustment process, just the same ... but now, pull one last trick: apply a blur effect to the layer. Because the only thing painted in this layer is the soft shadow, that's the only thing that will be blurred.
The effect is so easy, and so convincing. I used the exact same trick to get the lovely shadow under the hair on the character's forehead. It looks so natural, you'd never guess it was added later.
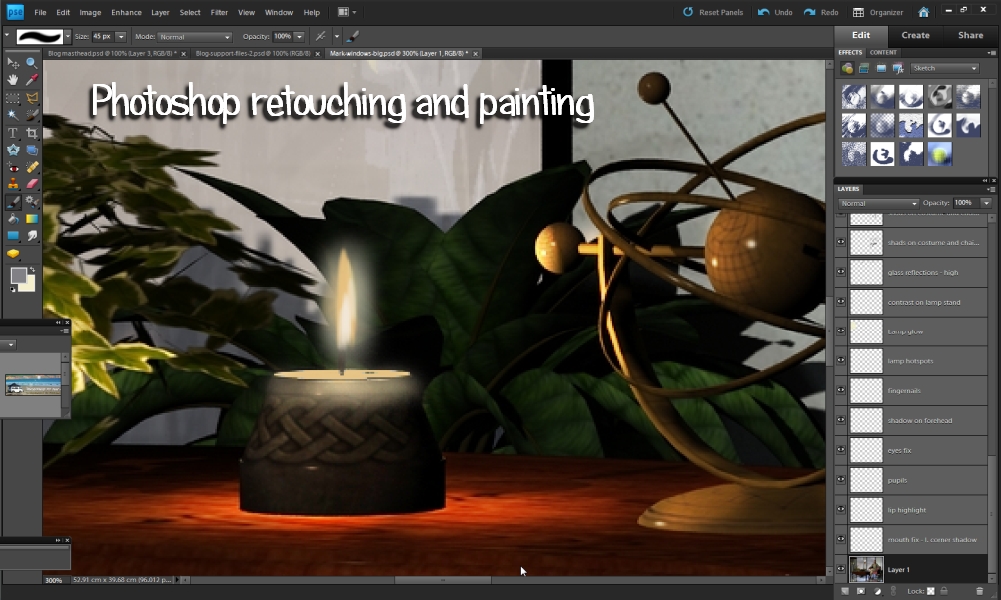
Working around lights is also a challenge. Go back to the comparison shots of the candle on the table. If you view them at large size, you'll see that the candle flame is painted literally from scratch, because the 3D model just gives you something like a "place holder" to show where a candle effect ought to be. Now, in your 3D program, you can work with particle effects, flame effects, reflectivity, luminosity, volumetrics and so on -- you can actually create the effect right there in the program ... so long as you have several hours to fiddle and a looong time for rendering! If you have the time, tools and the inclination to play -- go for it. On the other hand, if you would like to be finished this afternoon, painting the candle is an attractive alternative. So ... how would you go about doing it?
First, use your eyes. See that the candle flame is made up of a hotspot (the bright area where the color "burns out" to white); and a golden corona; and a halo of light; and notice that the candlelight brightens and warms other surfaces close to is, such as the plant and the astrolabe. You want to make a separate layer for each of these effects: the layer where you'll brighten the highlights on the nearby objects using pale "paint" plus the overlay merge mode, plus a tweak of the layer opacity; then, a layer where you'll paint the halo, using a big, soft brush, very little opacity on the brush, and a tweak of the layer's opacity; then, a layer where you'll paint in the corona, in a flame shape; then the top layer where you'll paint in the hotspot. The pure white hotspot wants to be the top layer; the halo wants to be under the yellow corona...
Painting in the candle flame (the corona shape), you can either hand-paint it, if you're good at drawing with a mouse or mouse pen; or you can use an .abr brush, which would let you zap on the flame shape with one click. If you're using an .abr brush, just make sure to use the right kind of flame, and to get it the right size. You can download .abr brushes from many places (a Google search is a great place to start), and they're often free. You can also spend some serious money on them, and get professional quality brushes. There are marvellous selections at DAZ and Renderosity. Happy browsing!
The other kind of light in this image is an electric light:

In the original render, even though I set a couple of point lights to get the shadows, the lights themselves don't look very "real." Sure, you can spend the next couple of hours fiddling with the 3D settings, and you can get fantastic results. But ... I was in a hurry. Alas, I almost always am! So a bit of post work was the answer, to come up with some lovely results in a few minutes. Just as with the candle, the light bulbs should have a hotspot, a halo, and so on You don't have to worry about painting a corona, because these are physical objects -- big plastic bulbs. So you'll create two layers: the hotspot layer and the halo layer. The hotspot is easy to paint: it's just pure white, where the light "burns out." The halo is done with a big, soft brush, white "paint," and then adjustments made to the layer's merge mode and opacity...
Speaking of the blend/merge modes ... there are loads of them, and the only way to learn how to use them is to play with them. I can't give you any quick way, any "Richard Of York Gave Battles In Vain" mnemonic, because I don't think there is one! But if you just play with the modes, you'll soon get a feel for it.
Similarly, with the effects menu ... there's several different kinds of "blur," even before you get into the other effects, and there are scores! Play. Some, you'll use often. Some will be seldom used. Just remember that you can apply any effect to an individual layer, and then mix it down with the blend/merge mode, and the opacity for the layer.
Painting the shadows and highlights on fabric is a lot of fun. Use the exact same techniques outlines above; work the shadows in one layer and the highlights in another, not forgetting the blend/merge step, and tweaking the layers' opacity levels. Use your eyes and see where the natural highlights and shadows fall, and follow these with your brushes when you magnify them. What you're doing is taking a flat image and making the highlights brighter, the shadows deeper...
Or, you can also decide that the image has an area that "glares" -- meaning, something is so bright, it's "shouting" out of the picture, commanding the eye to come look at it, even though it's an unimportant part of the image. If you go back to the raw render, third from the top in this post, and have a look at the stack of books, you'll see that I dimmed down the bottom of one of the books, which was way too bright in the context of the rest of that part of the painting. Also, have a look at the wax on the candle -- it was pure white and "shouting" out of the image, trying to command the eye. The viewer's eye tends to go to bright places in an image, and linger there, so you might need to dim down some of the brighter zones that aren't important.
One of the things you'll soon learn is how to configure your brushes:


Configuring Photoshop brushes is another skill best learned by playing. You can change the angle, hardness, roundness, shape ... almost anything you need to do with a brush, before you even get as far as the colors and opacities. There are even a few blend modes that can be applied at the brush stage, but I usually find that tweaking the blend and opacity at the layer level works better.
The simplest job to do with the color picker and brush is to fix "dead pixels." These are pixels that just didn't render in a 3D image ... they finish up white. Or, in a digital photo, they're those "UFOs" or blotches in the sky, or in otherwise plain colors. (Or maybe a bird that blurred through the shot? Or a blot on a window?) Fixing these is easy. Use the color picker to sample the color zone right next to the UFO or dead pixel. Choose a tiny, soft brush and dot in the color till the problem is cosmetically fixed. Do this in a layer on its own, if you can. If you absolutely have to paint directly onto the image, you'll need to "duplicate layer" on the bottom layer where the image itself lives, because Photoshop doesn't let you add anything to the original layer.
So, how many layers can be used to retouch an image? It's only limited by your computer's ability to handle the size of the project file ... but when you're done with a section of the work (for instance, the candle, or the lamp), you can also "merge layers," taking a whole bunch of layers and turning them into one. This can help to control the number of layers you're handling.
When the retouching is all done, you can look at softening, sharpening, resaturating or desaturating the image as a whole. This should be the last phase of the project. You won't know for sure what changes you'll need to make until the whole thing is done, because in the course of the retouching you can find yourself brightening or darkening various areas, such as this:


Until you're finished, you won't be quite sure how bright, how dark, how soft, how sharp, things need to be in he final image, so resist the temptation to mess with these "global" values till you're here:
The original DAZ Studio image uses Michael 4, wearing the Victor skinmap and the Midnight Prince hair set to blond. (The face and body morphs were designed by me.) The costume is the M4 Veranil pants ... and I wish I could tell you what the shirt is, but I can't recall! All the textures were changed out for my own before the scene was rendered. The furniture is the B9999 Queen Ann antique chair and coffee table. The lamp is from the Modern Furniture prop set. The room is the AS New Age Room. Outside the windows is the Dystopia skydome, set for "overcast." The floor was done by increasing the gloss and reflectivity and then adding a displacement map for the textured effect. The window glass was made more reflective and less transparent. Most of the books are from the Apartment Zero prop set, but the big, thick book as actually the "Bible" from the Mesh Manglers Vampire Hunter prop set! The plants and candle are from various DM prop sets, all mixed and matched, and the astrolabe is from The Magician's Study prop set. The scene was lit with a spotlight outside the windows pointing in, plus an off-camera light on the character, plus two "bounce lights" simulating reflected light from the floor, plus a point light on the candle and two point lights on the stand lamp. It was raytraced at 2000 pixels wide.
Hope this helps ... thanks to all those who asked for this feature, and thanks also for bearing with me while I got around to doing it!
Jade, July 26


