Sunday, October 31, 2010

HAPPY HALLOWEEN 2010 ... because brain-eating 3D zombies need love too


Happy Halloween, boys, girls and everything in betwixt! You might need to click on these pictures to see the seven-foot green brain-muncher in the background, and when you do you'll see a kind of story emerging out of the images.

Gorgeous party animal is looking for a street address in a weeeeeird part of town. Comes to the gate that he's sure is the right place. Doesn't see any sighs of (!) life. Is about to leave...

"Whaddaya mean, he's seven feet tall and green and standing right behind me?"

Bloody Nora, he is!

Better get outta here ...

"Well, hellooooooo beautiful! You wanna party down? Come in here, snookums, the party starts in about half an hour, and we're having brains to eat, and bobbing for shrunken heads, and all that good stuff..."

"Actually, no thank you, very much. I'm supposed to be meeting someone and, like, well, you know how it is."

"Okay, but it's your loss, sweet thang. Maybe next year?"

"Maybe. Bye, now."

"Tootles, snooks, come back soon, y'hear?"

So, uh, Happy Halloween from downunder where it's Halloween already!

Jade, 31 October

Saturday, October 30, 2010

All dressed an and waiting for the bus ... Happy Post 400!


What do you do for Post 400? The words "party, party" leap to mind. Or, a 3D party for the 3D "digitoids" at least. (I didn't coin that phrase -- wish I did! Mel Keegan thought of that one, back in Deep Sky. What a perfect term for digital actors. Digitoids.)

So they're all dressed to kill (or do I mean, undressed to kill?) and it's a warm evening (gazooks, it had better be), so they go out and stand waiting for the bus.

Twenty minutes later, and it still hasn't arrived. She says, ""you know, I think we missed that bus. When's the next one?"


He says, "Next Tuesday. Maybe we should try something a bit more enterprising."

"Like what?"

"Like, maybe you should stand in the road and stick out your thumb."

"Well, why don't you stand in the road, she demands, "and stick your thumb out? Or at least stick something out."

"Listen, Elspeth," he says, getting hot under the collar (which is a good trick, because it barely exists), "you've got more equipment for sticking out than have, so go put it to good use!"

"Phooey, Egbert," she says, sulking. "I'm not about to make an exhibition of myself."

*Well,* he thinks, *there's no answer to that.*

Fortunately the bus arrived in the nick of time before Egbert and Elspeth could resort to bare knuckles, since bare everything else didn't seem to be working.

HAPPY POST 400 !!

And -- 

Friday, October 29, 2010

Mirror, Mirror ... reflections in a pane of 3D glass


Two birds with one stone today, because time is short and (rats) I'm not well again. Migraine, with a 4:00am kickoff. Oh, joy. Anyway -- reflections in glass ... but window glass, not mirror glass. In other words, you want to be able to see through the glass and yet see yourself reflected in it.

The Room With a View renders last week were really inspiring, but there's no glass in them thar windows. I was more interested in shadows and reflections in the floor, at the time.

Here, it's all about mapping: diffuse, displacement, reflection, opacity. Everything in this scene is drooling color and texture, and the best part is, I did all the textures and maps myself, and designed the model to boot. Sorry guys, you can't buy this character anywhere ... this is Mildred, cousin to Agatha, Winifred and Hortense, my other Victoria 4 characters. I haven't bought a character in almost a year -- it's too much fun to create them, and you can save them as "character presets," and load 'em up next time you need them.

The background, outside, is a Bryce landscape I did a month or so ago. The only props are the window, from DM's Fantasy Visions, and the bikini which actually ships with the free version of DAZ, to get you started, and Neftis's Rock Star hair. Then the fun began. Everything was changed for new textures, down to the lipstick and nail polish.

Then ... glass in the window. See through it, see yourself reflected in it. Nice effect. I wish I had time (and brain cells) to tell how, but that'll have to wait till tomorrow. Migraines don't make for much coherence!

Join me soon ... we're going to see more of Mildred -- a lot more -- on the Exotic blog, when we'll convince the costume to blow away in a sudden gale, or else mysteriously turn transparent. Hey, she's a model, she's used to this stuff. Right?

Jade, 29 October

Sunday, October 24, 2010

Book covers ... and judging ebooks by them

Just a peek at what I'm up to in artwork today -- because I know I'm not going to have time to post something new. This is a "detail" outtake from a cover I'm working on ... processed to make a CG render look like it was painted on oil canvas.

Here's the whole cover painting -- but the canvas effect isn't going to show too well when Blogger is done resizing it:
Wellllll ... it shows a bit, but you don't get the full effect. This is the new cover for The Lords of Harbendane. The book came out a couple of years ago, and it is a fantastic fantasy novel. Why are we putting a new cover on it? You may well ask! Because the existing cover -- gorgeous though it is/was -- appears to be putting sales in jeopardy. We're not 100% sure about this, but there's one sure way to put the theory to the test, and that is to put a new cover on it and see what happens next.

So I took the existing background which was a digital painting done for the first version:
This, I stripped into DAZ Studio 3 as a background image. It's already a major piece of digital work -- the sky, the mountains, the lake and the foreground belong to three different pictures. The mountains are in Alaska. The foreground is in Finland. The sky is a digital airbrush painting ... this was one of the last projects I did prior to getting into full CG work. This was hand-painted in Micrografx, whereas today I'd do it in Bryce.

Next, design the characters, Rogan and Tristan:
Then, crop an area which will make a good ebook cover (paperbacks are going the way of the dodo. They're so expensive to set up, besides anything else. It will cost upwards of $100 to set up a paperback, and -- fact -- very few people are buying them anymore. Ebooks have won the war ... and Kindle has won the ebook contest! So, that the hey. Go with the flow).

Then front cover area was then shipped into GIMP to be painted a little bit in three corners -- just gives the work a better cohesion, since it's been turned from a landscape into a vignette. The GIMP version was then shipped back into Serif to have the canvas texture overlaid. Then these two were combined, and the composit was shipped out into Irfanview to be color corrected.

Then, back into Serif X3 to have the text objects overlaid:
And that's it -- done. Heck of a nice cover for an incredible book (almost mainstream fantasy, this one; the romance is gay, but it's so understated, the love story is part of a tapestry so vastly wider, the Rogan-and-Tris saga is only a small(ish) part of an epic.

Now, let's see if the new cover will inspire readers to give this novel a go. It's actually both tragic and weird that great books can be halfway undone by being jacketed in artwork which might be lovely in its own right, but just doesn't seem to fire the imagination of readers. So here's the experiment: let's see if this one does!

Jade, 15 October

Underwater effects in DAZ Studio 3


Underwater effects are fairly easy to do -- same as atmospheric effects -- in DAZ 3D. You just have to know how. You can pay for plugins to do this sort of stuff for you, but they're a bit expensive ($30 or so), and they're also very, very heavy on system resources. I did get the particle animation plugin, and some shaders ... the reason you haven't seen them on the blog here is that even a fast system (quad core with 4GB of RAM and a 1G video card) falls over its own feet when you ask it to do that work.

And the fact is, you can save time and money and do it the simple way...

All the effects in these shots were done the exact same way as the atmospherics on the industrial planet in yesterday's shots. So ... what's the trick?

It isn't even a trick, just a basic knowledge of how primitives and maps work.

A primitive is a basic shape created by the software. It sits there like a big piece of gray plastic, waiting for you to do something with it. And to make something of a primitive, you apply maps to it. Primitives in DAZ come in several kinds. Cube, Sphere, Torus, Cone, Plane, that sort of thing. Remember your high school geometry?!

To make the effects you see in these shots today, all you need is the Plane and the Sphere. I also used a Torus (donut) for one of the effects yesterday -- I'll get to that later.

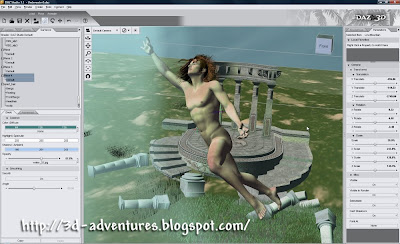
First, find the controls to make primitives. In DAZ, you've seen the bar menu across the top that gives you View, Render, Create, Tools ...? Look under Create. You get the option of creating lights and Deformers and (!) Primitives.

Play with making planes and spheres. Get familiar with sizing and moving them. Then, to do atmospheric effects with them, you need to know two things: 1) if you put an x-coordinate of -90 on a plane, it stands on end like a big, blank backdrop. And, 2) you can slap any kind of map your heart desires on a plane.

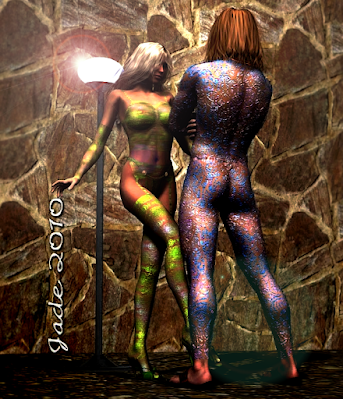
Penny starting to drop. Uh huh. Check this out:


There are no models in this shot. None at all. The ocean and the piling are primitives with maps applied. A JPEG photo of a length of wood was put onto a cylinder ... and for the water I used a DIFFUSE map, and an OPACITY map, and a DISPLACEMENT map -- and the same map served for both opacity and displacement. The sky is an old Bryce render I did months ago.

Now, a diffuse map is basically a picture which you want to appear on the object:

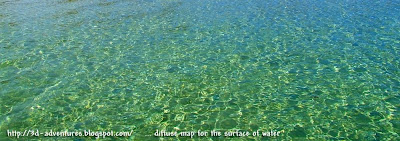
This is part of a photo I took a couple of years ago, from the end of a jetty in the late morning or early afternoon. Calm, green sub-tropical seas ... nice place we live in, I know! If you were doing an ocean-surface shot, you could make a plane and put this on it as the diffuse map. Then, you'd want to give it a bit of transparency (so you can see through it to objects below the surface), and you'd also want to suck the surface up, so it looks like there's a light chop.

You can use the same map for the transparency and the rucking:

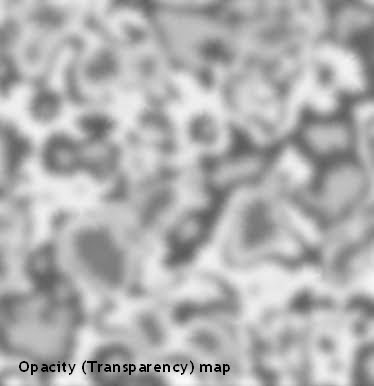
That's pretty much what you need to know about mapping, in a nutshell! The maps are added in the Surfaces tab, and you play with the percentages till it looks right. (Also, surface water should have its reflectivity set, so it reflects objects above the surface.)

Now, when you go underwater you're also going to use maps ... same kind of map as the opacity/transparency map you see right here ... but for different reasons. Underwater, you don't see reflections, and but do get effect of dimness, and currents, and light striking through the water.

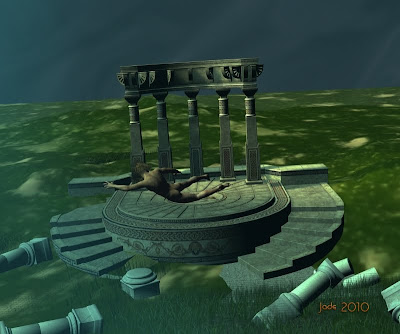
Make three planes and stand them on end with a -90 x-coordinate. Stand one in the background and make it dark blue-green, because this one is pretending to be ten cubic miles of water. Stand the second plane a bit in front of the dark one. Make it light sea-green and slap an opacity map on it ... the map makes swathes of this plane go transparent; the lighter parts show up against the darkness of the background, like currents and shafts of light angling through water.

You're halfway there now. Set the last plane to a lighter sea-green ... put the same, or similar, opacity map on it and stand it (!) right in front of the camera. Saaaaame effect, but now the currents and light-shafts effect show up between the camera and whatever models you pose.

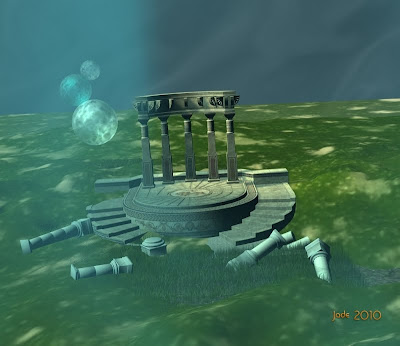
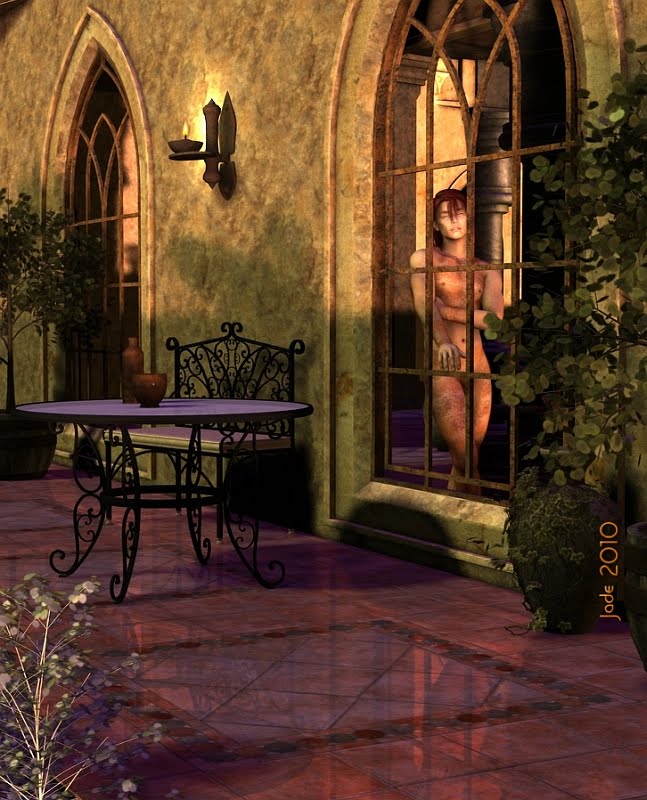
I've used the Mirador temple, and a scatter of columns from the Eroc column construction kit. For the seabed I used another plane and put a grassy surface on it. Then I used a grass-carpet prop by Rhodi Design to create the effect of sea grasses in the foreground. The background is my trusty old terrain prop which was made in Bryce ages ago. I import it every time I need a hillside or a bit of ground for a character to stand on. This time, I scaled it up till it's huge, and used four instances of it, rotated around and positioned.

Last thing: lights. I used only two. One distant light -- white -- pretending to be the sun ... offset at about a two o'clock angle; one spotlight, orange, to put a little warm highlight on the top arch of the temple ruin. Both lights were cranked very bright and then deep shadow maps turned on.

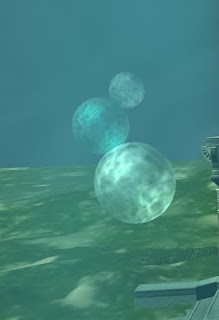
The only other thing in these shots are some bubbles ... and they're just spheres, scaled and positioned, with the same opacity map on them, all colors (diffuse, specular and ambient and reflection) set to white, then the reflection turned up to 100% and the lighting model set to metallic. The down-side to the bubbles is, they take a long, long, long long time to render, so I didn't do them in every shot. I don't have time for 30-minute renders, halfway through which you realize something isn't right, so you cancel it and start over!

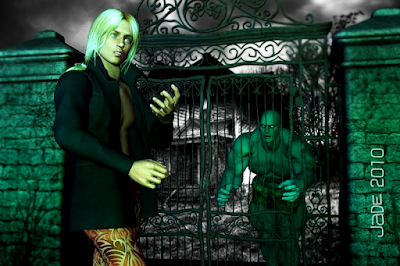
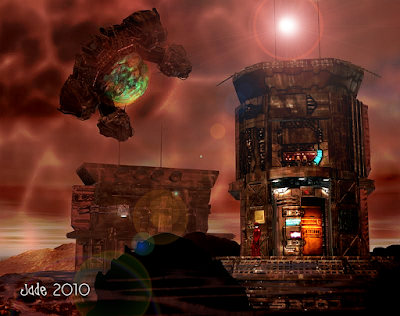
And that's it. Honestly! In yesterday's pictures I used the exact same technique to create atmospheric smog layers. The only thing I added was a torus, made huge and stretched, in the foreground. With an opacity map set, it became the mist layer close to the camera. And the repulsion fields under the ship were done with two nested spheres, both with opacity maps set, and diffuse maps used to get the colors, and the reflectivity turned up to 100% -- then I just shone a spotlight on them, and wham! Instant Arago field.

Now you know what you're looking at...


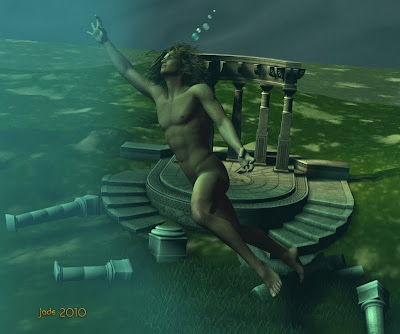
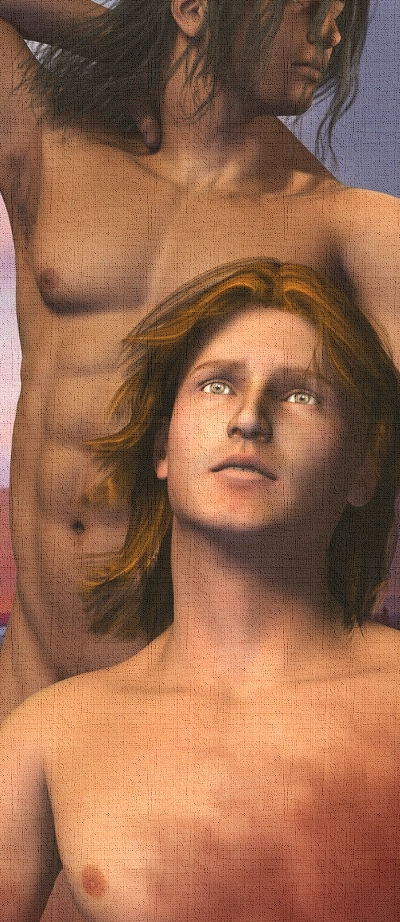
Same thing exactly -- just different colors. With the blues and greens and a character swimming in freefall, they eye sees water. With a sky and so on, the eye sees smog and dust. But the effect is worked the exact same way, right there in DAZ -- the free version -- without any plugins. Nothing to buy ... and as for the opacity maps, you can paint your own in five minutes -- those, you don't need to be buying.

The character swimming here is Michael 4, and he's wearing the Spartacos hair, which is great for this work because you can float it ... and it's the only hair model I have at this time which is floatable. Perfect for freefall.

Hope you enjoy playing around with all this. It's a lot of fun.

Jade, 24 October
NOTE; Posted by Mel, because I can't "get through" to Blogger for love or money at the moment.

Saturday, October 23, 2010

3D SF -- characters, and an atmospheric world...


In the second segment of the new Hellgate novel (which is probably going to get a title-change to Flashpoint, though it will also probably keep the old title, "The Silence of Knives" as a subtitle ... there, that's more information than you needed!) there's a scene on a mining colony faaaar on the wrong side of the frontier, in the wilds of Freespace. This was very much on my mind when I started paying with a new toy I just got on sale (the space ship here ... Powerage's Power Lifter), and I couldn't resist going ahead and setting up the rest of this shot, with all the atmospherics. More about this later ... you're thinking, "it had to be done in Bryce! Nope. Done in DAZ Studio 3 in 2010, repainted in Photoshop in 2024).

Then...


You have got to recognize this woman! Very French, very chic ... she's an order of magnitude more intelligent than you are, and don't you forget it! She was running a project to develop a biocyber brain implant for agents in the field which was highly controversial, because the telemetry transmissions from these "chips" can be tracked, and they get agents killed.

Yep, you got it: Yvette McKinnen. The computer genius who dug the bugs out of the carrier NARC-Athena, and later on sent the AI spies into the DAC computers.


As I said above, these shots were rendered in DAZ ... but a lot of overpainting happened in Photoshop, years and years later, to spruce them up. I originally posted the DAZ renders, just as the came out of the engine, but, but but ... well ... see for yourself:


Join me tomorrow, and I'll show you how to set up the atmospherics in Studio. Let's take Michael 4 skinny dipping -- two birds with one stone ... a tutorial on how to do this stuff, and some beaut, exotic "ars gratia artis" images!

Jade, 23 October

Thursday, October 21, 2010

Character creation: at last -- Gene Cantrell


For a few weeks now I've been promising you Gene Cantrell, and at last -- I got it right, and here he is. This face and physique were re-re-re-fine-tuned ... "not quite so thickset," and then "not quite so old -- remember, folks in the twenty-fourth century are living a heck of a lot longer, so at 55, our Captain Gene Cantrell will be a guy the equivalent of maybe early 40s. Ish. This character design got the Mel Keegan stamp of approval, and I have to say, I'm absolutely delighted myself.

Gene Cantrell was the renegade captain who busted the original Aphelion syndicate out of the Jupiter system 25 years before Jarrat and Stone are rampaging all over worlds like Rethan (Death's Head), Avalon (Equinox) and Aurora (Scorpio). And of course the fifth NARC book, Aphelion, brings them right back to Earth, Mars and Jupiter, where elements of the poisonous old syndicate ave resurrected themselves, and the fight is on again.

A quarter of a century on, Gene is back in the great space cities of the Jupiter system, and I loved the next part. He and Stoney drew the deep cover assignment. Whoot!

One of the things I'm most pleased about, with these renders, is that almost all the textures on the costumes are my own. And they look a treat. The hairstyle for Gene -- showing a lot of silver, because Cantrell is comfortable with aging and couldn't care less that he has a few wrinkles and gray threads -- is Mature Mark, which I bought specifically for this character. The backgrounds are a mixture. That's Dupre's office, with the Venice skyline out the windows, and the ship background is the Station 14 set, which renders up beautifully.

One thing that did surprise me is how the character changed when I switched lighting sets. He looks older in Dupre's office, with those lights. As soon as I switched lighting sets -- I was quite astonished at the results. The lighting really does have a huge effect on how good (or not) we look. I swear, there's no difference in the facial model in any of these shots, the only thing that changed was the lights.

Next -- Yvette McKinnen. Then the Canadian engineer, Budweiser, and the carrier pilot, Helen Archer (if you imagine the name was inspired by Star Trek's Jonathan Archer -- dead wrong. Helen Archer appeared in Equinox a decade -- yes, ten years before Scott Bakula put on the Starfleet uniform). Then -- and this is going to be exciting -- Scott Auel and Janine Cruz. I've always pictured George Clooney as Scott Auel, so this'll be a challenge and a thrill. And of course Captain Cruz has to be an absolute knockout. So ... several characters left to go before I have the whole major cast down, but I'm getting there.

Jade, October 21

Monday, October 18, 2010

3D fantasy: "They plan their escape"


Just three renders today, plus a kind of triptych of "in progress" shots ... because these are looong renders. As soon as you turn on loads of reflectivity, plus displacement maps and opacity maps everywhere, and a half dozen shadows to map too, even a fast system slows way down. But it's so well worth it, because the results are stunning.

Here's where I started -- click on this, see it at 800 pixels high:
The idea I started with was that I wanted to go back to the "Room with a View" shoot, and drive the camera outside, and look in through the windows. This was the original concept:
And you had so wonder, what happens when you take the camera outside and turn it around? So I basically started with the window and the boy. Changed the colors and textures on the skinsuit, and rendered one -- and immediately saw, "I'm wasting this idea." So I back the camera way off and added props ... plants, patio furniture, wine bottle, wall lamp. Then, another render, and it hit me. What the scene needed was the incredible visual flavor of the super-polished floor, which reflects absolutely everything:


I did raytrace one render to see if it made a big improvement, and the fact is, I actually prefer the deep shadow mapped ones. The raytraced render is too bright, and after five minutes messing about in Irfanview, trying to get it back to what I wanted, I decided to sacrifice the more complex shadows (and, truth be told, they're fantastic...) in order to get the overall visual flavor of the simpler -- and faster -- render.

Then, I thought -- what the heck? Add another character. And of course, as soon as you do that, the two interact and suddenly you have a scenario going. These two are captives -- very likely slaves, could also be hostages or war prizes, in the house of a conqueror. Maybe they even grew up in captivity there. But by now they've had quite enough of the whole deal, and they're out of there, tonight. In secret they make their plans. As soon as the boss is inebriated as usual, and sleeping with one or several of his fourteen wives while the guards snore through midnight ... they're out. Steal a couple of horses and be on the other side of the river before you know it.

The renders take an amazing number of props and support files:

Michael 4
Victoria 4
Mon Chevalier hair for M4
Evangelique hair for V4
Jagger skinmap for M4
Yaana skinmap for V4
Michael 4 Bodysuit
Andromeda -- the top
Ephi Arabesque -- skirt
Moonstone -- strappy slippers
change all the textures for my own
displacement and opacity maps (mine) on all fabrics
window wall, window corner from Fantasy Visions
change all the textures for my own
floor from Old Patio
reflection (white) set for the floor
furniture from ART Garden Escape
bottle and cup from Anardhouse
vase from DM Instances
potted tree from DM Instances
wall lamp from Fantasy Visions
six distatant lights
two point lights
shadows set on four of the lights

...and then about 15 or 20 test-renders to hit the "Goldilocks Spot," where everything is juuuust right. Which is why it's only three actual renders today. Same amount of time, huge levels of complexity!

Watch out for Episode 5 of our Yaoi fantasy very soon: Martin finds out what Leon's intentions are, after the brigand has gone hunting.

PS: you probably want a closer look at the costume Victoria 4.2 is almost wearing. That'll be my next post on the other blog. Not here, guys! I'd get my head handed to me...
Jade, 19 October