


 I know I usually celebrate the undraped (or mostly!) male form, but today I wanted to do something a bit different -- something that often gets overlooked. Once you've gotten his face designed, he still tends to look "stunned" or "glazed," like he's has a few too many and is gazing off into the distance. However, the fact is, his face is infinitely flexible. (Click on this one -- I uploaded it at almost 1000 pixels high, so you can see it properly.)
You can put any nuance of expression onto it. Have a look at this one -- my gypsy again, a) because I really like this character, b) because the file was handy! Doesn't that just wring your heart? He needs a big hug, somebody to fix the problem, which and it all starts with that bratty little dancer --
For benefit of folks tuning in late, here's the story so far ... and it's turned into quite a story:
http://3d-adventures.blogspot.com/2009/12/yaoi-mystique-3d-fantasy.html
http://3d-adventures.blogspot.com/2009/12/dancer.html
http://3d-adventures.blogspot.com/2009/12/little-seduction-plus-serif-borders-and.html
http://3d-adventures.blogspot.com/2009/12/little-romance-yaoi-style-plus-fonts.html
So, it's been established that the gypsy has a big problem, and it's breaking his heart. Now ... the challenge is to put this on Michael 4's face.
Here's where you get to play.
Load up a character you've already designed, or start a fresh one, perhaps even one that was designed by a pro 3D designer. (I like to work with my own characters. These are the faces that touch me, or have been designed around the descriptions in a book -- like Jarrat and Stone, for example. I also find a hell of a lot more gratification in working with my own characters. If you use the presets and auto-plugins and factory-delivered colors and textures ... well, you can sure get some great results, but it's missing something: your touch is what ain't there.)
Anyway, you've got Michael 4 loaded up. Zoom in CLOSE on his face. You have to be able to see what you're working with. A good tip here is to get his face fully designed before you add on the high-rez skin texture. This is because when the skin texture has been added on, the model as-visible in the "viewport" editing window isn't as clear as you need it to be, to do fine work. And expressions are very fine.
Okay, so now what?! Select Michael 4 ... then use the drop-down scene list to select is HEAD. Now, look way over on the right side of the screen. Here's a quick screen capture of my desktop when I do this work:
 (And yes, I know, I'm spoiled rotten with a 26" flatscreen. Believe me, it was worth it. I couldn't do this stuff on a small screen -- I got the big flattie in a sale for about $350. Mel, Dave and AC followed suit in the next month or two, just watching the sales. You wait till you see a price you want and jump on it fast.)
Anyway, look way over to to the right of the screen and you can see a whole 'nother menu just popped open when you selected Michael's head. MORPHS / EXPRESSIONS. Now you're ready to start cooking!
There really isn't anything you can do wrong here, but you will get some hilarious results while you figure out how to do this. However, DAZ has the default of 50 levels of undo, so you can always click back and back till you recover your last "best" version.
Also, SAVE the file often ... and don't save it over itself. You can get off track very easily, and decide when it's three saves too late that you really preferred this character the way he looked about 15 minutes ago. So save different versions every time you make a major change. And just ... play!
Every image here is the same Michael 4 with a different "spin" on it/him: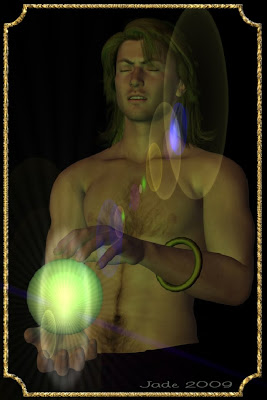


 There's so much you can do ... you can blow off days playing. You can also start to get drawn into the worlds you create for these characters. Beware! This can be habit-forming!
The thing you notice the least about today's render is the thing that actually puts the finishing touch to it: the lights. I have three lights on this portrait. A pale gold distant light turned almost to zero, and a fain dark blue light which picks out the shadows in blue, and then a green light off the left shoulder which picks out the highlights in green. It adds the last layer or "reality" to the shot that makes it poignant. I love this picture.
I'll be back tomorrow with something beautiful ... a male nude I have in mind. It's going to be quite a project, not something I can rush through and include here.
Jade, 19 December


